How to create and configure an Automate Patch Deployment task?
- Need for Automated Patch Deployment
- Automate Patch Deployment (APD) workflow has been enhanced!
- Benefits of Enhanced Automated Patch Deployment
Need for Automated Patch Deployment:
With the steady rise in attack vendors and frequency of attacks, it is mandatory to keep all your enterprise endpoints up to date and round the clock patched. The best way to address this problem, is to have a systematic and automated solution that manages multiple OSs and third party application patches effectively.
The Automate Patch Deployment (APD) feature provides system administrators the ability to deploy patches missing in their network computers automatically, without any manual intervention required.
Automate Patch Deployment (APD) workflow has been enhanced!
To keep up with cyber industry's security demands and requests from a few customers, ManageEngine's Patch Management module has undergone a few enhancements in the 'Automated Patch Deployment'(APD) functionality. We will shed light on what's new with the latest APD feature.
What's new?
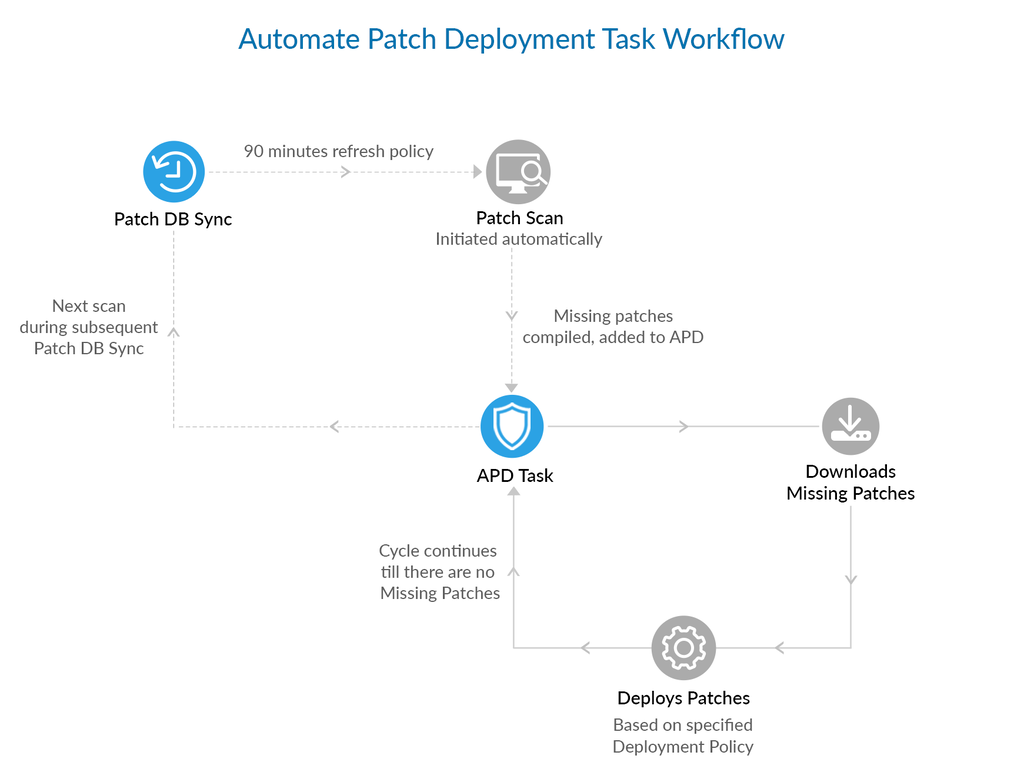
The newly upgraded APD calls for an automated scan(instead of manually scheduled scan) as soon as the server synchronizes with the Patch Database. The missing patches are detected on each of the machines in accordance with the next refresh cycle after the patch sync is complete. The patches are then downloaded on to server from vendors' site, and deployed automatically as specified in the deployment window. The whole new APD process aims at eliminating the manual efforts for scheduling a scan and the later downloading of missing patches, in order to be up to date with the most recent patches.
Benefits of Enhanced Automated Patch Deployment
- Deployments are fast, and security is tightened due to the readily available patches for deployment.
- All the approved patches will be deployed in the very next deployment window immediately after their download. There's no need to wait for the next APD scheduler to invoke the deployment.
- Whenever the computer in the network goes offline and encounters the network connectivity again, there could be new vulnerabilities and patches that the computer be missing. In the new APD, when the agent comes into contact with the server, it gets automatically scanned in the next refresh cycle, the missing patches are detected and updated in the server. The agent deploys them in the subsequent refresh cycle during the deployment window. Hence, there is no need to worry about the agent contact time and its prolonged vulnerable status. In the old APD, patch installation might be delayed because the agent contacted the server only after APD schedule.
- Deployment in agent continues until it gets zero missing patches for the APD criteria.
- In the new APD, you can also see the history of patching in a more detailed view.
Follow the steps to create and configure an Automate Patch Deployment task:
- If you are using build version 10.0.193 and above.
- If you are using a build version below 10.0.193
- If you want to migrate to the enhanced Automate Patch Deployment feature available in build version 10.0.193
For build version: 10.0.193 and above:
Follow the steps given below to create and configure an Automate Patch Deployment task:
Pre-requisite:
Configure Patch Database Settings to specify the time interval for the central server to synchronize with the Database and collect details of the latest patches available.
Note:After synchronization with the Patch Database, the central server will collect details of the latest patches released. In the next refresh policy, the agents will automatically scan the computers to check if the newly available patches are missing. With Automate Patch Deployment, these patches will automatically be deployed without any delay. Automate Patch Deployment task ensures all the computers in the network are fully patched.
Steps to create an APD task
Follow the steps given below to create tasks for automating patch deployment for a set of computers:
- Navigate to the Patch Mgmt and Automate Patch Deployment. This view will display all the tasks that are created.
- Click Automate Task to create a new task for Windows/Mac/Linux and name your task.
- Configure required details for the following steps:
- Select applications - The type of OS and 3rd party apps to patch
- Choose Deployment Policy - Configure how and when to deploy the patches based on your enterprise's patching requirements
- Define Target - Select the target computers to deploy patches
- Configure Notifications - Receive notifications on the deployment status
Select Applications
Deploy Operating System updates
If you want to deploy updates related only to Operating Systems (example Windows, Mac or Linux), then you can enable one of the given check boxes:
- Security Updates that involves all security updates of Windows and specify severity as Critical/Important/Moderate/Low/Unrated.
- Non-Security Updates that involves all non-security related updates from Windows
- Updates that are applicable only for Windows:
- Service Packs - A tested, cumulative set of all hotfixes, security updates, critical updates, and updates for different versions of Windows OS.
- Rollups - Cumulative set of updates including both security and reliability updates that are packaged together for easy deployment as a single update and will proactively include updates that were released in the past.
- Optional updates - Also called Preview Rollups, these are optional, cumulative set of new updates that are packaged together and deployed ahead of the release of next Monthly Rollup for customers to proactively download, test and provide feedback.
- Feature packs - New product functionality that is included in the full product release.
Deploy Third party updates
If you want to deploy updates only related to third party applications, then specify the severity as Critical/Important/Moderate/Low/Unrated.
Specify if you want to deploy all applications or if you would like to include/exclude a specific application.
Deploy Anti-virus updates
Select this option to deploy anti-virus definition updates for the following: Mcafee Virusscan Enterprise, Microsoft Forefront Endpoint Protection 2010 Server Management, Microsoft Forefront Endpoint Protection 2010 Server Management x64, Microsoft Forefront Client Security, Microsoft Forefront Client Security x64, Microsoft Security Essentials, Microsoft Security Essentials x64
Delay deployment
You can choose to delay the deployment of patches to ensure its stability. You can either choose to deploy the patches after a specific number of days from the date of release or approval.
For example, Assume, you specify the number of days as "5 days after release", then the patches will be deployed only after 5 days, from the day it is supported . If you choose to deploy patches "after 5 days from approval", then the patches will be deployed only after 5 days, from when the patch was marked as approved.
Choose Deployment Policy
- Customize the patching process according to your enterprise's requirements by configuring the Deployment Policy settings.
- The Deployment Policy details:
- Deployment frequency - Select how frequently you want to carry out the deployment
- Deployment window - The time interval during which patches need to be deployed
- Deployment will be initiated at - Select if deployment should happen during the system startup or the refresh cycle within the Deployment Window chosen.
- If you have set any policy as default, then the default policy will be automatically applied to the configuration.
- Based on your requirements, you can choose from the available list of pre-defined policies or create a policy of your choice.
- Click on View Details to see policy details and the list of configurations to which the policy is applied to.
- The Expiry setting allows to suspend a task after a specified period of time.
Define Target
- Select the target computers for which deployment has to be performed. The target can be a whole domain or remote offices. If you select the entire domain as target, this will also include all the remote offices in that specific domain.
- You can filter targets based on sites, OU, Group, specific computers and more.
- 'Exclude Target' allows you to select certain targets that you want to exclude from the patch deployment task. For example, you can exclude Server machines while deploying non-security updates.
Configure Notifications
Configure Notification settings to receive email notifications for the following :
- Failure in the deployment/download of the APD task
- Daily status reports on the APD task
Click on save to successfully create a task. Now all the chosen computers will automatically be deployed with the missing patches in the deployment window specified in the selected deployment policy.
For a build version below 10.0.193
Automated Patch Management occurs at various levels. For example, Administrators can:
- Choose to scan the systems in the network to detect the missing patches.
- Scan and download the missing patches. (Not applicable for PMP Cloud)
- Scan, download and draft the missing patches. (Not applicable for PMP Cloud)
- Scan, download, and deploy the missing patches.
All the above operations can be done for specific set of target computers like few systems will only be scanned, few other systems will be automatically patched and so on.
How Patch Management works?
Follow the steps below to create scheduled tasks for automating patch management:
- Click the Admin tab to invoke the Admin
- Click Automate Patch Deployment link available under Patch Settings
- Click Add Scheduled Task button and specify the following:
- Specify a name for the task
- Select the deployment option from any of the following:
- Scan the Systems to Identify the Missing Patches: This is the default option, which scans your network to detect the vulnerable applications.
- Scan the Systems and Download the Approved Missing Patches: Use this option to detect the vulnerable systems/applications in your network and download the corresponding fixes from the specific vendors website. (Not applicable for PMP Cloud)
- Scan the Systems , Download the Approved Missing Patches and Draft the Patch Configuration: Use this option to automatically download the missing patches from the specific vendors website and create a draft of the Patch Configuration. Configure the deployment settings.(Not applicable for Cloud)
- Scan the Systems, Download and Deploy the Approved Missing Patches: Use this option to scan the systems periodically to identify the missing patches, download the patches from the specific vendors website, and deploy the patches to the computers. Configure the deployment settings.
- Specify the severity for Microsoft and Third Party Applications:
- Deploying Operating System Updates: If you wanted to deploy updates only related to operating systems, then you can choose only "Microsoft/Apple Applications" and follow the steps mentioned below:
- Enable the check box to deploy "Security Updates"
- Specify the "Severity" as Critical/Important/Moderate/Low/Unrated. Only the patches with selected severities will be deployed via Automated Patch Deployment.
- Enable the check box to deploy "Non-Security Updates"
- Specify if you wanted to deploy all applications or specify the application that needs to be included/excluded. If you do not choose "Third Party Updates", only updates related to operating systems will be deployed.
- Deploying Third Party Updates: If you wanted to deploy updates only related to Third Party Updates, then you can choose only "Third Party Applications" and follow the steps mentioned below:
- Specify the "Severity" as Critical/Important/Moderate/Low/Unrated. Only the patches with selected severities will be deployed via Automated Patch Deployment.
- Specify if you wanted to deploy all applications or specify the application that needs to be included/excluded. If you do not choose updates from "Microsoft/Apple Applications", only updates related to Third Party Applications will be deployed
You can choose to delay the deployment of patches to ensure its stability. You can either choose to deploy the patches after a specific number of days from the date of release or approval. Assume, you specify the number of days as "5 days after release", then the patches will be deployed only after 5 days, from the day it is supported. If you choose the deploy the patches "after 5 days from approval", then the patches will be deployed only after 5 days, from when the patch was marked as approved. You should also remember, if you are using Enterprise Edition and have chosen to test patches before approval, then you would have configured a time delay even before approving the patches. So, the deployment of patches via APD will be determined by the time "delay specified for the tested patches to be approved" as well as "delay specified, to deploy the patch after approval".
- Deploying Operating System Updates: If you wanted to deploy updates only related to operating systems, then you can choose only "Microsoft/Apple Applications" and follow the steps mentioned below:
Configure the deployment settings by selecting a Deployment Policy:
If you have set any Policy as default, then the default policy will be automatically applied to the configuration. You can also choose from the policies which are listed under "Apply Deployment Policy". You can see the Policies segregated as My Policies and Created by Others. You can click on View Details to see the policy details and the list of configurations to which the policy is applied.
If you do not have an existing deployment policy, you can create one by clicking on create policy.- Enable the check box to continue deployment, even if some of the patches cannot be downloaded.
- Configure the scheduler settings:
After selecting the required option, the next step is to schedule the frequency to scan the systems. You have the following options to schedule:- Once - to schedule the scan to be run only once. You need to specify the starting date and starting time.
- Daily - to schedule the scan to run everyday. You need to specify the starting time and starting day.
- Weekly - to schedule the scan to run on specific day(s) in a week. You need to specify the starting time and the day(s) on which the scan has to be run.
- Monthly - to schedule the scan to run on a specific day every month(s). You need to specify starting time, select a day and select a month/months.
If you wish a mail to be sent upon successful completion of the task, select the Notify when Task Finishes check box and provide the email address. You can specify multiple email addresses as comma separated values.
- Choose a Target:
- The next step is to select the target computers for which the above operations has to be performed. The target chosen can be a whole domain, site, OU, Group or specific computers. You can also exclude computers from the chosen targets based on specific criteria.
- After adding the required target computers, click Create Task.
- Repeat the above steps to create more tasks.
Configure Execution Settings:
Enable the check box "Retry this configuration on failed targets", this will help you to retry in executing the configuration. You can also specify the total number of retry attempts, which includes retry during system start up and refresh interval.It is advisable to schedule the Vulnerability Database synchronization prior to scanning the network systems so that the latest patch information will be available for comparison.
Managing the Scheduled Tasks
Automatic Patch Deployment can be customized, so that managing the tasks becomes more easy. Every scheduled task can now be managed by;
Modifying the Task
To modify the automatic patch deployment task, follow the steps mentioned below;
- Click the Admin tab to invoke the Admin page.
- Click Automate Patch Deployment link available under Patch Settings
- Under Automate Patch Deployment view, click on the task for which you want to view the status
- To Modify the status of task, against the task name click the Edit icon to modify the task and Save.
You have modified the status of the scheduled automated patch deployment task. Modifying a task is not recommended during the scheduled time (while scan initiated or download is initiated). If you modify the task, the current schedule will be stopped and the modified task will be executed only during the next scheduled time.
Points to be Noted:
|
Suspending the Scheduled Task
To suspend the Automatic Patch Deployment Task, follow the steps mentioned below;
- Click the Admin tab to invoke the Admin page.
- Click Automate Patch Deployment link available under Patch Settings
- Under Automate Patch Deployment view, click on the task for which you want to view the status,
- To suspend the task, click the
 icon to suspend the task and Save.
You have suspended the scheduled automated patch deployment task.
Viewing the Status of Tasks
To view the status of an automatic patch deployment task, follow the steps mentioned below:
- Click the Admin tab to invoke the Admin page.
- Click Automate Patch Deployment link available under Patch Settings
- Under Automate Patch Deployment view, click on the task for which you want to view the status.
You can view the status of the scheduled automated patch deployment task.
You will find the following details;
- Navigate to Patch Management -> select Automate Patch Deployment. Under this view, click on the status of the task for which you want to view the status.
- The following details will be listed:
- Summary - This displays a detailed summary on the task that has been executed along with the status of deployment (whether it has failed or if it's successful).
- System view - This view lists computers based on the deployment status of the task.
- Patch view - This view lists patches that have been downloaded as per the severity, and the number of systems they have been found missing/installed/installation failed.
- Detailed view - You can view the details of all the patches and deployment status in this view. You can see the data in this view, only after the deployment has been initiated for at least one of the patches.
- Download failed patches - This view lists all the download failed patches. You can select patches for which download has failed and click on Download Patches to retry the download process.
Migration to the enhanced, new Automate Patch Deployment workflow
For customers using a build version below 10.0.193, if you would like to make use of the enhanced Automate Patch Deployment feature, them follow the steps to migrate your current APD tasks to the new workflow.
Enhancements to the Automate Patch Deployment (APD) have been made to ensure there are no delays in the detection and deployment of patches to the computers missing them in your network.
Changes in the new APD workflow
- In order to eliminate the delay in deploying patches and security updates to network computers, the scheduler in Automate Patch Deployment has been removed. This signifies that an administrator does not have to schedule a patch scan. Instead, a scan will be initiated every day after the central server synchronizes with the Patch Database.
Previously, a patch scan was initiated according to the time specified in Scheduler settings. Only the patches found missing after two hours from the scan were deployed to the computers. This practice had higher chances of missing critical patches from being detected and deployed. In the new workflow, any patch found missing after the scan will immediately be deployed during the deployment window.
How Automate Patch Deployment works?
The central server will synchronize with Patch Database every day at the scheduled time. After synchronization, the server will collect the details of the latest patches released. In the next refresh policy, Patch Manager Plus agents will scan the computers to check if the newly available patches are missing. With Automate Patch Deployment, these patches will automatically be deployed without any delay in the time specified in the Deployment Window. Thus the Automate Patch Deployment task ensures all the computers in the network are equipped with the latest patches.
Benefits:
- Eliminate any delay in the deployment of patches.
- Since scan is initiated subsequently after a patch database sync, the APD task reduces the time to patch known vulnerabilities.
- Enhance your network security. In times of zero day vulnerability patches or security updates, APD ensures their immediate deployment.
Follow the steps below to migrate your APD tasks to the new workflow:
If you fail to migrate within 90 days from your date of upgradation to the latest version, all the tasks will be deleted.
- Navigate to Patch Management and select Automate Patch Deployment. You can view the list of APD tasks created.
- Click on the Migrate button in the message box shown.
- Now, you can view an APD task, previously configured scheduler settings of the task, last modified by details and the action that can be performed.
- Click on Migrate, if you would like to automatically migrate the APD task to the new workflow with the existing Deployment Policy settings.
- Click on Modify, if you would like to modify the deployment settings for the APD task.
- This will display all the settings that you have previously selected.
- Once you modify an Automate Patch Deployment task and save, it will be migrated to the new workflow.
You can also migrate using the following steps:
- Navigate to Patch Management and select Automate Patch Deployment. You can view the list of APD tasks created.
- Click on the Action tab across a task and select Modify.
- Choose to modify:
- Task - Modify applications for which patches have to be deployed
- Notification Settings - Modify settings to receive notifications about the status of task
- Expiry Settings - Change when you want to suspend the task
- Deployment Policy - Change or create a new deployment policy to carry out the deployment
Highlights about the migration:
- In the Automate Patch Deployment view, all the tasks that have been deprecated, can be deleted permanently or can be suspended for a definite period of time.
- In the new workflow, deployment will be carried out only during the deployment window that you configure in your Deployment Policy. Therefore, it is important to configure the Deployment Policy accordingly to meet the patching requirements of your enterprise.
Frequently asked questions
- If "Schedule scan" is removed, will I be able to scan my machines at all?
- Will an automatic scan overburden the server with multiple requests? Will it choke the network traffic?
- How to get reports of missing patches after the scan is completed?
- How to control deployment under the new APD process?
- I was earlier using 'scan and download' option for downloading the missing patches. How will I be impacted?
- How do I view the report of patches to be installed in APD?
- I usually delay the patch installation by scheduling it 2 weeks after the 'Patch Tuesday'. How will things be different for me?
Vulnerabilities keep increasing every day, we must have up to date scanned data of which computers on our network are missing critical and important patches. So, we have automated the scan task. After the patch database sync, if new patches are released when compared to the previous sync, agents will automatically scan in the subsequent refresh cycle.
Definitely not. The scan happens right after the database is synced. Every time the scan happens, the latest missing patches are detected and downloaded on to the server. We employ this effective mechanism of posting only the diff scan data(difference in the scan data between two consecutive scans), it will not overburden the server.
Also, it will not affect the network traffic, since we don't initiate an on-demand scan from the server. It is similar to a configuration, the agents will scan only in their subsequent refresh cycle. So, the network traffic is distributed in the refresh interval and hence undisturbed.
You can use Schedule Report. Reports -> Schedule Reports. You can get it easily by scheduling the reports to be emailed 2 hours from the database sync. Also you can configure it at any frequency as you wish.
We can use the "Deployment policy" to control our date and time of deployment of the latest available patches. While the scan process is automated, you can set your own choice of deployment policies in accordance with the requirements that best suit your network environment.
The download of approved patches which are required for the task will automatically be triggered, once they were found missing during the scan phase. The patches will be downloaded in the server, ready for deployment in their refresh cycle as per deployment policy.
You can just navigate to 'Patch View' from APD. APD --> Patch View
No problem at all, you can still use "Delay deployment" option under APD, using which you can:
- Deploy patches after 'x' days from release
- Deploy patches after 'x' days from approval after testing
You can also tweak the deployment policy settings for a suitable deployment window.
You have a timeframe of 90 days to migrate. After 90 days, a notification will be sent and your APD tasks will be deleted. Hence, it is recommended to migrate your APD tasks within 90 days.
If patches are missing and not already installed, the Automatic Patch Deployment (APD) task will attempt to deploy them again. In cases where there is an installation error at the machine level, the APD task will halt after two unsuccessful attempts to deploy the patches. However, if the issue is network-related, the APD will continue retrying until the patches are successfully deployed.