Installing Agents
Installing agents is the first step to manage servers and computers. Agents can be installed manually or automatically. Installing agents manually on all the computers should be a tiring task, so you can automate the entire agent installation process in bulk, as explained below:
- Installing the Distribution Server and the agents
- Installing the Roaming agents
- Using GPO script
- Imaging the agents and deploying the imaged OS
- Installing the agents using local AD
- Installing the agents using SCCM
Installing the Distribution Server and the agents
You can install the Distribution Server and agents by following the steps mentioned below:
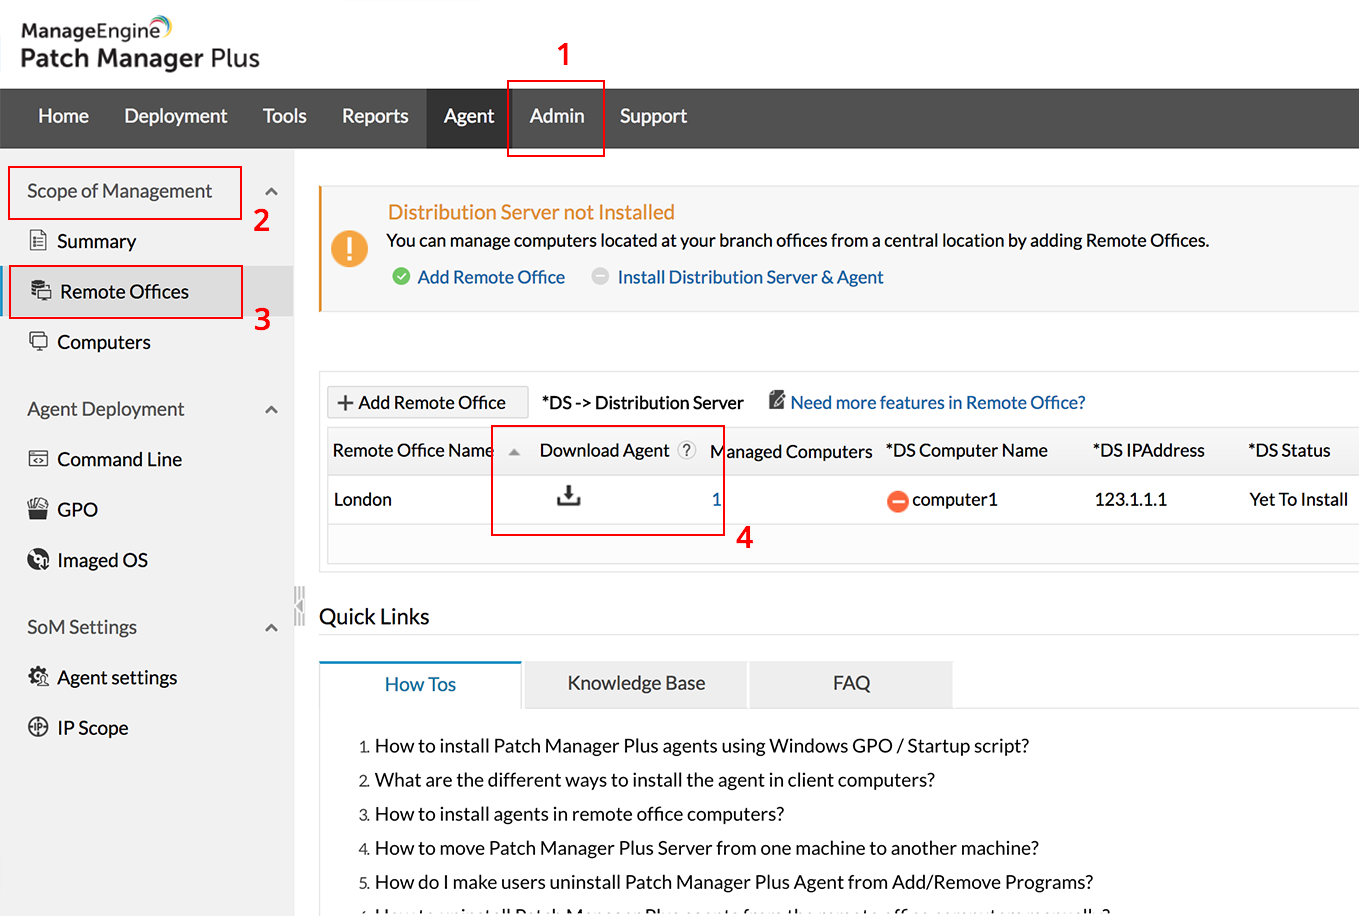
- You can log in to Patch Manager Plus console and navigate to Admin.
- Choose Scope of Management.
- Select Remote Office and click Download Agent. This should be done on the computer, where the Distribution Server needs to be installed.
This option allows the administrator to download the Distribution Server and the agents.
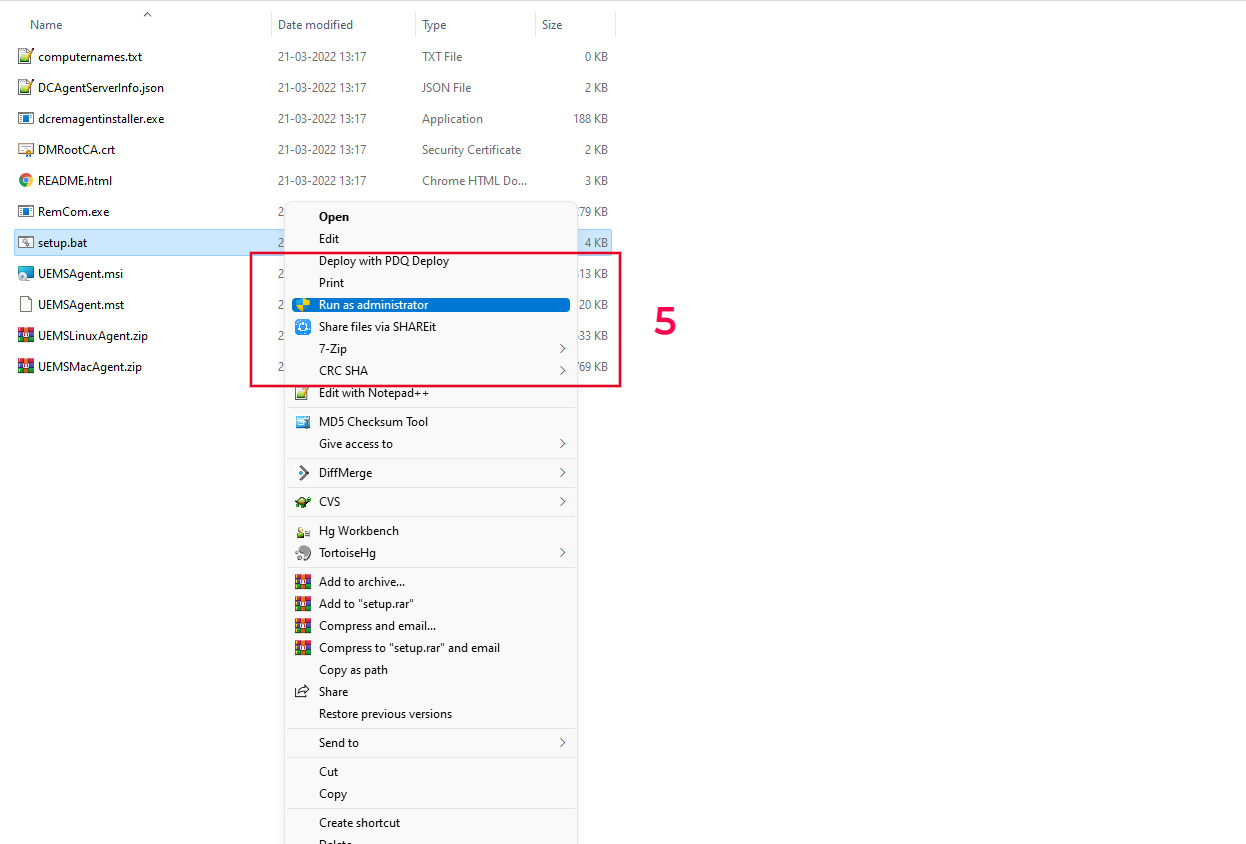
- Once the download/installation is completed, you can right-click setup.bat and run as administrator to execute it.
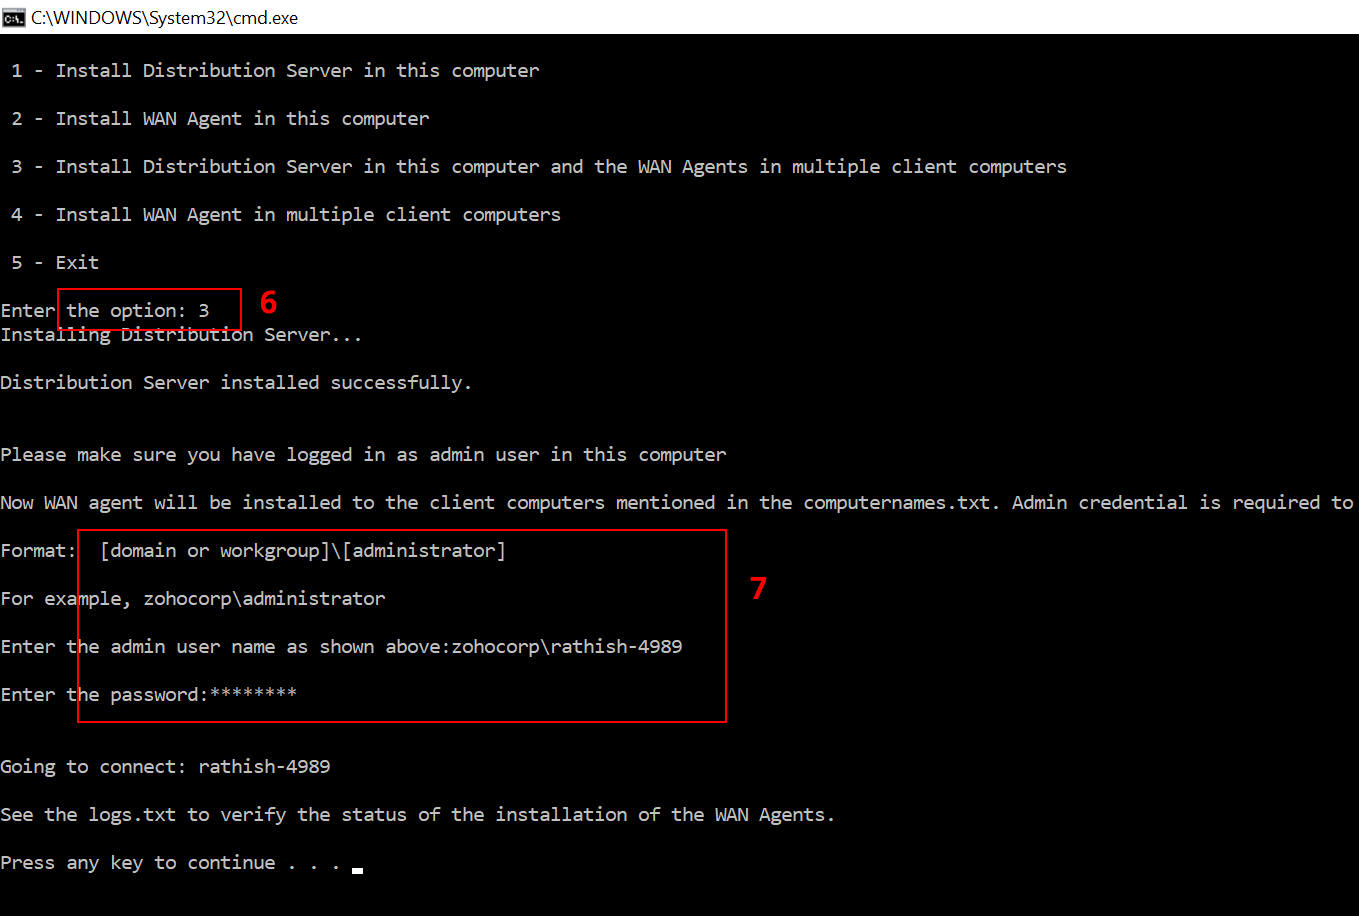
- You will be prompted to choose the below-listed options on the command prompt:
- Install Distribution Server in the computer
- Install Agent in this computer
- Install Distribution Server in this computer and agents in multiple computers
- Install Agents in multiple computers
- You should add computer names or IP address in the computernames.txt file and keep them ready for agent installation.
Note: The admin$\Temp folder of the target machine must be reachable from the computer that we are trying to deploy the agent.
- You can choose option 3
- Providing the administrator credentials will invoke agent installations on the target computers.
You have successfully installed agents and the distribution server on the target computers.
Installing agents
In case you have installed the distribution server and you wanted to add only the newly added computer, you can choose to follow the steps above and at step 11, you will have to choose option 4. This will invoke agent installation since the Distribution Server is already installed.
Roaming Agent Installation Steps
You can install the Roaming Agents by following the steps mentioned below:
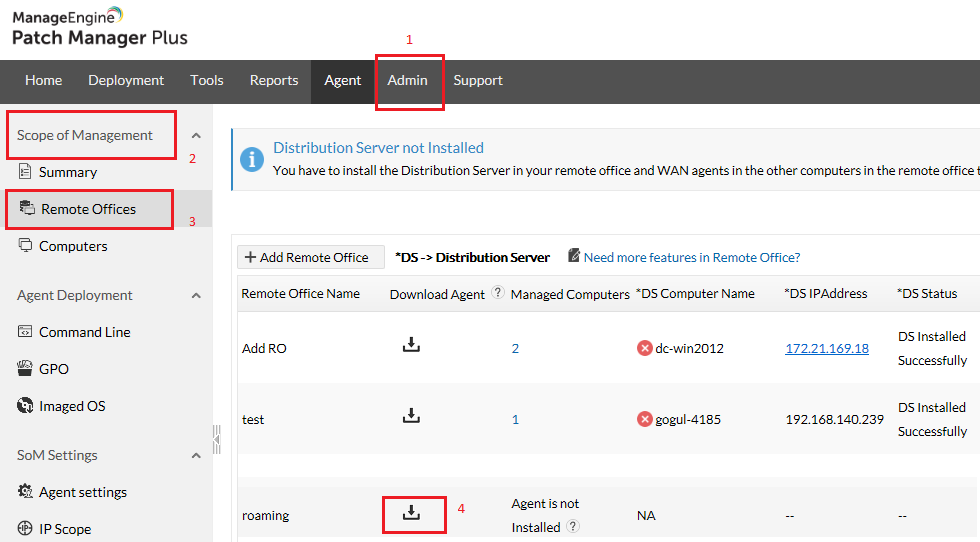
- Log into Patch Manager Plus console and navigate to Admin.
- Choose Scope of Management(SoM).
- Select Remote Office and click Download Agent.
- Once the download is completed, you should right-click the setup.bat file and run as administrator to execute it.
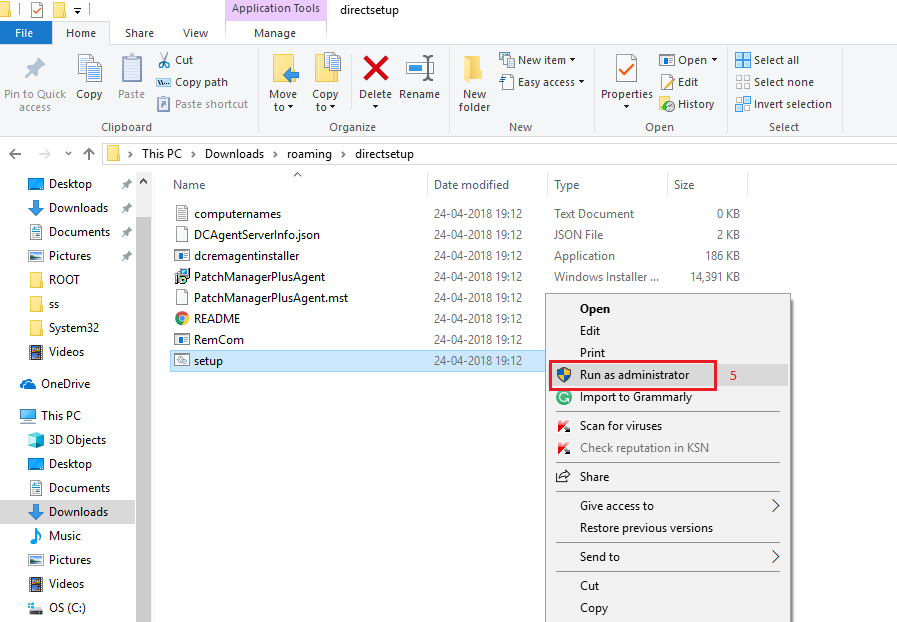
- You'll be prompted to choose the below-listed options on the command prompt:
- Install Agents on multiple computers.
- Install Agent on this computer.
- You can choose option (2).
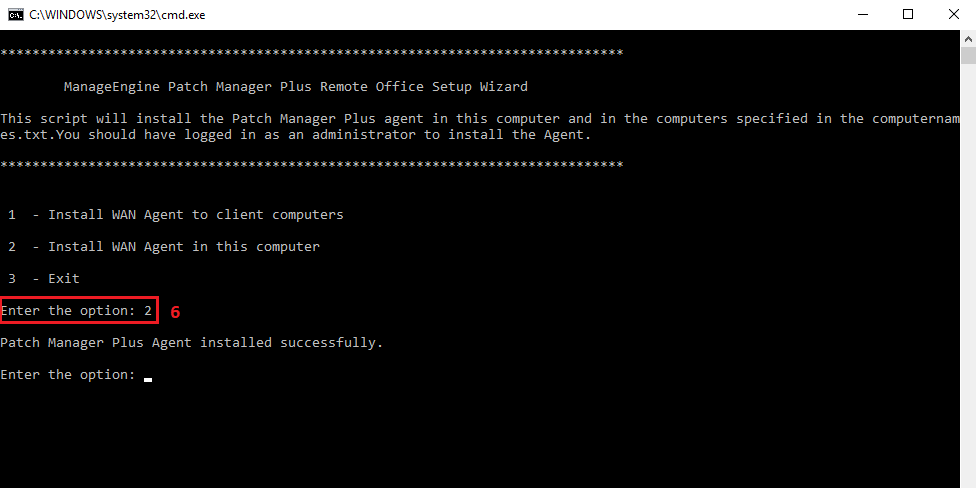
Now you've successfully installed roaming agents on your target computers.
Using GPO script
- Download the Agent Zip file, extract it, and follow the steps given below:
- Click the Admin tab.
- In the Som Settings section, click Scope of Management.
- Click Download Agent.
- Select the required office.
- Note: This can be a local office or a remote office depending on which computers you want to install agents in.
2. Save the .msi, .mst &DCAgentServerInfo.json file in the network share that you've created.
3. Click Start>Run.
4. Enter gpmc.msc.
5. Click OK.
6. Right-click the domain and select Create and Link a GPO here.
7. Specify a name for the GPO.
8. Select the GPO.
9. Note: If you want to install the agent on only a few client computers, follow the steps given below. To install the agent in all your client computers skip these steps.
- Click the Scope tab.
- In the Security Filtering section, click Add.
- In the Select User, Computer, or Group dialog box, click Object Types.
- Specify specific computer object types.
- Click OK.
- Specify the computer names.
- Click Check Names.
- Click OK.
10. Right-click the GPO and click Edit.
11. Expand Computer Configuration>Policies>Windows Settings>Scripts.
12. Right-click Startup and click Properties.
13. Click Show Files.
14. Drag and drop the InstallAgent.vbs(download the .txt file and rename it as .vbs) PatchManagerPlusAgent.msi PatchManagerPlusAgent.mst DCAgentServerInfo.json to this location and Copy the location(Domain name\Sys Vol\Domain name\Policies\{ID}\Machine\Scripts\Startup) and close.
15. In the Startup Properties dialog box, click Add.
16. Browse and navigate to the location (Domain name\Sys Vol\Domain name\Policies\{ID}\Machine\Scripts\Startup) and select the InstallAgent.vbs script or specify the path (copied location) and the script as mentioned below: (Domain name\Sys Vol\Domain name\Policies\{ID}\Machine\Scripts\Startup)\InstallAgent.vbs.
17. Specify the script parameters as mentioned below: PatchManagerPlusAgent.msi PatchManagerPlusAgent.mst.
18. Click OK to close the Add a Script dialog box.
19. Click OK to close the Startup Properties dialog box.
20. Close the Group Policy Object Editor.
21. Close the Group Policy Management dialog box.
You've now installed an agent in client computers using GPO.
Installing the agents using local AD
You can install agents by following the steps mentioned below:
Note: Distribution Server must be added and installed manually before proceeding with agent installation. To install Distribution Server manually, refer to Installing the Distribution Server and the agents.
- Agent -> Computers -> Add Computers button. Select a AD connector and add a domain/workgroup.
- Click the Select Computers link pertaining to a domain/workgroup. This opens the Select Computers dialog listing all the available computers of the domain/workgroup.
- Select the computers that have to be managed using Patch Manager Plus Cloud and click Ok. You can also manually specify the computer names instead of choosing them from the list. The selected computers get added to the Selected Computers table in the Add Computers view.
- Repeat steps 3 and 4 for adding computers from multiple domains/workgroups. Select the "Install Agent Immediately" checkbox to install the Patch Manager Plus agents in the selected computers immediately. When this option is not selected, the computers are only added. You need to install the agents later to manage them.
- Click done to add the selected computers. All the selected computers get added to the Scope of Management.
The Computers page will list all the computers that are being managed by Patch Manager Plus Cloud along with the status of the agent installation and the agent version. Agents can also be installed at a later stage, by selecting the computers from Agent -> Computers page and clicking the Install Agent button.
Note: Roaming agents cannot be pushed and installed through the AD.
Installing the agents using SCCM
You can install agents using SCCM by following the steps mentioned below:
- Download Agent.
- Extract these 3 files and put those files in a shared path, which is accessible by all the computers. (Files to be extracted: i) PatchManagerPlusAgent.msi ii) PatchManagerPlusAgent.mst iii) DCAgentServerInfo.json)
- Change the file location in the script.
- Create an SCCM package with this script.
- Deploy the package.


