How to migrate from the built-in PostgreSQL database to an external PostgreSQL server
Last updated on:In this article
Objective
By default, ADSelfService Plus uses a built-in PostgreSQL database. For organizations that require greater control over database management, scalability, or compliance, migrating to a dedicated external PostgreSQL server is recommended. This article walks you through backing up existing data, configuring the external server connection, and transferring data using the ADSelfService Plus Database Setup Wizard.
Prerequisites
Before you begin the migration process, ensure that the following conditions are met:
Supported PostgreSQL versions: Only PostgreSQL server versions 15, 16, and 17 are supported for this migration.
Server status: The external PostgreSQL server must be fully operational and reachable from the ADSelfService Plus server over the network.
Network accessibility: Ensure that no firewall rules block communication on the PostgreSQL port (default port: 5432).
Access and permissions:
- You must have administrative access to the ADSelfService Plus web portal and the server where ADSelfService Plus is installed.
- You must have superuser or equivalent privileges on the external PostgreSQL server to create database users and grant schema permissions.
Database user setup (required before running the migration wizard)
To create a dedicated user account for ADSelfService Plus on your external PostgreSQL server, first connect to the ADSelfService Plus database using the command \c DBNAME, replacing DBNAME with your actual database name. Then, run the following SQL script to create the database user and assign permissions.
CREATE USER adssp_user WITH CREATEDB NOCREATEROLE LOGIN ENCRYPTED PASSWORD 'Password';
The script creates the user adssp_user account with the following privileges:
- CREATEDB: Grants permission to create databases.
- NOCREATEROLE: Prevents the user from creating new roles or escalating to superuser.
- LOGIN: Grants permission to connect to the database.
Next, run the following script to grant the required schema permissions to the adssp_user account:
GRANT ALL ON SCHEMA public TO adssp_user;
GRANT USAGE ON SCHEMA pg_catalog, information_schema TO adssp_user;
The table below explains what each permission grants:
| Command | Purpose |
|---|---|
| GRANT ALL ON SCHEMA public TO adssp_user; | Grants permissions required for basic database operations. |
| GRANT USAGE ON SCHEMA pg_catalog, information_schema TO adssp_user; | Allows access to PostgreSQL metadata, including data types, column definitions, constraints, internal catalog tables, and system functions. |
Steps to migrate to an external PostgreSQL server
Step 1: Back up ADSelfService Plus data
It is crucial to back up your existing ADSelfService Plus data to prevent any data loss during the migration process. Follow the steps detailed on this page to back up your data.
Step 2: Migrate data to the external PostgreSQL server
- Stop the ADSelfService Plus service.
- Navigate to the ADSelfService Plus installation directory bin folder (default path: C:\Program Files\ManageEngine\ADSelfService Plus\bin).
- Run the command changeDB.bat.
- The Database Setup Wizard will open. From the Server Type drop-down, select Pgsql Server (this is usually the default option).
- Enter the following details for your external PostgreSQL server:
- Host Name: The name of the server where your PostgreSQL database is running.
- Port: The port number of the PostgreSQL server.
- Database Name: The name of the database where ADSelfService Plus will store its data.
- User Name: The SQL username with access to the above database.
- Password: The corresponding password for the SQL user.
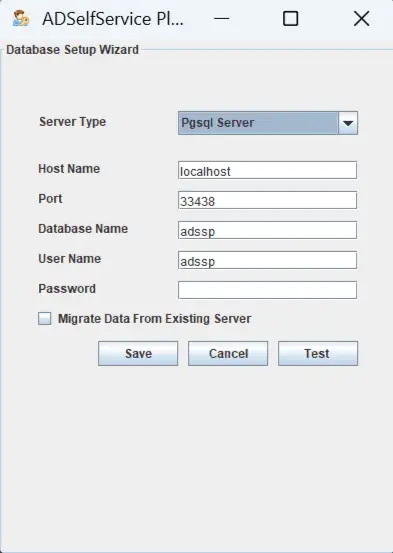
Figure 1: Configuring ADSelfService Plus to connect to the external PostgreSQL server database. - To migrate your existing data to the new database server, check the Migrate Data From Existing Server checkbox. Leave it unchecked if you are setting up a fresh database with no data to migrate.
- Click Test to verify the connection using the provided credentials. If the connection fails, recheck your credentials and try again.
- Once the test is successful, click Save.
Tips
- Always test the connection before saving changes in the configuration wizard.
- Use strong passwords for your database user account.