Request List View
The request list view page organizes and displays all the tickets raised into SupportCenter Plus. This page includes various useful functionality such as,
-
option to view requests based on filters
-
customize columns to be displayed in the list view
-
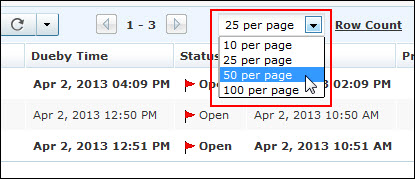
set the number of requests to be displayed per page
-
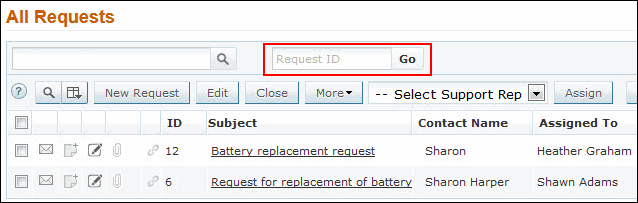
search for requests on entering the request ID
-
view recent items
-
import requests from XLS file
-
perform major operations on requests from the list view page.
On clicking the Request tab in the header pane, the page redirects to the request list view page.
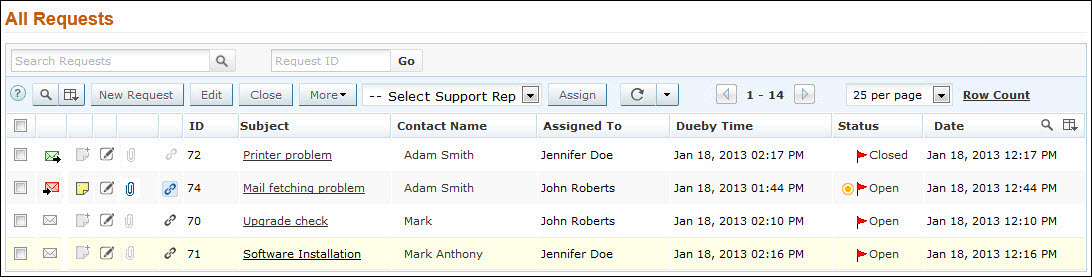
Representation of Icon in the list view:
-
 - A note is added to the request.
-
 - No reply is sent nor received for the request.
-
 - Reply generated by the system.
-
 - A reply has been sent by the support rep to the contact.
-
 - A reply has been sent by the contact.
-
 - The mail has been forwarded to a support rep.
-
 - Unapproved contact.
-
 - Resolution time for the request is overdue
-
 - First Response time is overdue
-
 - Both Response time and Resolution time are overdue
-
 - Edit individual requests.
 - Request has attachments
-
 - Search for requests on entering the request id, subject, requesters name and so on.
-
 - select the columns to be displayed in the list view.
-
 - The request is not linked with any other request
-
 - Reference Request
-
 - Linked Request
From the request list view page you can:
-
Refresh this page: Set the time frame to refresh the page from every minute to 30 minutes. On setting the refresh time in the application, the page gets refreshed automatically for the specified time frame. By default, the value is set to Never.
To auto refresh list view page,
-
Click the drop down icon  beside the refresh button.
-
From the drop down list select the frequency of refreshing the page.

To refresh the request list section alone, you can click the refresh button  .
.
-
Search Request: Search for requests instantly on entering the Request ID.
-
Set the number of requests per page and navigation buttons: You can set the number of requests to be displayed in the request list view page.
-
Custom and Manage the Views: Customize the page to display the requests using Custom View option. You can create criteria to filter requests accumulated in the request list view page. Thus sorting and viewing requests based on your requirements. You can create, reorder, and manage the custom views. The custom views created can be made public or private. [Refer Custom Views to know more]
-
Request based on filters: View specific group of requests through pre defined filters.
-
Recent Items: While using ManageEngine SupportCenter Plus, the application tracks your last viewed items and lists them in the Recent Items block. It lists the last 10 items with the latest viewed item appearing on the top of the list. Clicking on the item takes you directly to the item's details.
-
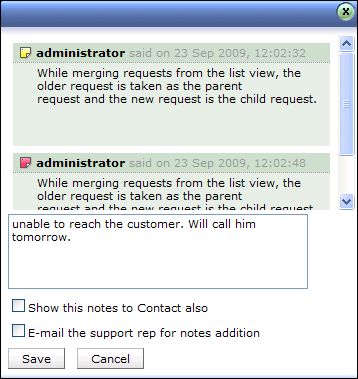
View and Add Notes to a request: Select on the notes icon to view and add notes to a request instantly from the list view page. Public notes are marked as , whereas private notes are marked in  . [Refer Notes for more information].
-
New Request: Create new requests on specifying the detail information of the request such as, request type, priority, urgency, group, category, sub category and items.[Refer New Request to know more].
- Import Requests from XLS file: Quick and easy to import requests from the existing application as well as from other applications.
-
Bulk Operation:
-
Edit Request: Bulk edit requests with similar information. [To know more, refer Editing Request].
-
Delete Request: Bulk delete requests. [To know more, refer Deleting Request].
-
Close Request: Bulk Close of all the completed requests. [To know more, refer Closing Request].
-
Merge Requests: Merge two or more similar request. While merging requests, the newly added requests are taken as the child request while the older request is the parent request. [To know more, refer Merging Request].
-
Assign To: Assign bulk requests to support reps. [To know more, refer Assigning/Unassigning Support Reps].