Database maintenance in M365 Manager Plus
M365 Manager Plus comes bundled with PostgreSQL. Users can migrate to MS SQL if required.
What causes database growth in this solution?
M365 Manager Plus stores the historical data of all basic Microsoft 365 reports, audit logs, and service health data indefinitely since they're essential for ensuring security and compliance. Population of these data is the major cause for the database growth.
How does archiving help?
Archiving helps to avoid uncontrollable database growth over time. Data older than the configured number of days will be saved as zipped CSV files and deleted from the product database. Archiving is supported for auditing and monitoring reports of M365 Manager Plus. The archived files can be restored any time with a single click using M365 Manager Plus.
Configuring archiving
- Go to the Settings tab of M365 Manager Plus.
- Navigate to Configuration → Audit Configuration → Archive Settings in the left pane.
- Click on the Click here to enable option.
- Select the Enable Archive check box.
- Enter the age of the data to be archived, the path where the archived files will be stored, and the password for the archived files.
- Click Save.
Restoring archived data
- Go to the Settings tab of M365 Manager Plus.
- Navigate to Configuration → Audit Configuration → Archive Settings in the left pane.
- Click the Restore option found under the Actions column, corresponding to the report you need to restore.
Migrating from PostgreSQL to MS SQL
Migrating data from M365 Manager Plus' default server, PostgreSQL, to MS SQL is a three step process:
- Backing up PostgreSQL data
- Configuring MS SQL server
- Migrating PostgreSQL data to MS SQL server
Backing up PostgreSQL Data
- Stop M365 Manager Plus.
- Open the Command Prompt as an administrator.
- Run the backupDB.bat file located in M365 Manager Plus installation directory\bin.
- Data in PostgreSQL server will be backed up and stored by default under M365 Manager Plus installation directory\backup\OfflineBackup_ <Backup_Time>.
Configuring MS SQL Server
Steps to be followed in MS SQL Server
- Run compmgmt.msc in the Command Prompt to open Open SQL Server Configuration Manager.
- Go to SQL Server Services and ensure that SQL Server Browser is running.
- In the left pane, click QL Server Network Configuration → double-click Protocols for SQLEXPRESS.
Note: SQLEXPRESS is the instance name provided while configuring MS SQL Server. This name will be used throughout the document.
- In the pop-up that appears, go to the Protocol tab and enable TCP/IP. Restart the SQL Server SQLEXPRESS Service.
- Go back to the SQL Server Configuration Manager. In the left pane:
- Navigate to SQL Server Network Configuration → Protocols for SQLEXPRESS, and enable all the protocols.
- Navigate to SQL Native Client Configuration → Client Protocols, and enable all the protocols.
Delegating MS SQL server access to M365 Manager Plus technicians
- Log in to SQL Server Management Studio.
- In the left pane, navigate to MACHINE NAME > SQLEXPRESS > Security > Logins.
- Right-click Logins and select New Login.
- Provide a Login Name, and choose whether to use Windows Authentication or QL Server Authentication.
- If you choose Windows Authentication, enter the Windows NT name of the user to whom access must be granted.
- If you choose SQL Server Authentication, you will be prompted to create a new User Name and Password.
- The new user must have the sysadmin role in the server level and db_owner role in the database level. Follow these steps to provide the sysadmin role permission:
- Navigate to MACHINE NAME → SQLEXPRESS → Security → Logins > right-click the user → Properties.
- Go to Server Roles, select the sysadmin check box, and click OK.
Note: To learn more about user roles, click the links below:
Server level roles: http://msdn.microsoft.com/en-us/library/ms188659.aspx
Database level roles: http://msdn.microsoft.com/en-us/library/ms189121.aspx
If MS SQL Server is installed in the same machine as M365 Manager Plus
Copy the following files to <M365 Manager Plus installation directory>\bin folder.
- bcp.exe - <MSSQL installation directory>\Tools\Binn\bcp.exe
- bcp.rll - <MSSQL installation directory>\Tools\Binn\Resources\1033\bcp.rll
If MS SQL Server is installed in a remote computer
Note: Please install the corresponding SQL Native Client or command line Utilities in the M365 Manager Plus machine as per the MS SQL Server version, as well as the CPU type of the M365 Manager Plus machine.
After installing the command line utilities:
Copy the following files to M365 Manager Plus installation directory\bin.
- bcp.exe - <MSSQL installation directory\Tools\Binn\bcp.exe
- bcp.rll - <MSSQL installation directory\Tools\Binn\Resources\1033\bcp.rll
Migrating PostgreSQL Data to MS SQL
Stop M365 Manager Plus before migrating the database.
- To migrate the database from PostgreSQL to MS SQL with all data intact:
- Open the Command Prompt and navigate to <M365 Manager Plus installation directory>\bin.
- Enter the command changeDB.bat to migrate the database with the data intact.
- To migrate from PostgreSQL to MS SQL without data:
- Open the Command Prompt and navigate to <M365 Manager Plus installation directory>\bin.
- Enter the command changeDB.bat false to change the database without migrating the data.
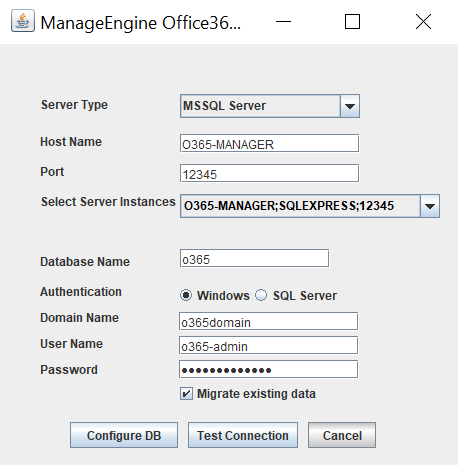
- In the Database Setup Wizard that pops up, select Server Type as MS SQL Server.
- Enter the Host Name and Port number of MS SQL server.
- Select the QL Server Instance from the drop-down.
- Select the Authentication type.
- If you choose Windows Authentication, provide the Domain Name, User Name, and Password of the machine that has access to the server.
- If you choose SQL Server Authentication, provide the User Name and Password of the M365 Manager Plus technician who has access to it. Refer to: Delegating MS SQL server access to M365 Manager Plus technicians.
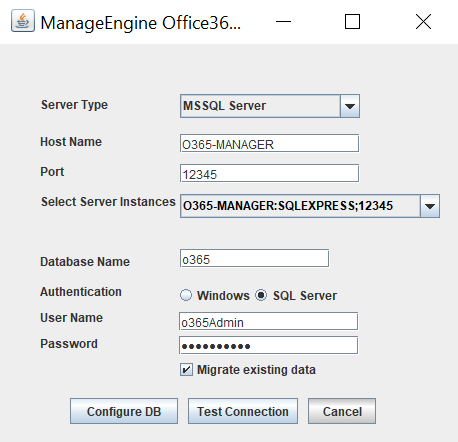
- Click on Test Connection. If the test fails, the credentials may be wrong. Recheck and enter the correct credentials.
- Click Save to finish MS SQL Server configuration.
- Start the M365 Manager Plus Server/Service to work with the MS SQL SERVER as the database.
Restoring the M365 Manager Plus database
- Open the Command Prompt as an administrator in M365 Manager Plus Installation Directory. By default, the path to the installation directory is C:\Program Files\ManageEngine\M365 Manager Plus
- Execute the command below to restore the database.
- restoreDB.bat compressed_file_name.zip

