Configuring Active Directory-based SSO and MFA for Cisco FTD VPN
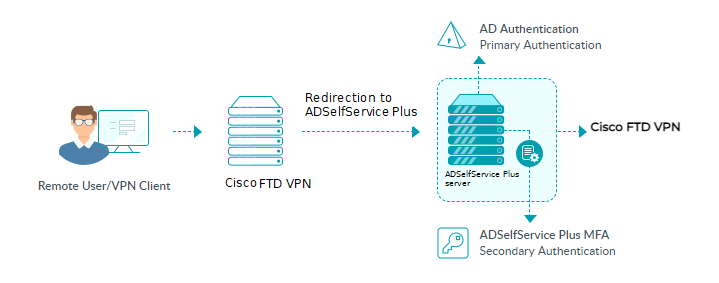
This guide provides steps for enabling single sign-on (SSO) and multi-factor authentication (MFA) for Cisco's Firepower Threat Defense (FTD) product using ManageEngine ADSelfService Plus' Enterprise SSO and MFA for cloud applications features.
The Enterprise SSO feature allows users to complete Active Directory authentication once and then access integrated SAML-based cloud applications without logging in again.
When enabling SSO for Cisco FTD, admins can enable MFA for cloud applications feature to add additional authentication steps during AD-based single sign-on using any of the 18 authentication methods, including Yubico OTP, biometrics, Microsoft Authenticator, Google Authentication, Zoho OneAuth TOTP, and DUO Security.
The SSO and MFA process for Cisco FTD using ADSelfService Plus
Configuration process
Step 1: Configure SSO
Prerequisite:
- Log in to ADSelfService Plus as an administrator.
- Go to Configuration > Self-Service > Password Sync/Single Sign On.
- In the Configured Applications section, click on Add Application.
- In the All Applications page that opens, click on Custom Application.
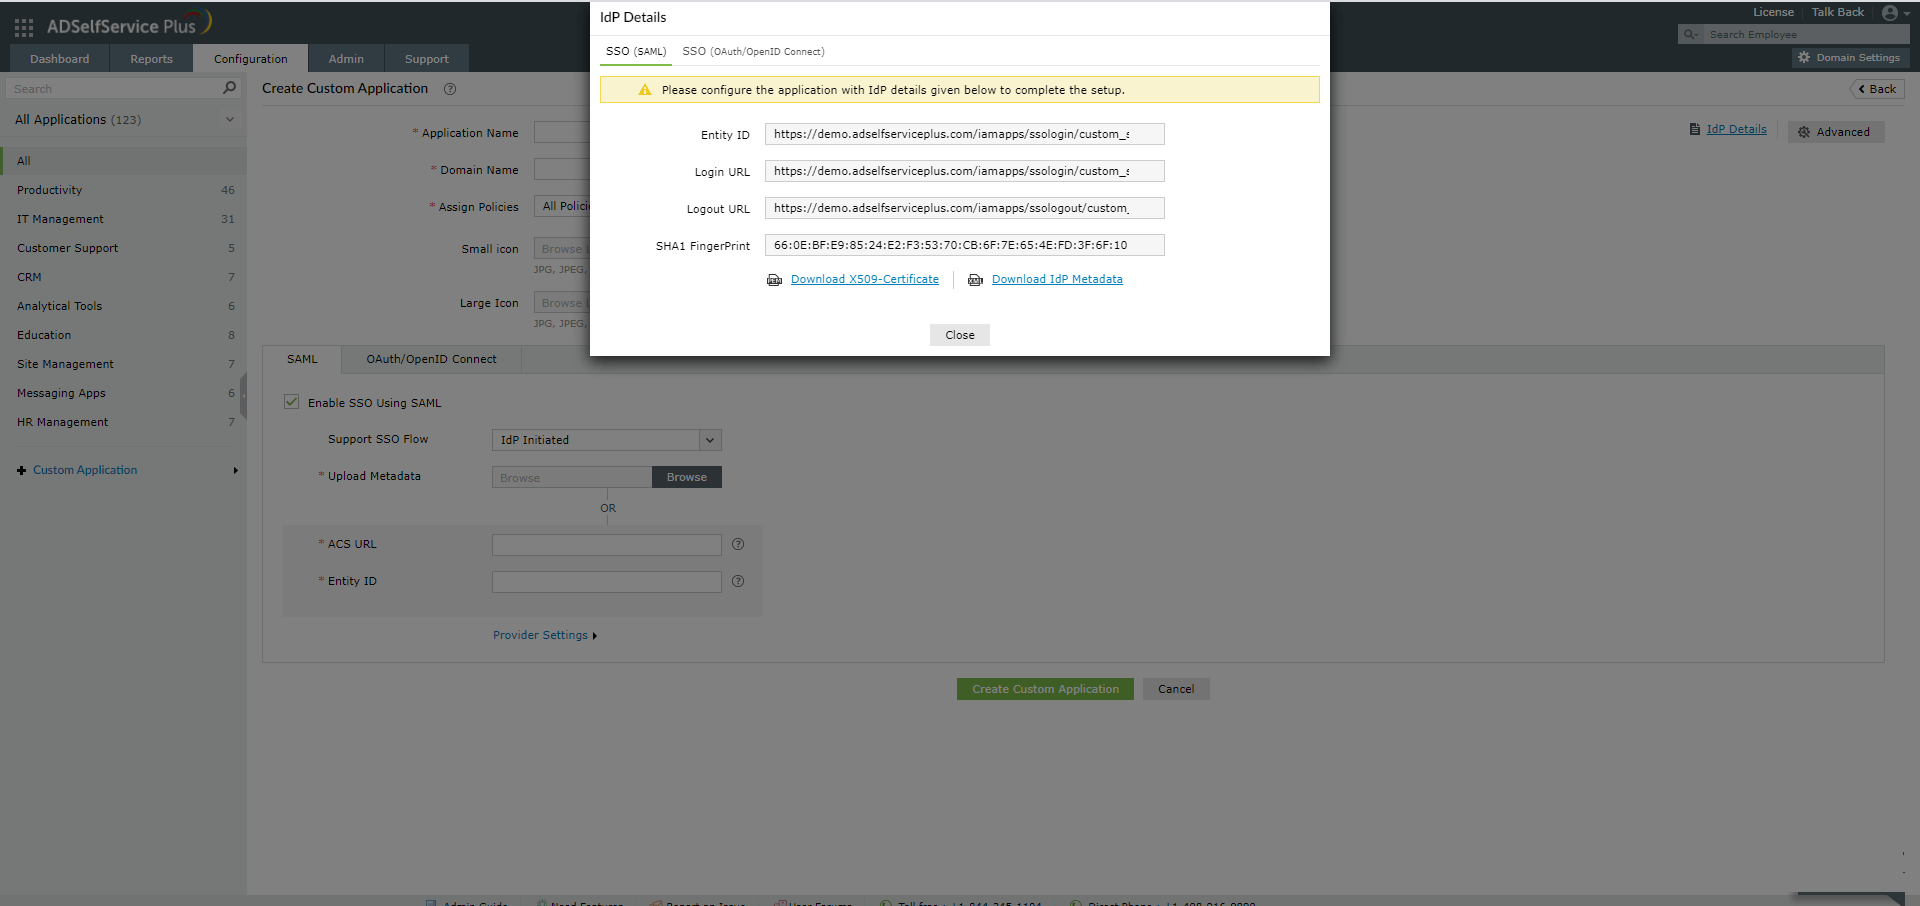
- The Create Custom Application section will open. Here, click IdP details at the top right of the page.
- In the pop-up that opens, copy the Entity ID, Login URL, and Logout URL. Also, click Download X.5O9 certificate to download the ADSelfService Plus certificate.
1. Configure Cisco Firepower SSO:
- Log in to the Cisco Firepower Management Center (FMC) that manages the FTD.
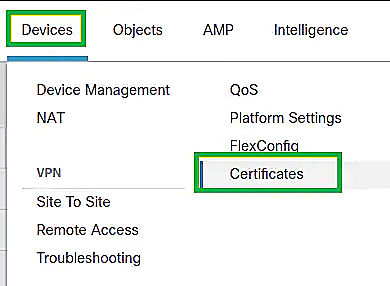
- Click Devices at the top of the screen; from the drop-down, click on Certificates.
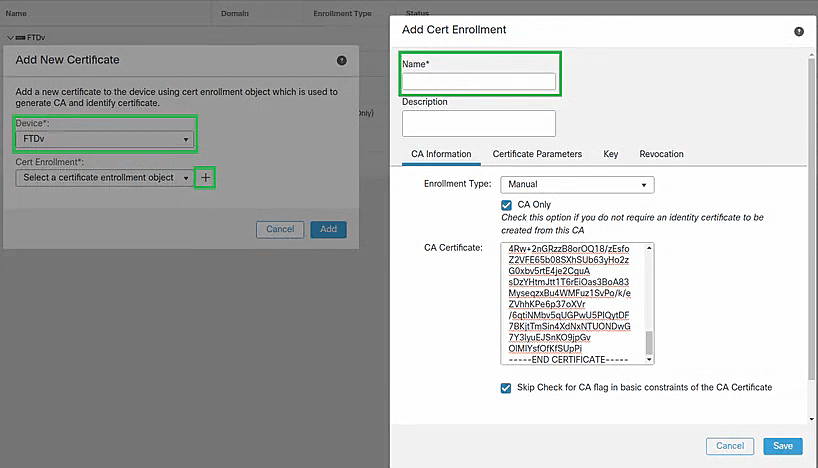
- In the Certificates page that appears, click Add.
- The Add New Certificate window will pop up. Use the Device drop-down to select the FTD where you're configuring SSO.
- Under Certificate Enrollment, click the + button. A new window will pop up.
- In the Add Cert Enrollment page, enter ADSelfServicePlus_Single_SignOn in the Name field.
- Under CA Information tab, select Manual from the Enrollment Type drop-down.
- Check the box next to CA Only.
- Open the certificate file downloaded in step 6 of Prerequisites in a text editor, and copy the entire contents of the file (including the -----BEGIN CERTIFICATE----- and -----END CERTIFICATE----- lines).
- Paste the certificate file text into the CA Certificate field in FMC.
- Enable the Skip Check for CA flag checkbox.
- Click Save.
- Once back to the Add New Certificate window, click Add.
- In the Cisco FMC homepage, click Object and in the drop-down, select Object Management.
- On the left-hand navigation, expand AAA Server and click on Single Sign-on Server.

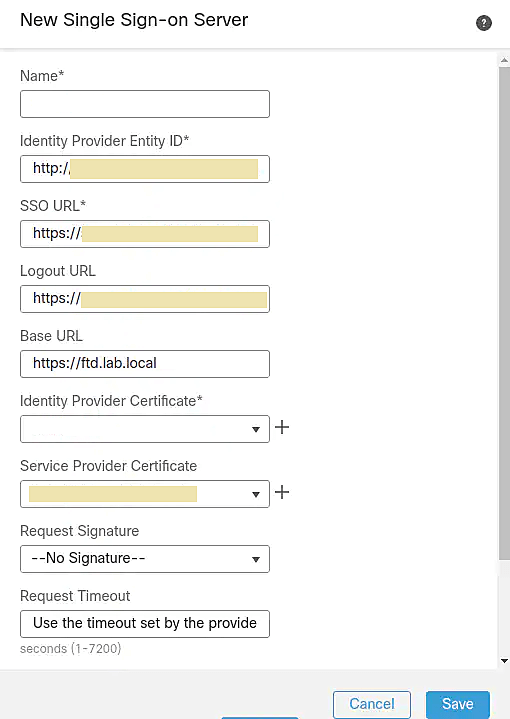
- Click the Add Single Sign-on Server button in the upper-right hand corner of the page. A new window will pop up.
- In the Name field, type ADSelfServicePlus_Single_SignOn.
- Paste the Entity ID copied in step 6 of Prerequisites in the Identity Provider Entity ID field.
- Paste the Login URL copied in step 6 of Prerequisites in the SSO URL field.
- Paste the Logout URL copied in step 6 of Prerequisites in the Logout URL field.
- Under Base URL enter the publicly resolvable hostname of your Cisco Firepower into the field. Example: https://vpn.example.com.
- Select ADSelfServicePlus_Single_SignOn from the drop-down under Identity Provider Certificate.
- Select the SSL certificate used for the Cisco Firepower itself from the drop-down under Service Provider Certificate.
- Leave the Request Signature set to No Signature.
- Enter a minimum of 300 as the Request Timeout field value.
- Leave the other settings at their default values.
- Click Save to be returned to the Cisco FMC page.
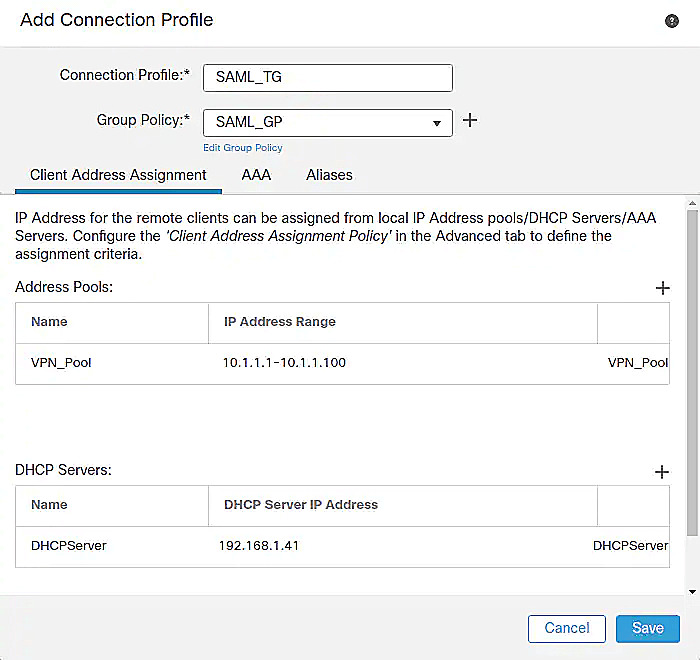
- Click Devices at the top of the screen; from the drop-down click on Remote Access.
- Select the pencil icon for the remote access configuration you'd like to update.

- In the Connection Profile tab, click the pencil icon for the connection profile you'd like to use SSO.
- In the Edit Connection Profile page that appears, click on the AAA tab.
- Under Authentication, select SAML from the Authentication Method drop-down.
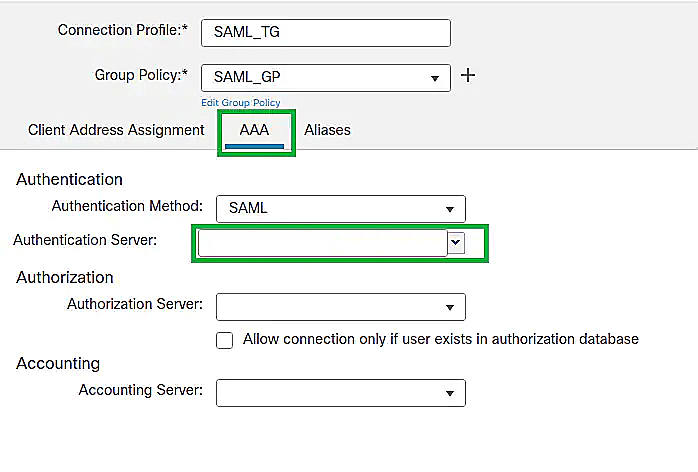
- Select ADSelfServicePlus_Single_SignOn (SSO) from the Authentication Server drop-down.
- If more than one connection profile is present, click the Aliases tab and ensure that an Alias Name is enabled for this connection profile.
- Click Save. Click Save again.
- In the Cisco FMC page, click Deploy at the top of the page. In the drop-down that appears, click Deployment.
- In the Deployment page, select the FTD targeted for SSO checkbox. Click Deploy.
- In the pop-up that appears, enter the deployment notes, if any, and click Deploy. The changes will take some time to be implemented.
2. Configure SSO in ADSelfService Plus
Follow the steps given below to set up SSO functionality between ADSelfService Plus and Cisco FTD VPN.
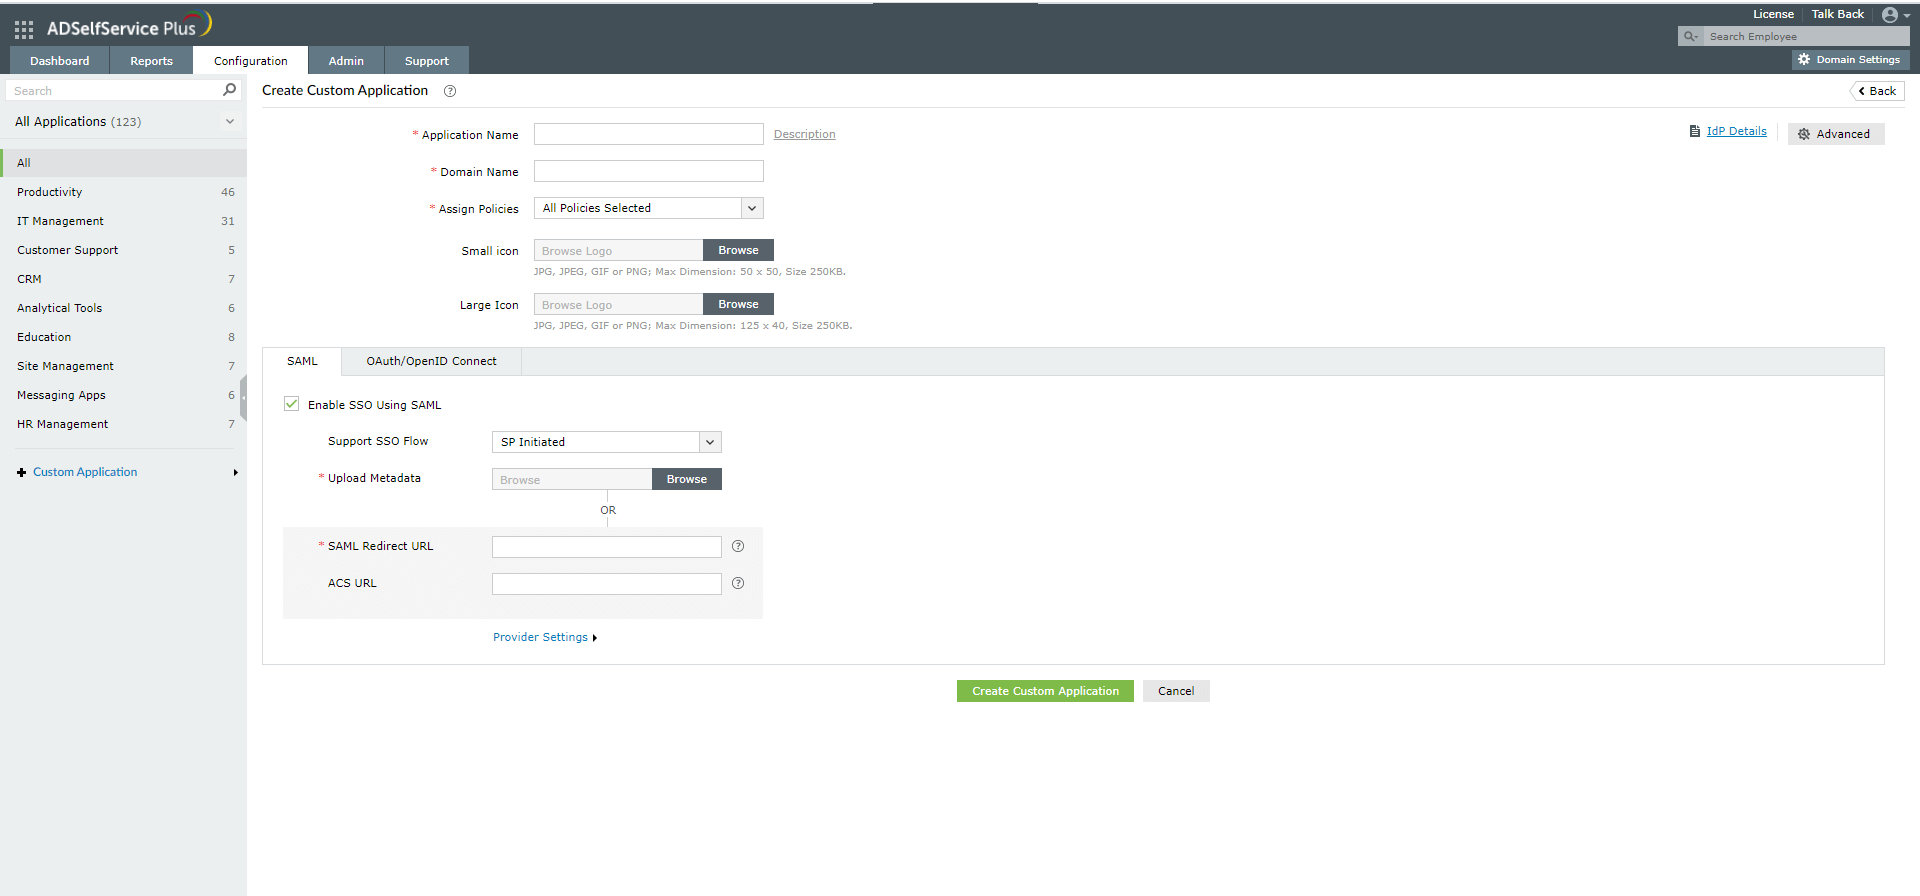
- Log in to ADSelfService Plus web console as an administrator.
- Navigate to Application → Add Applications → Custom Application.
- Enter your Application name and Description.
- In the Domain Name field, enter the domain name of your email address. For example, if you use johndoe@mydomain.com to log in, then mydomain.com is the domain name.
Select the policies you want this SSO configuration to apply to from the Assign Policies drop-down.
Note: ADSelfService Plus allows you to create organizational unit (OU) and group-based policies. To create a policy, go to Configuration → Self-Service → Policy Configuration → Add New Policy. Click Select OUs/Groups, and make the selection based on your requirements. You need to select at least one self-service feature. Finally, click Save Policy.
- Upload a Small Icon and Large Icon image for the Cisco Firepower app icon.
- Provide a suitable option for the Supported SSO flow.
- Select SAML. In the SAML section, click the Enable SSO using SAML checkbox.
- Select SP Initiated from the Support SSO flow drop-down.
- Enter the same Base URL entered in step 20 of Configure Cisco Firepower SSO in the SAML Redirect URL field.
- Under Provider Settings:
- Choose an RSA-SHA1 or RSA-SHA256 algorithm depending on the encryption Cisco Firepower supports.
- Pick Signed as the SAML response.
- Click Create Custom Application.
Step 2: Enable MFA for Cisco FTD VPN
- Go to Configuration → Self-Service → Multi-Factor Authentication.
- Configure the authentication methods necessary.
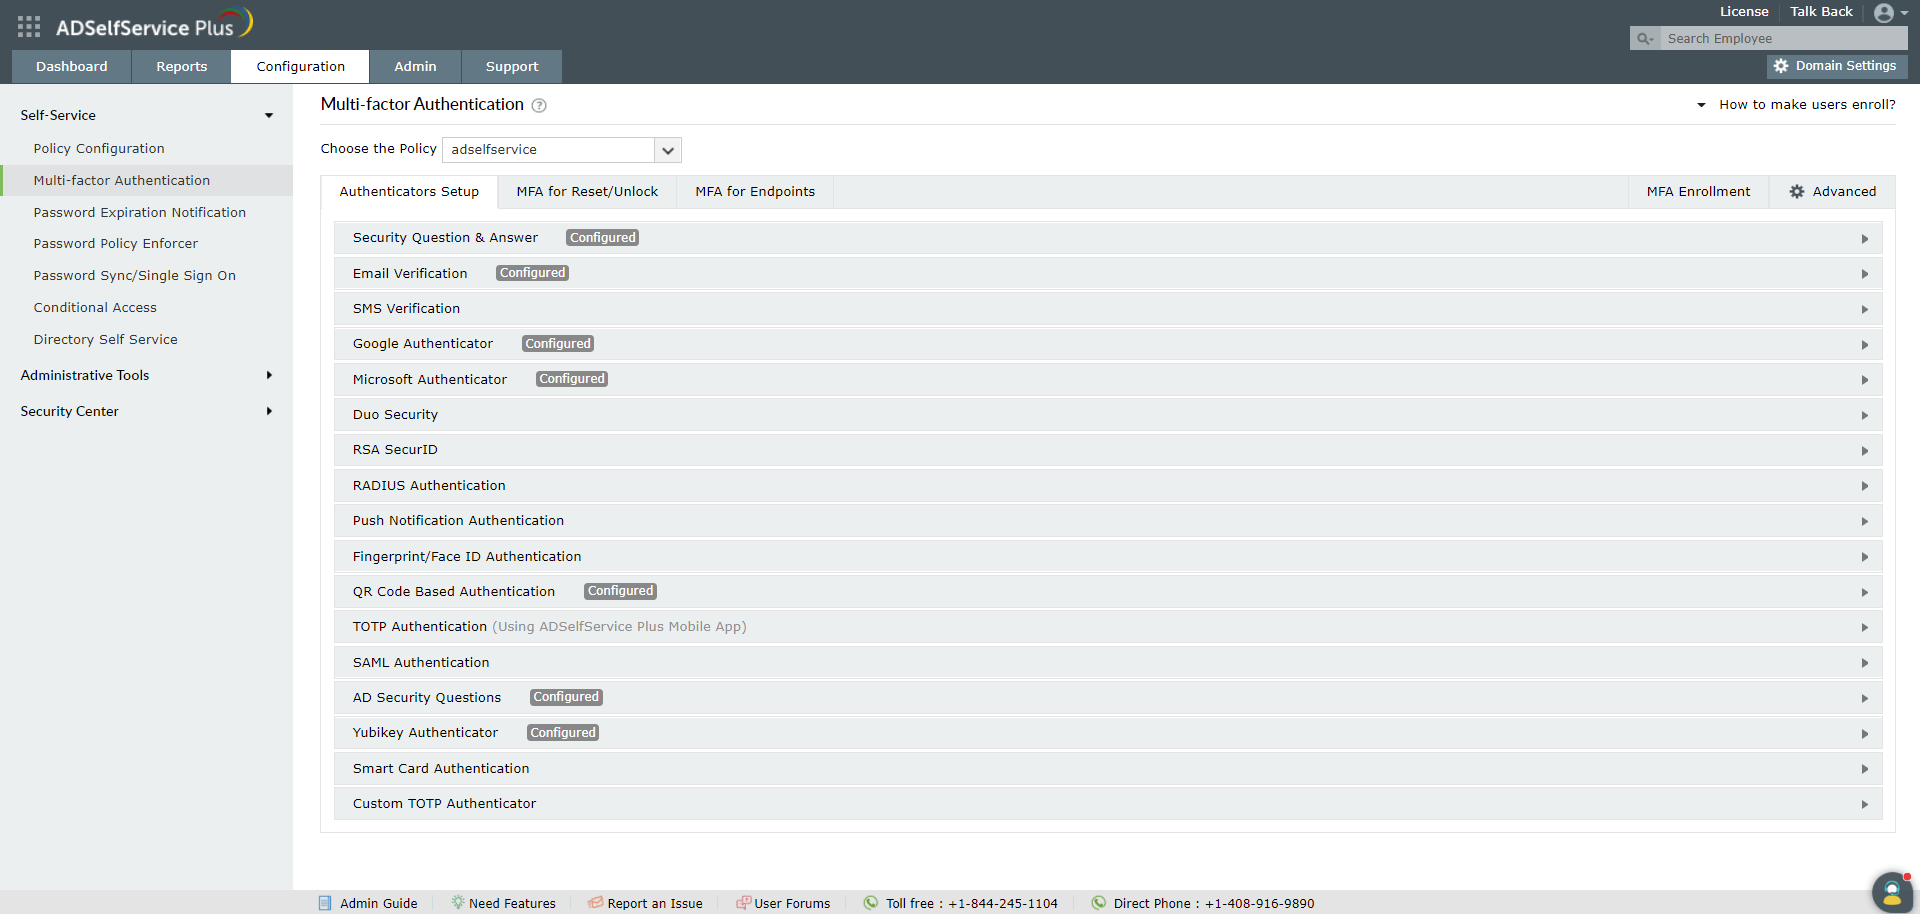
- Go to MFA for Applications.
- Select a policy from the Choose the Policy drop-down. This will determine which authentication methods are enabled for which sets of users.
- In the MFA for Cloud Applications section, enter the number of authentication methods to be enforced, and select the authentication methods to be used.
- Click on the asterisk (*) symbol next to the authentication method to set it as mandatory. You can reorder the authenticators as well.
- Click Save Settings.
Access other settings like passwordless login, MFA idle time, and browser trust, by clicking on Advanced.
Highlights of ADSelfService Plus
Allow Active Directory users to self-service their password resets and account unlock tasks, freeing them from lengthy help desk calls.
Get seamless one-click access to 100+ cloud applications. With enterprise single sign-on, users can access all their cloud applications using their Active Directory credentials.
Intimate Active Directory users of their impending password and account expiry via email and SMS notifications.
Synchronize Windows Active Directory user passwords and account changes across multiple systems automatically, including Microsoft 365, Google Workspace, IBM iSeries, and more.
Strong passwords resist various hacking threats. Enforce Active Directory users to adhere to compliant passwords by displaying password complexity requirements.
Enable Active Directory users to update their latest information themselves. Quick search features help admins scout for information using search keys like contact numbers.
