How to configure multi-factor authentication with Duo Security
ADSelfService Plus wards off potential security threats by fortifying access to user accounts with multi-factor authentication (MFA), by adding an extra layer of security. When MFA is enabled, users are required to prove their identity through the enforced authenticators in addition to passwords.
ADSelfService Plus supports 20 advanced authentication techniques, including Duo Security integration that enables Duo MFA for Active Directory environments, enterprise applications, and self-service password reset. Organizations can specifically configure Duo MFA for domain admin accounts to provide enhanced security for privileged users.
Multi-factor authentication via Duo Security
When multi-factor authentication using Duo Security is enabled, during every login, users will have to prove their identity through any one of the following methods:
- Approving a push notification through the Duo Security mobile app.
- Entering a security pass code received through a verification call.
- Entering a security pass code generated during the login process.
Configuration
Duo Security-based multi-factor authentication can be configured in just three simple steps.
Step 1: Integrate Duo Security with ADSelfService Plus
- Log in to your Duo Security account (i.e., https://admin-3d5d33c0.duosecurity.com), or if you're a new user, sign up and log in.
- Navigate to Applications.
- Click Protect an Application.

- Search for Web SDK in the applications list.
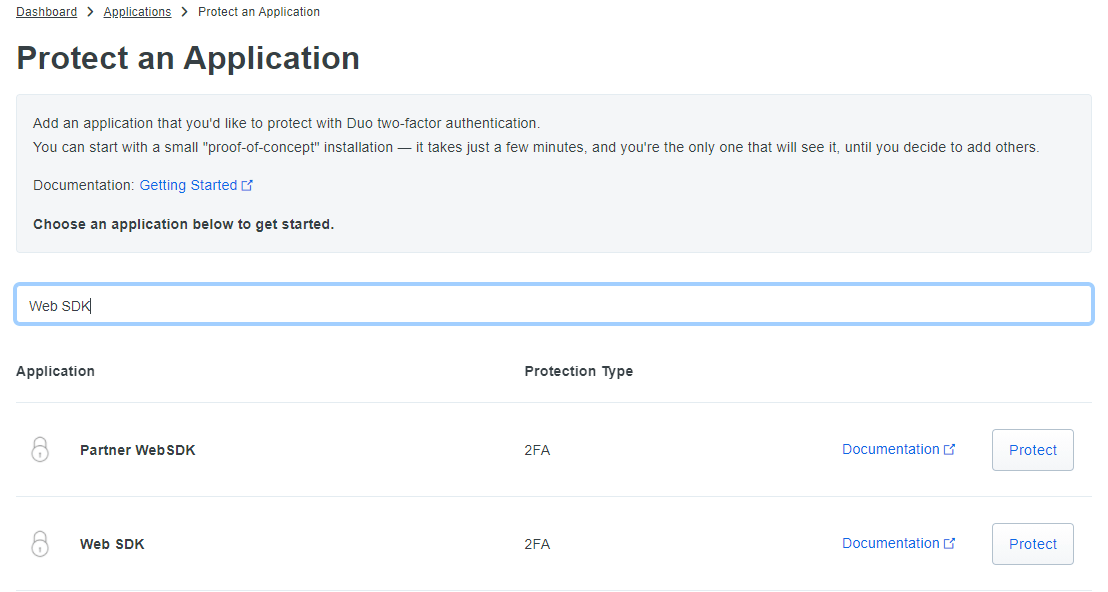
- Click the Protect this Application link from the search result.
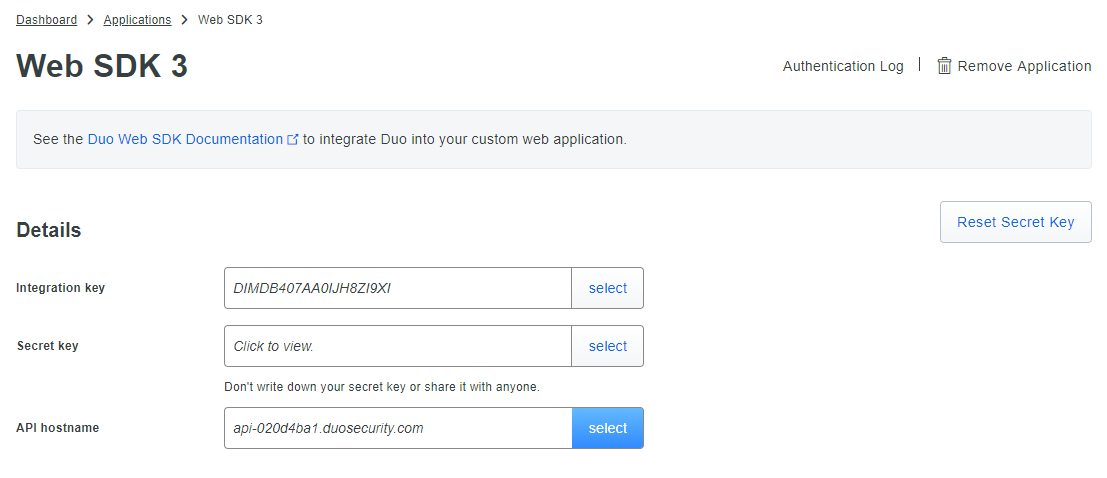
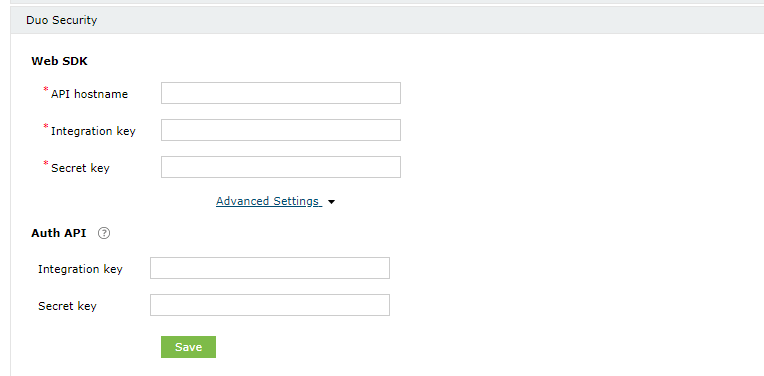
- Copy the values of Integration key, Secret key, and API hostname from the Web SDK page that opens up.
Configure Auth API (optional)
The Auth API configuration is used to verify a user's enrollment with Duo Security. If Auth API is not configured, it's mandatory to remove the user's enrollment in ADSelfService Plus on deleting a user's enrollment in Duo Security. If this isn't done, the user will be added back to Duo Security when it is used for authentication in ADSelfService Plus.
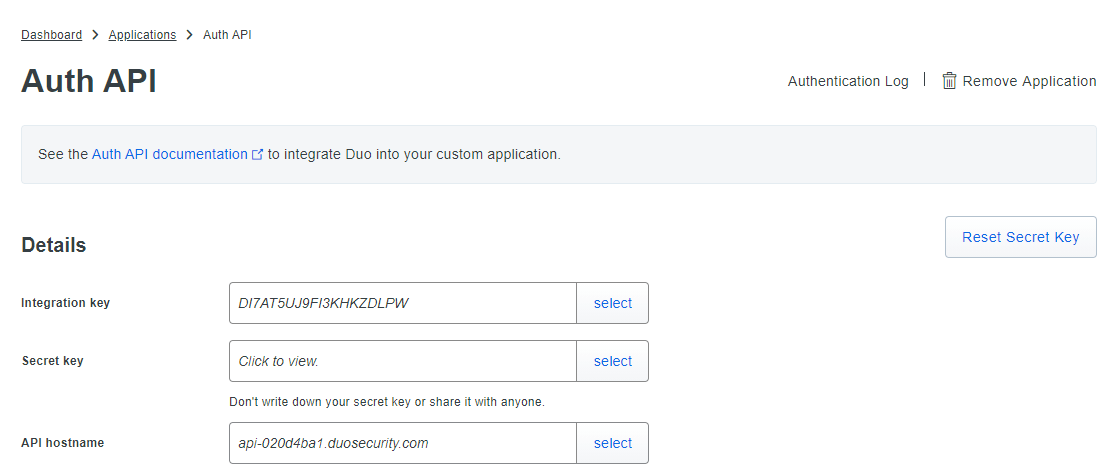
- If Auth API is configured, then go back to Applications → Protect an Application.
- Search for Auth API.
- Copy the values of the Integration key and Security key.
Step 2: Configure Duo Security in ADSelfService Plus
- Log in to the ADSelfService Plus console using administrator credentials.
- Navigate to Configuration → Self-Service → Multi-factor Authentication → Authenticators Setup.
- Select Duo Security.
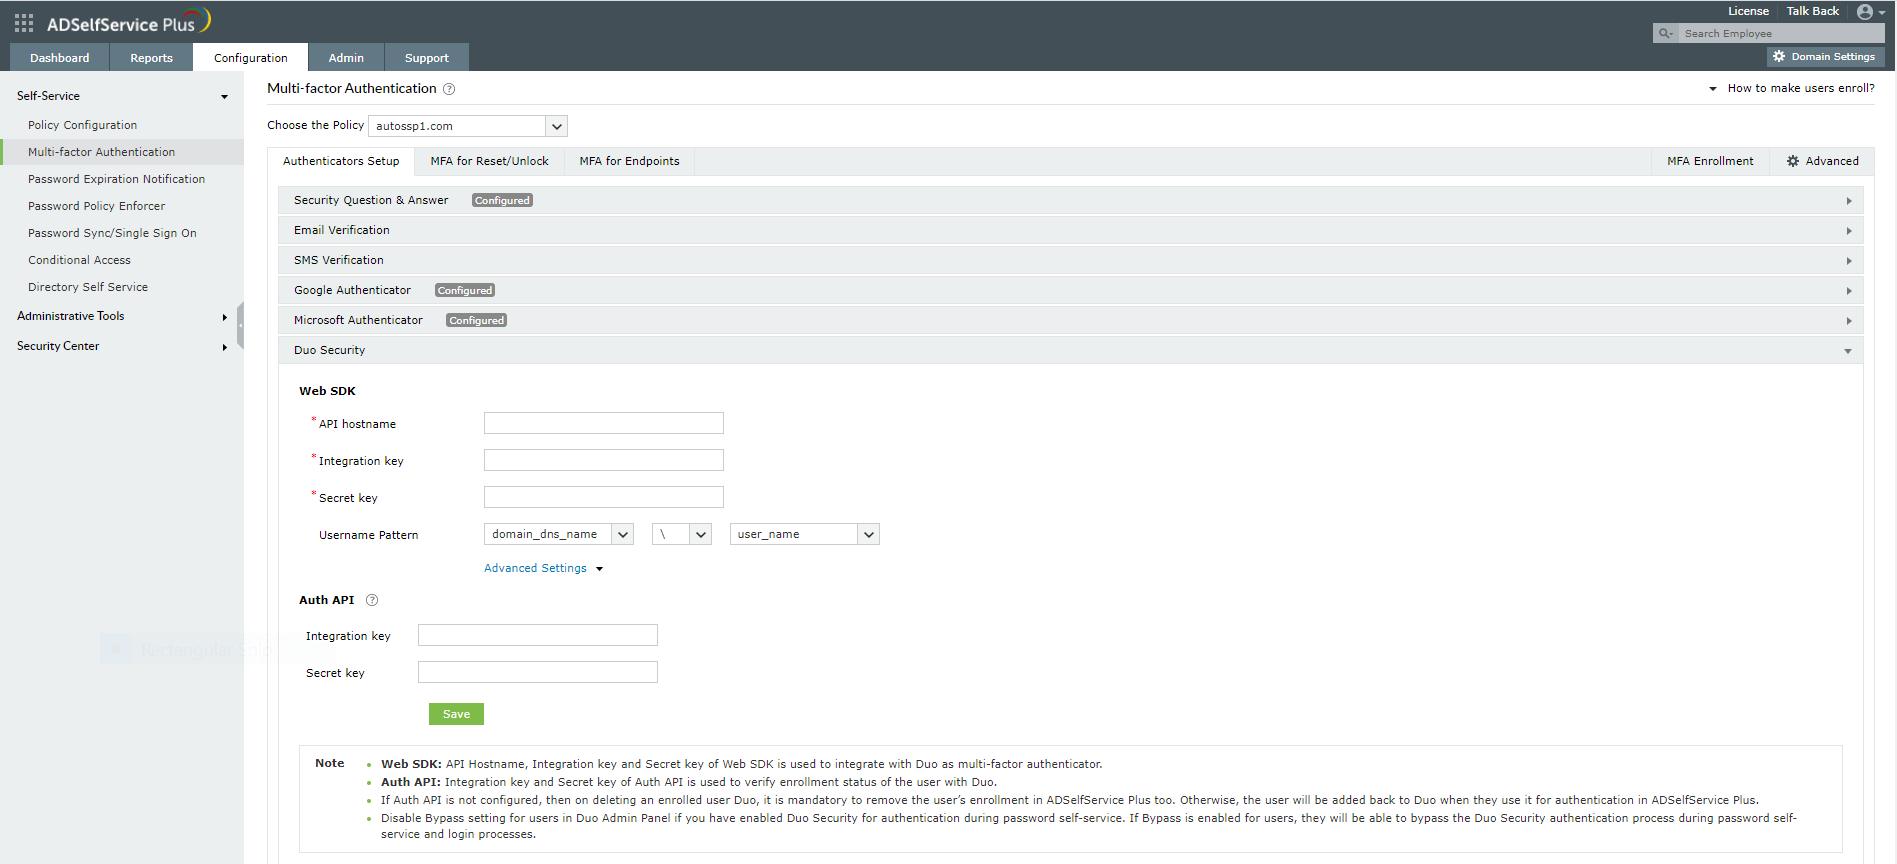
- Paste the values that you copied previously from the Web SDK page in the Integeration Key, Secret Key, and API hostname fields.
- If Auth API is configured, go to Advanced Settings and paste the values that you copied in this step from the Auth API page in the Integration key and Secret key fields.
- Click Save.
Steps to enable multi-factor authentication for ADSelfService Plus' end-user portal login
Prerequisite:
- SSL must be enabled: Log in to the ADSelfService Plus web console with admin credentials. Navigate to Admin → Product Settings → Connection. Select the ADSelfService Plus Port [https] option. Refer to this guide to learn how to apply a SSL certificate and enable HTTPS.
Steps to configure:
- Navigate to Configuration → Self-Service → Multi-factor Authentication → MFA for Applications..

- Choose the Policy from the drop-down.
Note: ADSelfService Plus allows you to create OU- and group-based policies. To create a policy, go to Configuration → Self-Service → Policy Configuration → Add New Policy. Click Select OUs/Groups, and make the selection based on your requirements. You need to select at least one self-service feature. Finally, click Save Policy.
- Use the Enable _ authentication factors option next to MFA for ADSelfService Plus Login,
- Select Duo Security and other necessary authenticators from the Select the authenticators required drop-down.
- Click Save Settings.
Steps to enable multi-factor authentication for password reset/account unlock
Prerequisite:
- SSL must be enabled: Log in to the ADSelfService Plus web console with admin credentials. Navigate to Admin → Product Settings → Connection. Select the ADSelfService Plus Port [https] option. Refer to this guide to learn how to apply a SSL certificate and enable HTTPS.
Steps to configure:
- Navigate to Configuration → Self-Service → Multi-factor Authentication → MFA for Reset/Unlock..

- Choose the Policy from the drop-down.
Note: ADSelfService Plus allows you to create OU- and group-based policies. To create a policy, go to Configuration → Self-Service → Policy Configuration → Add New Policy. Click Select OUs/Groups, and make the selection based on your requirements. You need to select at least one self-service feature. Finally, click Save Policy.
- Enable the Select the authenticators required checkbox
- Use the Enable _ authentication factors option next to MFA for Password Reset/Account Unlock to select the number of authenticators
- Select Duo Security and other necessary configured authenticators from the drop-down.
- Click Save Settings.
Steps to enable multi-factor authentication for endpoints
Prerequisites:
- Utilize Endpoint MFA: Your ADSelfService Plus license must include Endpoint MFA. Visit the store to purchase it.
- SSL must be enabled: Log in to the ADSelfService Plus web console with admin credentials. Navigate to the Admin tab → Product Settings → Connection. Select the ADSelfService Plus Port [https] option. Refer to this guide to learn how to apply a SSL certificate and enable HTTPS.
- Access URL must be set to HTTPS: Navigate to Admin > Product Settings > Connection > Connection Settings > Configure Access URL and set the Protocol option to HTTPS.
- Applicable to MFA for machine logins: Install ADSelfService Plus client software for Windows, macOS, and Linux on the machines where you want to enable MFA. Click here for steps to install the ADSelfService Plus client software.
Configuration:
- Navigate to Configuration → Self-Service → Multi-factor Authentication → MFA for Endpoints.

- Choose the Policy from the drop-down.
Note: ADSelfService Plus allows you to create OU- and group-based policies. To create a policy, go to Configuration → Self-Service → Policy Configuration → Add New Policy. Click Select OUs/Groups, and make the selection based on your requirements. You need to select at least one self-service feature. Finally, click Save Policy.
- MFA can be configured so additional factors of authentication are required at the login screens of Windows, macOS, and Linux machines or systems, during VPN or Outlook Web Access (OWA) logins.
- For machine logins:
- Navigate to Configuration > Self-Service > Multi-factor Authentication > MFA for Endpoints > MFA for Machine Logins.
- Enable the Select the authenticators required checkbox
- Use the Enable _ authentication factors option next to MFA for Machine Login to select the number of authenticators
- Select Duo Security and other necessary configured authenticators from the drop-down.
- Click Save Settings.
- For OWA login:
- Navigate to Configuration > Self-Service > Multi-factor Authentication > MFA for Endpoints > MFA for Machine Logins.
- Enable the Select the authenticators required checkbox.
- Select the Enable second factor authentication option next to MFA for OWA Login, and choose RSA SecurID from the drop-down.
- Click Save Settings.
- Click Save Settings.
Highlights of ADSelfService Plus
Allow Active Directory users to self-service their password resets and account unlock tasks, freeing them from lengthy help desk calls.
Get seamless one-click access to 100+ cloud applications. With enterprise single sign-on, users can access all their cloud applications using their Active Directory credentials.
Intimate Active Directory users of their impending password and account expiry via email and SMS notifications.
Synchronize Windows Active Directory user passwords and account changes across multiple systems automatically, including Microsoft 365, Google Workspace, IBM iSeries, and more.
Strong passwords resist various hacking threats. Enforce Active Directory users to adhere to compliant passwords by displaying password complexity requirements.
Enable Active Directory users to update their latest information themselves. Quick search features help admins scout for information using search keys like contact numbers.
