Pricing  Get Quote


Configuring SSO for custom .NET applications using OpenID Connect protocol

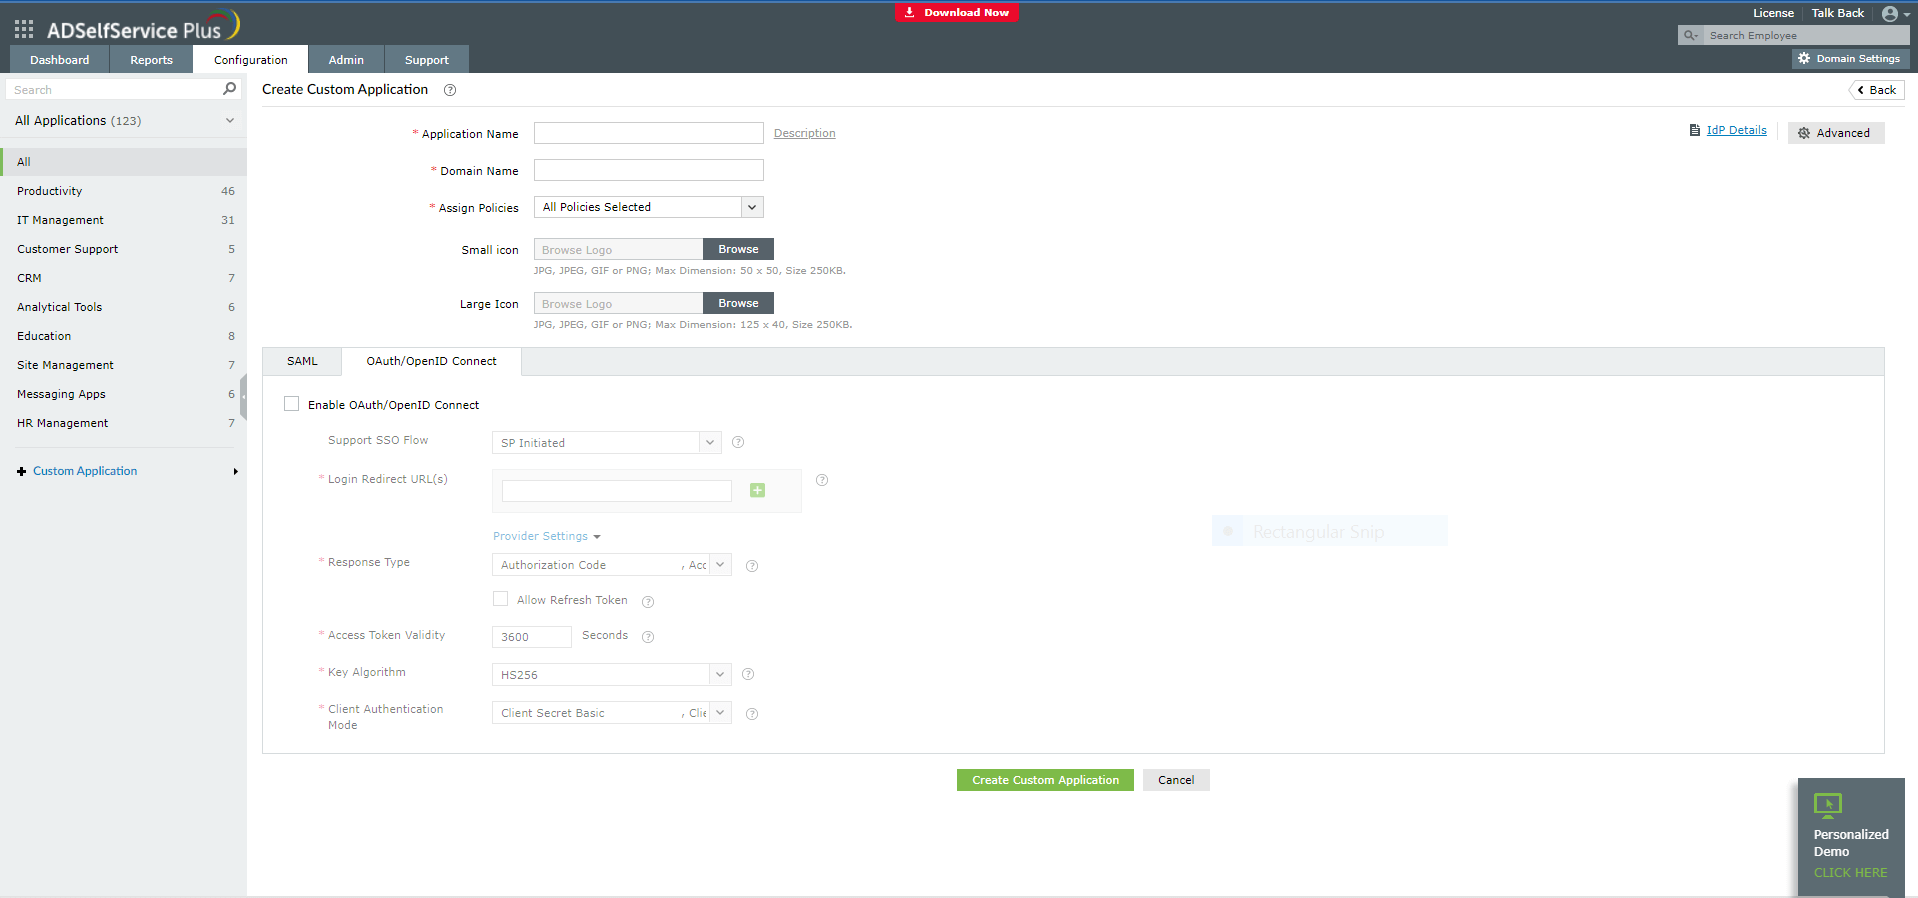
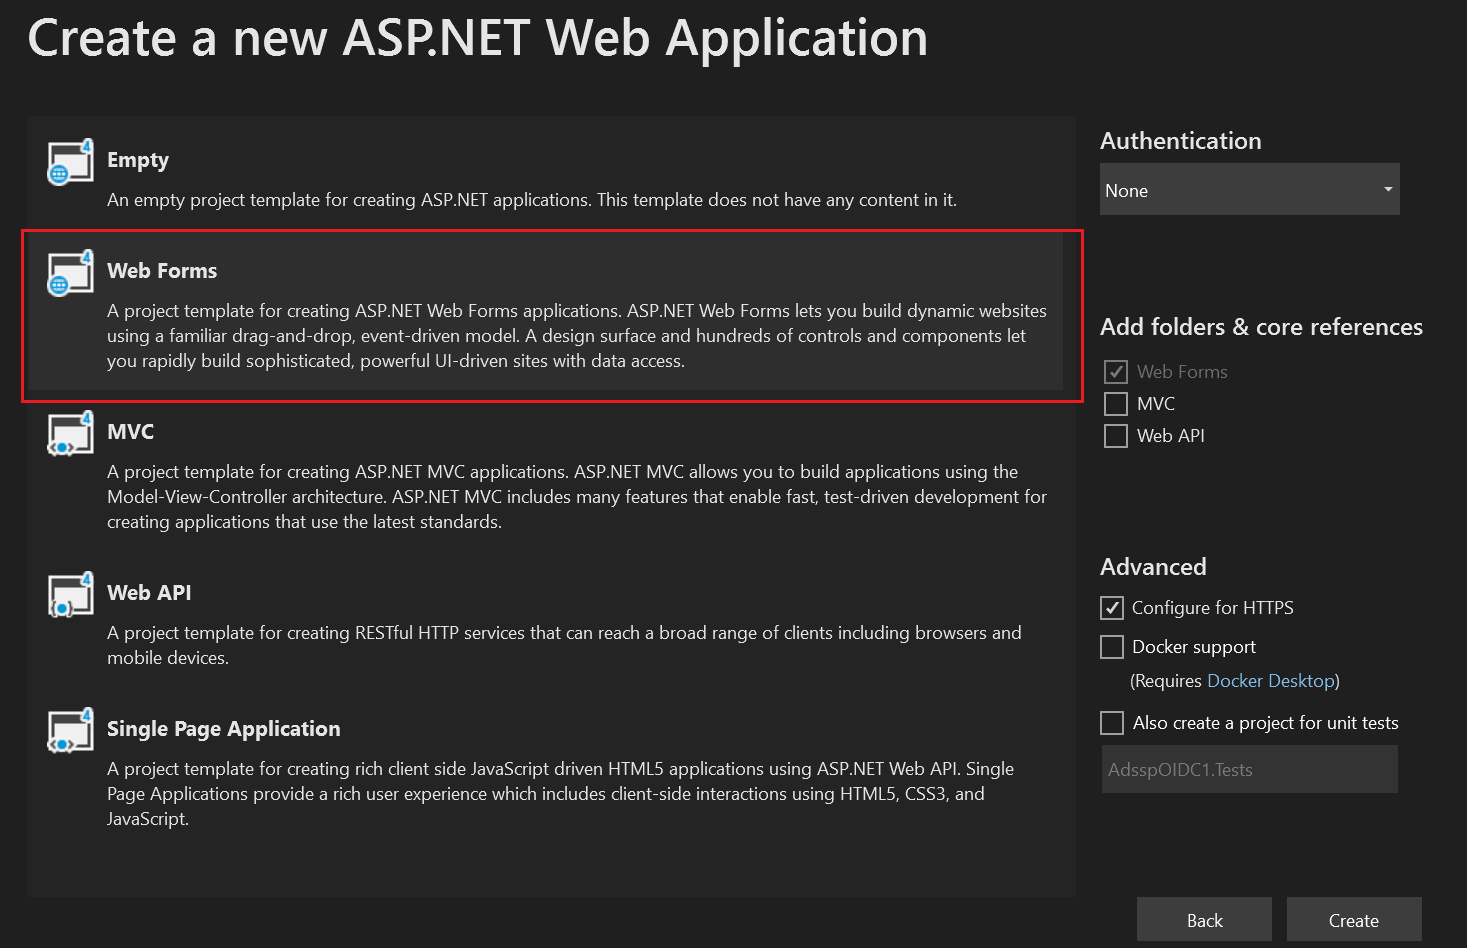
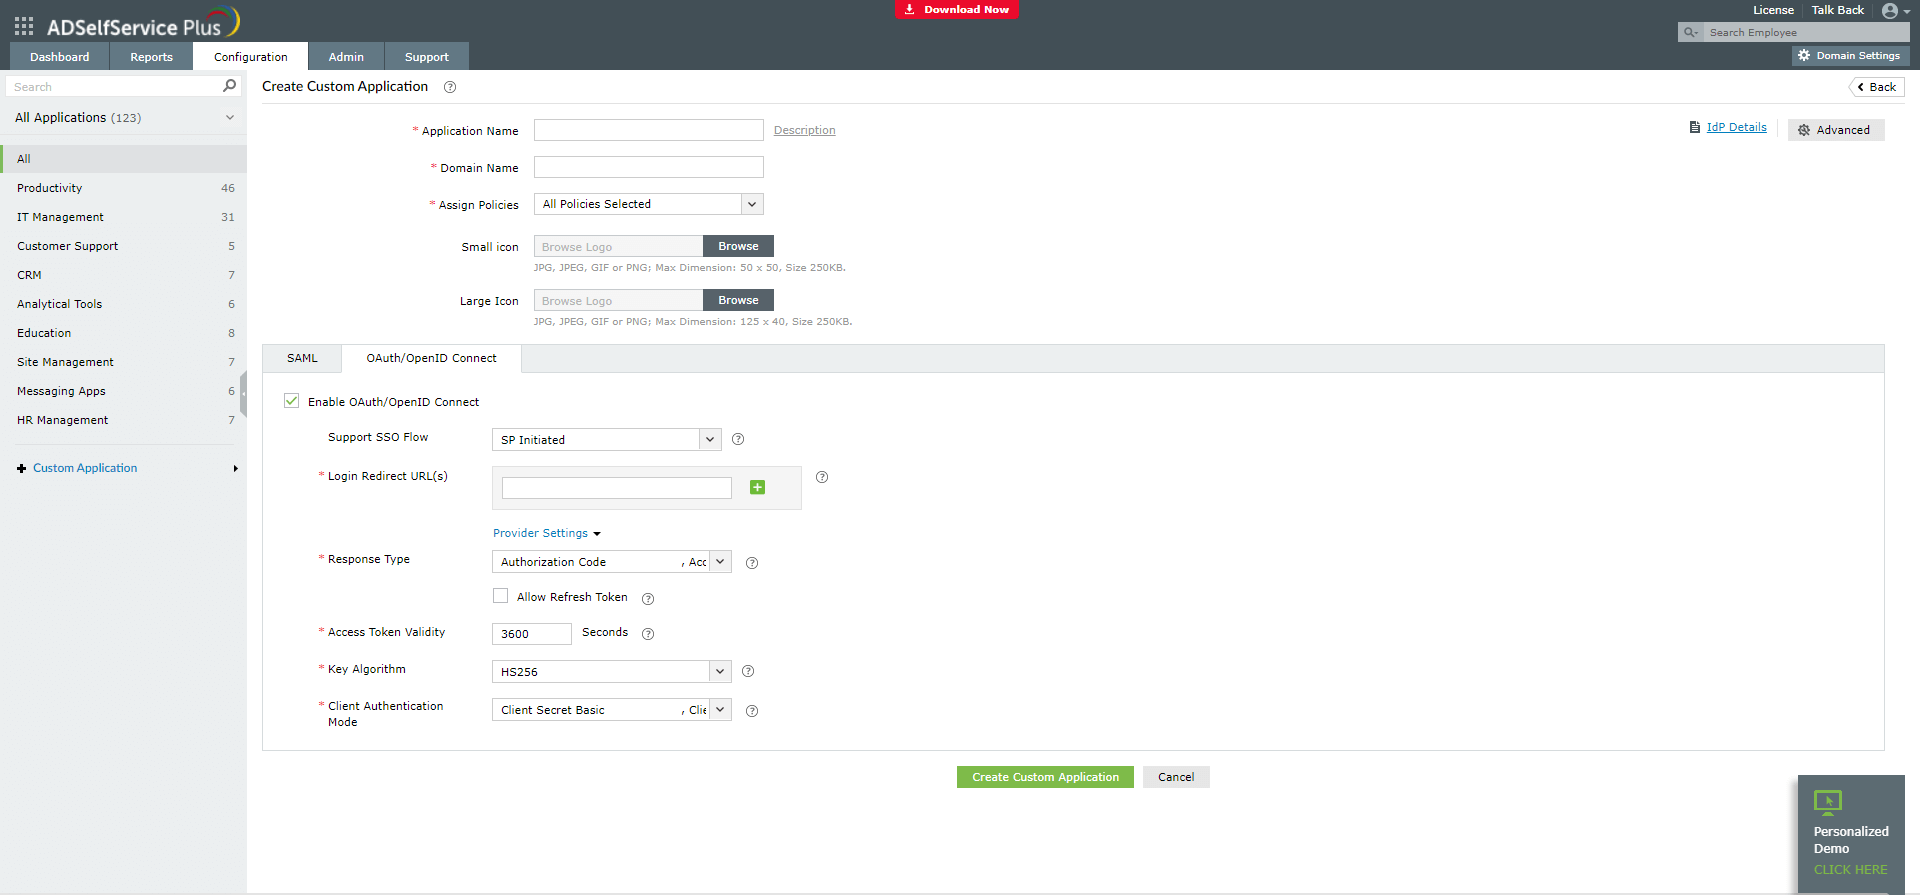
This guide provides steps to enable SP-initiated SSO for custom .NET applications via the OpenID Connect protocol using ManageEngine ADSelfService Plus' SSO feature. The steps have been detailed for the understanding of a system administrator with knowledge of Microsoft Windows, Microsoft Visual Studio, and .NET. The solution supports SSO configuration for enterprise and custom applications supporting SAML, OAuth, and OpenID Connect applications. Once this feature is configured, when users access the .NET application, they will be redirected to ADSelfService Plus and will have to complete authentication.

Prerequisites

  1. Log into ADSelfService Plus using administrator credentials.
  2. Go to Configuration > Password Sync/Single Sign-On.
  3. Click Add Application.
  4. In the left pane, click Custom Applications.
  5. In the page that appears, click on IdP details at the top-left corner.
  6. From the pop-up that opens, copy the values of Client ID, Client Secret, Authorization Endpoint URL. Right-click Well-Known Configuration, click Copy link address and note down the address.

    Configuring SSO for custom .NET applications using OpenID Connect protocol

    Configuring SSO for custom .NET applications using OpenID Connect protocol

Step 1. Configuration in Microsoft Visual Studio

  1. Open Microsoft Visual Studio.
  2. Go to File > New > Project.
  3. Under Visual C#\Web, select ASP.NET Web Application (.NET Framework).

    Configuring SSO for custom .NET applications using OpenID Connect protocol

  4. Name your application and click Create.

    Configuring SSO for custom .NET applications using OpenID Connect protocol

  5. Select the default template for Web Forms

    Configuring SSO for custom .NET applications using OpenID Connect protocol

  6. Go to Tools > NuGet Package Manager > Package Manager Console.
  7. Add OWIN middleware NuGet packages by typing the following in the Package Manager Console window:
    • Install-Package Microsoft.Owin.Security.OpenIdConnect
    • Install-Package Microsoft.Owin.Security.Cookies
    • Install-Package Microsoft.Owin.Host.SystemWeb
    • Install-Package Microsoft.AspNet.Identity.Owin
  8. Go to View > Solution Explorer. In the Solution Explorer pane that opens on the right, click Web.config and add the below lines to the Web.config file:
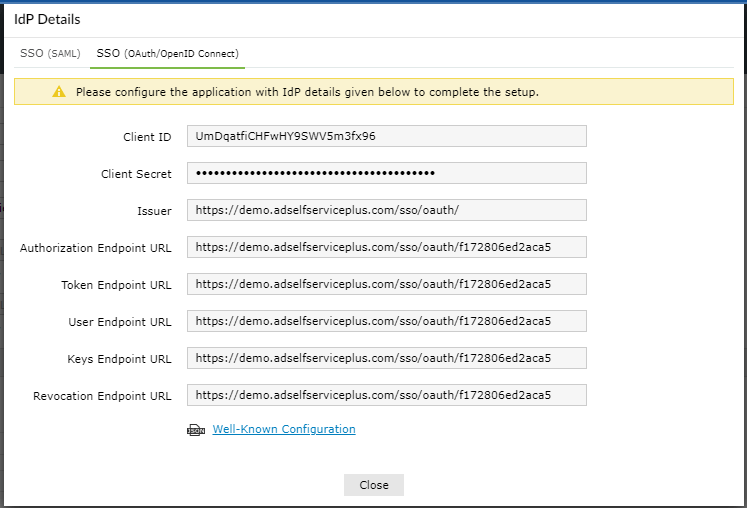
    <appSettings>
    <add key="adssp:ClientId" value="clientID" />
    <add key="adssp:ClientSecret" value="clientkey" />
    <add key="adssp:OrgUri" value="https://organization-url" />
    <add key="adssp:RedirectUri" value="https://redirect-url" />
     <add key="adssp:WellKnownConfigUri" value="https://wellKnownConfiguration" />
    </appSettings>

    Here, in place of

    • clientID, enter the Client ID copied in Step 6 of Prerequisites
    • clientkey, enter the Client Key copied in Step 6 of Prerequisites.
    • https://organization-url, paste the Authorization Endpoint URL value copied in Step 6 of Prerequisites. Remove /endpoint from the URL.
    • https://redirect-url, enter the URL to which the user must be redirected after successful authentication.
    • https://wellKnownConfiguration, enter the Well-Known Configuration link address from step 6 of Prerequisites.
  9. If your project doesn't have a Startup.cs file in the root folder:
    • Right-click the project's root folder, and then select Add > New Item > OWIN Startup class.
    • Name the file as Startup.cs.
  10. Make the below changes to Startup.cs.
    • Replace the existing OWIN reports with the following reports:

      using Microsoft.Owin;

      using Owin;

      using Microsoft.IdentityModel.Protocols.OpenIdConnect;

      using Microsoft.IdentityModel.Tokens;

      using Microsoft.Owin.Security;

      using Microsoft.Owin.Security.Cookies;

      using System.Configuration;

      using Microsoft.AspNet.Identity;

      using Microsoft.Owin.Security.OpenIdConnect;

    • Replace the Startup.cs class with the below code
      	public class Startup
          {
              // These values are stored in Web.config. Make sure you update them.
              private readonly string _clientId = ConfigurationManager
      		.AppSettings["adssp:ClientId"];
      
              private readonly string _redirectUri = ConfigurationManager
      		.AppSettings["adssp:RedirectUri"];
              private readonly string _authority = ConfigurationManager
      		.AppSettings["adssp:OrgUri"];
              private readonly string _clientSecret = ConfigurationManager
      		.AppSettings["adssp:ClientSecret"];
              private readonly string _wellKnownConfigUri = ConfigurationManager
      		.AppSettings["adssp:WellKnownConfigUri"];
      
              public void Configuration(IAppBuilder app)
              {
                  ConfigureAuth(app);
              }
      
              public void ConfigureAuth(IAppBuilder app)
              {
                  app.UseExternalSignInCookie(DefaultAuthenticationTypes
      			.ExternalCookie);
      
                  app.SetDefaultSignInAsAuthenticationType
      			(CookieAuthenticationDefaults
      			.AuthenticationType);
                  app.UseCookieAuthentication(new CookieAuthenticationOptions());
      
                  app.UseOpenIdConnectAuthentication(new OpenIdConnectAuthenticationOptions
                  {
                      ClientId = _clientId,
                      ClientSecret = _clientSecret,
                      Authority = _authority,
                      RedirectUri = _redirectUri,
                      MetadataAddress = _wellKnownConfigUri,
                      ResponseType = OpenIdConnectResponseType.CodeIdToken,
                      Scope = OpenIdConnectScope.OpenIdProfile,
                      TokenValidationParameters = new TokenValidationParameters 
      				{ NameClaimType = "name" },
                      Notifications = new OpenIdConnectAuthenticationNotifications
                      {
                          AuthorizationCodeReceived = async n =>
                          {
                              // Exchange code for fetching access token
                          },
                      },
                  });
              }
          }
  11. In the Solution Explorer pane, click Site.Master. Add the below code to the Site.Master file to display login and logout buttons.
    //Alter Site.Master file to add login and logout button to the default view template
    
      <asp:LoginView runat="server" ViewStateMode="Disabled">
                            <AnonymousTemplate>
                                <ul class="nav navbar-nav navbar-right">
                                    <li>
                                        <a
                                            href="Site.Master"
                                            runat="server"
                                            onserverclick="login_init">Log In</a>
                                    </li>
                                </ul>
                            </AnonymousTemplate>
                            <LoggedInTemplate>
                                <ul class="nav navbar-nav navbar-right">
                                    <li>
                                        <asp:LoginStatus runat="server"
                                            LogoutAction="Redirect"
                                            LogoutText="Log off"
                                            LogoutPageUrl="~/"
                                            OnLoggingOut="logout_init" />
                                    </li>
                                </ul>
                            </LoggedInTemplate>
                        </asp:LoginView>
  12. Make the following changes to Site.Master.cs
    • Import the below statements to Site.Master.cs.

      using Microsoft.Owin.Security;

      using Microsoft.Owin.Security.OpenIdConnect;

      using Microsoft.AspNet.Identity;

    • Add the below methods to Site.Master.cs.
       //Add the below methods to capture login and logout events triggered from Site.Master.cs
      
      protected void login_init(object sender, EventArgs e)
              {
                  if (!Request.IsAuthenticated)
                  {
                      HttpContext.Current.GetOwinContext().Authentication.Challenge(
                          new AuthenticationProperties { RedirectUri = "/" },
                          OpenIdConnectAuthenticationDefaults.AuthenticationType);
                  }
              }
      
              protected void logout_init(object sender, LoginCancelEventArgs e)
      {
      Context.GetOwinContext().Authentication.SignOut(DefaultAutie);
      }

2. Configuration in ADSelfService Plus

  1. Go back to ADSelfService Plus.
  2. Navigate to Configuration > Self-Service > Password Sync/Single Sign On.
  3. Click Add Application.
  4. Click on the Custom Application option in the left pane.

    Configuring SSO for custom .NET applications using OpenID Connect protocol

  5. Enter a suitable Name and Description for the application.
  6. Enter a desired Domain Name for the application account.
  7. Choose the policies you want to assign from the Assign Policies drop-down.
  8. You can also add a small or large Icon of the application, if desired.

    Configuring SSO for custom .NET applications using OpenID Connect protocol

  9. Under the OAuth/OpenID Connect tab, select the Enable OAuth/OpenID Connect checkbox.
  10. From the Support SSO Flow drop-down, choose SP Initiated.
  11. In the Login Redirect URL(s) field, enter the Redirect URI mentioned in step 8 of Configuration in Microsoft Visual Studio.

    Configuring SSO for custom .NET applications using OpenID Connect protocol

  12. Under Response Type, choose all three options - Authorization code, Access Token and ID Token.

    Configuring SSO for custom .NET applications using OpenID Connect protocol

  13. Unselect the Allow Refresh Token checkbox.
  14. Retain the default Access Token Validity field value of 3600 seconds.
  15. Choose Key Algorithm as RS256, RS384, or RS512 depending on the algorithm used for Access Token or id_token signature.

    Configuring SSO for custom .NET applications using OpenID Connect protocol

  16. From the Client Authentication Mode drop-down, choose the following modes:
    • Client Secret Basic
    • Client Secret Post
  17. Click Create Custom Application.

    Configuring SSO for custom .NET applications using OpenID Connect protocol

SSO is now enabled for the custom .NET application. Users need to only login once to access the custom .NET application and other enterprise applications. To secure the login process, MFA can be enabled using authenticators such as biometrics, Google Authenticator, and Azure AD MFA.

Request for Support

Need further assistance? Fill this form, and we'll contact you rightaway.

  • Name
  •  
  • Business Email *
  •  
  • Phone *
  •  
  • Problem Description *
  •  
  • Country
  •  
  • By clicking 'Submit' you agree to processing of personal data according to the Privacy Policy.
Highlights

Password self-service

Free Active Directory users from attending lengthy help desk calls by allowing them to self-service their password resets/ account unlock tasks. Hassle-free password change for Active Directory users with ADSelfService Plus ‘Change Password’ console. 

One identity with Single sign-on

Get seamless one-click access to 100+ cloud applications. With enterprise single sign-on, users can access all their cloud applications with their Active Directory credentials. Thanks to ADSelfService Plus! 

Password/Account Expiry Notification

Intimate Active Directory users of their impending password/account expiry by mailing them these password/account expiry notifications.

Password Synchronizer

Synchronize Windows Active Directory user password/account changes across multiple systems, automatically, including Office 365, G Suite, IBM iSeries and more. 

Password Policy Enforcer

Ensure strong user passwords that resist various hacking threats with ADSelfService Plus by enforcing Active Directory users to adhere to compliant passwords via displaying password complexity requirements.

Directory Self-UpdateCorporate Search

Portal that lets Active Directory users update their latest information and a quick search facility to scout for information about peers by using search keys, like contact number, of the personality being searched.

ADSelfService Plus trusted by

Embark on a journey towards identity security and Zero Trust