Pricing  Get Quote


How to install self-signed certificates?

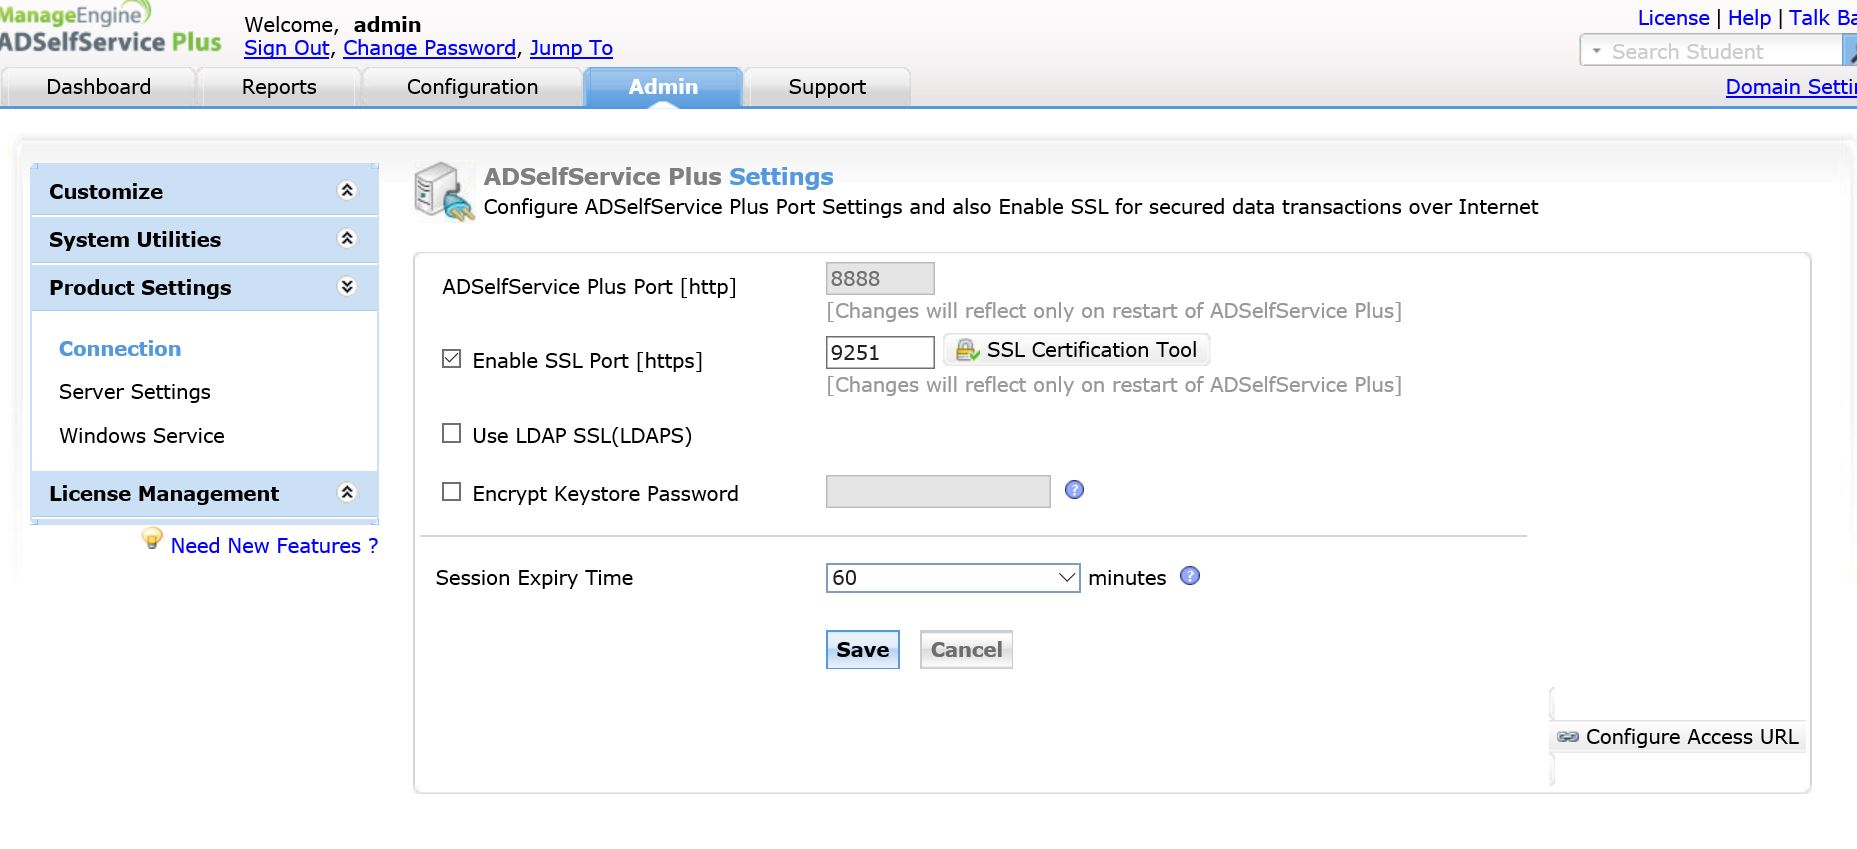
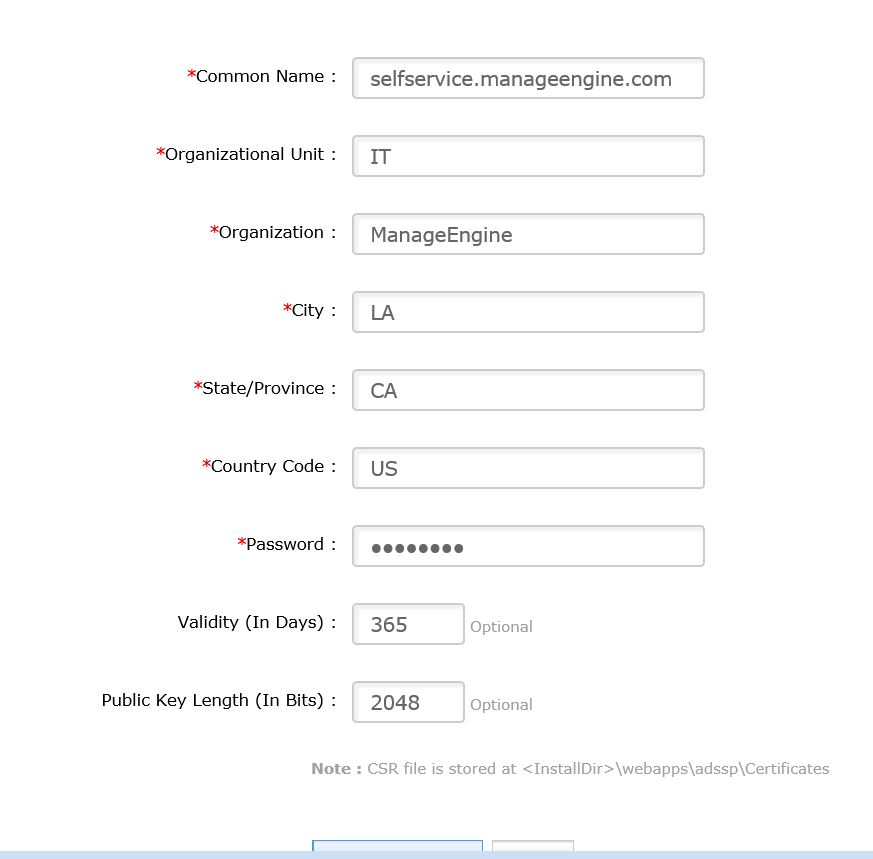
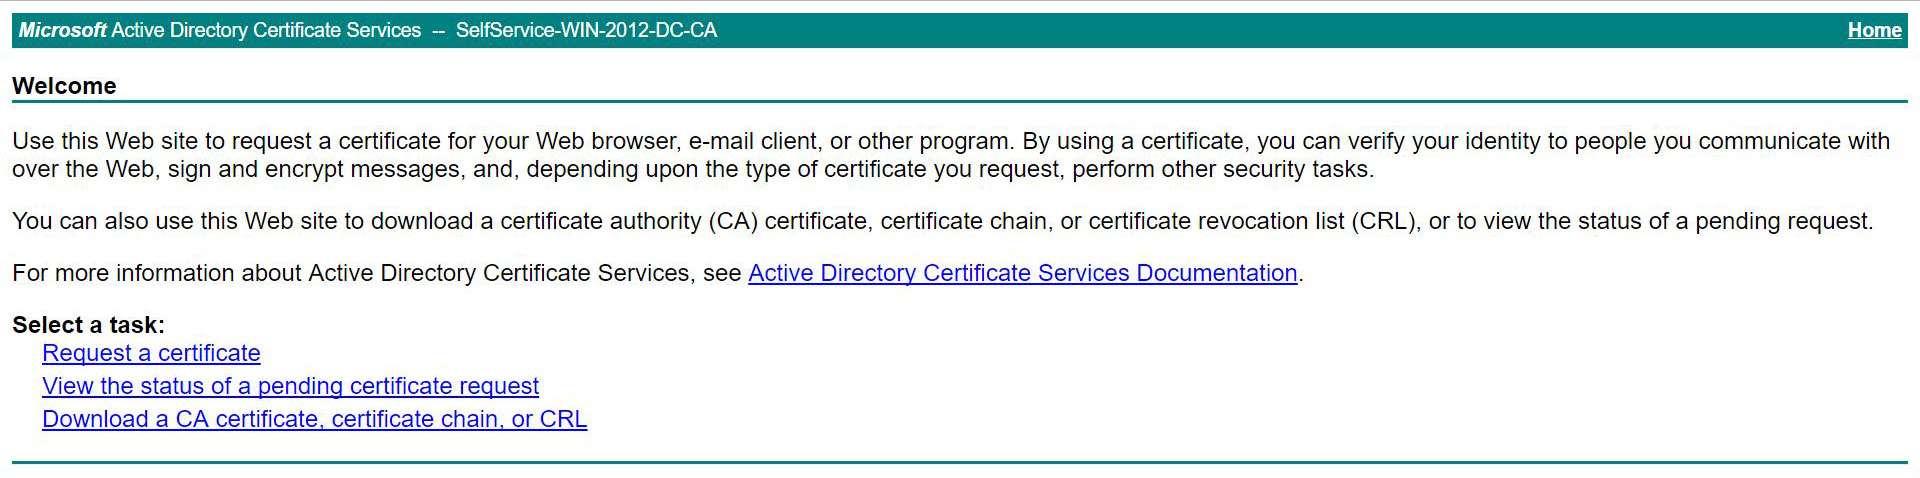
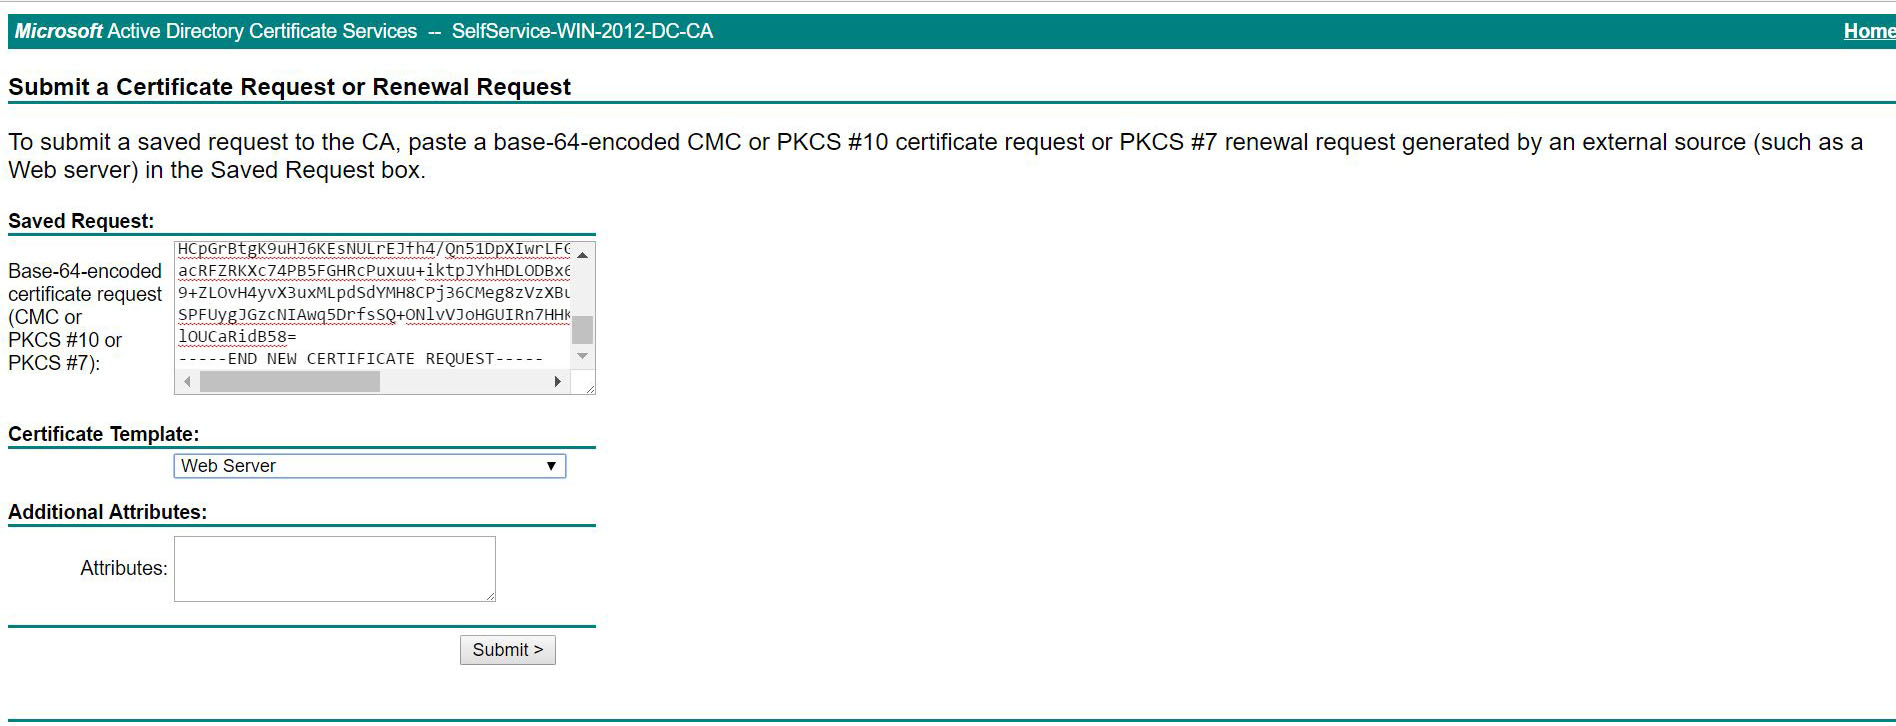
Self-signed(Internal CA) SSL certificates for ADSelfService Plus can be applied in five steps. They are:

Step 1: Enable SSL in ADSelfService Plus

  • Log in to ADSelfService Plus with admin credentials.
  • Navigate to Admin tab → Product Settings → Connection.[Refer image]
  • Select Enable SSL Port [HTTPS] checkbox.
  • Click Save and restart ADSelfService Plus.
  • Note: The default port for https connection in our application is 9251.

Step 2: Generate a CSR file

  • Start ADSelfService Plus and login as admin.
  • Again, navigate to Admin → Product Settings → Connection.
  • Click SSL Certification Tool button.
  • In the SSL Tool & Guide page that opens up, enter all the mandatory fields. [Refer image]
  • Provide a value for the validity of the certificates in days(optional).
  • Update the value for Public Key Length as 2048 bits(recommended).
  • Click Generate CSR.
  • Two files namely SelfService.csr and SelfService.keystore will be created.
  • Note: The two files will be created at different locations.
    • SelfService.csr at <installation directory>webapps\adssp \Certficates\SelfService.csr
    • SelfService.keystore at <installation directory>jre\bin

Step 3: Submit the CSR to your certificate authority

  • Log in to Microsoft Certificate Services (https:\\server-name\certsrv).
  • Click Request a Certificate → Advanced Certificate Request.[Refer image]
  • Click Submit a certificate request by using a base-64-encoded CMC or PKCS #10 file, or submit a renewal request by using a base-64-encoded PKCS #7 file.
  • Paste the contents of your SelfService.csr file in the Saved Request field.[Refer image]
  • It's always recommended to open the CSR file from its native location using a text editor rather than opening from the browser.
  • When you copy the contents of SelfService.csr file, please ensure that no additional space from the end of the file is also copied along with it.
  • Set the certificate template as Web Server and click Submit.
  • In the Certificate Issued page that appears, select DER encoded. [Refer image]
    • Click Download certificate to download the certificate in CER file format.
    • Click Download certificate chain to download the certificates in a P7B file format,
  • Place the certificate files at <Install Directory>\jre\bin.
  • Note: Convert your certificate from CER to P7B format. Follow the steps given here.

Step 4: Import the CA signed Internal certificates to the keystore

  • Open an elevated command prompt and navigate to <Install Directory>\jre\bin.
  • Back up the SelfService.keystore file.
  • Execute the following command to import the internal certificate to keystore file :
    • Keytool -import -alias tomcat -trustcacerts -file certnew.p7b -keystore selfservice.keystore
  • Execute the following command to add your internal CA's root file to the list of trusted CAs in the Java cacerts file:
    • keytool -import -alias tomcat -keystore ..\lib\security\cacerts -file certnew.cer
  • Note: Use "changeit" as the password when you install the Chain Certificate.

Step 5: Bind the certificate with ADSelfService Plus

  • Copy the SelfService.Keystore file to <Install Directory>\conf.
  • Back up the server.xml and web.xml files.
  • Edit the server.xml file (at <Install Directory>\conf) by replacing the values of the following SSL connector tags :
    • "keystoreFile" with "./conf/SelfService.keystore".
    • "keystorePass" with the password you entered while generating CSR.
    • Eg: <Connector SSLEnabled="true" acceptcount="100" clientauth="false" connectiontimeout="20000" debug="0" disableuploadtimeout="true" enablelookups="false" keystorefile="./conf/selfservice.keystore" keystorepass="keystore_password" maxsparethreads="75" maxthreads="150" minsparethreads="25" name="SSL" port="9251" scheme="https" secure="true" sslprotocol="TLS" sslprotocols="TLSv1,TLSv1.1,TLSv1.2"> <connector>
  • Restart ADSelfService Plus and check if the certificates are installed correctly.

Request for Support

Need further assistance? Fill this form, and we'll contact you rightaway.

  • Name
  •  
  • Business Email *
  •  
  • Phone *
  •  
  • Problem Description *
  •  
  • Country
  •  
  • By clicking 'Submit' you agree to processing of personal data according to the Privacy Policy.
Highlights

Password self-service

Free Active Directory users from attending lengthy help desk calls by allowing them to self-service their password resets/ account unlock tasks. Hassle-free password change for Active Directory users with ADSelfService Plus ‘Change Password’ console. 

One identity with Single sign-on

Get seamless one-click access to 100+ cloud applications. With enterprise single sign-on, users can access all their cloud applications with their Active Directory credentials. Thanks to ADSelfService Plus! 

Password/Account Expiry Notification

Intimate Active Directory users of their impending password/account expiry by mailing them these password/account expiry notifications.

Password Synchronizer

Synchronize Windows Active Directory user password/account changes across multiple systems, automatically, including Office 365, G Suite, IBM iSeries and more. 

Password Policy Enforcer

Ensure strong user passwords that resist various hacking threats with ADSelfService Plus by enforcing Active Directory users to adhere to compliant passwords via displaying password complexity requirements.

Directory Self-UpdateCorporate Search

Portal that lets Active Directory users update their latest information and a quick search facility to scout for information about peers by using search keys, like contact number, of the personality being searched.

ADSelfService Plus trusted by

Embark on a journey towards identity security and Zero Trust