How to deploy Microsoft Lync Basic 2013 using Endpoint Central?
Description
This document provides you the steps required to deploy Microsoft Lync Basic 2013 to multiple computers using Endpoint Central.
Steps
To deploy Microsoft Lync Basic 2013, follow the steps given below:
Download the Installables
- Download the Microsoft Lync Basic 2013 from the following website:
Microsoft Lync Basic 2013 (64 Bit): http://www.microsoft.com/en-us/download/details.aspx?id=35450
Microsoft Lync Basic 2013 (32 Bit): http://www.microsoft.com/en-us/download/details.aspx?id=35451
Extract the Contents of the EXE
- Go to command prompt and navigate to the location where you have downloaded the installable
- Extract the contents of lyncentry.exe to the desired location: < storage location >\Lync2013Basic\setup.exe/extract:C:\Software\Lync2013Basic
For example: C:\lyncentry.exe /extract:C:\Software\Lync2013Basic
Customize the Installation
By using customization tool
- Go to command prompt and navigate to the location where you have downloaded the installable
- Invoke installation of Lync : C:\Software\Lync2013Basic\setup.exe /admin
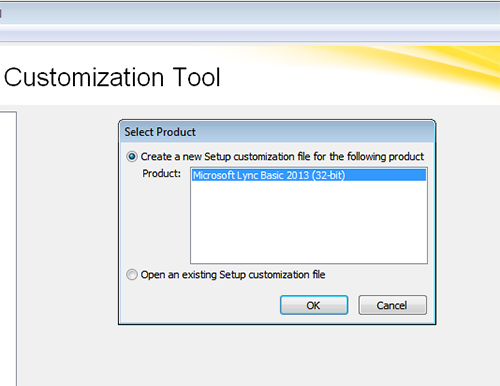
- Microsoft Office Customization Tool opens, select Microsoft Lync 2013 Basic (32-bit) and click OK

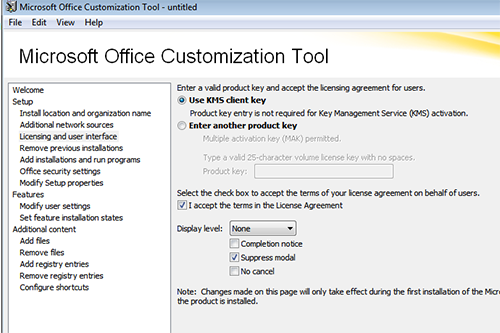
- Click License and user interface as mentioned below, accept the 'Terms and Conditions' in the license agreement. Ensure only Suppress Modal is enabled

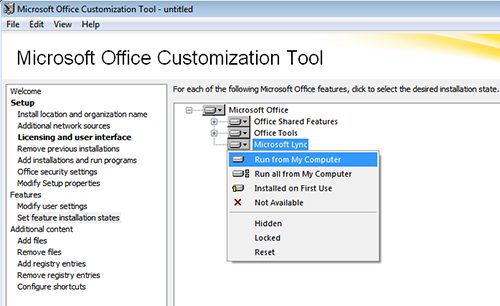
- Select Set feature installation states and choose Microsoft Lync. Click "Run from My Computer"

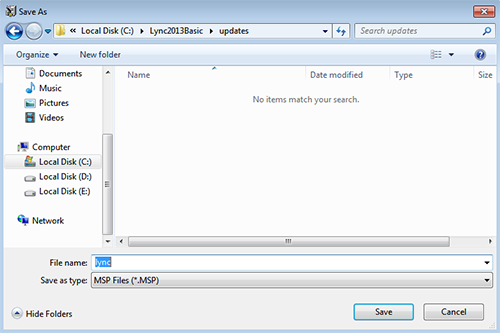
- The Customization Wizard creates a Microsoft transform (custom.msp) file, which needs to be stored in the same folder as Lync.exe file.

By editing config.xml file
1. Alternatively you can also deploy Lync by editing the config.xml file, Open the config.xml file from the extracted folder and the edit the file as given below,
<Configuration Product="LyncEntry">
<Setting Id="LYNC_STANDALONE" Value="yes" />
<Updates Enabled="FALSE"/>
<Display Level="none" CompletionNotice="no"
SuppressModal="yes" AcceptEula="yes"/>
<Setting Id="SETUP_REBOOT" Value="ReallySuppress" />
</Configuration>
2. Save the file, after making the customization changes.
Add the Software Package
To install from a network share, copy the files that you have extracted (as mentioned above), in the same structure to the network share. The network share should have read access to "Everyone" and "Authenticated Users" group.
- Click on Software Deployment Tab
- Click Add package
- Select the MSIEXEC/EXE/ISS/Command package type
- Choose Network Path/Http Path based on your requirement and Locate/Add the files
- Specify the installation command with switches/argumentsas
For deployment using custom.msp - "\\storage location\Lync2013\setup.exe" /adminfile "\\storage location\Lync2013\custom.MSP" For example,
"\\DC-machine1\Software\Lync2013\setup.exe" /adminfile "\\DC-machine1\Software\Lync2013\custom.MSP"
For deployment using config.xml - "\\storage location\Lync2013\setup.exe" /config "\\storage location\Lync2013\config.xml" For example, "\\DC-machine1\Software\Lync2013\setup.exe" /config "\\DC-machine1\Software\Lync2013\config.xml"
- Click Add Package
Create and Deploy the Configuration
- Select the package that you have added
- Click Install/Uninstall Software
- Enter a name and description for the configuration
- Define the package settings
- Configure the deployment settings
- Choose the target computers
- Specify the schedule options, if required
- Click Deploy
You have deployed Microsoft Lync Basic 2013 to the target computers.


