Support
 
Phone Live Chat
 
Support
 
US: +1 888 720 9500
US: +1 800 443 6694
Intl: +1 925 924 9500
Aus: +1 800 631 268
UK: 0800 028 6590
CN: +86 400 660 8680

Direct Inward Dialing: +1 408 916 9393



Service Pack
 
Close


close-but
  • How do I find my Build number?
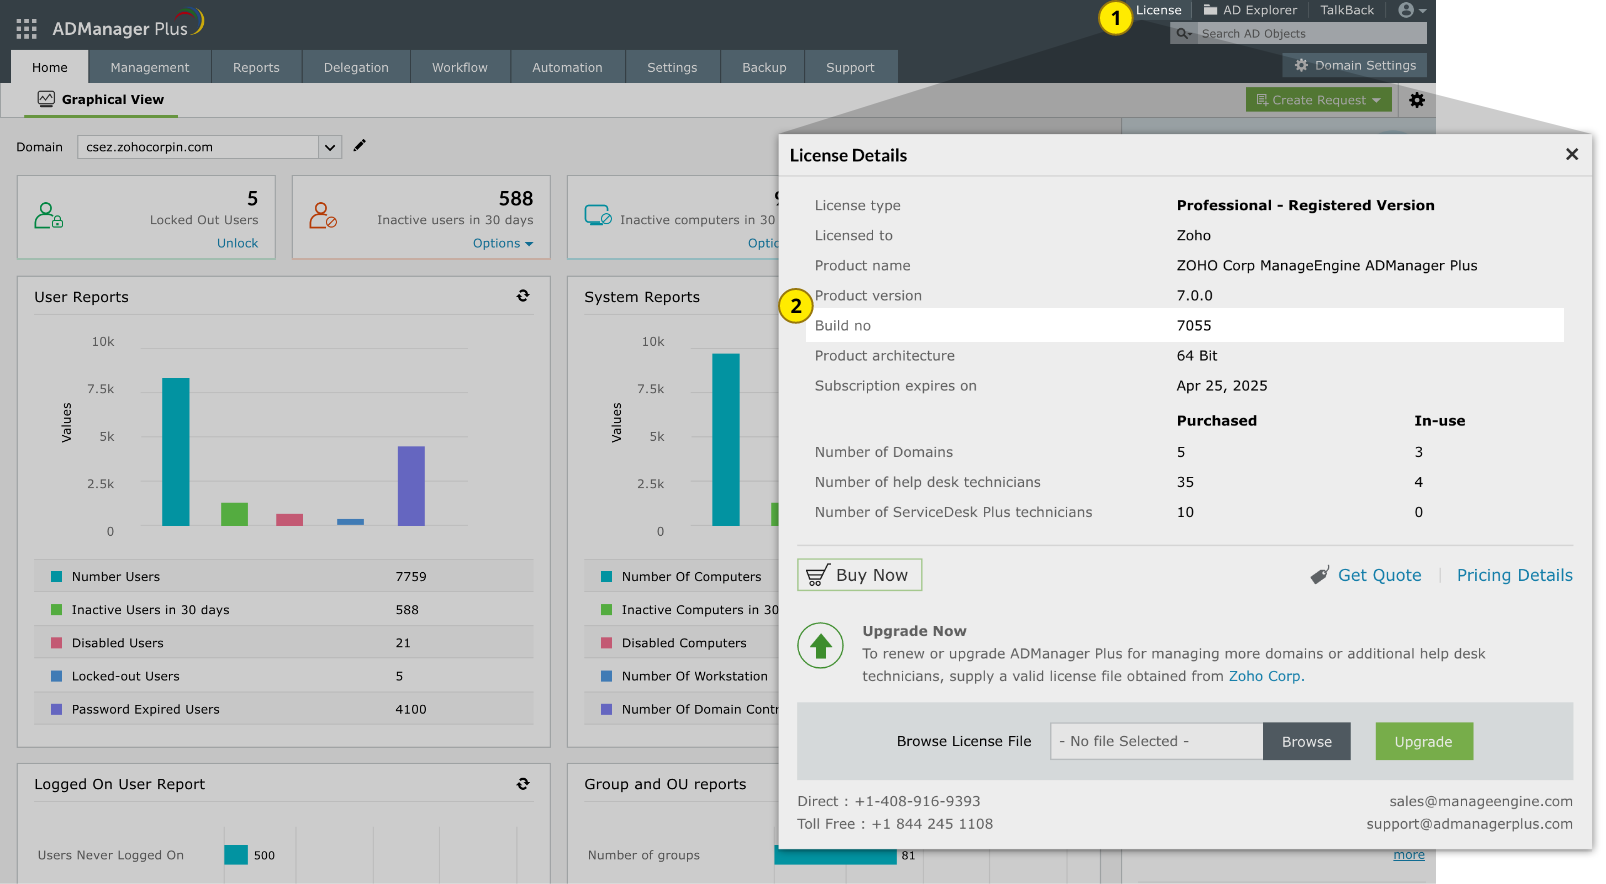
  • 1 Log in to the ADManager Plus web client, and click the "License" link in the top pane.
  • 2 Your ADManager Plus build number is mentioned below the "Product version".

ADManager Plus service pack installation

Note: We strongly recommend you to take backups before applying the service pack. This helps you prevent accidental loss of data.
     
  • Steps to upgrade to the latest build
  • Enter your current build number, click FIND, and follow the provided steps to upgrade.
  •  
  • Please contact our support team or fill this form for our support team's assistance in upgrading to the latest build number 7252
  • How do I find my build number?
If your build number is Update to build number SHA256 checksum hash value
7222 through 7251

Download and update to 7252

8bec3fa9ede46327de7134bde3ee102df841aeb3a6dc0255eab2c171442d8dd5

7203 through 7221

Download and update to 7222

898e35987adfc46ccfd5515894307f7984fd6ab5fae45fff9324eb6c3a145650

7102 through 7202

Download and update to 7203

3d96f8cb708aecb6f20609fb81acdc0ab7436b5df2f7b2110971e73762f2a5a4

7000 through 7101

Download and update to 7102

4763c9e1e5a0fafe10b0d921ed238b9c91d64a19356363596b176f98040c6894

6601 through 6660

Download and update to 7000

a89ff505042bcf5d0dbb8c4fe69192e12c0ecb30eb0e0b91fd4f2cd53d2323b2

6500 through 6591

Download and update to 6601

473e1022f98267404b9b82801f9bb7800bea2b7c56803d2587aa72fa719db8eb

Builds older than 6500

Please contact our support team or fill out this form for assistance in upgrading to the latest build number 7252

spack-arrow

Service pack installation steps:

Follow steps 1 through 8 to apply the service pack. If you have enabled High Availability, proceed with the steps after implementing the service pack. Alternatively, if you have enabled Load Balancing, follow these steps.
  1. Shut down ADManager Plus
    1. If the product runs as an application, click StartAll ProgramsADManager PlusStop ADManager Plus.
    2. If the product runs as a Windows service, click StartRun. Type services.msc and stop ManageEngine ADManager Plus.
  2. Execute the stopDB.bat file in the <ADManagerPlusHome>\bin directory.
  3. Back up ADManager Plus by zipping the contents of the <ADManagerPlusHome> directory.
  4. If you use Microsoft SQL as the database server for ADManager Plus, back up the database as well.
  5. Open the Command Prompt and execute the UpdateManager.bat file under the <ADManagerPlusHome>\bin directory.
    For Windows 7, Vista, 2008, and 2008 R2 machines with User Account Control enabled, select Run as Administrator while opening the Command Prompt.
  6. Click Browse and select the PPM file that you downloaded.
  7. Click Install for the service pack. Depending on the amount of data to be migrated, the installation procedure may take a few minutes. Please do not terminate prematurely.
    Note: For users installing builds 7222 and above, if you are facing the error Signature does not match with any available certificates, please import a valid certificate or contact support. You can download this certificate and import it using the Import Certificate button found at the top-right corner.
  8. Click CloseExit to quit the Update Manager tool.
  9. Start ADManager Plus.
Note: If you need to apply more than one service pack, follow the same instructions for each installation.
How to update ADManager Plus when high availability (HA) is enabled?
  1. Stop ADManager Plus
    • Stop ADManager Plus in both the primary and secondary servers.
    • In the secondary server, navigate to services.msc. Make sure the ADManager Plus service is stopped and the Startup Type is changed to disabled.
    • Ensure that the instance in the secondary server is accessible from the primary server. To verify the access rights, follow the steps provided below.
      • Log on to your secondary server.
      • Navigate to the installation directory of ADManager Plus.
      • Right-click the ADManager Plus folder and go to Properties > Sharing. Check if ManageEngineADManagerPlus is listed below Network Path.
      • If yes, go to the Security tab and verify if the service account configured to run the ADManager Plus service has Full control permission over the ADManager Plus installation folder.
      • If not, click Share, add the service account to the list, and grant Read/Write permission. Once done, go to Advanced Sharing > Add, enter ManageEngineADManagerPlus in the Share name field, and click Apply.
  2. Back up ADManager Plus' folder and database
    • In both primary and secondary servers, back up ADManager Plus by zipping the contents of the <ADManagerPlusHome> directory or, if it's a VM, by taking a snapshot of the server.

      Note: If you are using Microsoft SQL as ADManager Plus' backend database, connect to that server and back that up as well.

  3. Apply service pack in the primary server

    In the primary server,

    • Start Command Prompt as an administrator, navigate to the <ADManagerPlusHome>\bin directory, and execute the UpdateManager.bat file.
    • Next, browse and select the PPM file (service pack file).
      Note: For users installing builds 7222 and above, if you are facing the error Signature does not match with any available certificates, please import a valid certificate or contact support. You can download this certificate and import it using the Import Certificate button found at the top-right corner.
    • Click Install.

    Note: Applying the service pack in the primary server will automatically update the ADManager Plus version in the secondary server as well.

  4. Start ADManager Plus
    • Once the service pack installation is successful, start ADManager Plus in the primary server first, and then after a few minutes, in the secondary server.
    • In the secondary server, navigate to services.msc and change the Startup Type to automatic.
Note: If you need to apply more than one service pack, follow the same instructions for each installation.
How do I update ADManager Plus when Load Balancing is enabled?
  1. Stop ADManager Plus
    • Stop ADManager Plus in both the primary and secondary nodes.
  2. Back up the ADManager Plus folder and database
    • In both the primary and secondary nodes, back up ADManager Plus by zipping the contents of the <ADManagerPlusHome> directory or, if it's a VM, by taking a snapshot of the node.

    Note: If you are using Microsoft SQL as ADManager Plus' back-end database, connect to that node and back it up as well.

  3. Apply the service pack in the primary node
    • Apply the service pack in the primary node. After successfully applying it in the primary node, do not start the ADManager Plus service. Continue applying the service pack in all the secondary nodes one by one.
  4. Start ADManager Plus
    • Once the service pack installation is successful, start ADManager Plus in the primary node first, and then after a few minutes, in each of the secondary nodes.
How do I find my build number?
Log in to the ADManager Plus web client, and click License in the top pane. You will find the build number mentioned below the version number. This is the currently installed build number of ADManager Plus.
Need help?
You can contact ADManager Plus support at any time for assistance in updating ADManager Plus to the latest version.

ManageEngine named a customers choice 2023 for identity governance and Administration

ADManager Plus Trusted By

The one-stop solution to Active Directory Management and Reporting