Home » Creating Software Packages
 

Manual Package Creation for Windows

The fundamental step in software deployment is package creation. To install software on your network, you will require an installer package, which can be purchased from the vendor in the case of commercial software or downloaded from the vendor's website in the case of non-commercial software. The Silent Switches that need to be provided as the installation argument must be received from the vendor for automatic software installation without user interaction. Endpoint Central supports the following Windows executables: MSI, MSP, EXE, APPX, APPX Bundle, MSIEXEC, MSU, MSIX, and MSIX Bundle.


Software Repository

The created software packages are stored in a centralized location called the Software Repository. Endpoint Central supports two types of software repositories: Network Share and HTTP Repository.

The HTTP repository is recommended for storing created packages when deploying software to both roaming Agents and Agents within your network. It is configured by default after the Central Server installation.

The Network Share repository is recommended when deploying software to Agents within your local network. It needs to be configured based on your requirements, and the configured network share must be accessible to all Agents in order to access the stored software installers.

To learn more about Software Repositories, refer to this link.

Pre and Post-Deployment Activities

While creating software packages, you can configure certain activities to take place before and after the installation of the software; these are known as Pre and Post Deployment Activities.

Pre-deployment activities are configured to perform specific actions before the software is installed on the target computers or user accounts. For example, checking disk space on the target computer or verifying whether the software being deployed is already installed.

Post-deployment activities are configured to perform specific actions after the software installation is complete. Examples include setting environment variables, creating or deleting shortcuts, or managing ongoing processes related to the deployed software.

To learn more about Pre and Post Deployment Activities, refer to this link.

Creating Windows Manual Software Package

Follow the steps below to create a Windows manual package:

Windows package creation navigation
  1. In the Endpoint Central console, navigate to the Software Deployment tab > Package Creation > Packages > Add Package > Windows
  2. Give an appropriate name for your package in the Package Name field.
  3. Based on the software that you are creating, select the Package Type as MSI/MSP, if you are creating an MSI or MSP package and select the package type as EXE/APPX/MSIEXEC/MSU/MSIX/MSIX Bundle, if you are creating an EXE or APPX or MSIEXEC or MSU or MSIX or MSIX Bundle package.
  4. Select the License Type as Commercial or Non-commercial based on the software.
  5. If you are deploying the software package from the Network Share repository, select From Shared Folder under Locate Installable. If you are deploying the software package from the HTTP Repository, select From Local Computer and upload the software installable by clicking the Browse option.
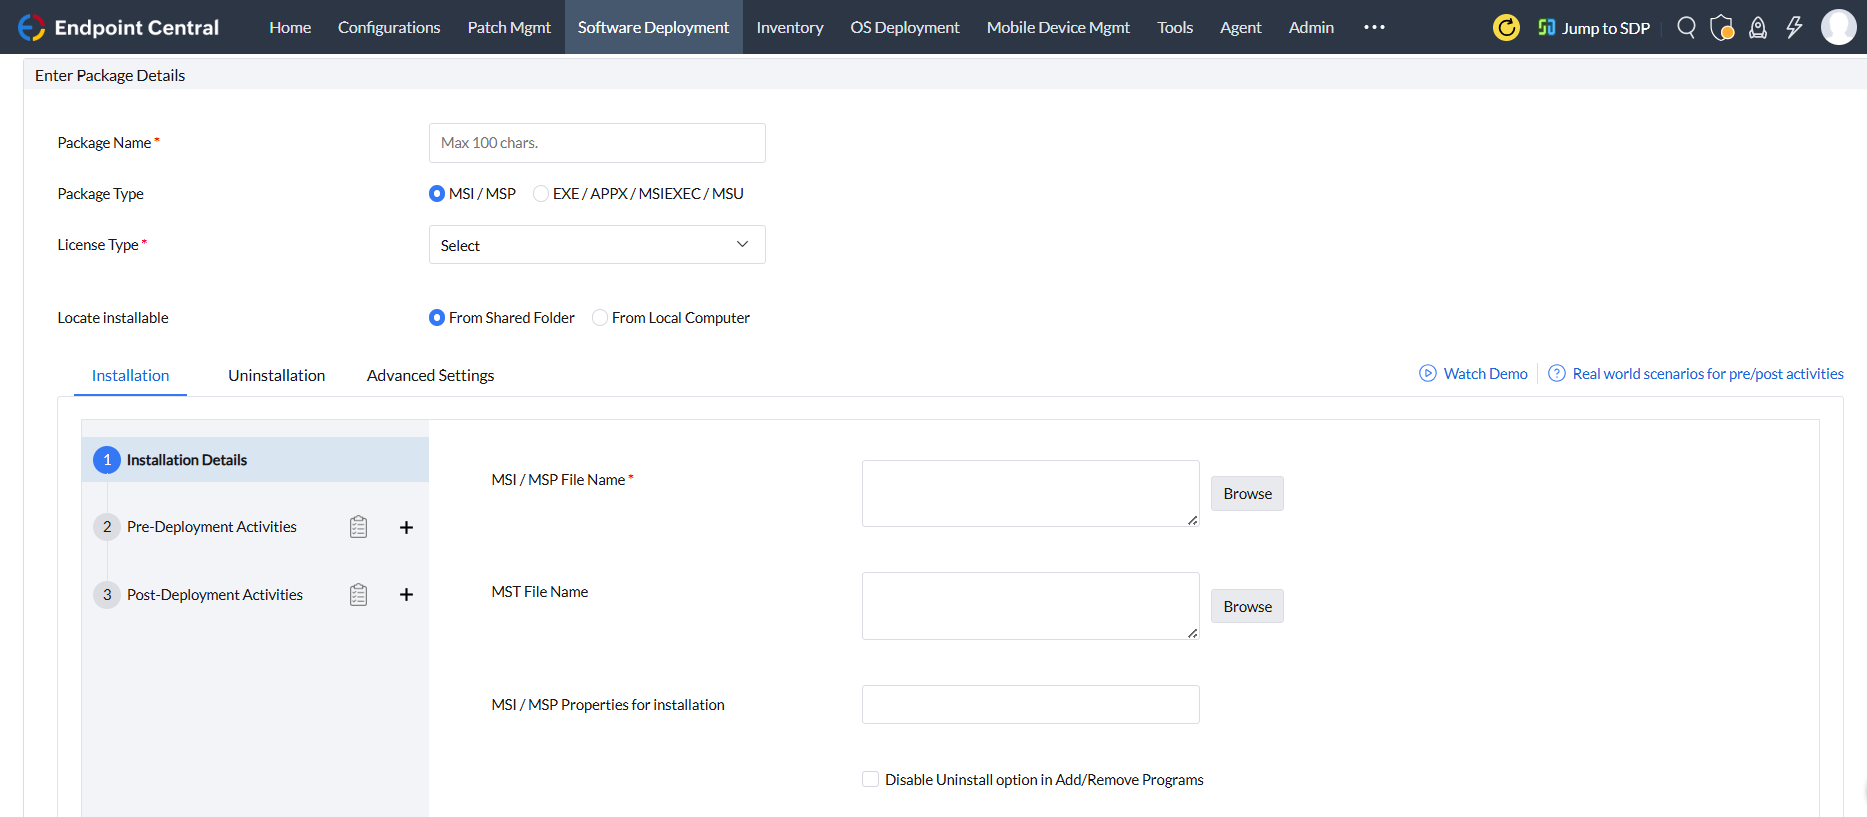
  6. Windows MSI package creation
  7. For MSI or MSP Installation:
    • For MSI or MSP, provide the installation commands under MSI/MSP File Name. Refer the below table for the installation commands.
    • If the deployment has any Transformation file dependencies, provide the files under MST File Name.
    • Provide the properties for installation if any under MSI/MSP Properties field. Kindly refer this link for information about the MSI/MSP properties.
    • Kindly note that multiple Properties should be given with space separating them.
    For MSI or MSP Uninstallation:
    • For MSI or MSP package the uninstallation switches are the same as the given MSI/MSP file in the installation field. The given MSI/MSP file under Installation will be automatically given as the uninstallation command.
    • Provide the properties for the package if any under the MSI/MSP Properties for uninstallation. Kindly refer this link for information about the MSI/MSP properties.
    • Kindly note that multiple Properties should be given with space separating them.
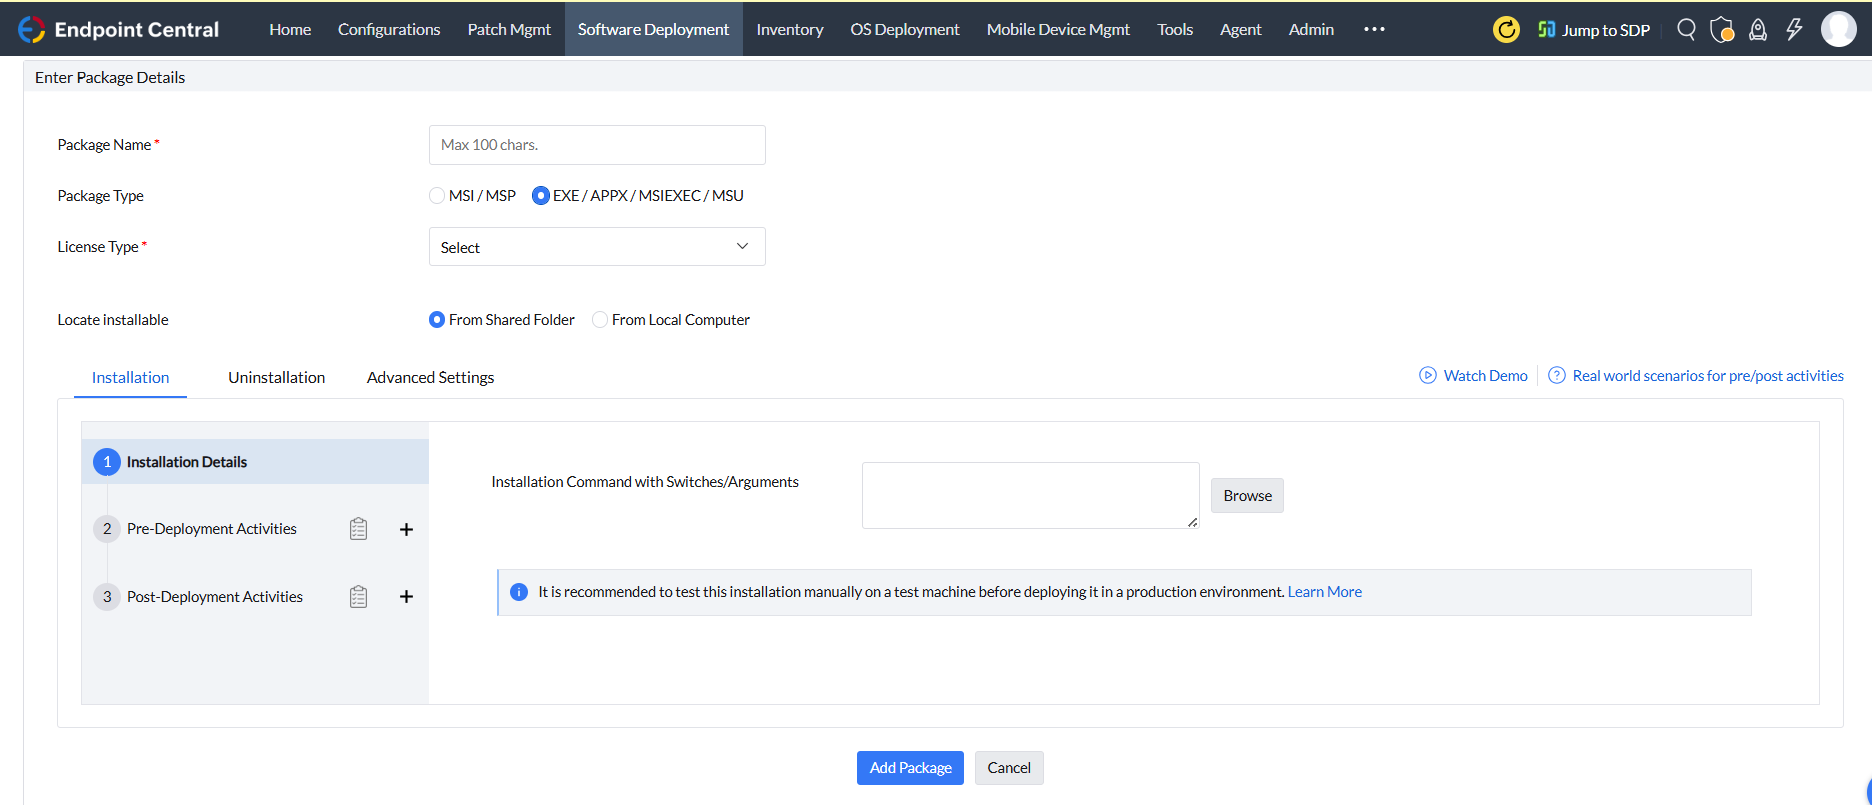
    Windows EXE package creation
    For EXE/APPX/MSIEXEC/MSU/MSIX/MSIX Bundle Installation:
    Provide the installation command in the Installation Command with Switches/Arguments field. Refer the below table for the installation commands.

    For EXE/APPX/MSIEXEC/MSU/MSIX/MSIX Bundle  Uninstallation:
    Provide the uninstallation command in the Uninstallation Command with Switches/Arguments field. Refer the below table for the uninstallation commands.
    Kindly note that the Silent Switches must be received from the Vendor for proper silent deployment.
  8. Configure the Pre-Deployment and Post-Deployment Activities for both Installation and Uninstallation based on your requirement.
  9. Under Advanced Settings, provide the below as per your requirement:
    Under Advanced Option:
    • Exit Code 
    • Architecture
    • Maximum Time Limit for Installation(Hours)
    Under Package Properties:
    • Application Name
    • Version
    • Vendor
    • Language
    • Package Description
  10. Click on Add Package to create your Windows manual software package.

Supported Executables and Switch Arguments

Executable Network Share Command HTTP Command
EXE

For Installation


"\\<Share Path>\<installerfilename.exe>" /s


For Uninstallation

"\\<Share Path>\<uninstallerfilename.exe>" /s

For Installation


installerfilename.exe /s


For Uninstallation


uninstallername.exe /s

MSI

For Installation


"\\Share Path\installerfilename.msi"


For Uninstallation

"\\Share Path\installerfilename.msi"

For Installation


installerfilename.msi


For Uninstallation


installerfilename.msi

MSP

For Installation


"\\Share Path\installerfilename.msp"


For Uninstallation

"\\Share Path\uninstallerfilename.msp"

For Installation


installerfilename.msp


For Uninstallation


uninstallername.msp

APPX

For Installation


"\\Share Path\installerfilename.appx"


For Uninstallation

Not Supported

For Installation


installerfilename.appx


For Uninstallation

Not supported

Appx Bundle

For Installation


"\\Share Path\installerfilename.appxbundle"


For Uninstallation

Not Supported

For Installation


installerfilename.appxbundle


For Uninstallation

Not Supported

MSIEXEC

For Installation


"msiexec /i "\\Share Path\ installerfilename.msi"


For Uninstallation

"msiexec /x "\\Share Path\installerfilename.msi"

For Installation


msiexec /i "intstallerpath\installerfilename.msi" /qn


For Uninstallation


msiexec /x "intstallerpath\installerfilename.msi"

MSU

For Installation


"\\Share Path\installerfilename.msu"


For Uninstallation

"\\Share Path\uninstallerfilename.msu"

For Installation


installerfilename.msu


For Uninstallation


uninstallername.msu

MSIX

For Installation


"\\Share Path\installerfilename.msix"


For Uninstallation

Not Supported

For Installation


installerfilename.msix


For Uninstallation

Not Supported

MSIX Bundle

For Installation


"\\Share Path\installerfilename.msixbundle"


For Uninstallation

Not Supported

For Installation


installerfilename.msixbundle


For Uninstallation

Not Supported

Modifying the Package

The created packages can be modified based on your requirement. Follow the below steps to modify the package:

Windows modify package
  • In the Endpoint Central console, navigate to the Software Deployment tab > Package Creation > Packages.
  • Select the software package you wish to modify.
  • In the Actions column select the three dots icon and select the Modify option to proceed with your modifications.

Saving the Package As

The created packages can be saved as a new package in case of package duplication requirement. Follow the below steps to duplicate the package:

Windows save as package
  • In the Endpoint Central console, navigate to the Software Deployment tab > Package Creation > Packages.
  • Select the software package you want to duplicate.
  • In the Actions column select the three dots icon and select the Save package as option and perform the required changes and save the package.

Deleting the Package

The created packages can be deleted based on your requirement. Follow the below steps to delete the package:

Windows delete package
  • In the Endpoint Central console, navigate to the Software Deployment tab > Package Creation > Packages.
  • Select the software package you want to delete and click on the Delete Packages option.

The selected packages will not be deleted in the following scenarios:

  • When the selected packages are in use in any Configuration. To delete these packages, you must delete the configuration to proceed with the package deletion.
  • When the selected packages are published in the Self Service Portal. To delete the selected packages, you must disassociate the packages from the Self Service Portal. To learn about how to disassociate the package from the Self Service Portal, refer to this link.
  • When the selected packages are in use in any User-defined Templates. To delete these packages, you must delete the user-defined templates to proceed with the package deletion.