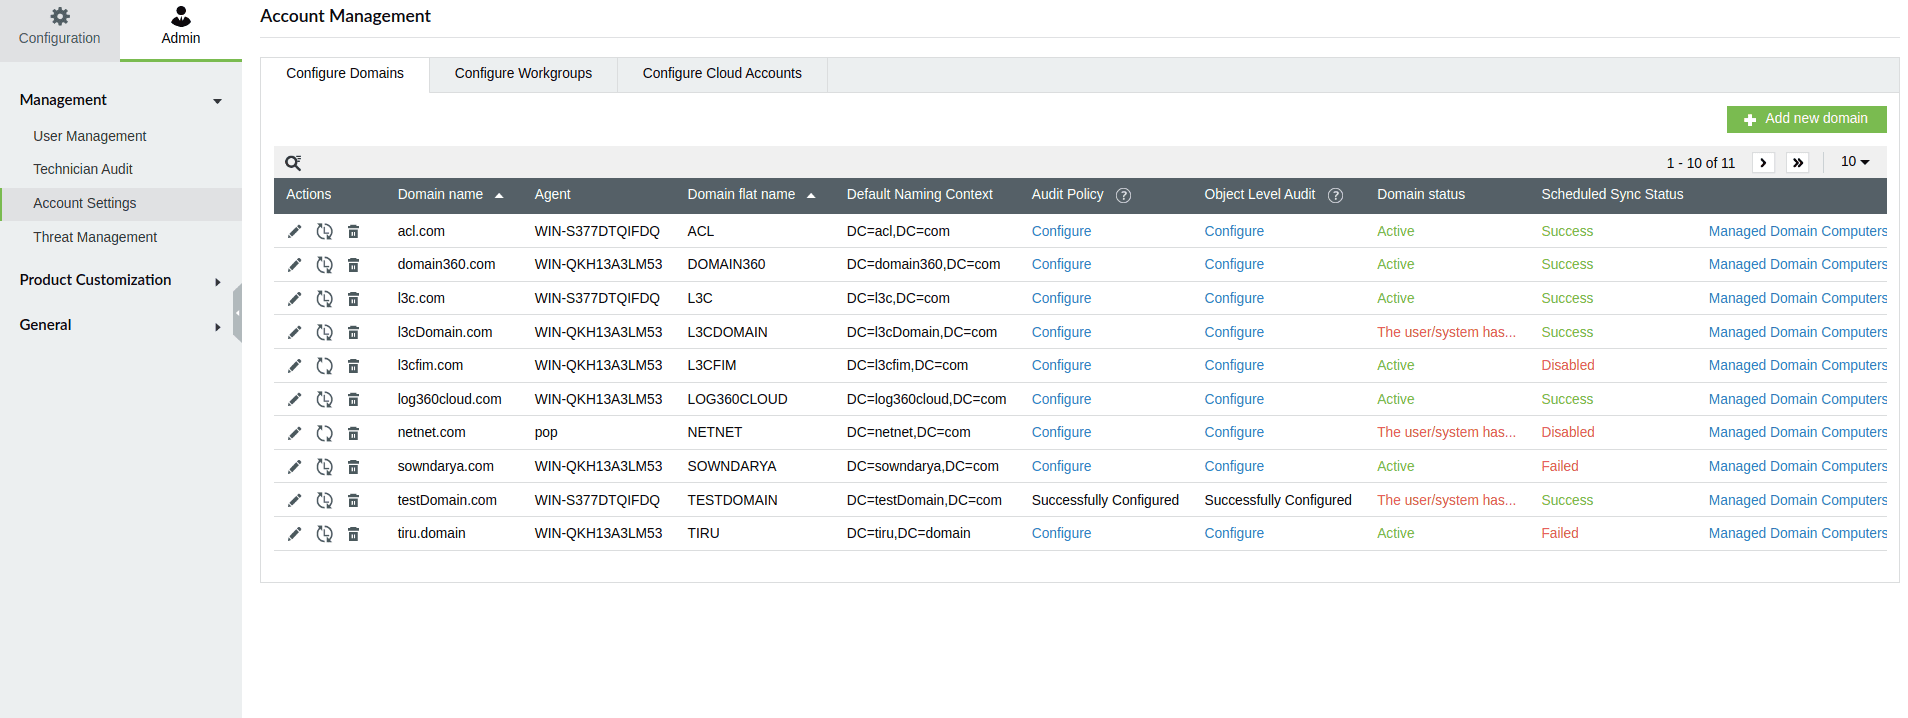
Account Management
Domains
- Adding a Domain
- Update a Domain
- Reload domain objects
- Configuring object level auditing
- Configuring audit policies
- Schedule reload domain objects
- Managed Domain Computers
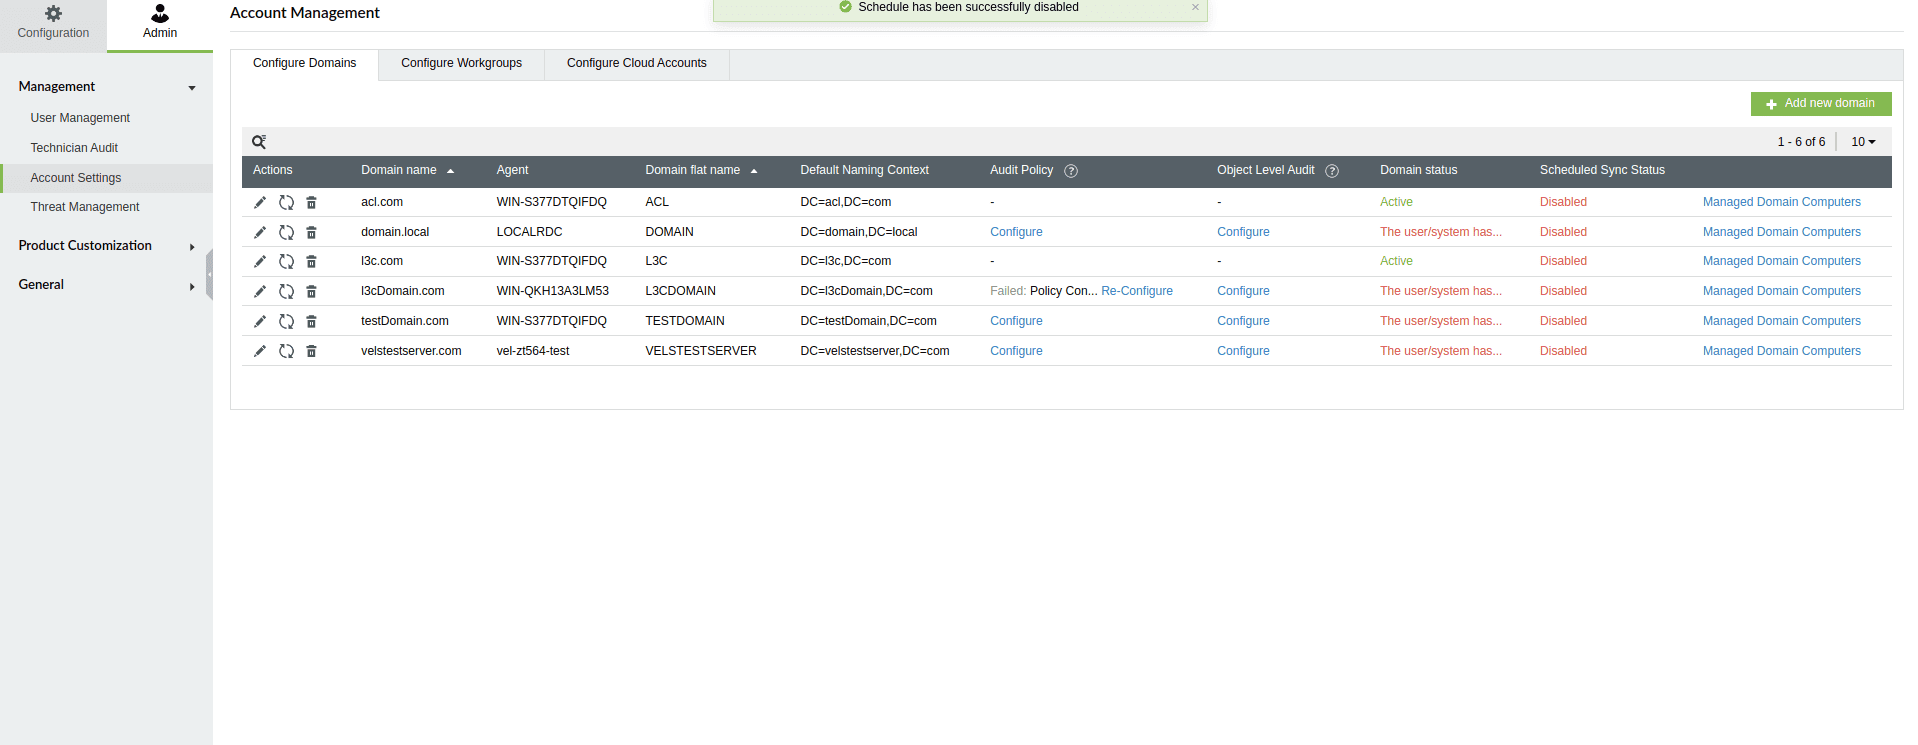
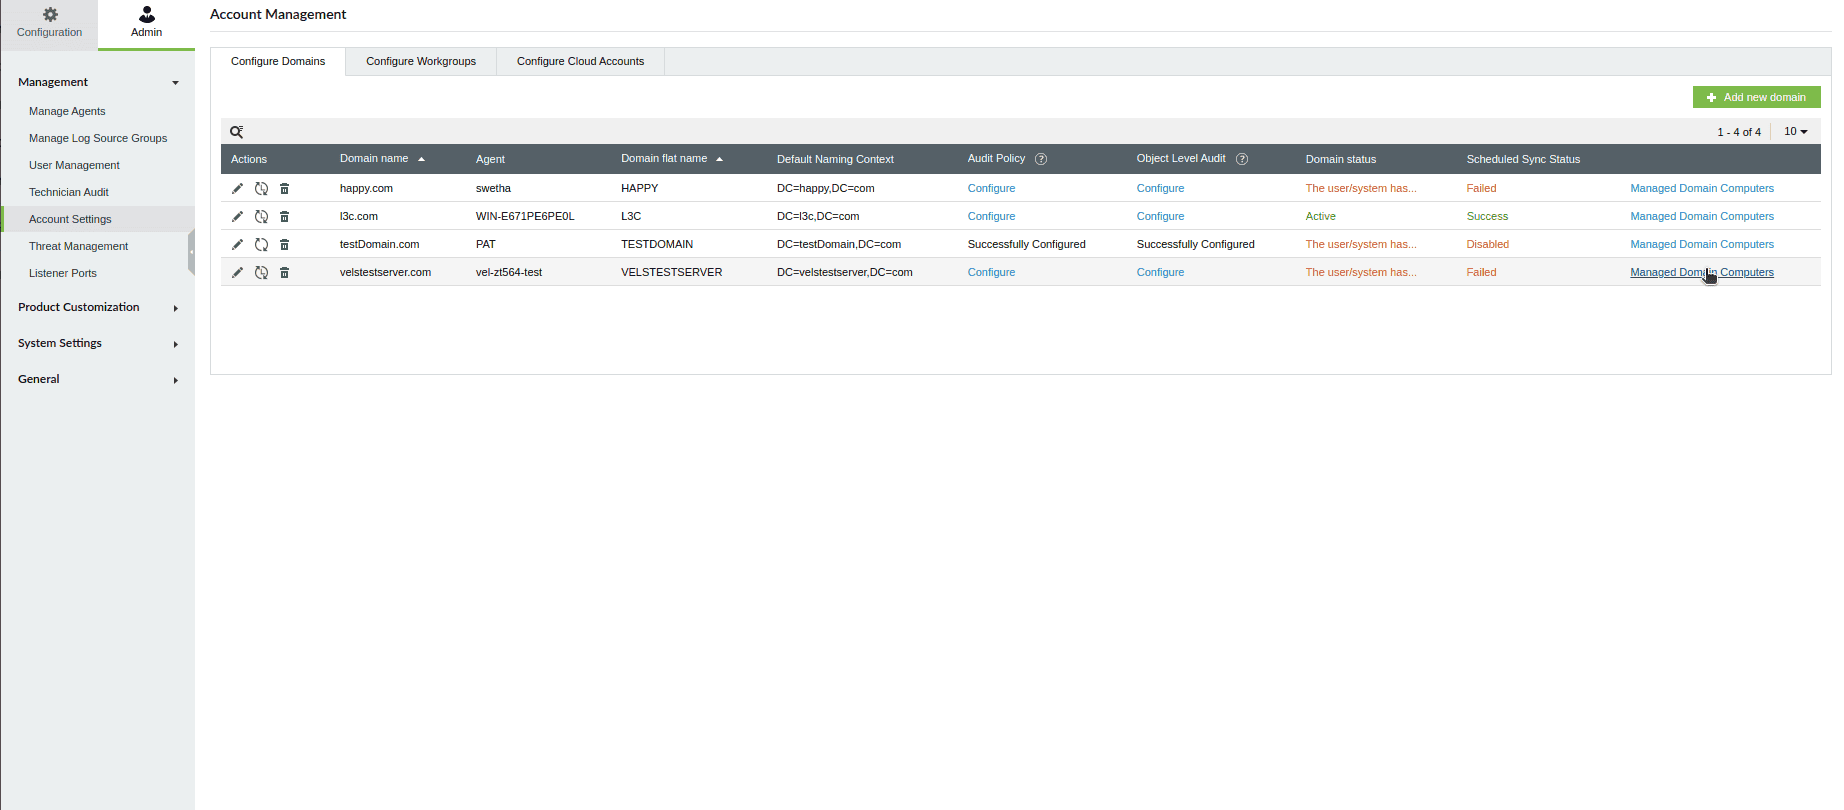
Domains and Workgroups page lists all the Active Directory domains and workgroups discovered by Log360 Cloud Agent. You have the option to update, reload and delete a domain by clicking on the respective icons.
Adding a Domain
To add a new domain, follow the steps given below.
- Open Log360 Cloud and select the Settings tab. Then, navigate to Account Settings under Admin.

- Choose the Configure Domains tab and click the + Add new domain button. This will open the Add Domain window.

- Choose a Agent and provide a desired Domain Name in the respective fields.
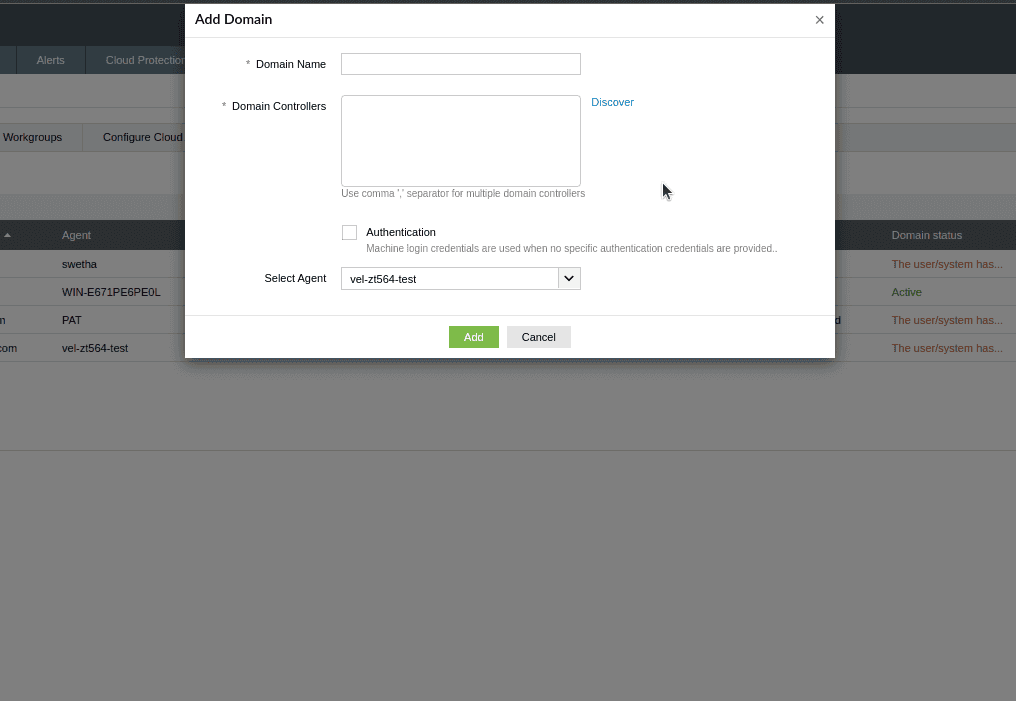
- Enter the desired Domain Controllers in the given field. Use comma ',' separator for entering multiple domain controllers. Alternatively, you may click on Discover to auto-discover the domain controllers.
- If you select Authentication you will need to provide the credentials (Login Name and Password) with admin privileges. Note that the agent login credentials are used when no authentication credentials are provided.
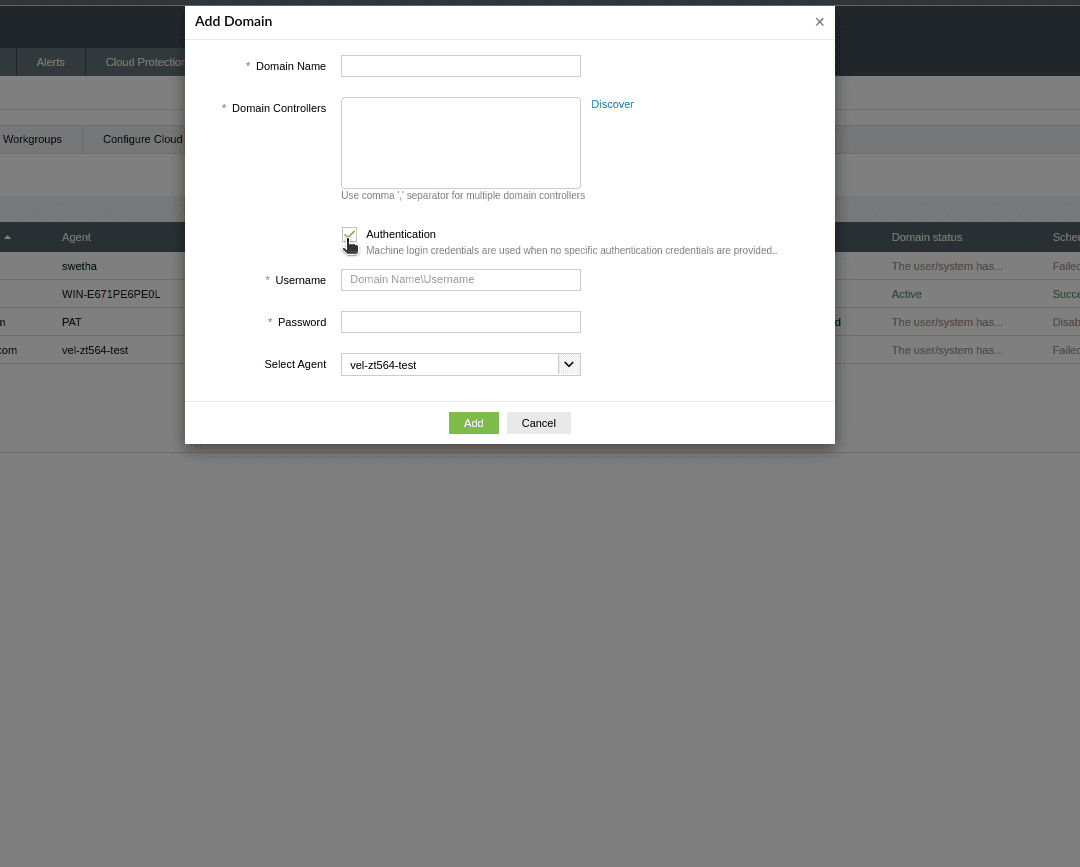
- Click the Add button.
Update a Domain
To update a domain, follow the steps given below.
- Open Log360 Cloud and select the Settings tab. Then navigate to Domains and Workgroups under Configuration.
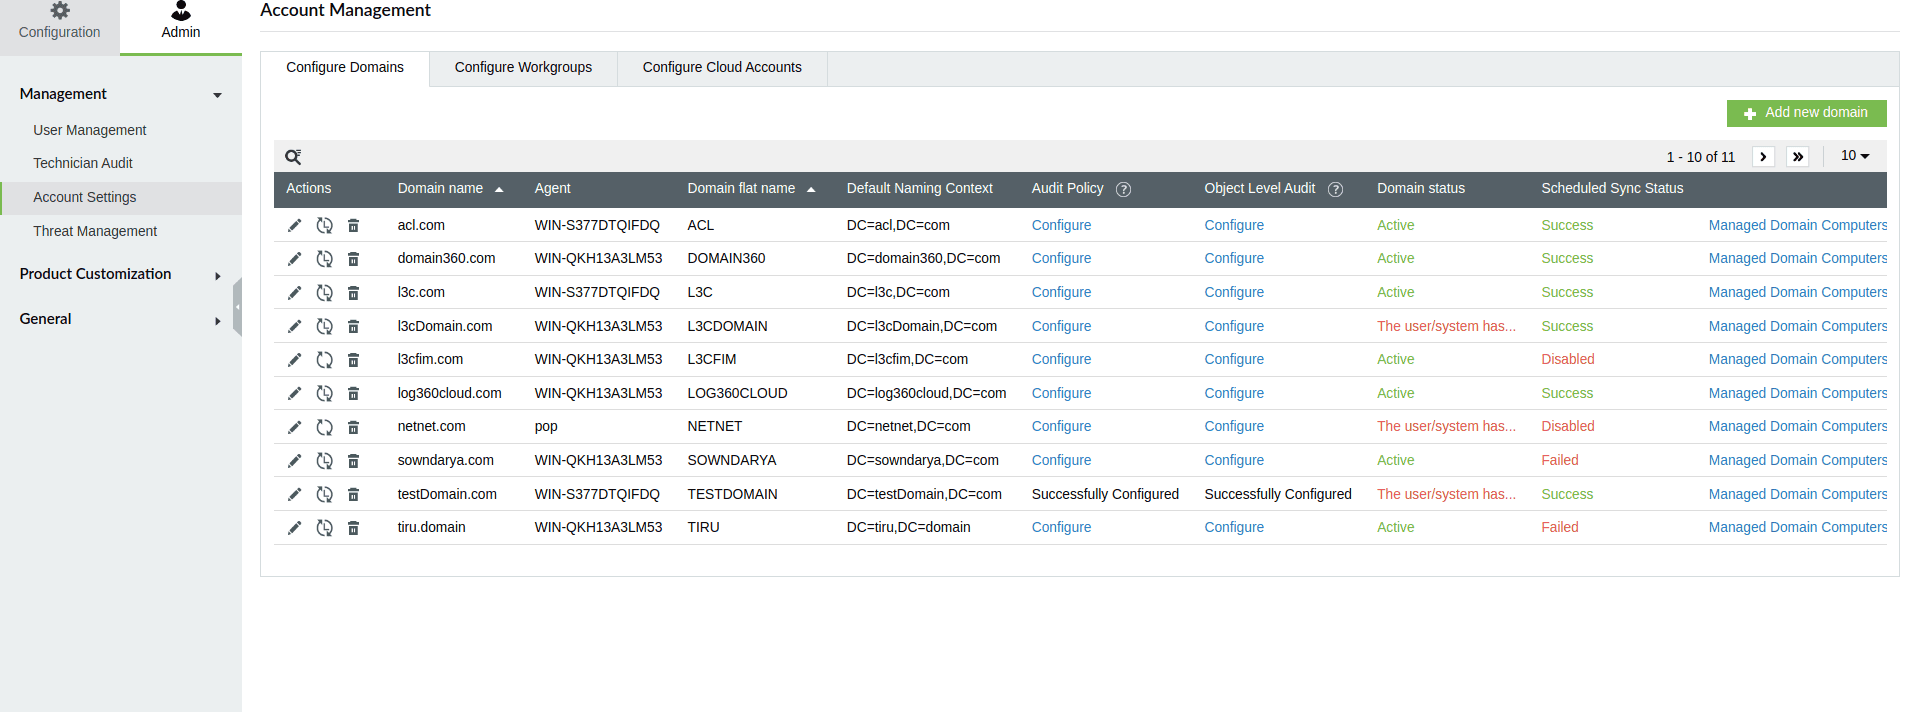
- Choose the Configure Domains tab and click the
 icon corresponding to the desired domain.
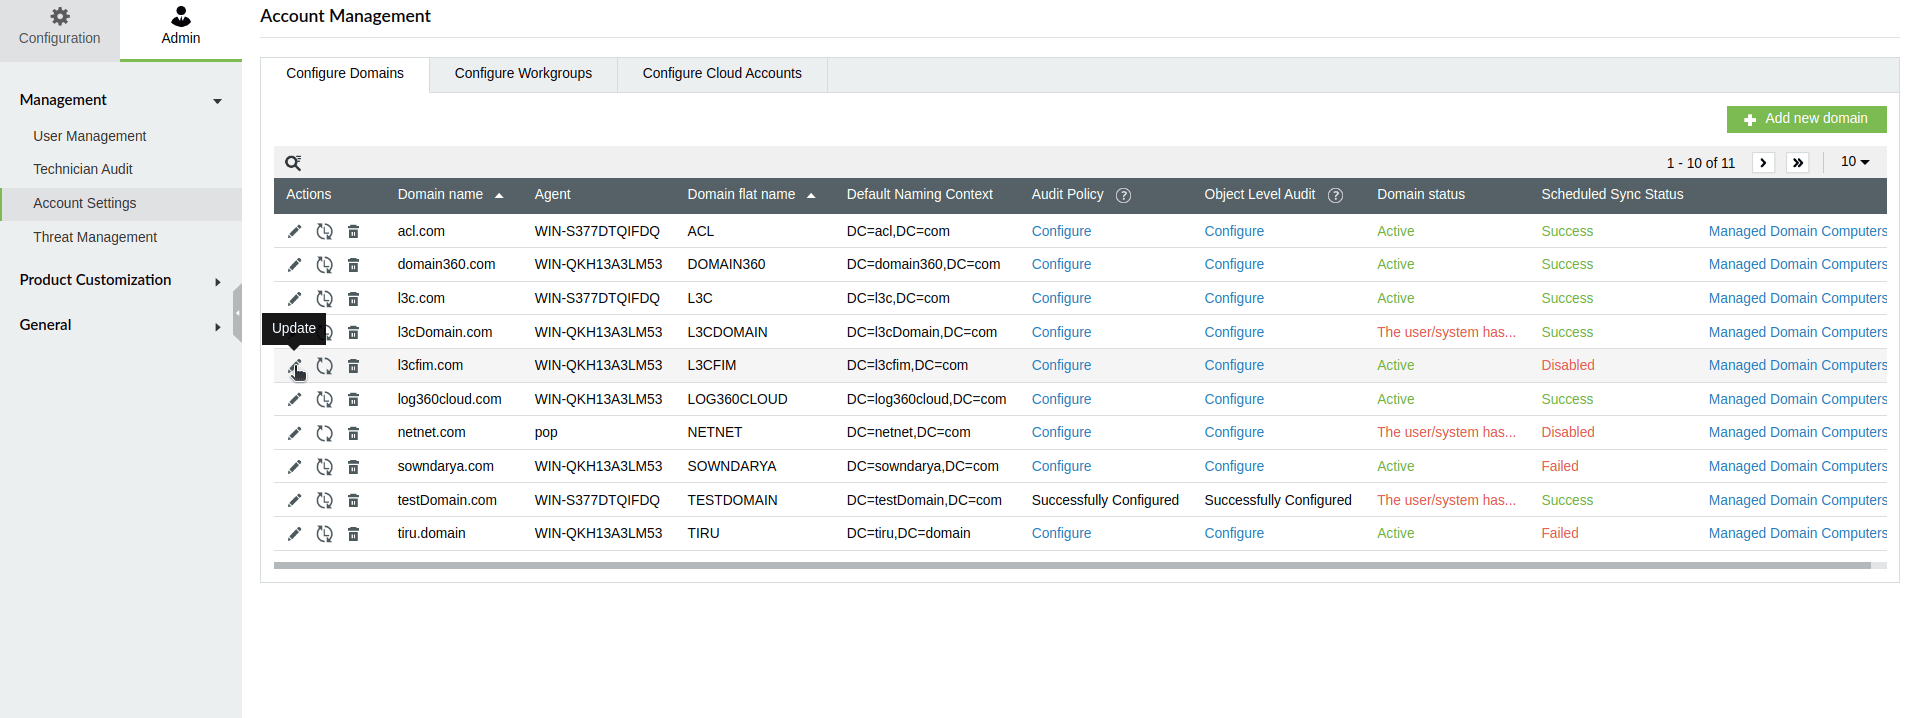
- In the window that pops-up, choose a Agent from the drop-down list.

- Enter the desired Domain Controllers in the given field. Use comma ',' separator for entering multiple domain controllers. Alternatively, you may click on Discover to auto-discover the domain controllers.
- To modify the authentication credentials, tick the box corresponding to Authentication and provide a Username and Password in the respective fields. Note that the agent login credentials are used when no authentication credentials are provided.
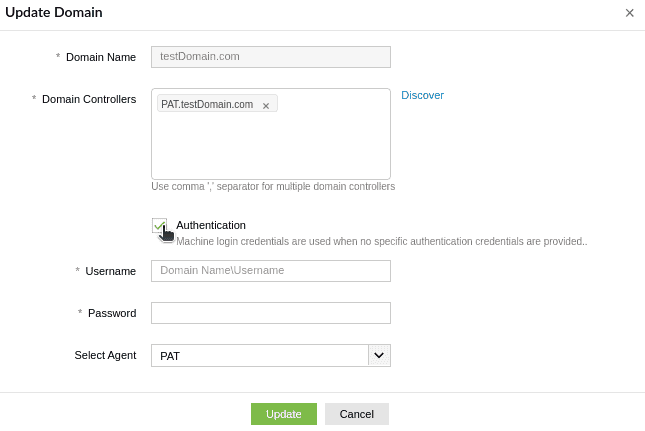
- After making the desired modifications, click the Update button.
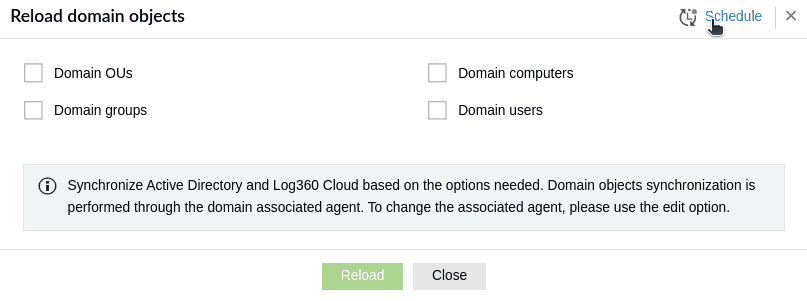
Reload domain objects
To reload domain objects in a domain, follow the steps given below.
- Open Log360 Cloud and select the Settings tab. Then navigate to Domains and Workgroups under Configuration.

- Choose the Configure Domains tab and click the
 icon corresponding to the desired domain.
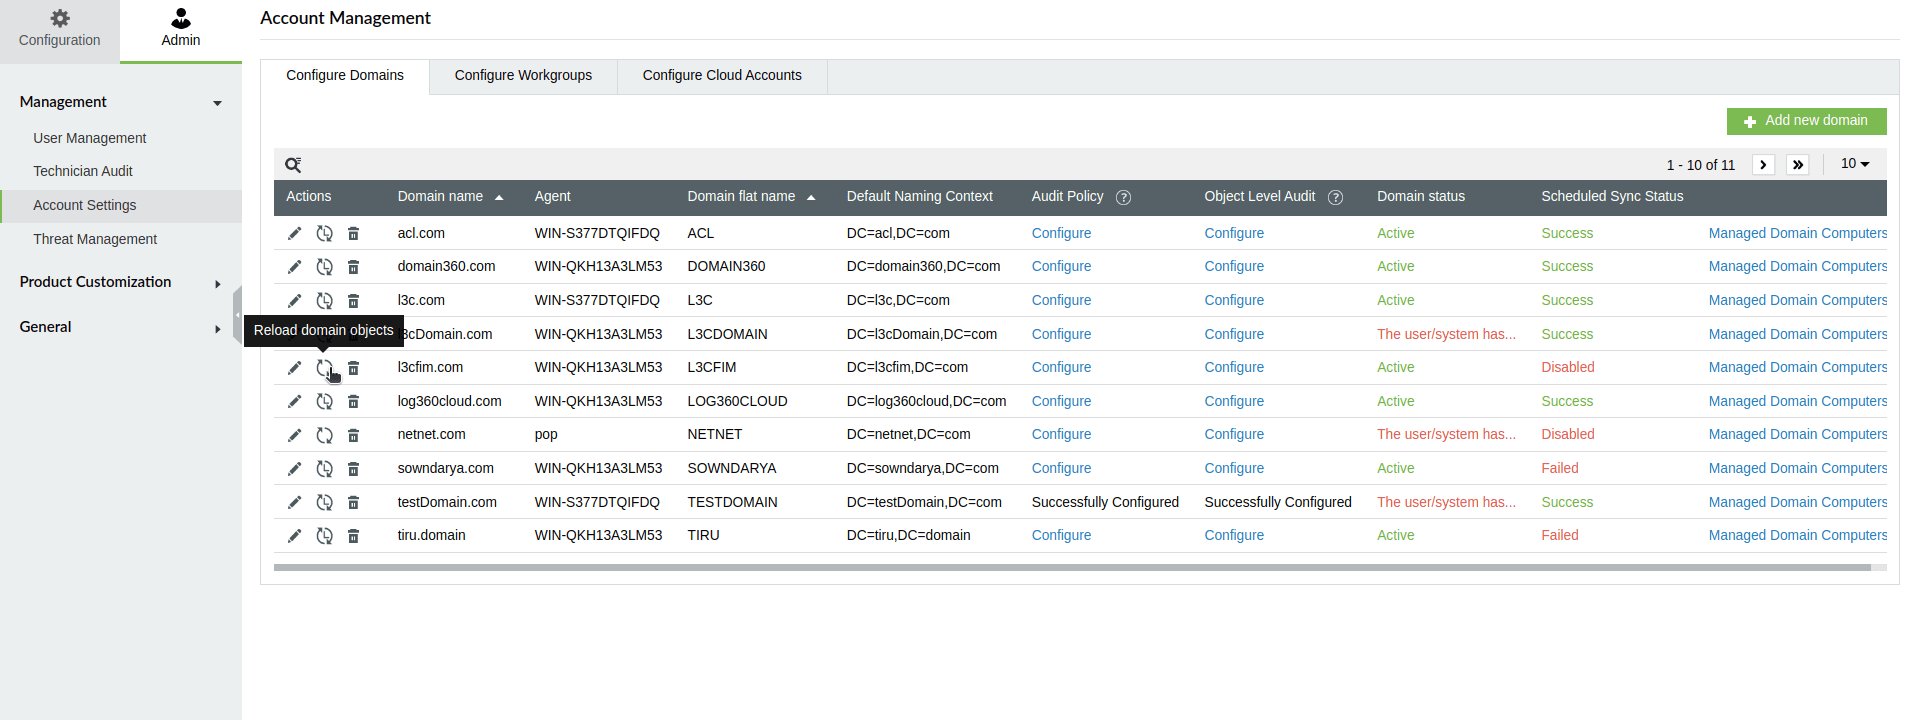
- In the window that pops-up, select the required objects and click Reload.
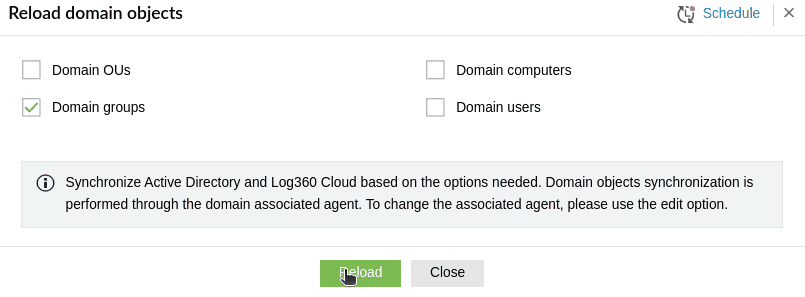
Now the domain objects will be reloaded successfully.
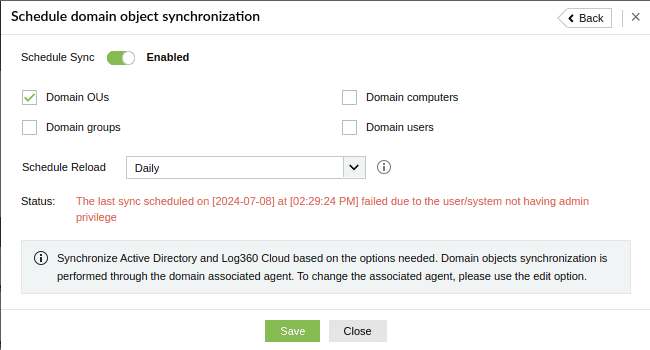
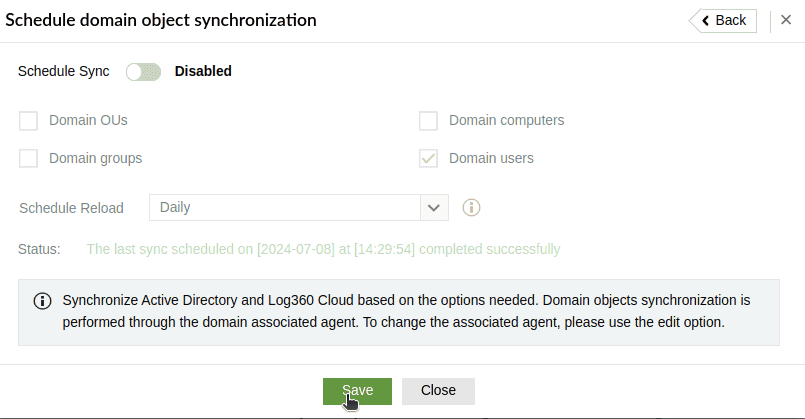
Schedule reload domain objects
To configure schedule reload domain objects, follow the steps below.
- Open Log360 Cloud and select the Settings tab. Then navigate to Account Settings under Admin
- Choose the Configure Domains tab and click the reload icon to open the reload domain objects.
- Then, click on the Schedule icon to go to the schedule domain objects synchronization page. The schedule icon will turn green
 if the scheduler is previously enabled for that domain, or else it will turn red
  .
.
- To configure the page, enable the Schedule Sync toggle icon.
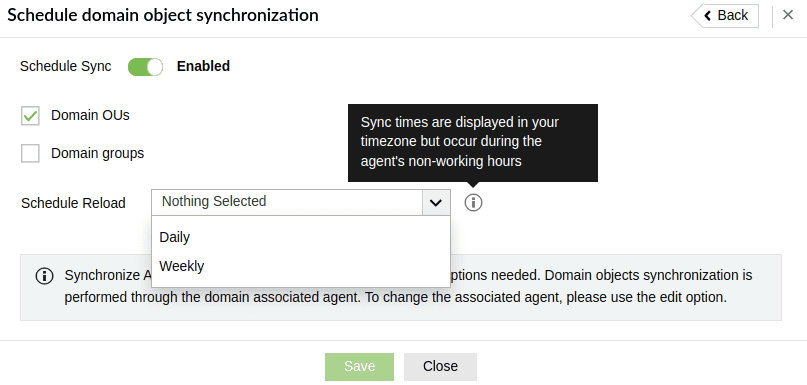
- Fill in the required details and click on Save.

- Monitor the 'Scheduled Sync Status' column for updates. This column displays the latest sync status: 'Success,' 'Failed,' or 'Scheduled Sync.' If a sync is scheduled during working hours, it will activate, and the initial sync will take place at the next available time outside working hours. The status will appear as 'Scheduled Sync' until the first sync completes. If scheduled outside working hours or on a non-working day, the first sync initiates immediately. The status will then update to 'Success' or 'Failed' based on the outcome.
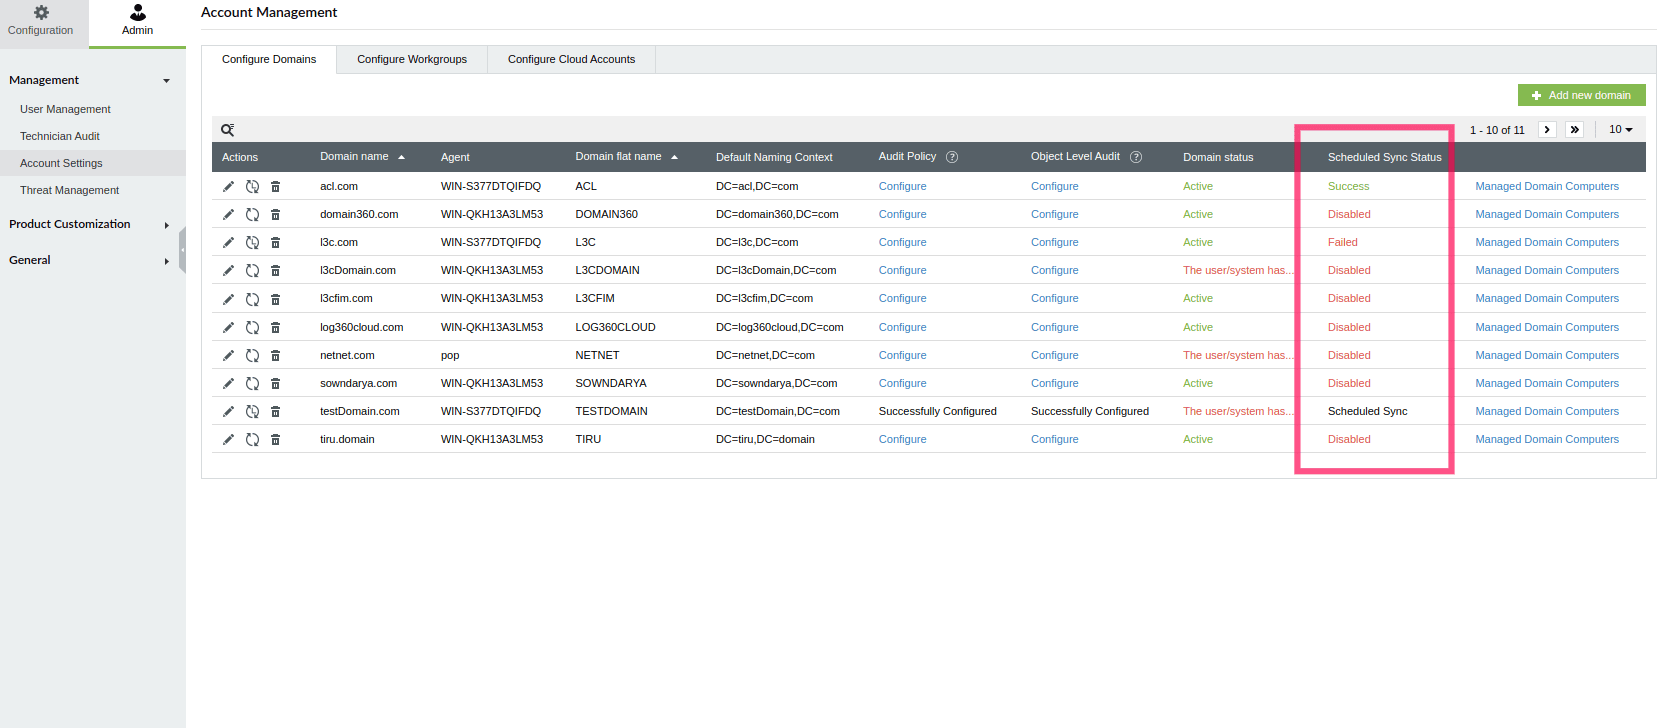
- Detailed information is available on the Scheduled Domain Objects Synchronization page, including the time, date, and status of the last sync, and causes for any failure.

- If the scheduler is enabled successfully, the icon changes from to
 .
.
- You can disable the scheduled sync by toggling off the icon in the Schedule domain object synchronization page.
Note:
- Only one schedule can be created per domain.
- If a domain is being configured, users will receive a warning message when they try to set up another schedule. Schedule configuration is disabled until the current configuration completes.
- Scheduled sync runs during the non-working hours of the agent's machine. The displayed time in the UI is converted to the user's time zone set on the Accounts Page.
- If "00:00 to 24:00" (full day) working hours are configured, the scheduler operates regardless of working hours.
- Once a schedule is configured, syncs run according to the working hours set at that time. Updating working hours will adjust subsequent scheduled syncs accordingly.
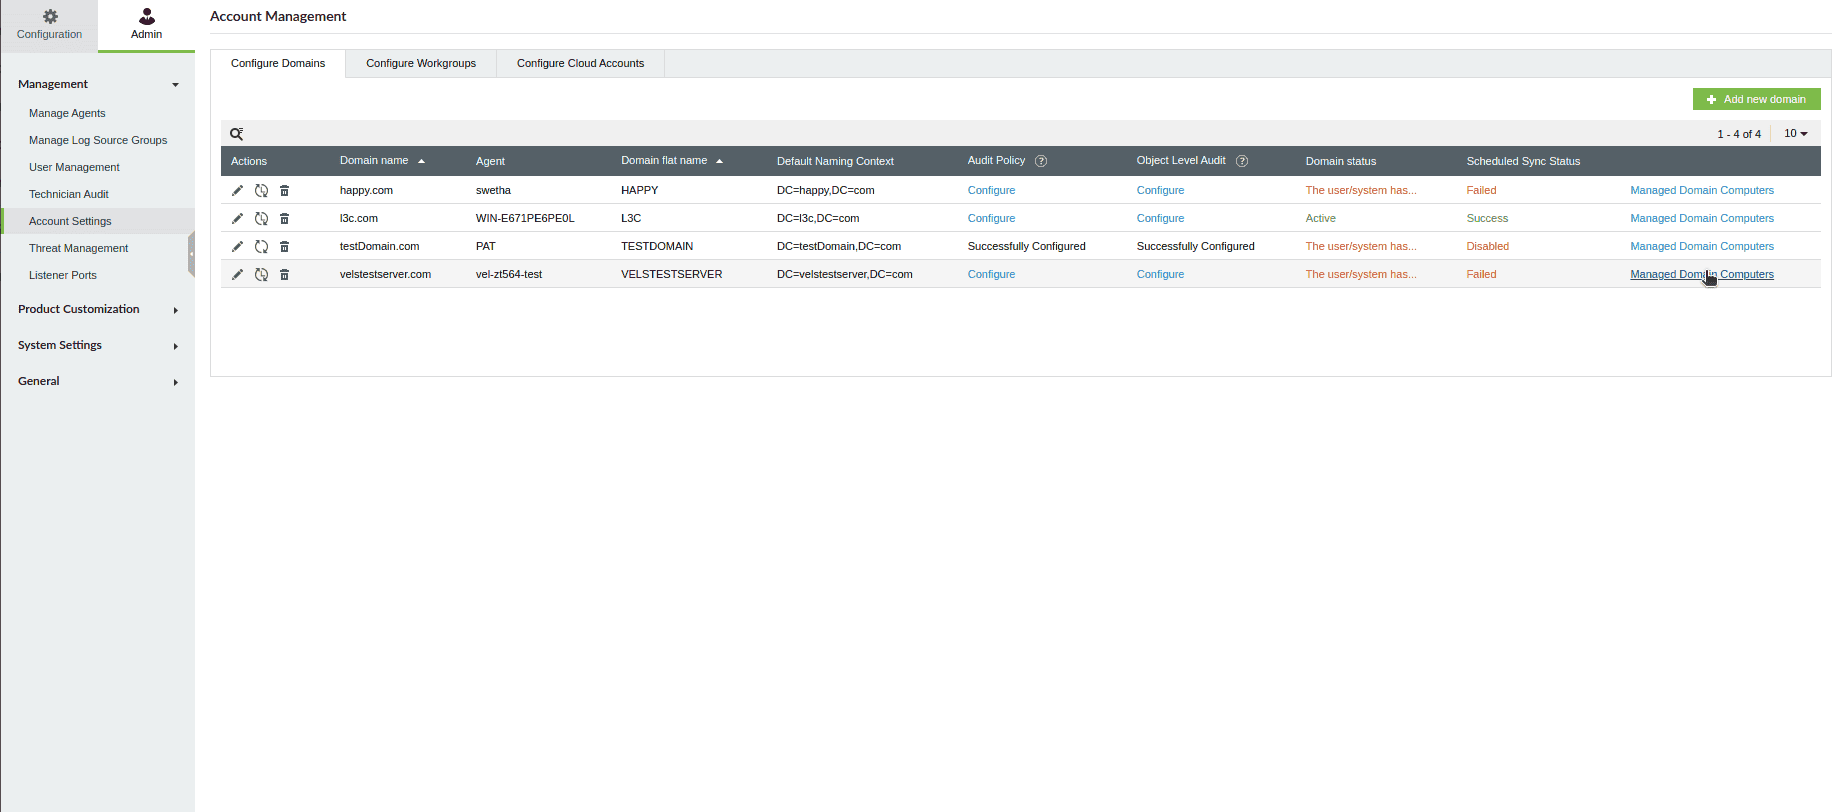
Managed Domain Computers
Log360 Cloud allows users to easily view all the devices configured within their account settings, including domain controllers, member servers, and workstations. With this enhanced domain settings, users can access detailed information about each device, filter them based on their roles, and manage devices that are yet to be configured.
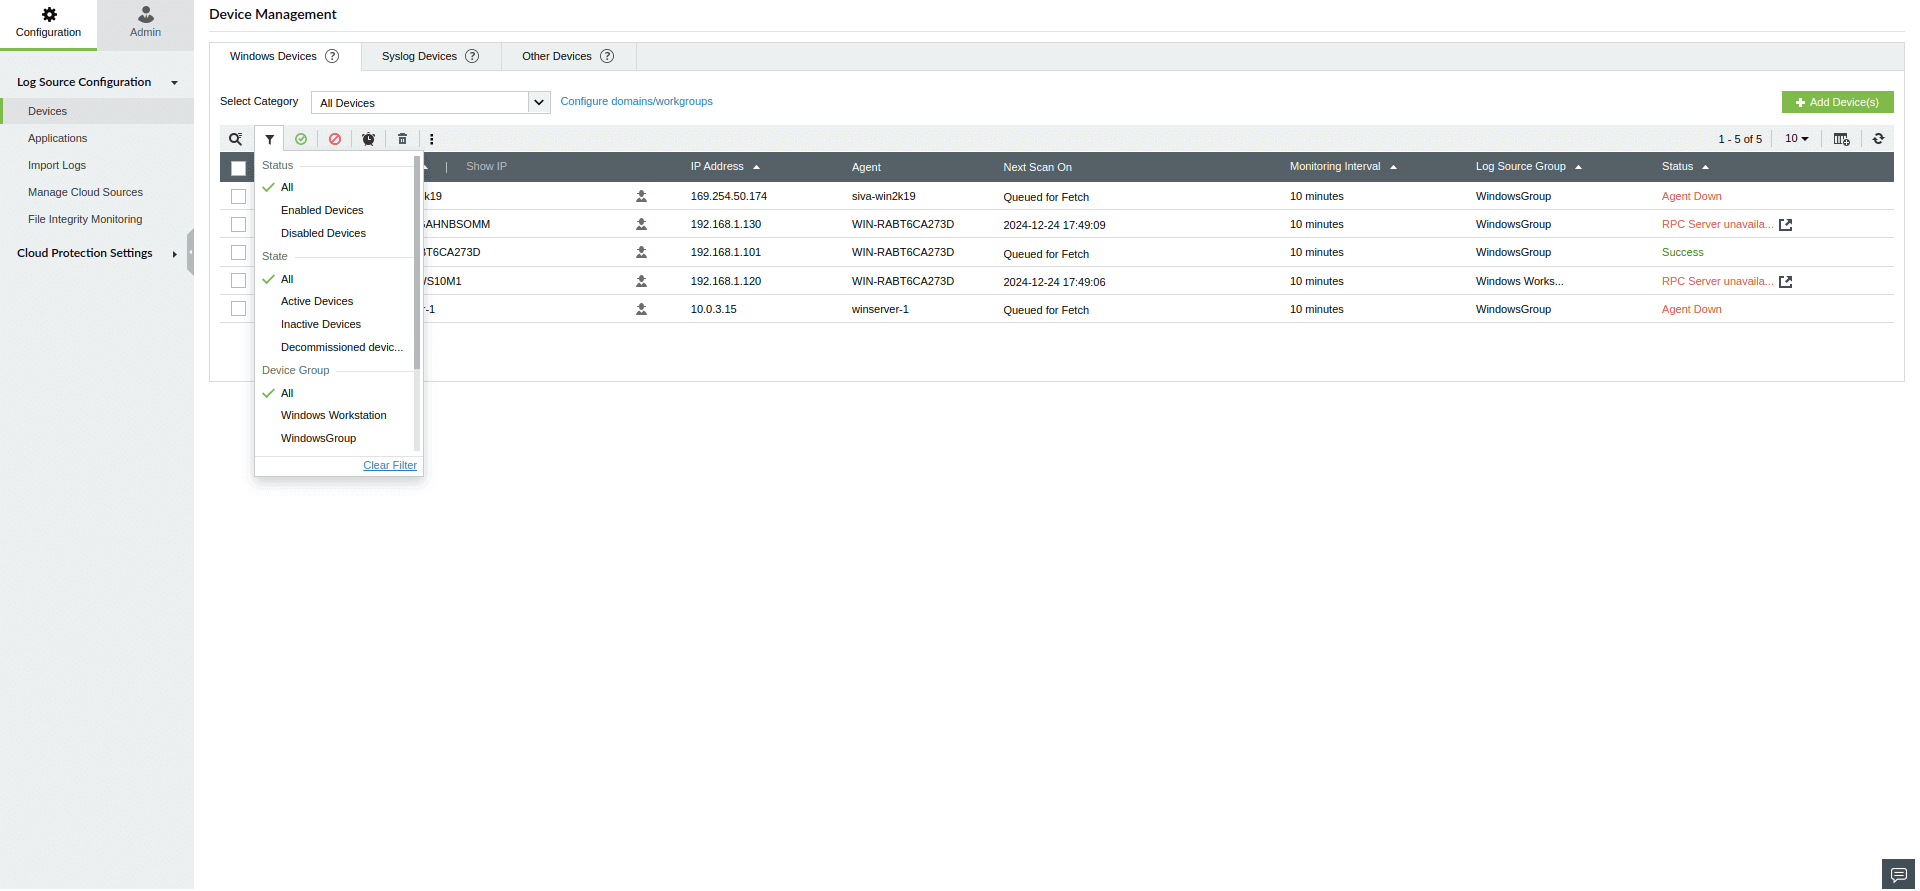
Viewing and Managing Devices
In Log360 Cloud, you can view the configured devices by following these steps:
- Login to your Log360 Cloud account.
- Go to Admin → Account Settings → Account Management.
- Under Account Management, click on Configure Domains.
- Click on Managed Domain Computers to view all the configured devices.
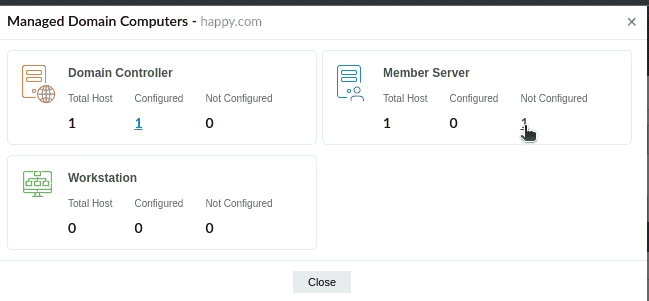
- In the pop-up that appears, you will be able to view the number of configured and unconfigured devices which includes domain controllers, member servers, and workstations along with the total number of hosts.
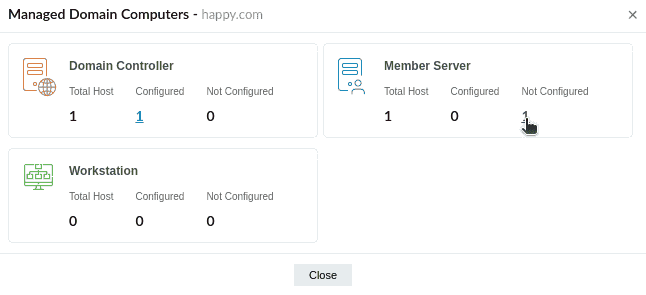
- To view more details about the devices under each domain controller, you can click on the number displayed under configured and not configured.
- Clicking on the Configured count will redirect you to the Account Management page, where you can view more details about each configured Windows device.
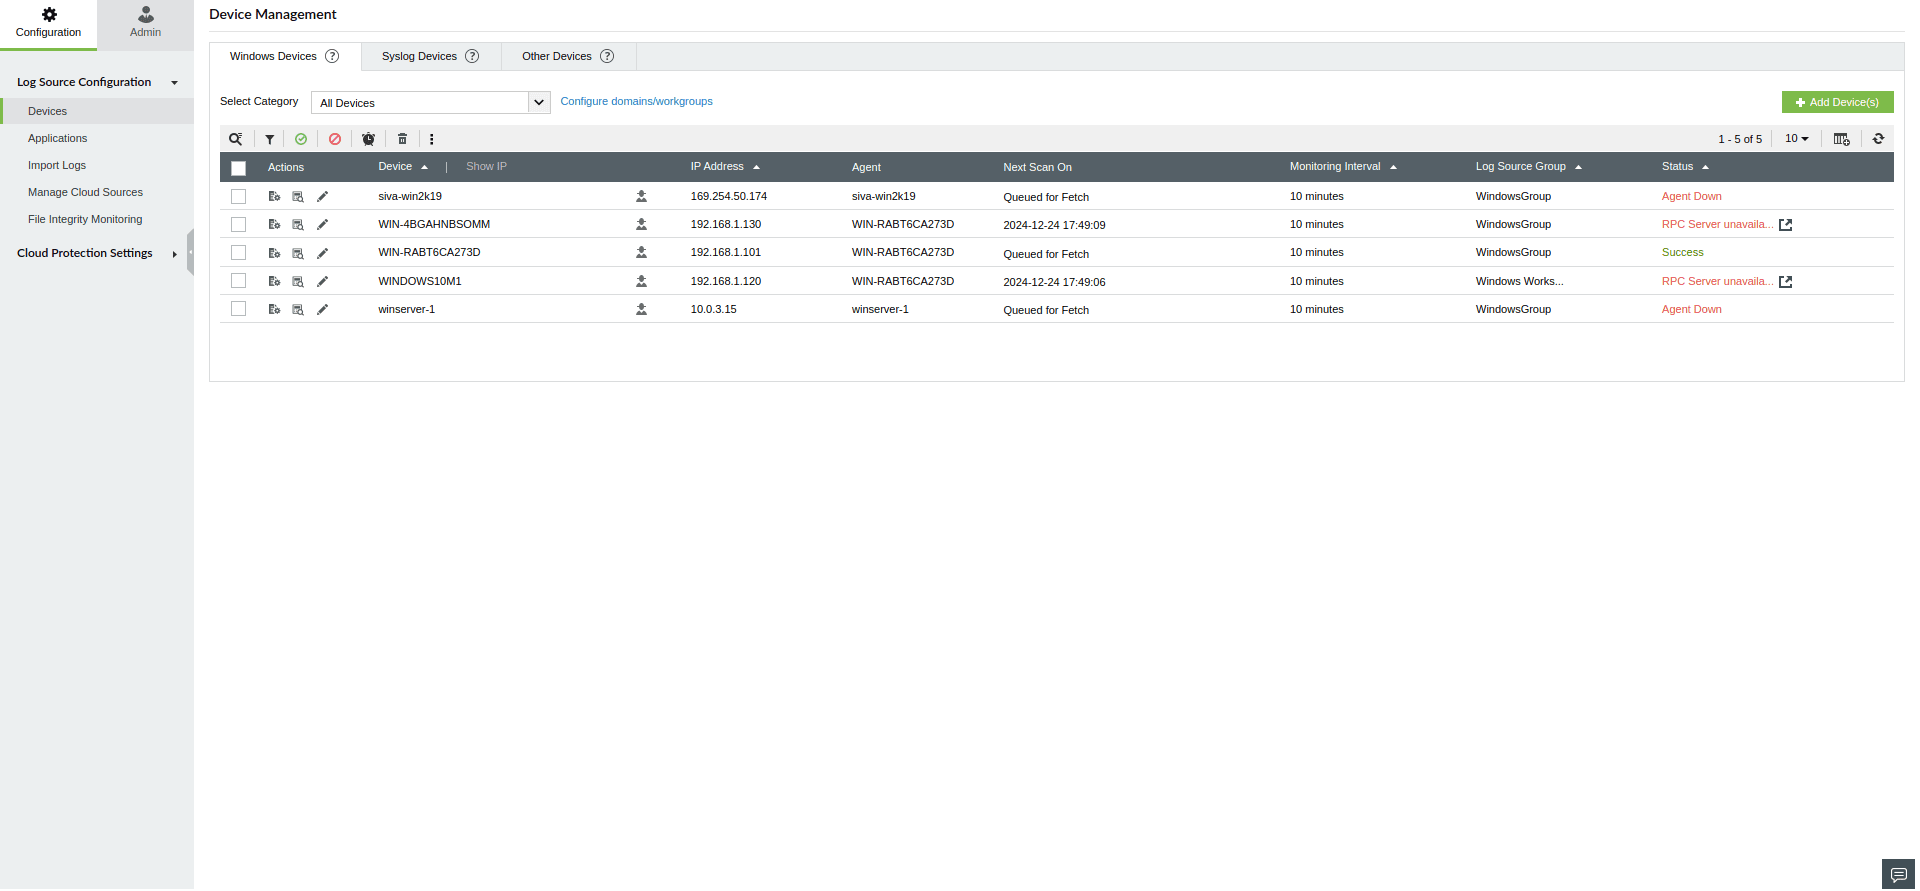
- You can use the filter under Select Category to categorize and manage the devices by their roles (Domain Controllers, Member Servers, Workstations).
- Clicking on the Not Configured count will redirect you to the Add device pop-up, where you can add/configure each unconfigured Windows device.
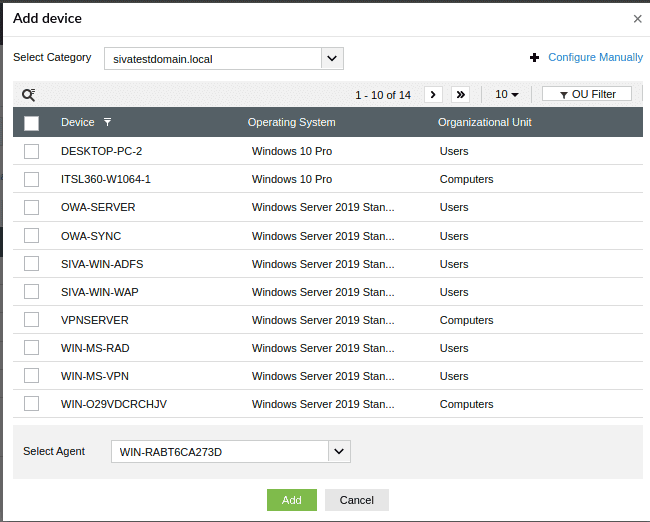
Adding/Configuring New Devices
In Log360 Cloud, you can add or configure the unconfigured devices by following these steps:
- Login to your Log360 Cloud account.
- Go to Admin → Account Settings → Account Management.
- Under Account Management, click on Configure Domains.
- Click on Managed Domain Computers to view all the unconfigured devices.
- To add/configure the unconfigured device(s), click on the Not Configured count under the specific domain controller.
- In the Add device pop-up that appears, use the filter next to Device to choose the specific domain controller of the unconfigured device(s) you wish to configure.
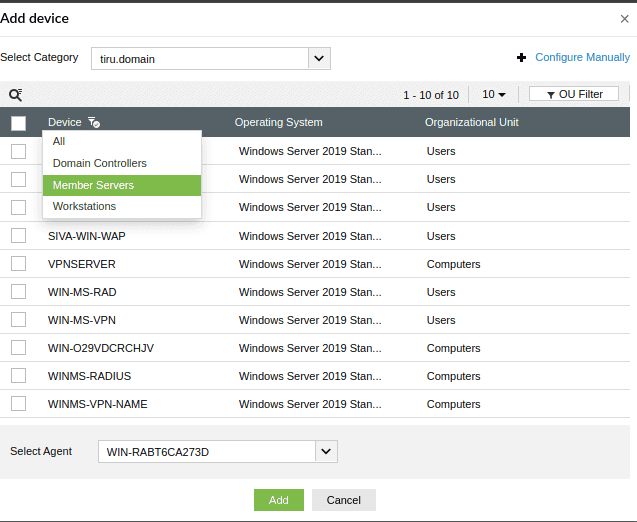
- From the filtered list of devices, click on the specific device(s) you wish to add/configure.

- Select the Category, the Agent, and click on Add to configure the device.
- The device has been configured successfully.

Note: You can configure the audit policies with the steps outlined
here.
Workgroups
- Update a Workgroup
- Delete a Workgroup
- Re-discover workgroup devices
Update a Workgroup
To update a workgroup, follow the steps given below.
- Open Log360 Cloud and select the Settings tab. Then navigate to Account Settings under Admin.
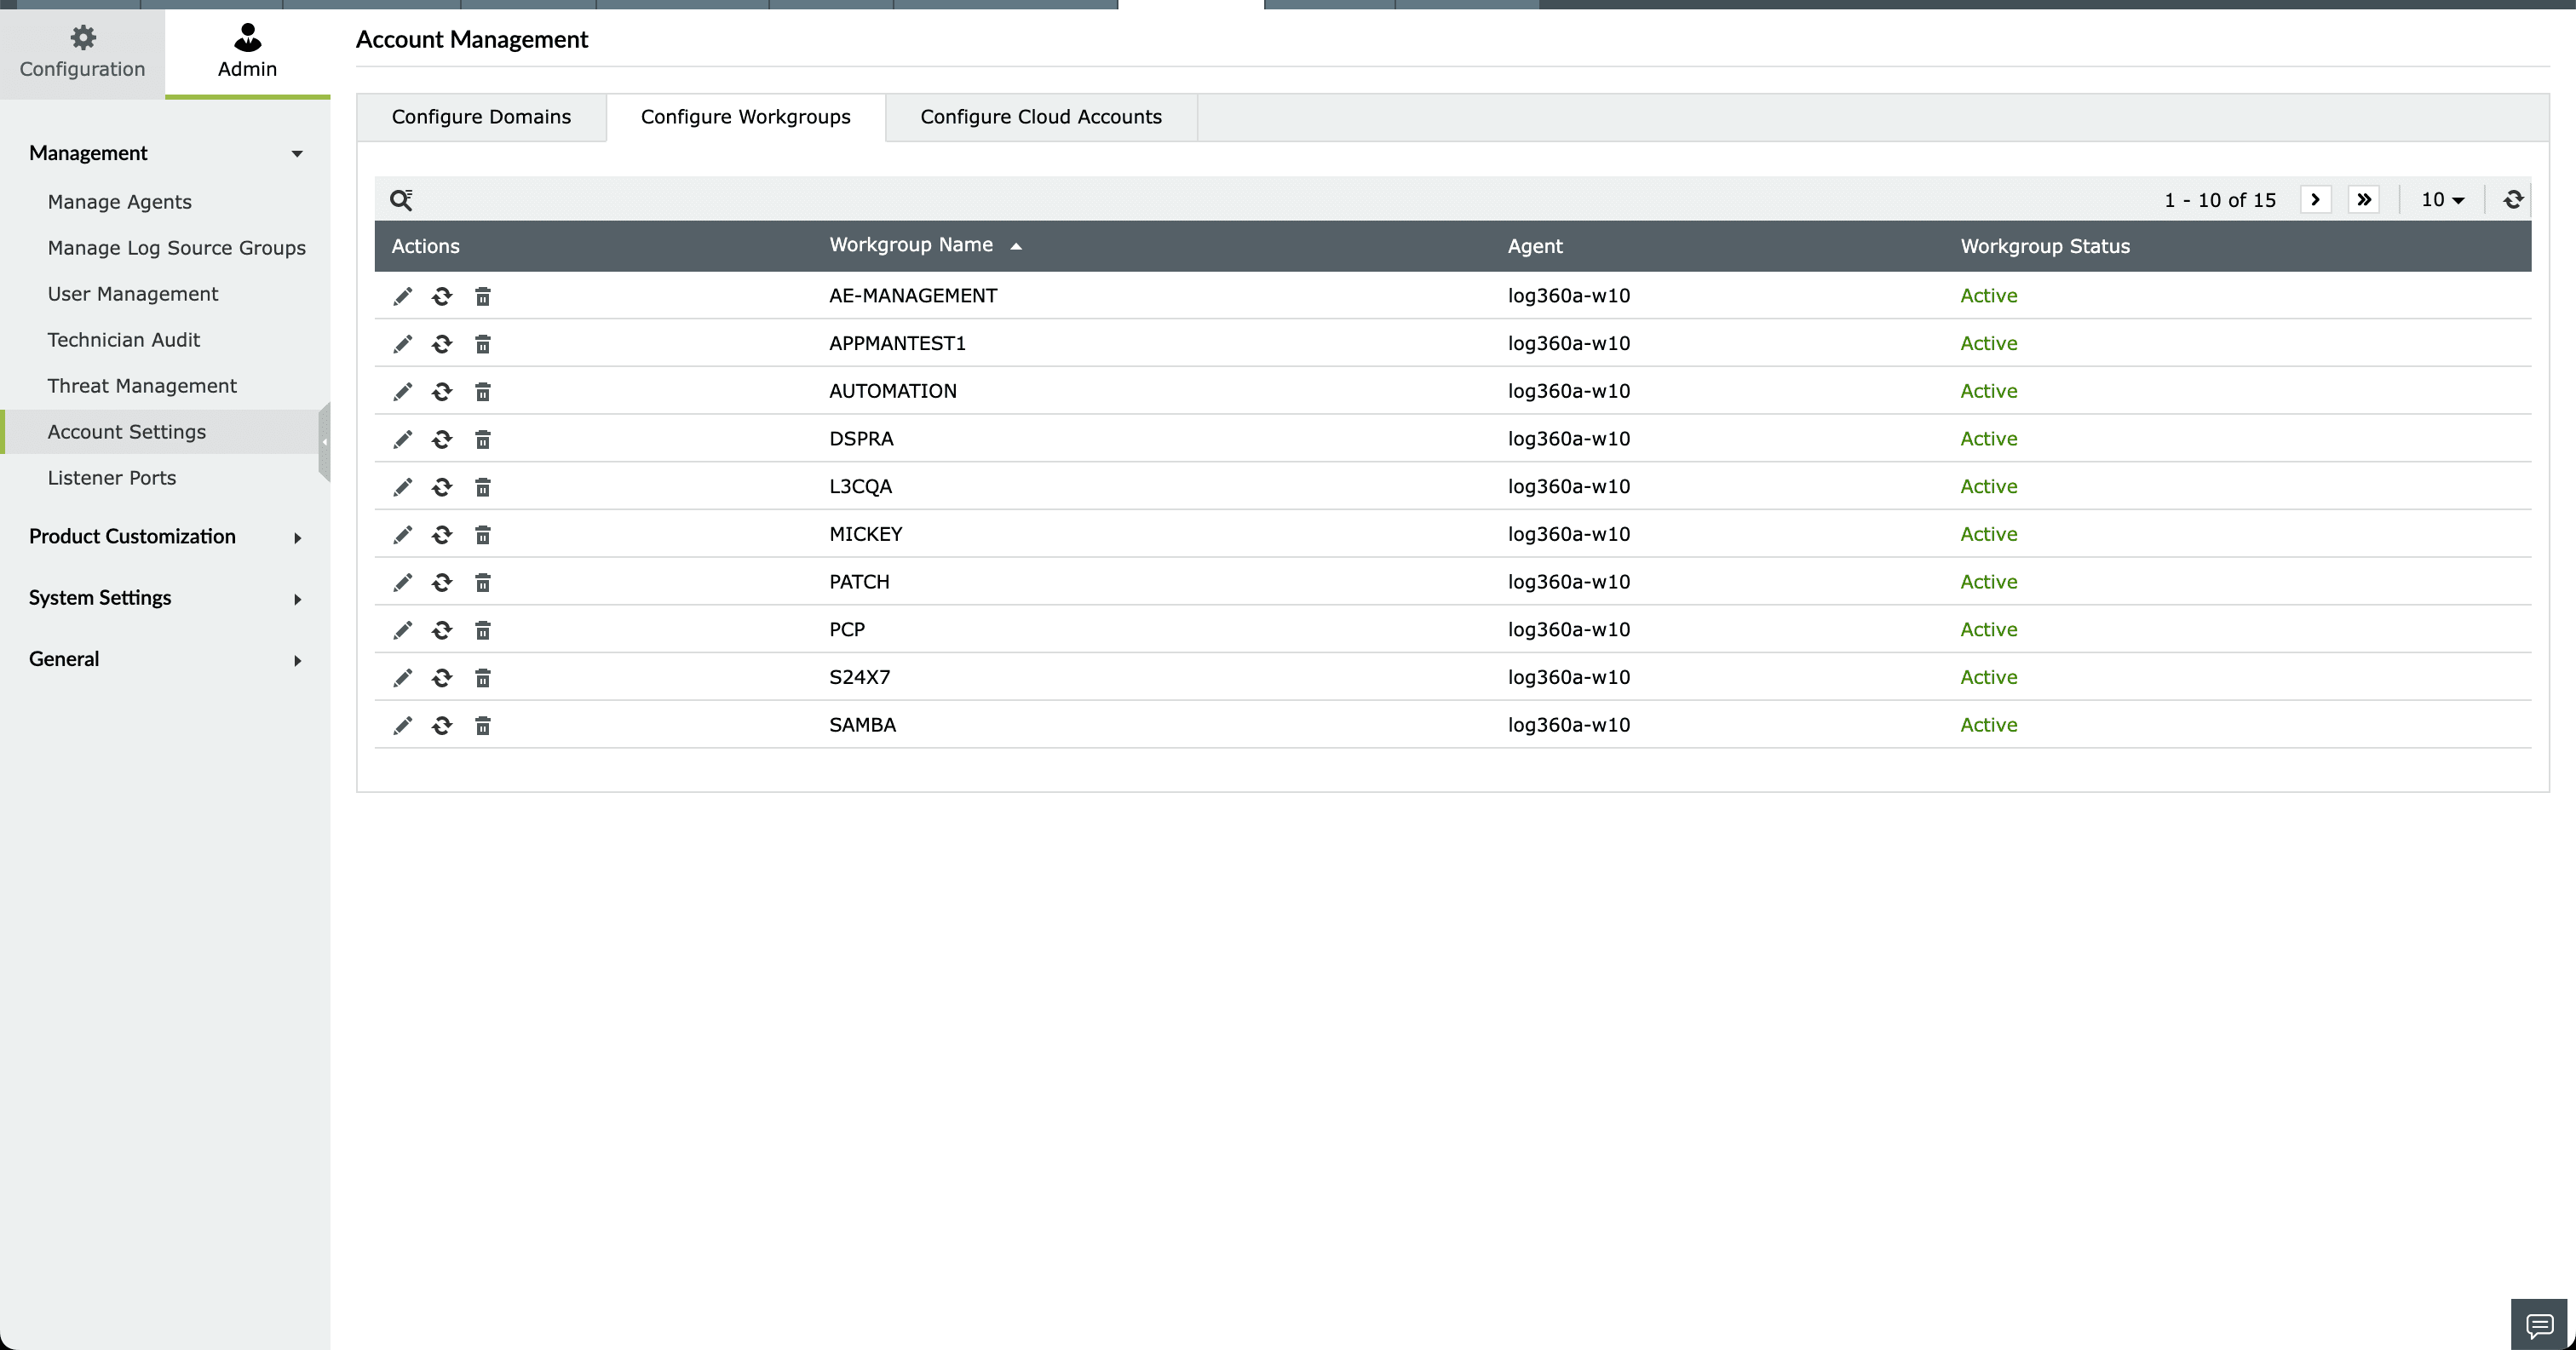
- Choose the Configure Workgroups tab and click the icon corresponding to the desired workgroup.
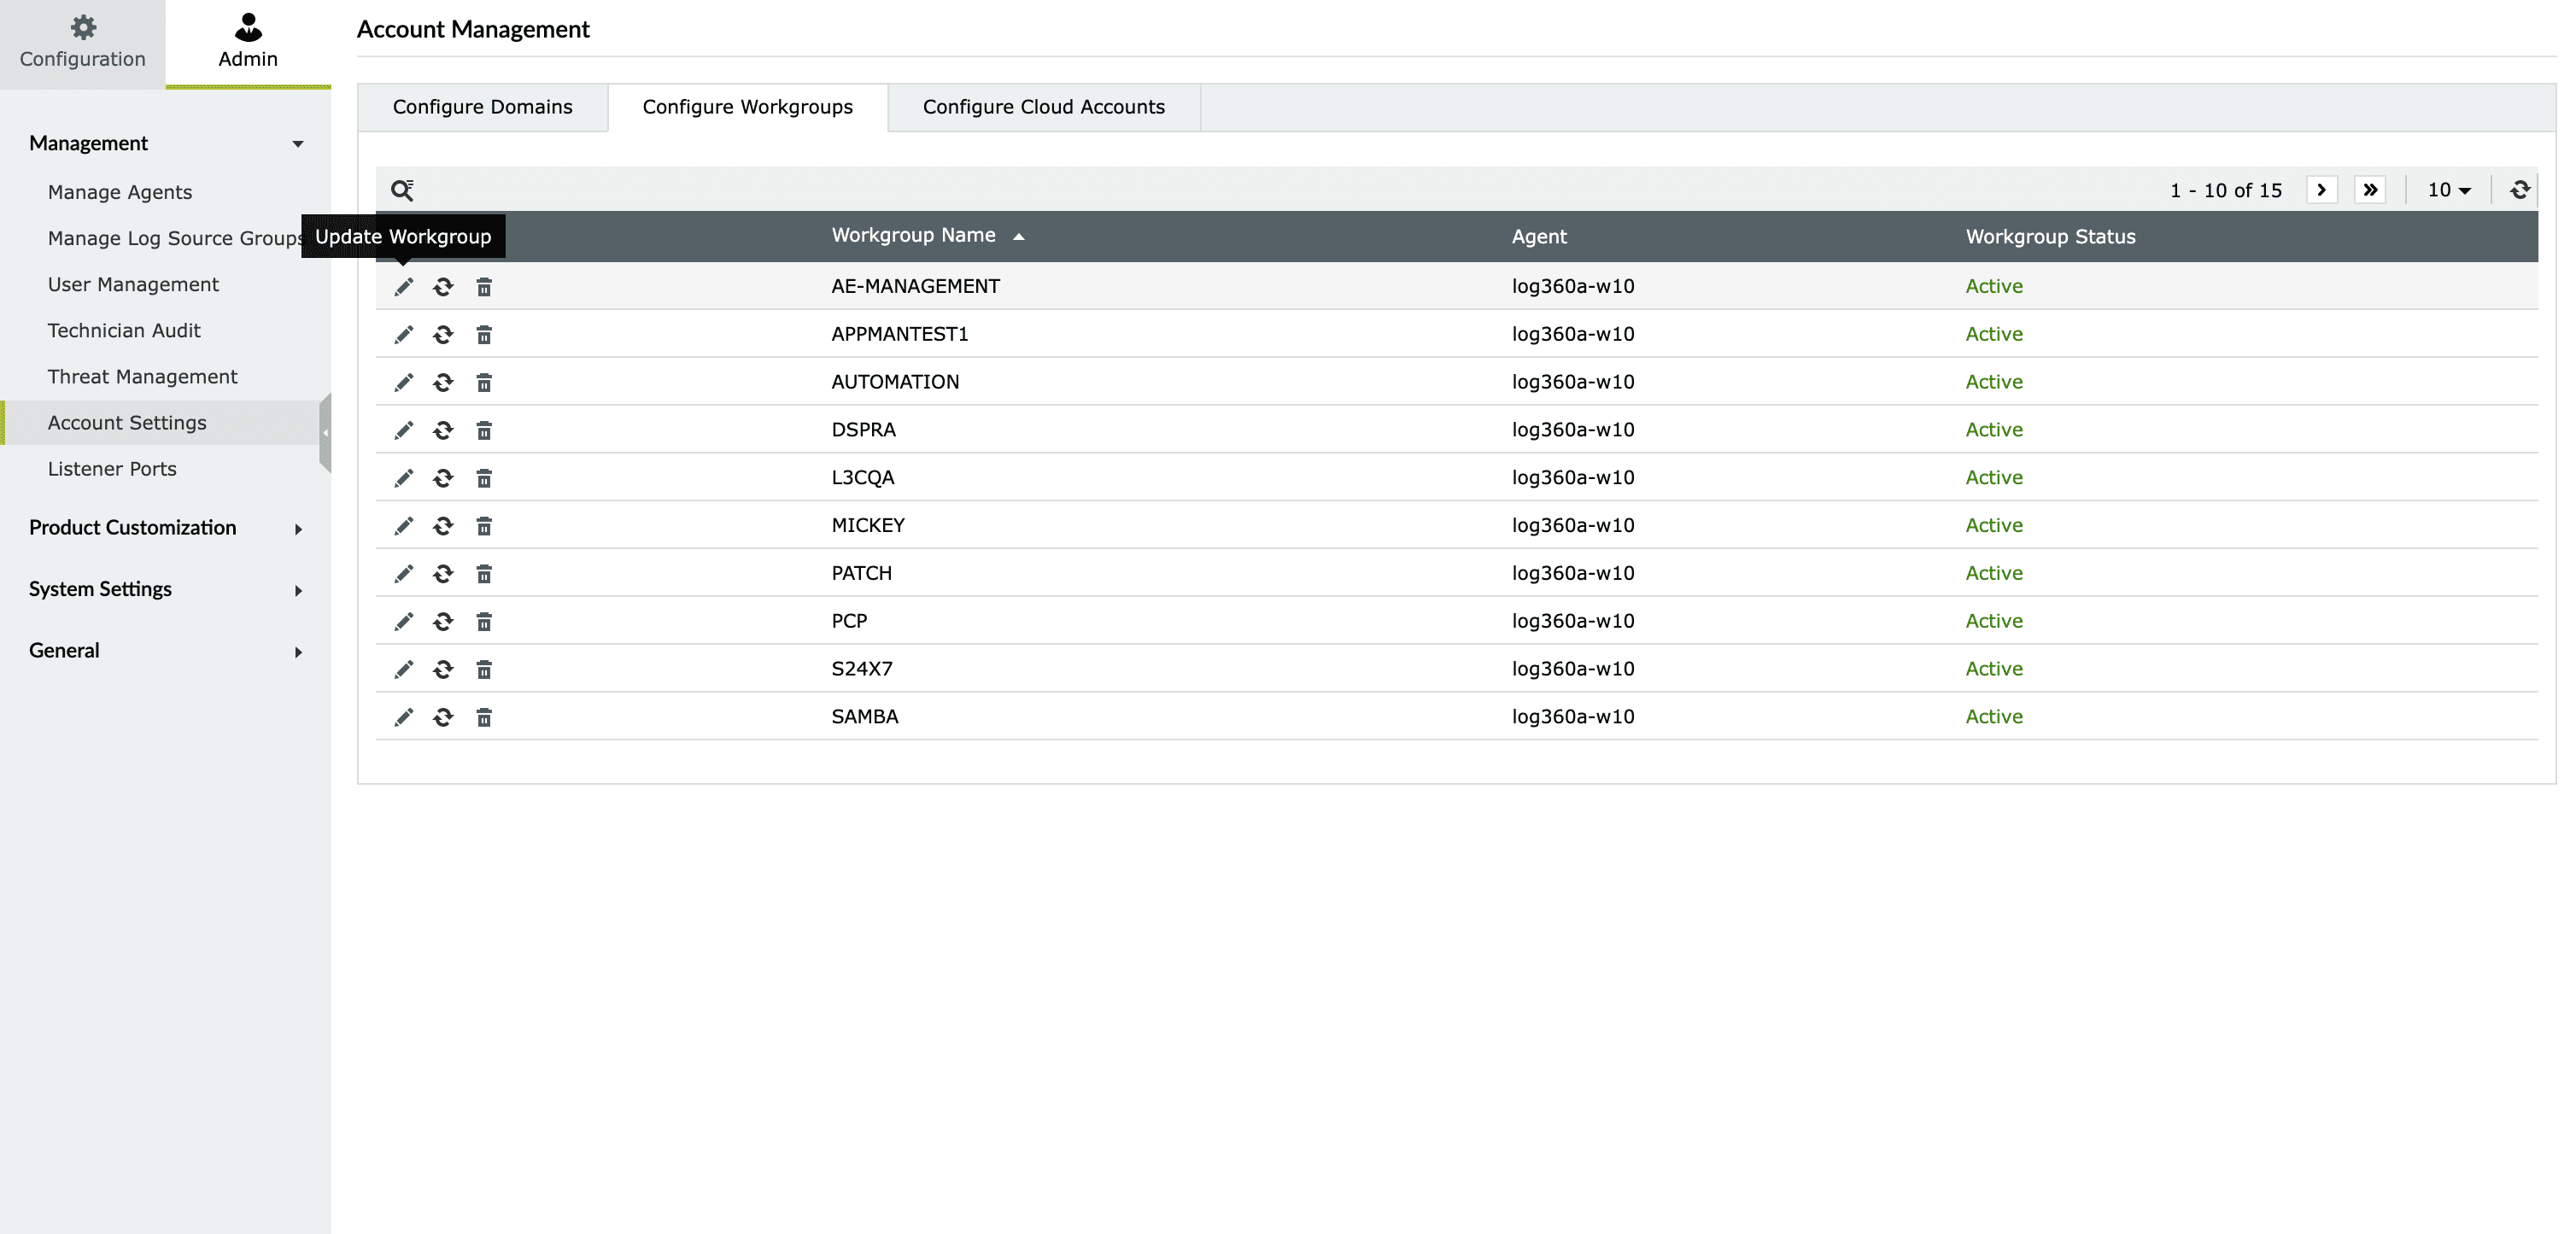
- To modify the authentication credentials, select the Authentication checkbox and provide a Username and Password in the respective fields. Note that the agent's login credentials are used when no authentication credentials are provided.

- Click the Update button.
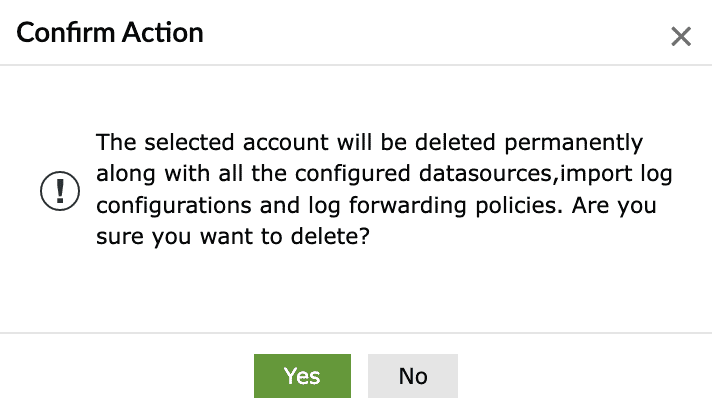
Delete a Workgroup
To delete a workgroup, follow the steps given below.
- Open Log360 Cloud and select the Settings tab. Then navigate to Account Settings under Admin.
- Choose the Configure Workgroups tab and click the
 icon corresponding to the desired workgroup.
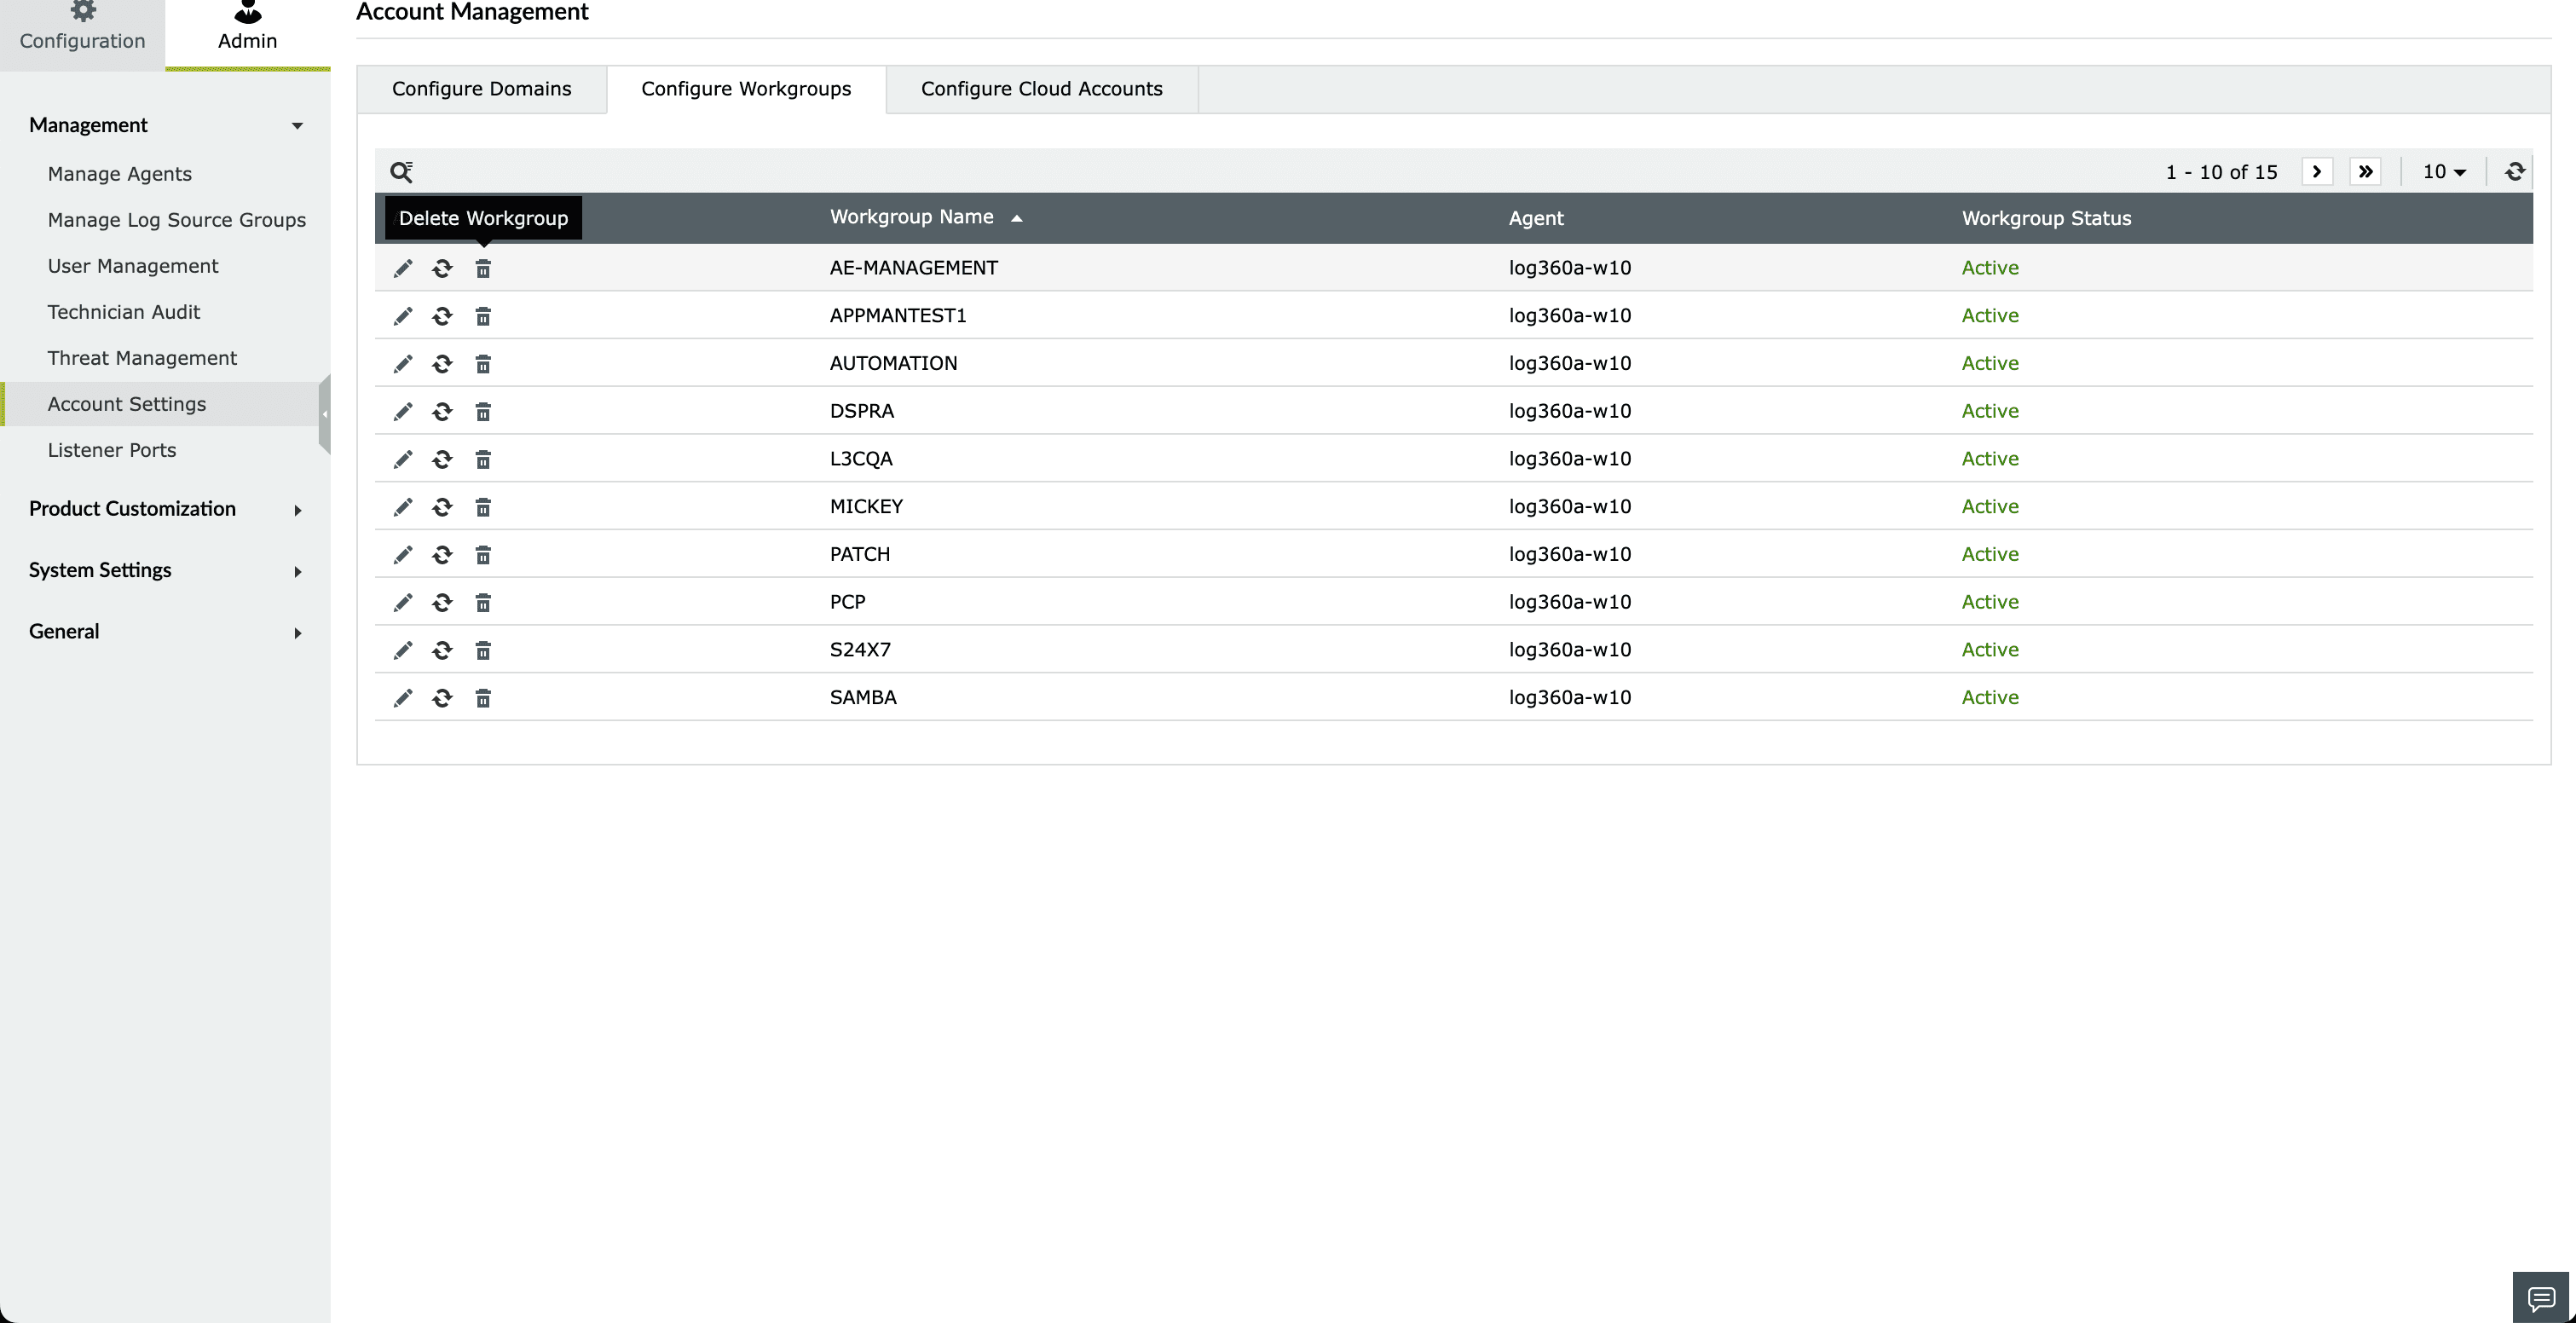
- Click Yes to confirm the action.

The workgroup is deleted successfully.
Re-discover workgroup devices
To re-discover workgroup devices, follow the steps given below.
- Open Log360 Cloud and select the Settings tab. Then navigate to Account Settings under Admin.

- Choose the Configure Workgroups tab and click the
 icon corresponding to the desired workgroup.
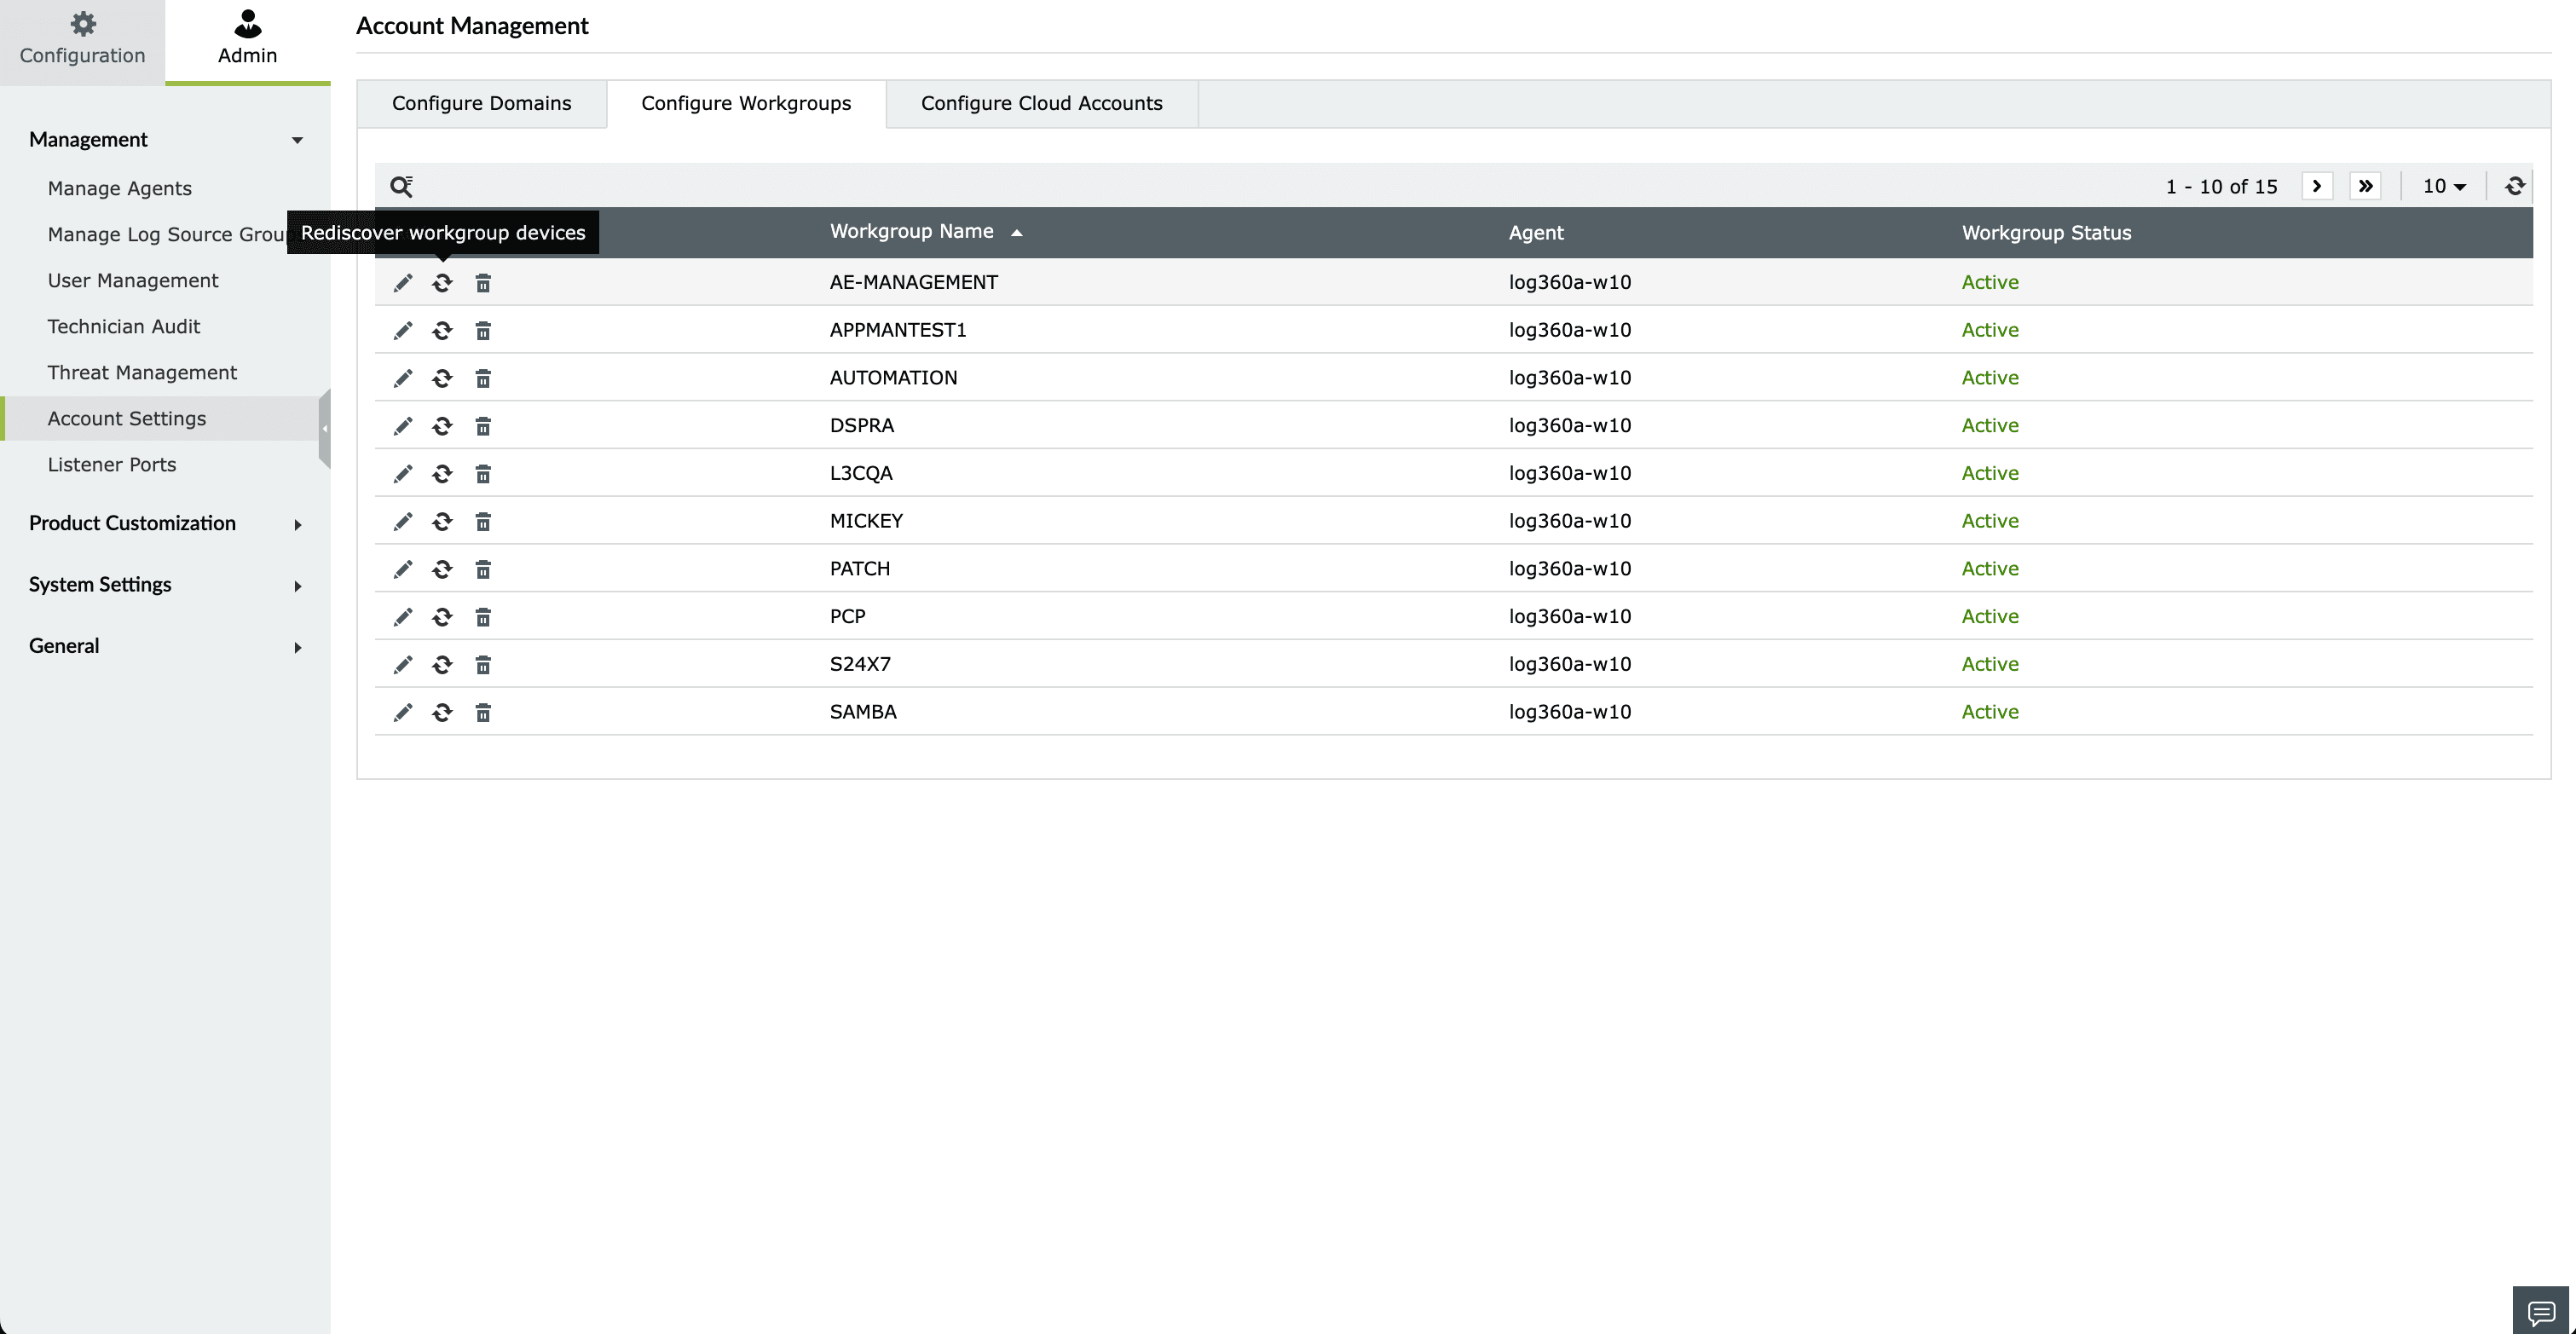
Discovery of workgroup devices will take place in the background.
Cloud accounts
- Add a cloud account
- Update a cloud account
- Delete a cloud account
Adding a cloud account
To add a new cloud account, follow the steps given below.
- Open Log360 Cloud and select the Settings tab. Then, navigate to Account Settings under Admin Settings.
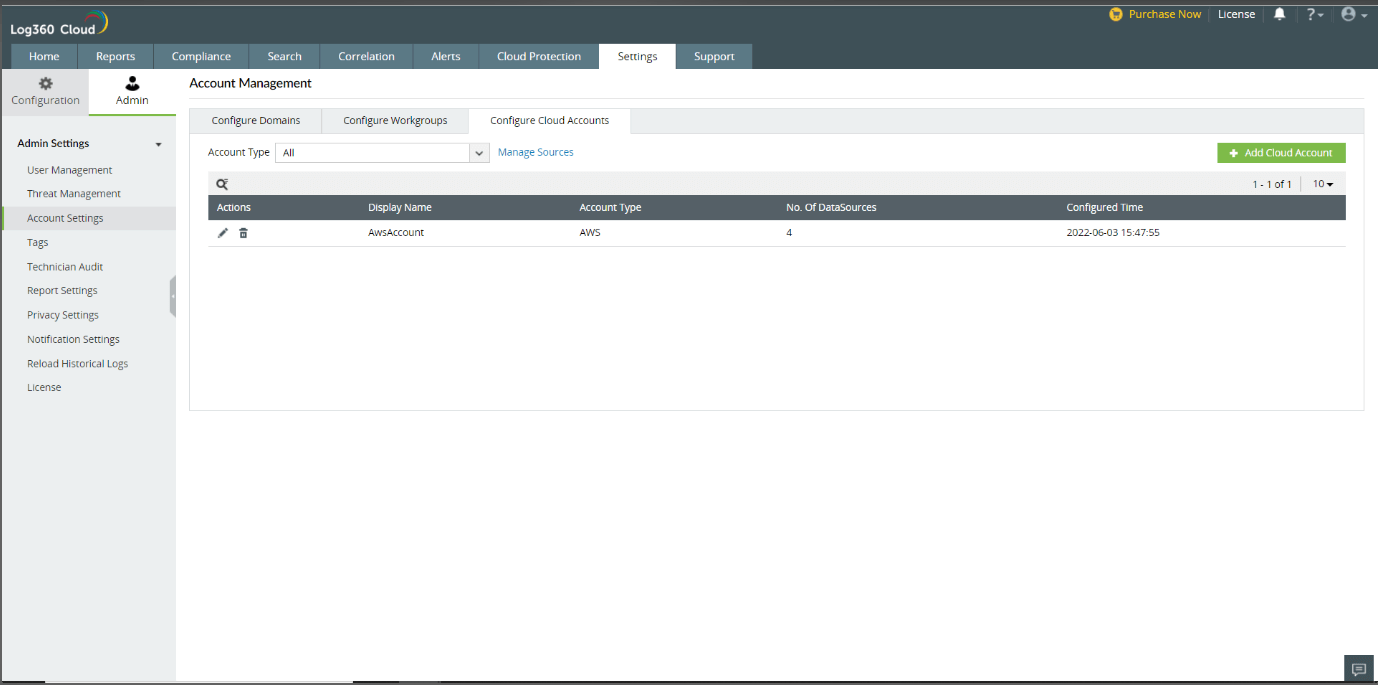
- Choose the Configure Cloud Accounts tab and click the + Add Cloud Account button. This will open the Add Cloud Account window.
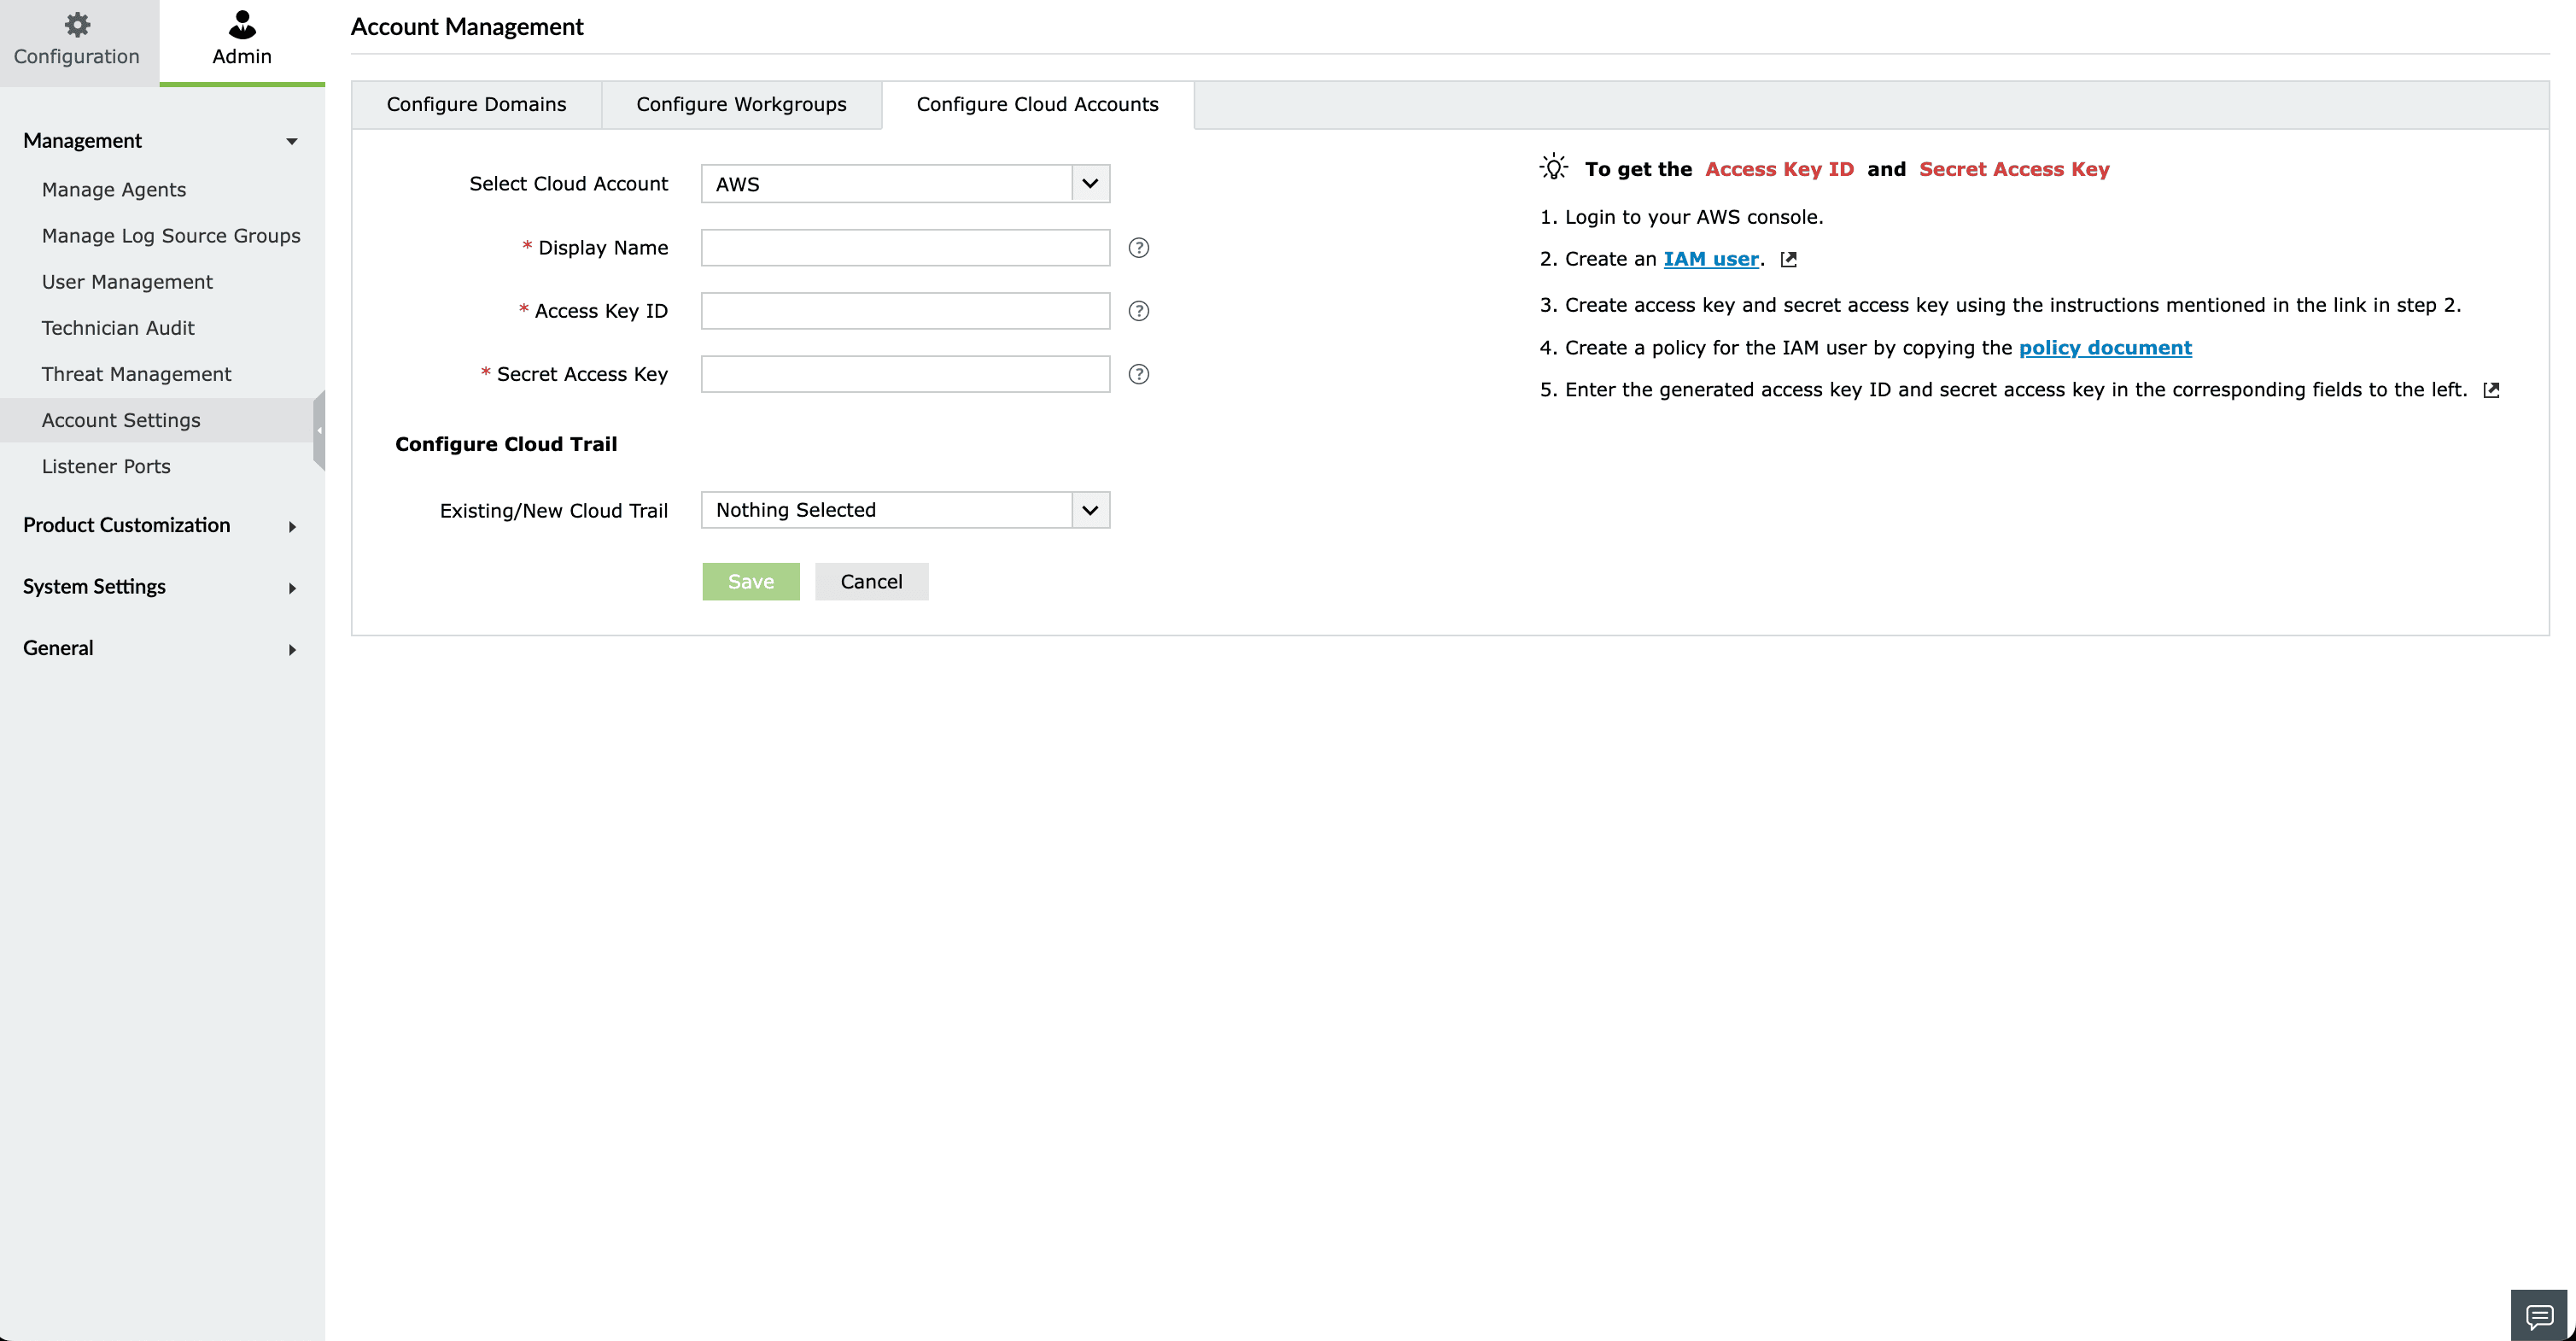
- Select a Cloud Account Type from the drop-down menu.
- For AWS accounts:
- Enter the Display name and Access Key ID.
- Enter the Secret Access Key value.
- To add a Cloud Trail account, please follow the configuration instructions.
- Click Save.
- For Microsoft 365 accounts:
- Enter the Tenant Name, Application ID, Application Object ID, and Application Secret.
- Click Save to add the new Microsoft 365 account for monitoring.
Updating a cloud account
To edit a cloud account, follow the steps given below.
- Open Log360 Cloud and select the Settings tab. Then, navigate to Account Settings under Admin Settings.
- Choose the Configure Cloud Accounts tab and click the icon corresponding to the desired cloud account.
- Enter the new credentials for the cloud account such as the Access Key ID and Secret Access Key and click Save.
Deleting a cloud account
- Open Log360 Cloud and select the Settings tab. Then, navigate to Account Settings under Admin Settings.
- Choose the Configure Cloud Accounts tab and click the delete icon corresponding to the desired cloud account.
- Select Yes in the dialogue box that prompts you to confirm the action.