How to configure MFA for Cisco ASA SSL VPN using RADIUS
In this article:
Objective
This article outlines the steps to configure two-factor authentication (2FA) for your Cisco Adaptive Security Appliance (ASA) SSL VPN using RADIUS. By integrating ManageEngine ADSelfService Plus' MFA for endpoints with Cisco ASA, you can add an extra layer of security to your VPN infrastructure. Enabling 2FA for CISCO SSL VPN helps prevent unauthorized access, enforces strong user verification, and improves compliance with security standards.
ADSelfService Plus supports a wide range of secure authentication methods for 2FA for CISCO ASA SSL VPN, including:
- Push notification authentication
- Fingerprint/Face ID authentication
- ADSelfService Plus TOTP authentication
- Google Authenticator
- Microsoft Authenticator
- Yubico OTP (hardware key authentication)
Prerequisites
Before you begin, ensure you meet the following requirements:
Endpoint MFA add-on license: Your ADSelfService Plus license must include Endpoint MFA. You can purchase this add-on from the store.
HTTPS is enabled: Ensure HTTPS is enabled in ADSelfService Plus. Navigate to Admin > Product Settings > Connection to verify and enable it.
Note: If you are using an untrusted certificate for HTTPS in ADSelfService Plus, you must disable the Restrict user access when there is an invalid SSL certificate option. You can find this setting under Configuration > Administrative Tools > GINA/Mac/Linux (Ctrl+Alt+Del) > GINA/Mac/Linux Customization > Advanced.
Access URL is configured: The Access URL configured in Admin > Product Settings > Connection > Configure Access URL will be used by the NPS extension to communicate with the ADSelfService Plus server. Ensure this URL is correctly updated before installing the NPS extension.
RADIUS server: You must use a Windows server (Windows Server 2008 R2 and above) with the Network Policy Server (NPS) role enabled to act as your RADIUS server.
User dial-in properties: In AD, set users' Network Access Permission to Control access through NPS Network Policy in their Dial-in properties.
NPS connection request policy: On the Windows NPS server where the NPS extension will be installed, set the authentication settings of the Connection Request Policy to authenticate requests on this server.
RADIUS authentication configured: Your Cisco ASA server must already be configured to use RADIUS authentication.
Steps to configure 2FA for Cisco SSL VPN
Step 1: Configuring MFA in ADSelfService Plus
- Log in to ADSelfService Plus as an administrator.
- Navigate to Configuration > Self-Service > Multi-Factor Authentication > Authenticators Setup.
- Configure the authentication methods you wish to enable for MFA.
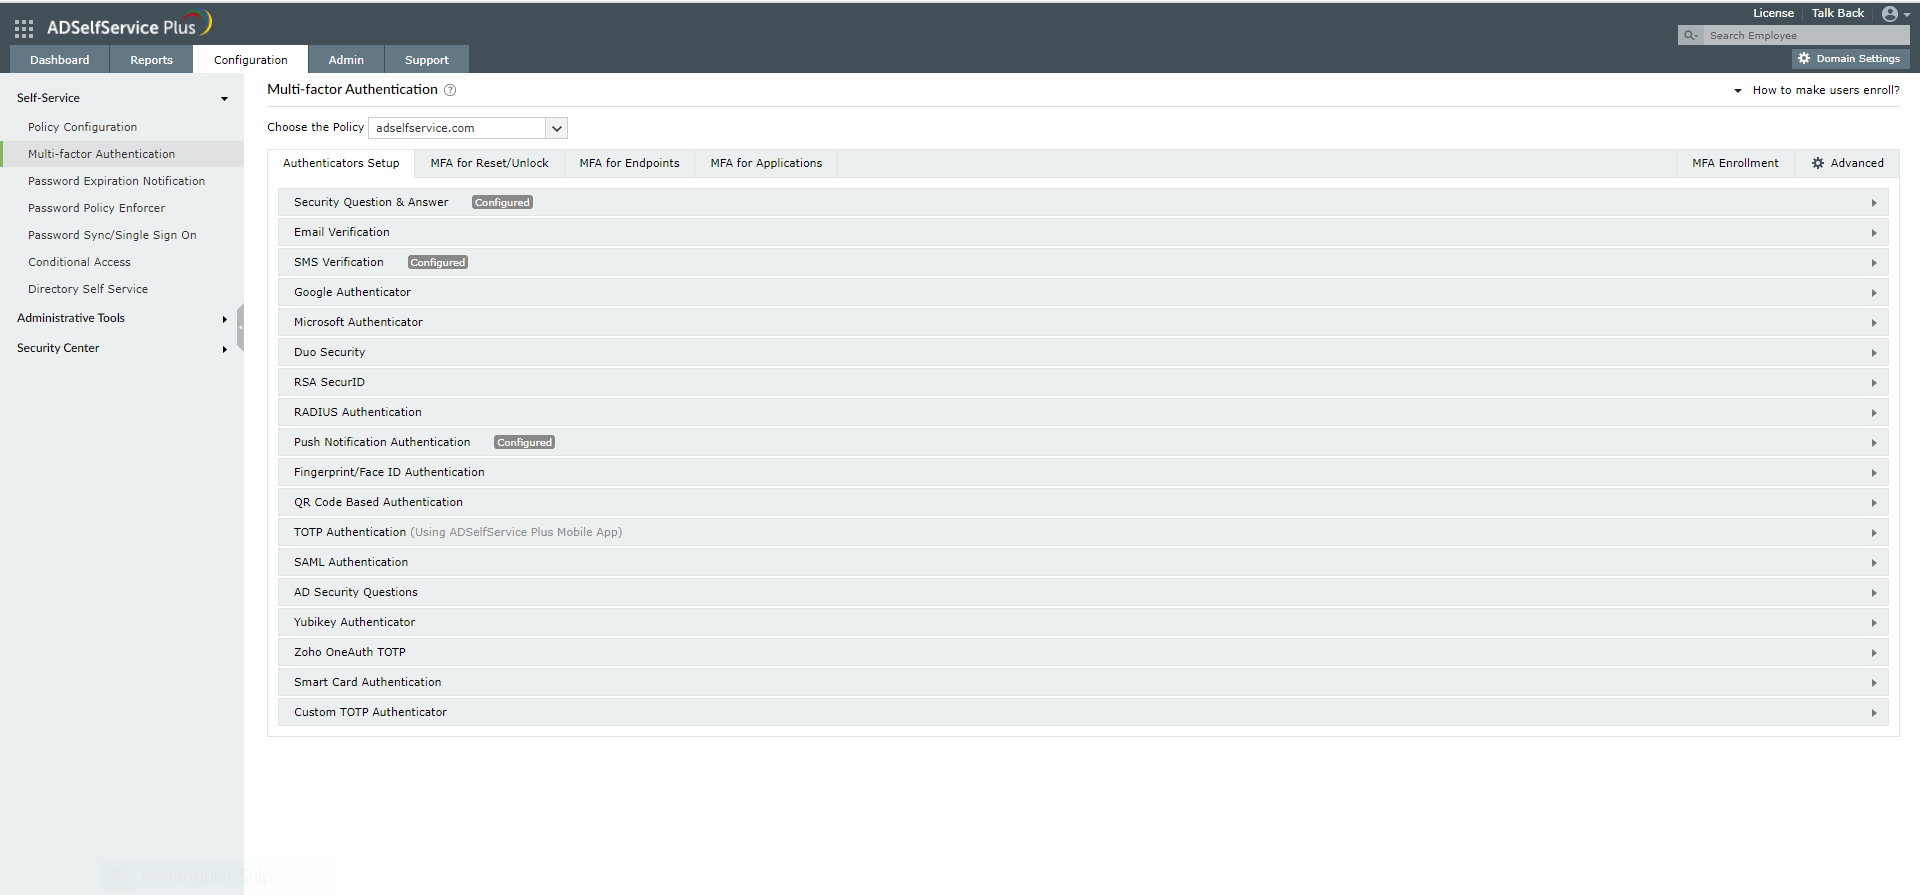
Fig.1: Configuring authenticators in ADSelfService Plus
- Navigate to the MFA for Endpoints section.
- From the Choose the Policy drop-down menu, select the policy that will determine the users for whom MFA for Cisco ASA will be enabled.
- In the MFA for VPN Login section:
- Select the checkbox next to Enable the authentication factor(s) required for VPN logins.
- Choose the desired number of authentication factors to be enforced.
- Select the specific authentication methods to be used. You can rearrange the listed authentication methods by dragging and dropping them to your preferred order.
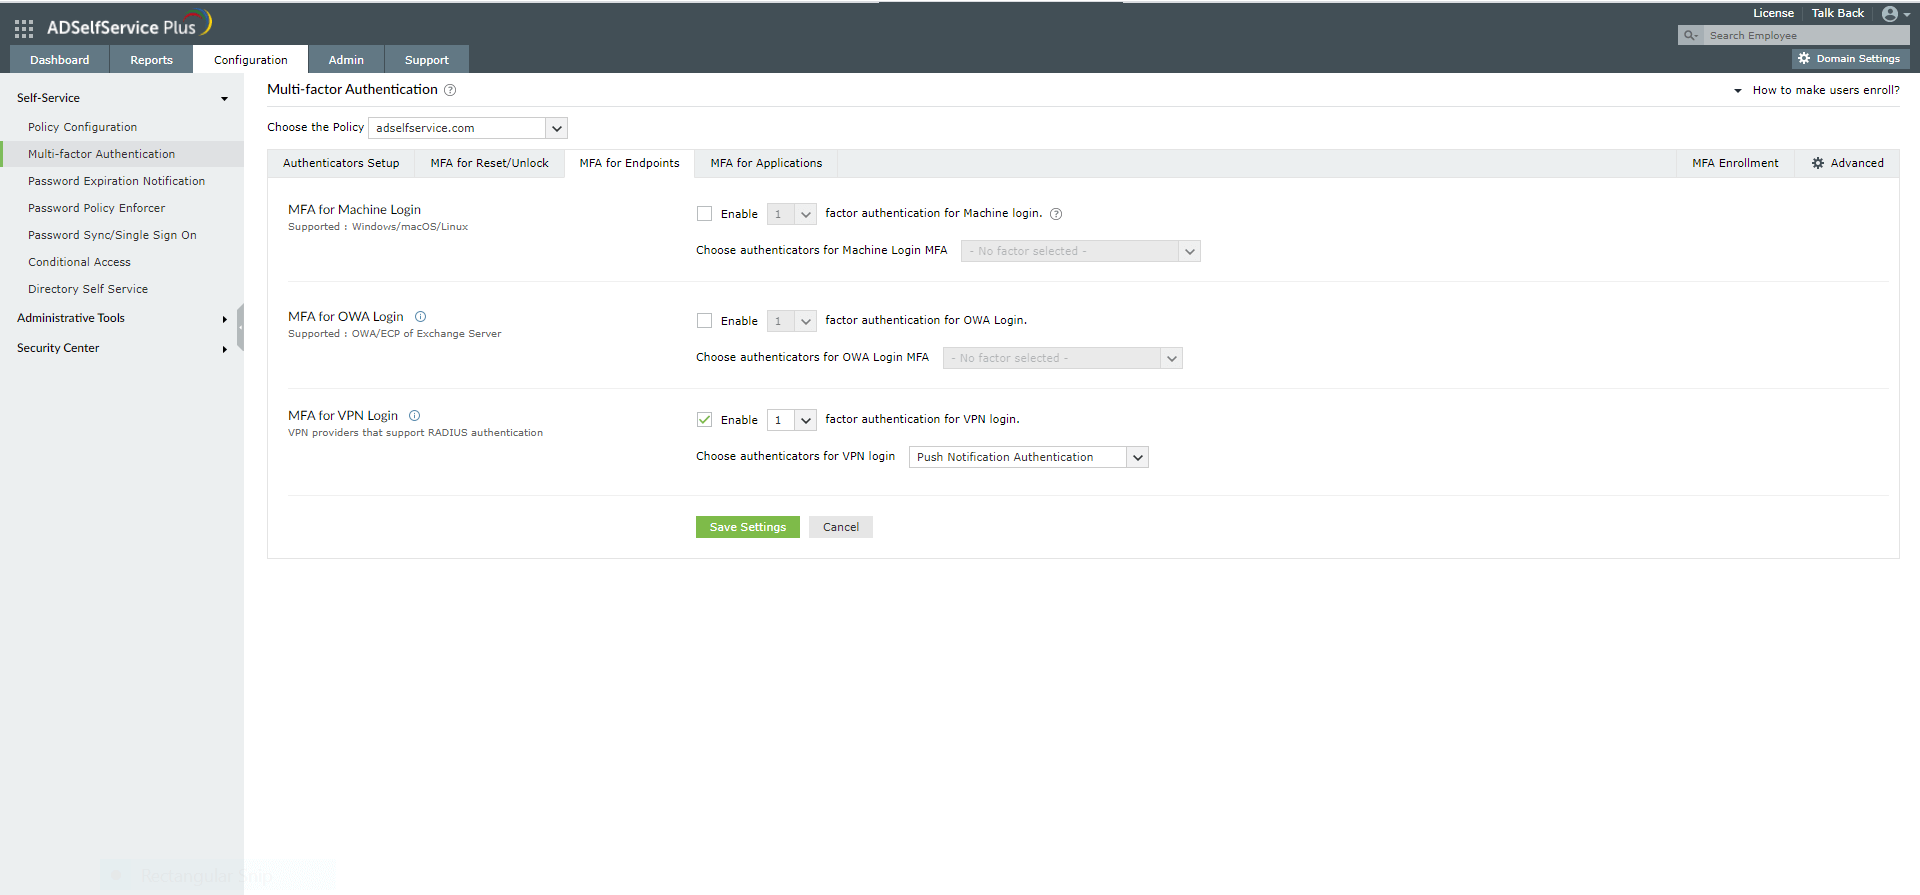
- Click Save Settings.
- Click the help icon next to MFA for VPN.
- Download the NPS extension using the Download link provided in the pop-up window that appears.
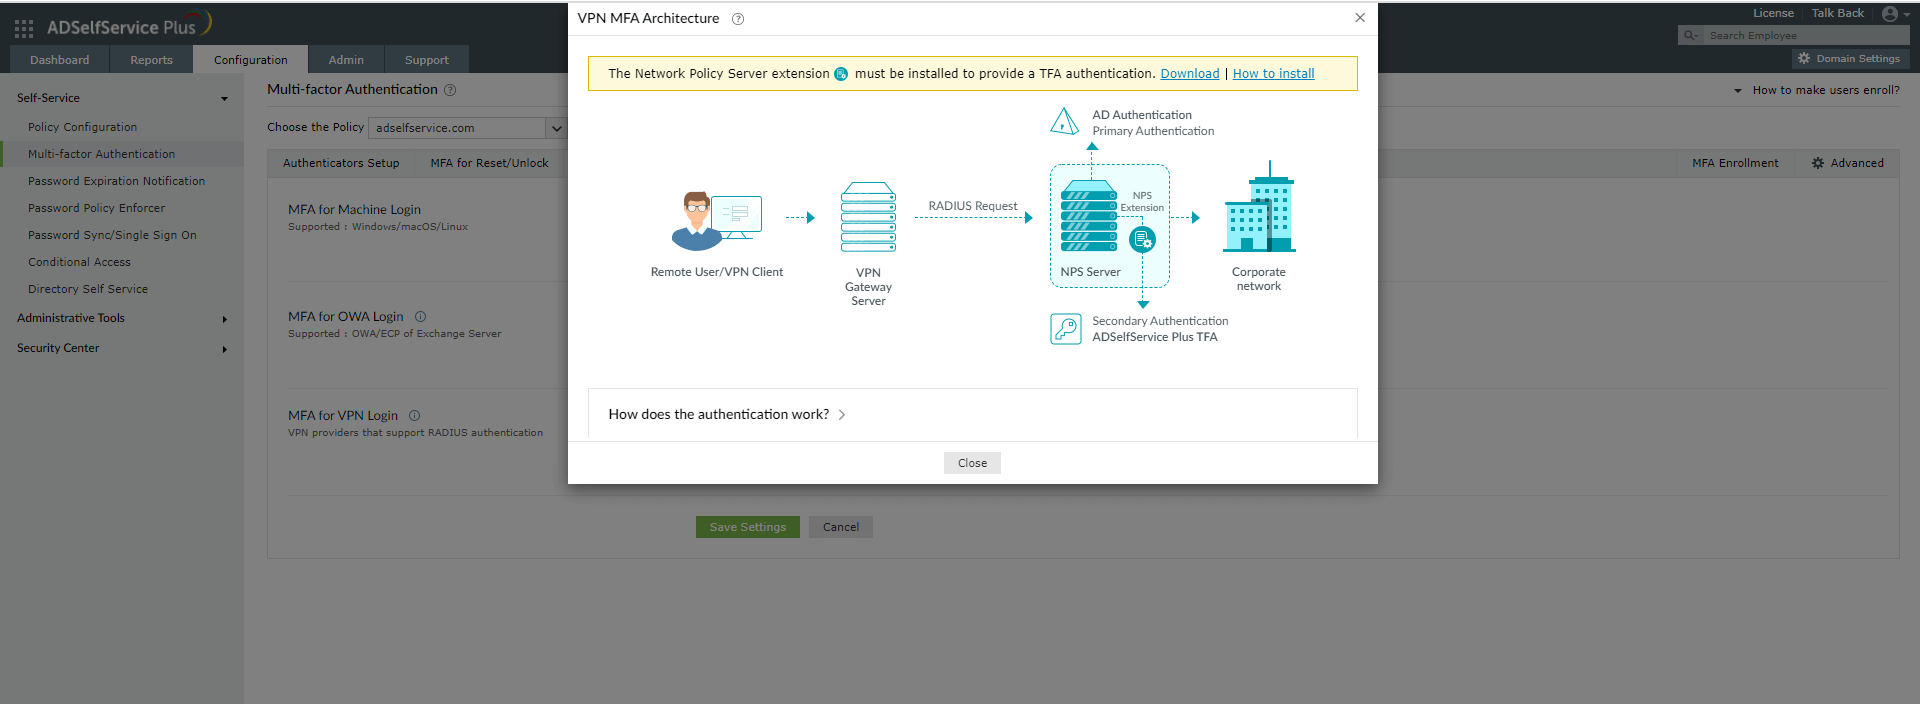
Step 2: Install the NPS extension
- Copy the downloaded extension file (ADSSPNPSExtension.zip) to the Windows server designated as your RADIUS server. Extract the contents of the ZIP file and save them to a chosen location.
- Open Windows PowerShell (x64) as administrator and navigate to the folder where you extracted the extension files.
- Execute the following command:
PS C:\> .\setupNpsExtension.ps1 Install
Note: If you need to uninstall the NPS extension plug-in or update it to a newer version, use Uninstall or Update respectively, instead of Install.
- After the installation is complete, you will be prompted to restart the NPS Windows service. Proceed with the restart.
- Configure a RADIUS client in the NPS service specifically for ADSelfService Plus. During this configuration, set a shared secret that you will use later when configuring your Cisco ASA.
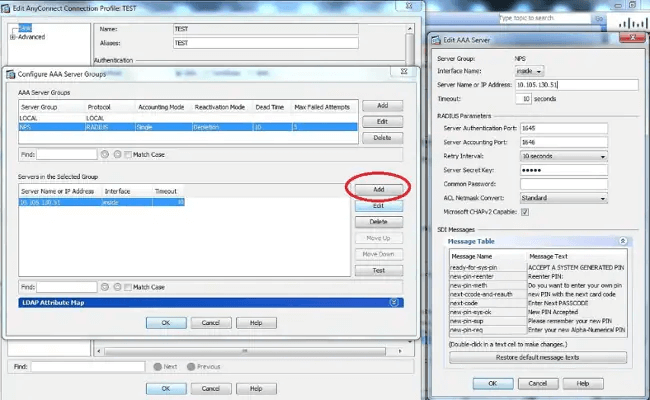
Step 3: Configure your Cisco ASA
- Navigate to AAA/Local Users → AAA Server Groups and click Add.
- Provide a name for the AAA Server Group and select RADIUS as the Protocol.
- Click OK to create the new server group.

- Select the newly created AAA Server Group.
- In the Add AAA Server pop-up window, enter the following information for your NPS server:
- Interface Name: The ASA interface through which the NPS extension can be reached.
- Server Name or IP Address: The hostname or IP address of the NPS server where the NPS extension is installed.
- Timeout: Set a minimum of 60 seconds to allow sufficient time for MFA challenges.
- Server Authentication Port: 1812
- Server Accounting Port: Not required
- Retry Interval: Set for a minimum of 10 seconds.
- Server Secret Key: Enter the shared secret that you configured during the RADIUS client setup in Step 2 on the NPS server.
- Microsoft CHAPv2 Capable: Leave this checkbox unselected if you are using challenge-based authenticators like ADSelfService Plus TOTP Authentication, Google Authenticator, Microsoft Authenticator, or Yubico OTP (hardware key authentication).
- Click OK, and then OK again to save the new server.
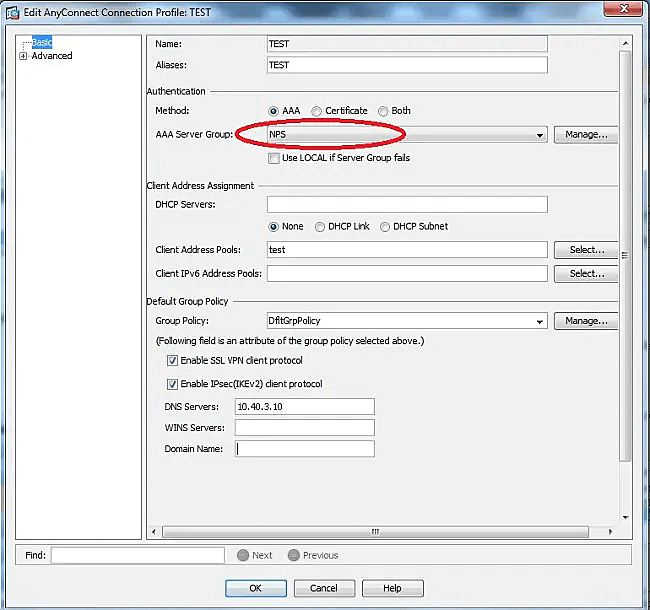
- Go to Network (Client) Access → AnyConnect Connection Profiles.
- Select the connection profile to which you want to add 2FA and click Edit.
- In the Authentication section of the Basic profile settings page, select the AAA Server Group you created previously.
- Go to AnyConnect Connection Profiles. Navigate to Advanced > Secondary Authentication, and set Server Group to None.
- Go to Network (Client) Access again, and navigate to AnyConnect Client Profile > Edit > At Preferences (Part 2) and set the Authentication Timeout (seconds) value to 60.
- Uncheck the Use LOCAL if Server Group fails option.
- Click OK, then click Apply.
- Click Save to save all the configuration information to the ASA device memory.
Related topics and articles
How to configure MFA for Cisco AnyConnect VPN with ADSelfService Plus
MFA for VPN logins
Highlights of ADSelfService Plus
Allow Active Directory users to self-service their password resets and account unlock tasks, freeing them from lengthy help desk calls.
Get seamless one-click access to 100+ cloud applications. With enterprise single sign-on, users can access all their cloud applications using their Active Directory credentials.
Intimate Active Directory users of their impending password and account expiry via email and SMS notifications.
Synchronize Windows Active Directory user passwords and account changes across multiple systems automatically, including Microsoft 365, Google Workspace, IBM iSeries, and more.
Strong passwords resist various hacking threats. Enforce Active Directory users to adhere to compliant passwords by displaying password complexity requirements.
Enable Active Directory users to update their latest information themselves. Quick search features help admins scout for information using search keys like contact numbers.
