Pricing  Get Quote


How to create IP-based rules to bypass MFA for specific client locations in ADSelfService Plus

In this article

Objective:

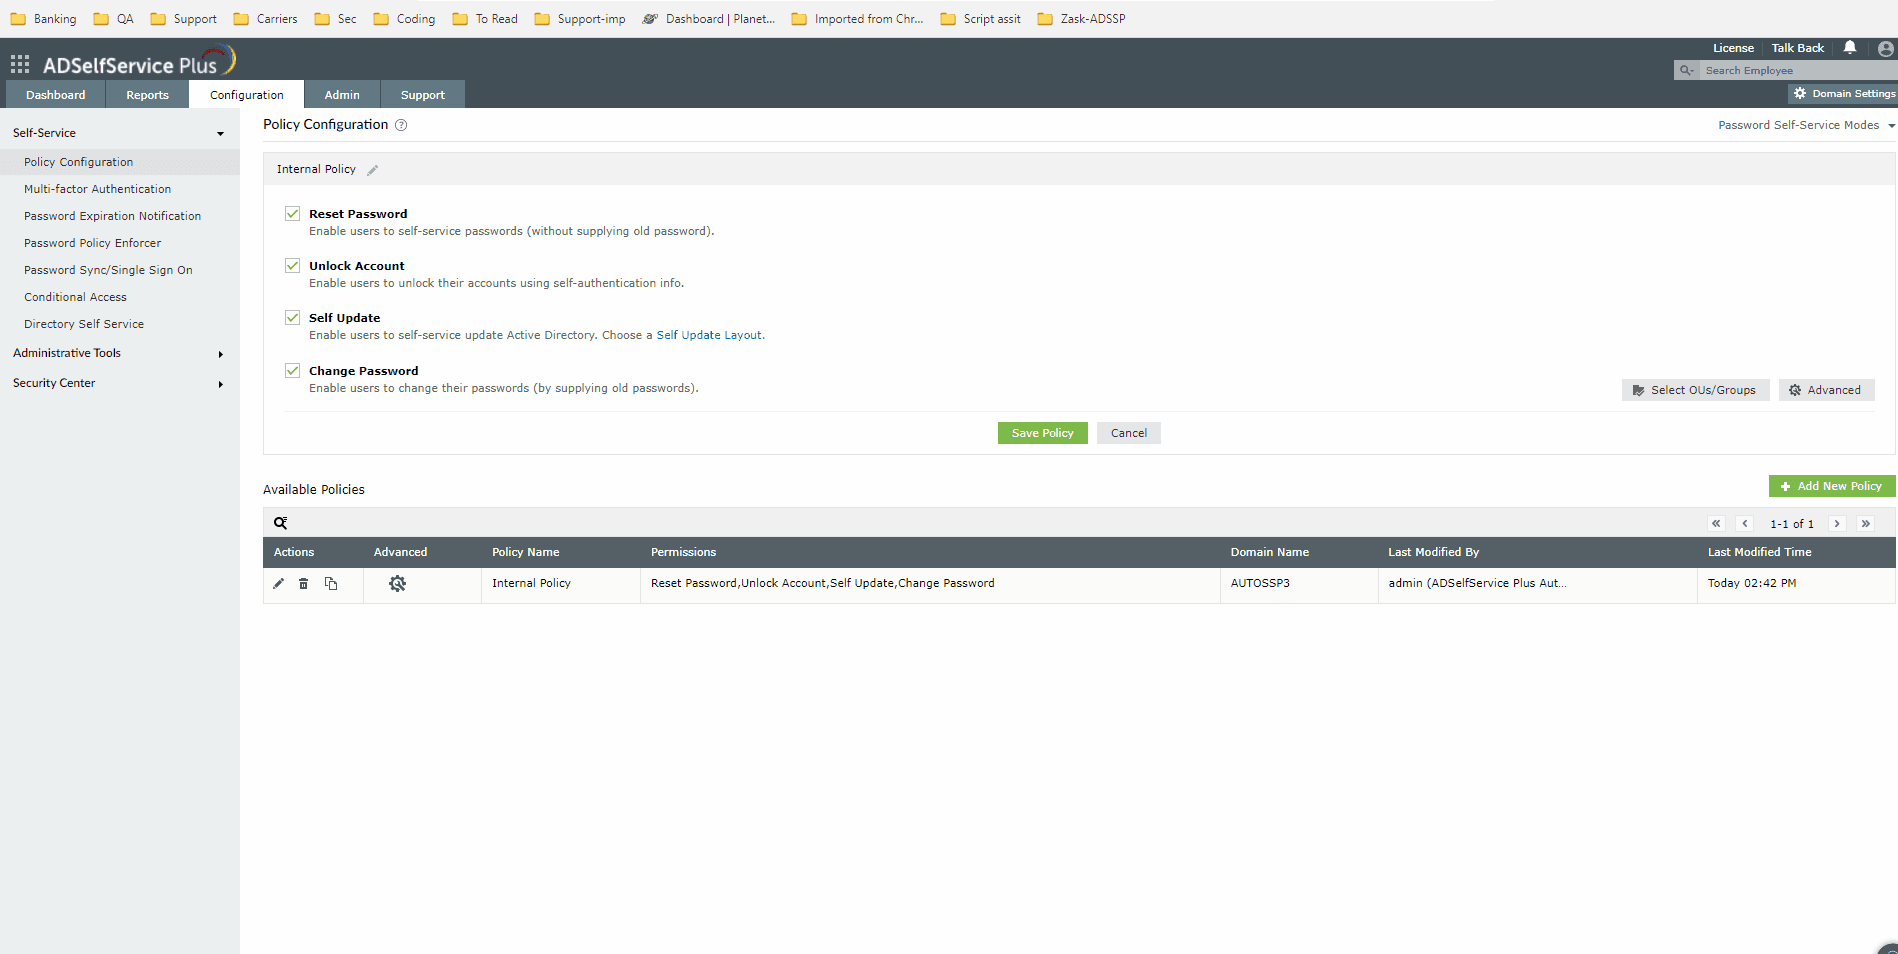
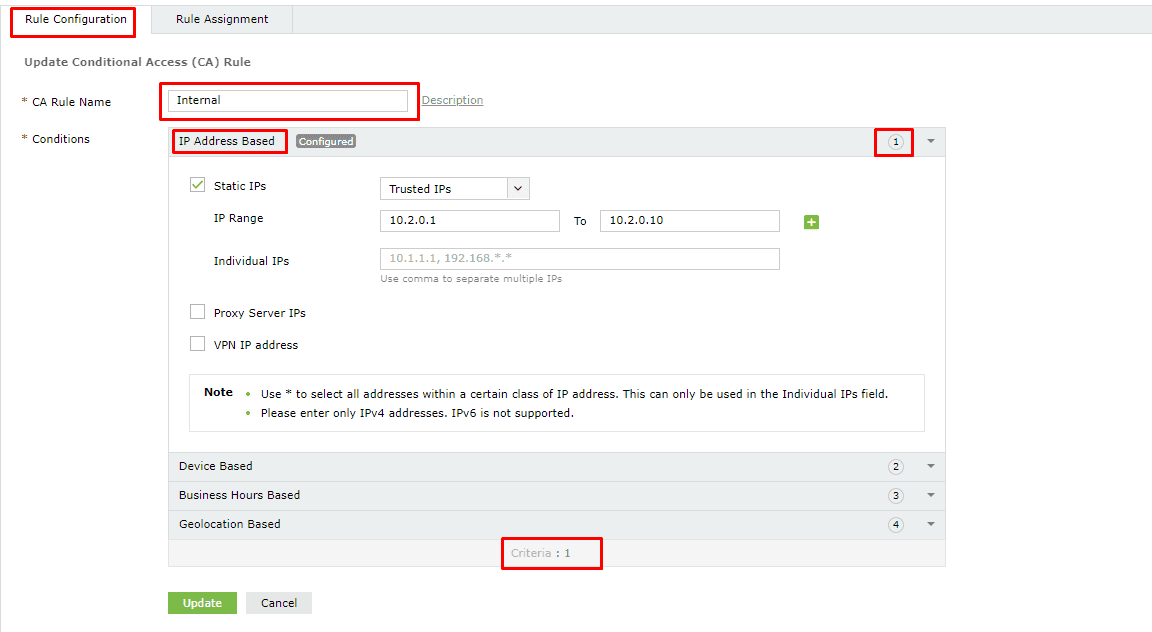
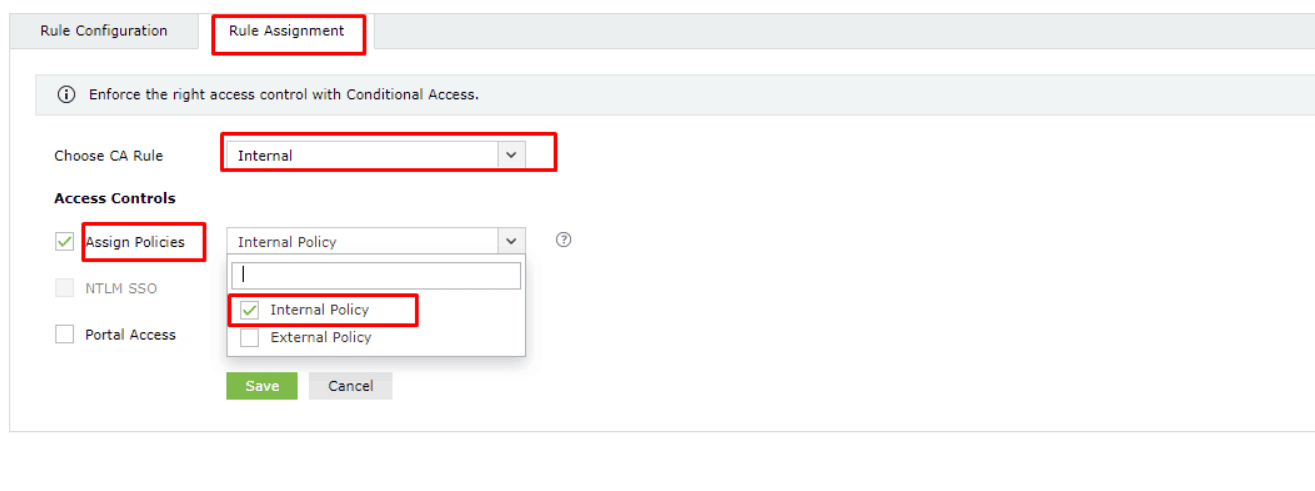
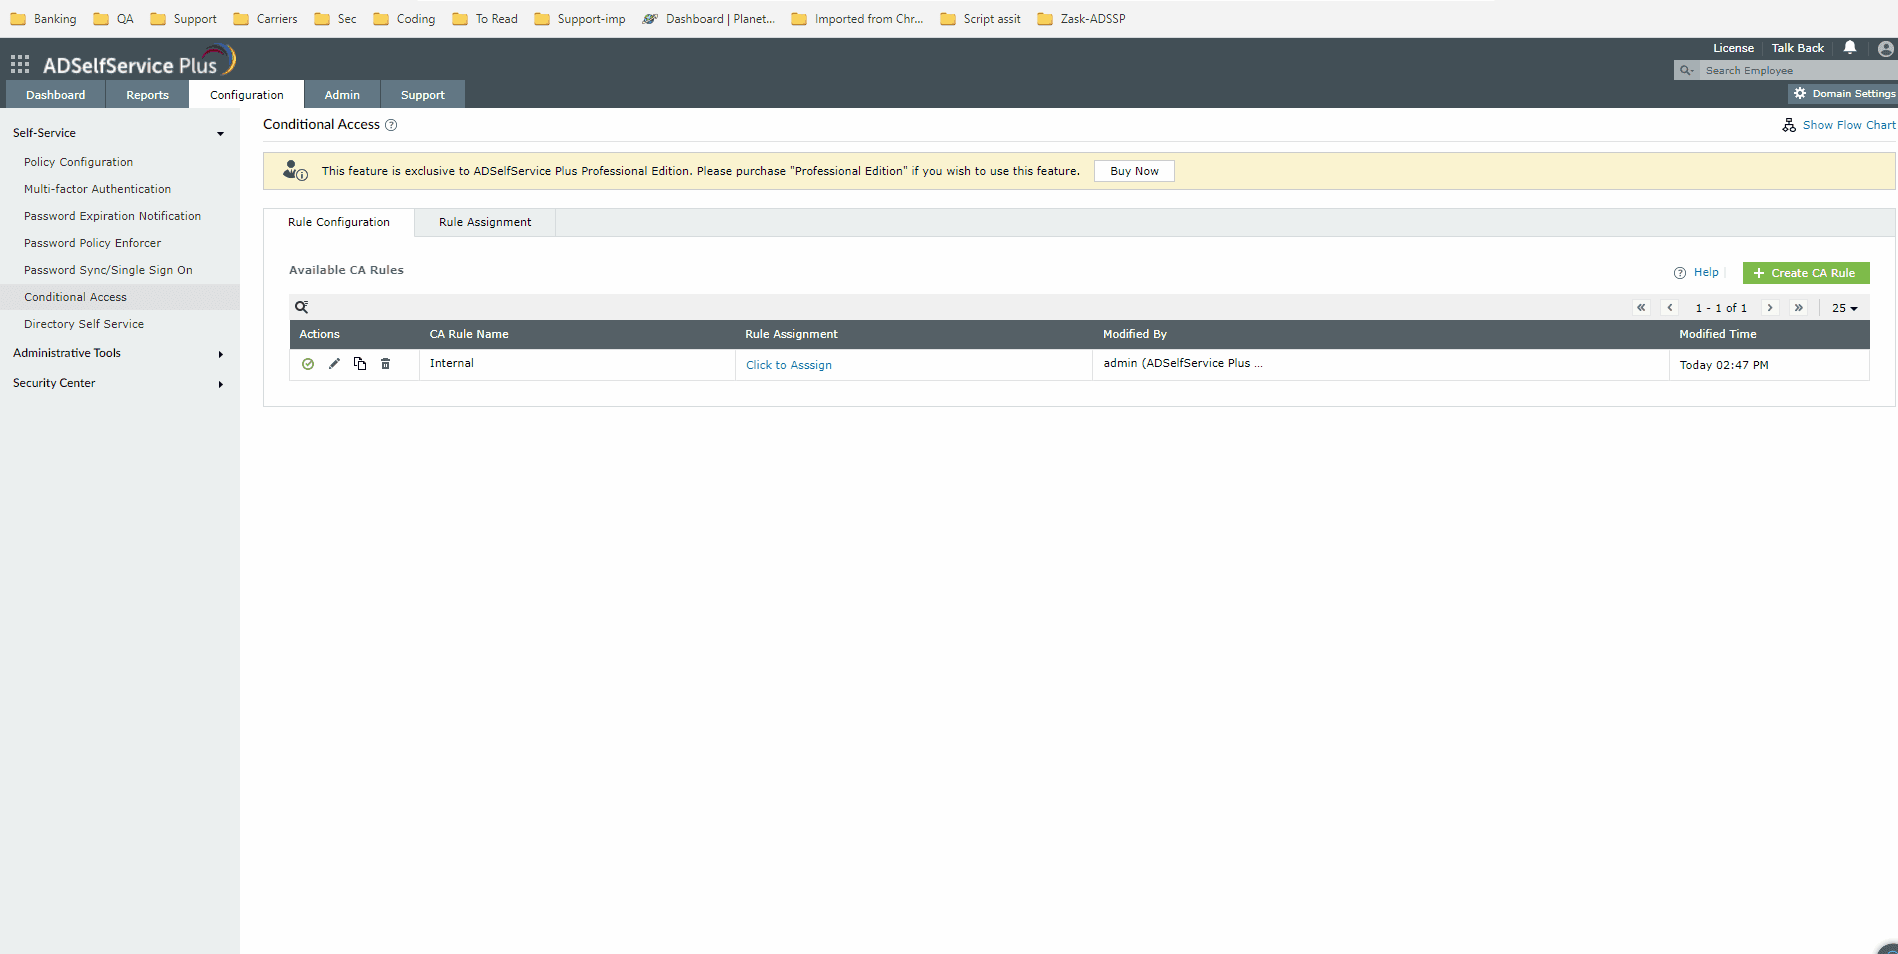
To configure a rule that allows users from a specified area (based on IP) to bypass multi-factor authentication (MFA), follow these guidelines for setting up Adaptive MFA using Conditional Access.

Note: The policy names used in this article are for illustrative purposes only.

Prerequisites:

  • Professional edition of ADSelfService Plus
  • Endpoint MFA add-on license
  • ADSelfService Plus application must be hosted on the internet with X-Forwarded-For enabled

Note on X-Forwarded-For:
Perimeter security is essential for this setup. When users connect from a public IP address, the request initially reaches the perimeter firewall before proceeding to the ADSelfService Plus server. This means the server sees the firewall’s IP address, not the user’s original IP. If the firewall’s IP falls within the internal range, MFA won’t be enforced. To address this, ensure that X-Forwarded-For is enabled at each network hop. This ensures the source IP is included in the request, allowing accurate IP-based Conditional Access.

Steps to enable X-Forwarded-For:

  • To enable X-Forwarded-For in ADSelfService Plus, navigate to the conf folder in the installation directory and open the security.xml file.
  • Update the following <Valve> configuration:

    <Valve className="org.apache.catalina.valves.RemoteIpValve" remoteIpHeader="x-forwarded-for" proxiesHeader="x-forwarded-by" requestAttributesEnabled="true" internalProxies="172\.16\.10\.20"/>, replacing 172\.16\.10\.20 with your proxy server’s IP.

  • Save the file, then restart the ADSelfService Plus service to apply the changes.

Steps to follow

Step 1: Creating policies

  1. Create a policy named "Internal Policy", targeting relevant users and configuring MFA for required endpoints; refer to these policy configuration steps for detailed instructions.
  2. Duplicate the Internal Policy by clicking the Copy option under the Actions column and renaming it to "External Policy".
  3. Edit the Internal Policy and disable MFA for endpoints.
    • Navigate to Configuration > Multi-Factor Authentication, and select the policy named Internal Policy. Select the MFA for Endpoints tab, then in the MFA for Machine Login section, disable the Enable N factor authentication for Machine login checkbox.
    • Creating policies for MFA configuration, including Internal and External policies for targeting relevant users and endpoints.

Step 2: Configuring Conditional Access

  1. Go to Configuration > Self Service > Conditional Access.
  2. Create a rule named Internal Access. This rule will define the internal IP range, ensuring that users within this range are assigned the newly created Internal Policy, where MFA is disabled.
  3. Configuring Conditional Access rules to define the internal IP range and assign the Internal Policy where MFA is disabled

    Assigning Conditional Access rules for the Internal Policy where MFA is disabled.

  4. Copy the Internal Access rule and rename it as External Access. Modify this rule’s criteria to "NOT 1," meaning all IP addresses outside the defined internal range.
  5. Navigate to the Rule Assignment tab, then select External for the Choose CA rule drop-down. In the Access Controls section, enable the Assign Policies checkbox and assign the External Policy.
  6. Configuring a Conditional Access rule for the external IP range by modifying the criteria to 'NOT 1' and assigning the External Policy.

Validation and confirmation:

  • If a user’s machine connects from a public network (i.e., the IP is not in the internal range), the External rule applies, activating the External Policy where MFA is required.
  • If a user’s machine is on the office LAN (i.e., the IP is in the internal range), the Internal rule applies, activating the Internal Policy where MFA is disabled, allowing the user to log in without MFA.

How to reach support

For further assistance, contact our support team here.

Last updated on: 24th June,2025.

Request for Support

Need further assistance? Fill this form, and we'll contact you rightaway.

  • Name
  •  
  • Business Email *
  •  
  • Phone *
  •  
  • Problem Description *
  •  
  • Country
  •  
  • By clicking 'Submit' you agree to processing of personal data according to the Privacy Policy.
Highlights of ADSelfService Plus

Password self-service

Allow Active Directory users to self-service their password resets and account unlock tasks, freeing them from lengthy help desk calls.

One identity with single sign-on

Get seamless one-click access to 100+ cloud applications. With enterprise single sign-on, users can access all their cloud applications using their Active Directory credentials.

Password and account expiry notification

Intimate Active Directory users of their impending password and account expiry via email and SMS notifications.

Password synchronization

Synchronize Windows Active Directory user passwords and account changes across multiple systems automatically, including Microsoft 365, Google Workspace, IBM iSeries, and more.

Password policy enforcer

Strong passwords resist various hacking threats. Enforce Active Directory users to adhere to compliant passwords by displaying password complexity requirements.

Directory self-update and corporate directory search

Enable Active Directory users to update their latest information themselves. Quick search features help admins scout for information using search keys like contact numbers.

ADSelfService Plus trusted by

Embark on a journey towards identity security and Zero Trust