How to install Agents Using GPO Scheduler?
Agents can now be installed in an Active Directory environment using the scheduler option. When the installation process is initiated with the Scheduler, it is triggered in the time specified while configuring the same, unlike a normal GPO script where the installation happens when a device is turned on or when a user logs in. Windows GPO Tool can be used to install agents via scheduler.
If a new GPO policy is applied, the installation for existing installed agents will be skipped on all machines. The remaining agents will be installed according to the new policy.
Advantages:
- Automatically installs the agent more quickly, as it executes during the next GPO refresh cycle, unlike GPO Startup which requires computer restart
Disadvantages:
- Complex to configure via traditional GPO editor.
For Endpoint Central version 10.1.2124.1 and above, it is recommended to use exe based agent installation.
Steps
- .EXE
- .MSI
1. Download the agent package
- Open the server web console.
- Navigate to Agent -> Computers
- Select the required remote office
- Click the Download Agent button
- Rename the file to LocalOffice_Agent.exe
and place it in a folder.
- Open the AD machine to configure GPO.
- GPO configuration - Creating/Provisioning Network Share
- Log on to the Windows Server machine as an administrator.
- Open the Server Manager Console by selecting it from the Administrative Tools menu.
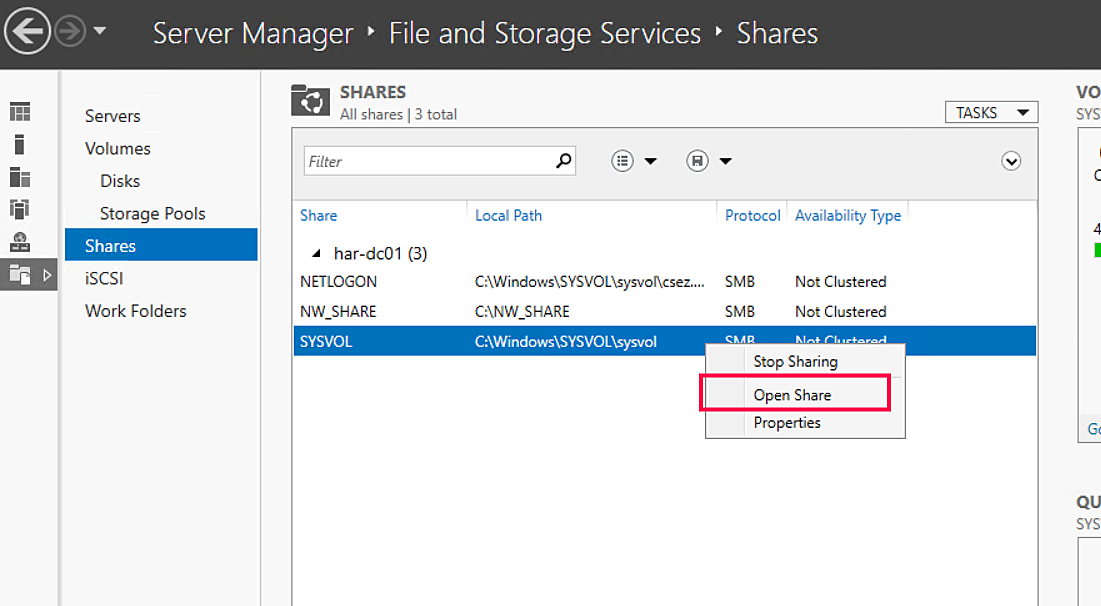
- From the Server Manager Dashboard, select File and storage devices.
- Now, open the Shares tab, select SYSVOL and click on Open Share.
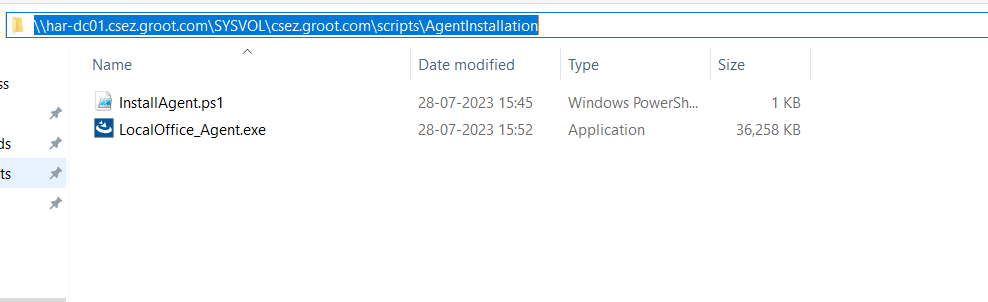
- Navigate to the scripts folder and create a new folder.
- Paste the InstallAgentgposched.ps1 and LocalOffice_Agent.exe downloaded above into the created folder.
- Now copy the network path, as it is needed in later steps. Network file path format - \\Domain name\SysVol\Domain name\Policies\{ID}\Machine\Scripts\Startup
Create a GPO to identify targets for deployment
- Open the Group Policy Management Console (GPMC) by opening Run (Windows key + R) and typing gpmc.msc.
- Once in the GPMC, right-click on your target "organizational unit" (typically a domain), and select 'Create a GPO in this domain, and Link it here' option.

- Enter a Name for the new GPO. For example, "MEDC_DC_agent_installation". Once the new GPO is created, you can see it in the GPMC in the left navigation pane, under Group Policy Objects.
Create a scheduled task to execute the deployment and installation of the Windows Agent
- Open the Group Policy Management Editor by right-clicking on the newly created GPO and selecting Edit.
- In the editor navigation tree, under Computer Configuration, click Preferences -> Control Panel Settings; then right-click Scheduled Tasks.
- Now, click on New -> Select Immediate Task (At least Windows 7).
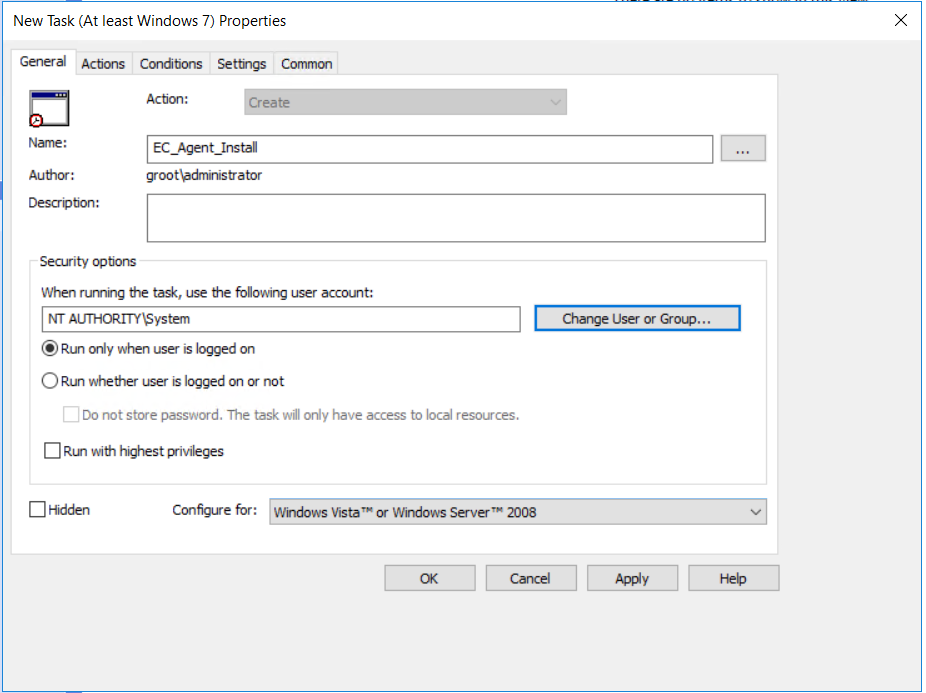
- In the New Task dialog box enter a name and a description (if needed). Under Security options, click the Change User or Group button.
- In the dialog box that appears, enter "system" in the text box, then click Check Names. Confirm that you have the correct values and click OK.
- Make sure that the system object resolves to the value "NT Authority\System," as shown in the Security Options group.
- Kindly ensure that,
- 'Run whether user is logged on or not' is selected.
- 'Run with the highest privileges' is selected.
- 'Configure for:' is set to Windows Vista or Windows Server 2008.
- Click on the Actions tab and then click New. In the New Action dialog box, set the Action drop-down to Start a program. In the Program/script text box, enter the network file path to the shared folder that was created earlier. Then provide the arguments and Start in folder details and click OK.
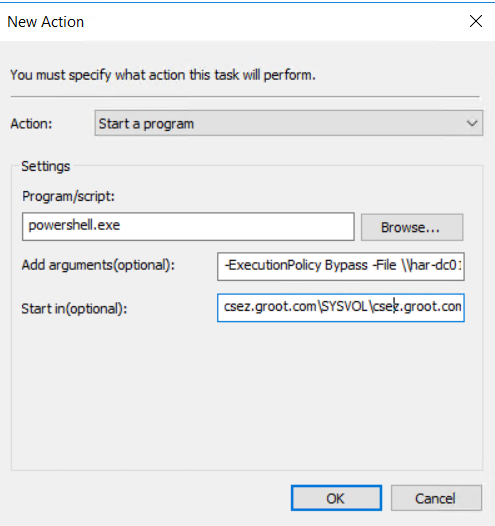
- Program/Script: powershell.exe
Add arguments: -ExecutionPolicy Bypass -File \\DCNAME.zoho.com\SYSVOL\zoho.com\scripts\agent_reinstallation\InstallAgent.ps1
Start In: \\DCNAME.zoho.com\SYSVOL\zoho.com\scripts\agent_reinstallation\ - **(replace \\domain.com\SYSVOL\domain.com\scripts\agent_reinstallation\psinstallagent.ps1 with the network path you copied earlier.
- In the Conditions tab, select the checkbox for Start only if the following network connection is available, then select Any connection. Finally, click APPLY and OK
Note:
- Test it in a few test machines before mass deployment.
- Execute the command gpupdate /force on the client machine with admin privileges to trigger the GPO task.
- The task result can be viewed on the task scheduler tool in the client machine.
- If the scheduled task fails, remove the computer name from the network path. For example, if the network path copied earlier is \\DCNAME.zoho.com\SYSVOL\zoho.com\scripts\agent_reinstallation\psinstallagent.ps1, remove the computer name and change it to \\zoho.com\SYSVOL\zoho.com\scripts\agent_reinstallation\psinstallagent.ps1 and check again.
Troubleshooting steps
Please reach out to support with the below files if issue persists.
- GPO result from the client machine.
- In client machine, open command prompt with administrator mode.
- In command prompt, navigate to C:\ and run the command gpresult /h gprep.html
- Kindly upload gprep.html file under C:\ from the client machine.
- Event Logs
Export and upload application and system event viewer logs
- To download the agent package, Navigate to the server web console ->Agent ->Deployment ->Agent Installation
- Under Using Directory Services, in the GPO tab, click on Download Agent.
- Select the required office.
- Download the Zip file, extract it and follow the steps given below
Note:This can be a local office or a remote office depending on which computers you want to install agents in.
Creating/Provisioning Network Share:
- Log on to the Windows Server machine as an administrator.
- Open the Server Manager Console by selecting it from the Administrative Tools menu.
- From the Server Manager Dashboard, select File and Storage Services.
- Now, open the Shares tab, click on Tasks and select New Share.

- On clicking, a New Share Wizard opens up. In the wizard, click on Select Profile, select the option SMB Share - Quick, then click Next.
- On the Shared Location tab, enter the file path to the shared folder that is created for deploying the agent installer, then click Next.

- On the Specify share name tab, enter a name for your share. Enter a share description, if needed.
- The wizard will now automatically create the local and remote file paths in the share.
- After this, click Next to configure the settings.
- On the Configure share settings wizard page, accept the default options in Other Settings (Allow caching of share)and Click Next.

- On the Specify permission to control access page, accept the default permissions and click Next.
- On the Confirm selections page, review your selections, then click Create.
- The new public share is now visible in the Shares pane (It is recommendable to make the network share accessible to everyone).
- Now, right-click on the share and select Open Share.
- Download the agent installable from the server web console by navigating to Agent-->Agent Installation-->GPO-->Download Agent.
- Also, copy the text from this page and save it as installagentscript.vbs.
- Place UEMSAgent.msi, UEMSAgent.mst,DMRootCA.crt, DMRootCA-Server.crt and installagentscript.vbs file in the share.
Kindly include DCAgentServerInfo.json file only if the build version is 10.1.2124.1 and above.
Note: Be sure to capture and store the full network file path (not the local path), it is needed in the later steps.

Create a GPO to identify targets for deployment
- Open the Group Policy Management Console (GPMC) by opening Run (Windows key + r) and typing gpmc.msc.
- Once in the GPMC, right-click on your target "organizational unit" (typically a domain), and select Create a GPO in this domain, and Link it here option.

Enter a Name for the new GPO. For example, "Desktopcentral_agent_install."
Note: By default, the GPO applies to all users and computers that successfully authenticate to the Active Directory domain that you selected.
- Once the new GPO is created, you can see it in the GPMC in the left navigation pane, under Group Policy Objects.
Note: You can modify the scope of computers to which the agent is deployed and installed by changing the Security Filtering values for the new GPO.
Create a scheduled task to execute the deployment and installation of the Windows Agent
- Open the Group Policy Management Editor by right-clicking on the new GPO you created, and selecting Edit.
- In the editor navigation tree, under Computer Configuration, click Preferences > Control Panel Settings; then, right-click Scheduled Tasks.
- Now, click on New and select Immediate Task (At least Windows 7).

- This opens the New Task dialog box. Enter a Name and a description (if needed).
- Under Security options, click the Change User or Group button.
- In the dialog box that appears, enter "system" in the text box, then click Check Names. Confirm that you have the correct values and click OK.
- Make sure that the system object resolves to the value "NT Authority\System," as shown in the Security Options group.
- Also ensure the following:
- Ensure that Run whether user is logged on or not is selected.
- Ensure that Run with highest privileges is selected.
- Ensure that Configure for: is set to Windows Vista or Windows Server 2008.
- Click on the Actions tab and then click New.
- In the New Action dialog box, set the Action drop-down to Start a program. In the Program/script text box, enter the network file path to the shared folder that was created earlier. Then provide the arguments and Start in folder details and click OK.

Program/script:
\\computer_name\DCAgentShare\installagentscript.vbs
Add arguments:
UEMSAgent.msi UEMSAgent.mst (for below 10.0.653 version)
UEMSAgent.msi UEMSAgent.mst DMRootCA.crt DMRootCA-Server.crt(for versions after 10.0.653)
Start in:
\\computer_name\DCAgentShare\
- In Conditions tab, select the checkbox for Start only if the following network connection is available, then select Any connection.
- Finally, click OK
You have now successfully initiated agent installation using GPO Scheduler.