How to configure SSO for Amazon WorkSpaces using ADSelfService Plus
In this article
Objective
This guide provides step-by-step instructions for enabling single sign-on (SSO) for Amazon WorkSpaces using ManageEngine ADSelfService Plus.
By integrating ADSelfService Plus with Amazon WorkSpaces via SAML 2.0, users can authenticate using their primary authentication method along with MFA in ADSelfService Plus, and gain seamless access to Amazon WorkSpaces.
Prerequisites
- Log in to ADSelfService Plus as an administrator.
- Go to Configuration > Self-Service > Password Sync/Single Sign On.
- In the Configured Applications section, click Add Application.
- In the All Applications page that opens, click Custom Application.
- In the Create Custom Application page that opens, click IdP Details in the top-right corner.
- In the pop-up that opens, you can download the IdP Metadata and copy the Login URL.
Note: To achieve complete single sign-on in AWS WorkSpaces without requiring an AWS Directory (AWS Managed AD or AD Connector) username and password, Certificate-Based Authentication (CBA) must be enabled. Even with SAML authentication, users are still required to complete AWS Directory authentication.
Amazon WorkSpaces (service provider) configuration steps
Step 1: Create a SAML identity provider in AWS
- Sign in to the AWS Management Console and open the AWS IAM Console.
- In the left-hand navigation pane, select Identity providers under the Access management section, then click Add provider.
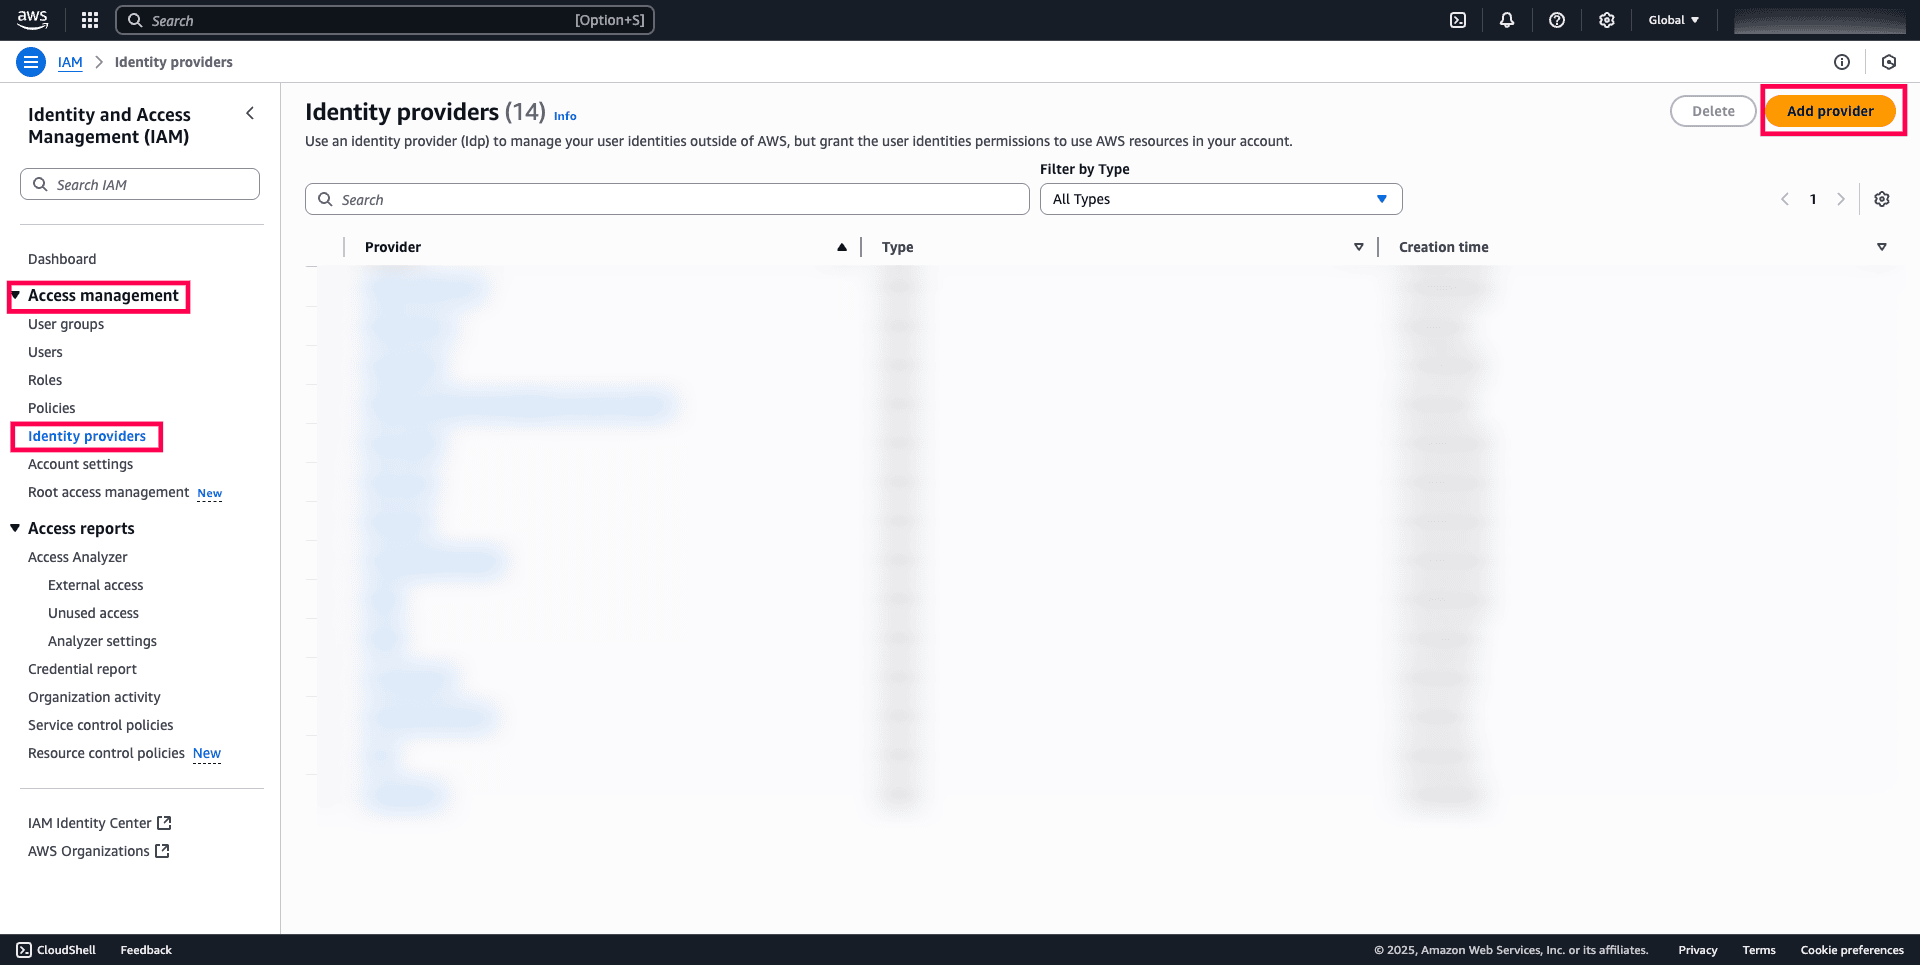
Fig. 1: Adding an identity provider to begin SAML configuration.
- Under Add provider:
- Choose SAML as the provider type.
- Enter the Provider name.
- Upload the metadata XML file downloaded from ADSelfService Plus under the Metadata document section.
- Click Add provider to complete the setup.
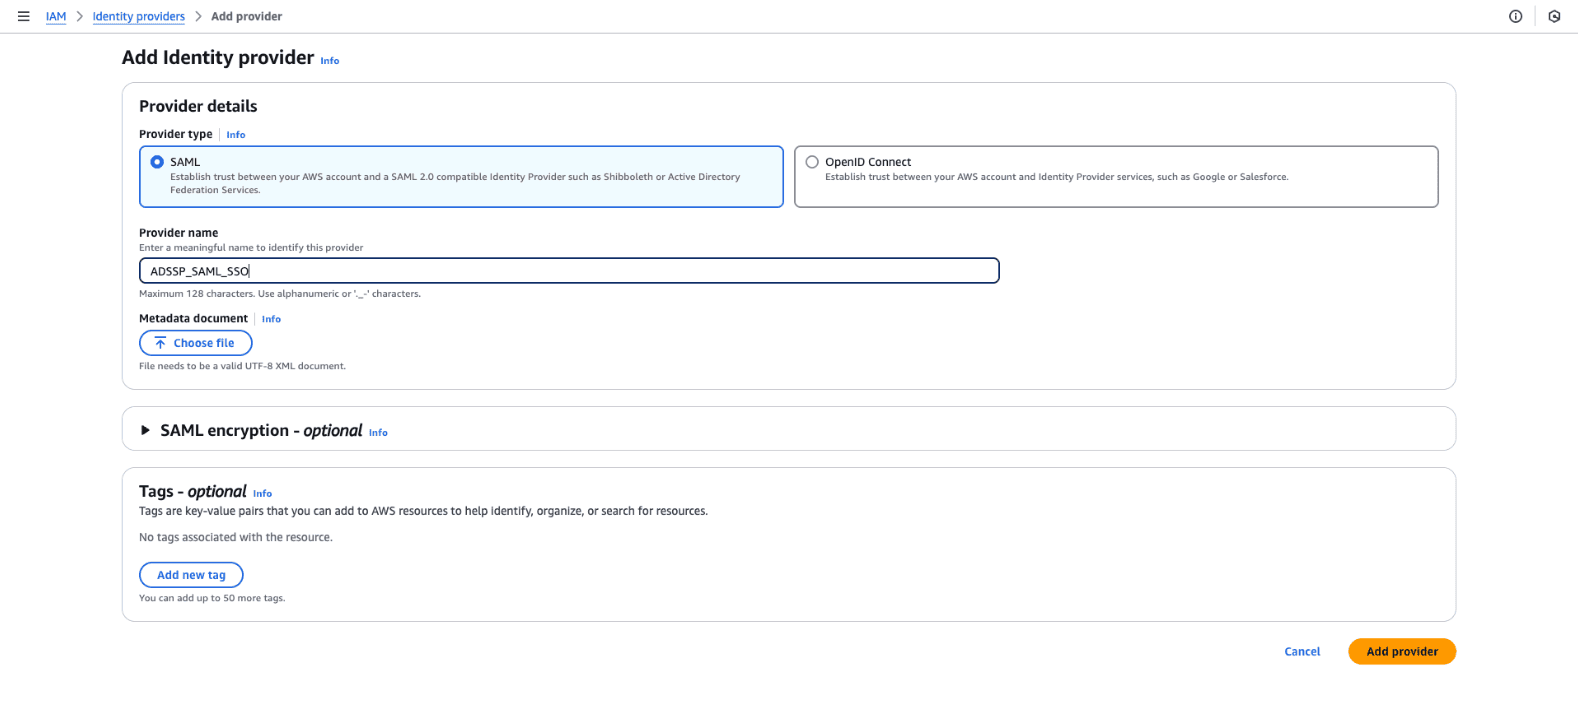
Fig. 2: Steps to create a SAML identity provider in AWS.
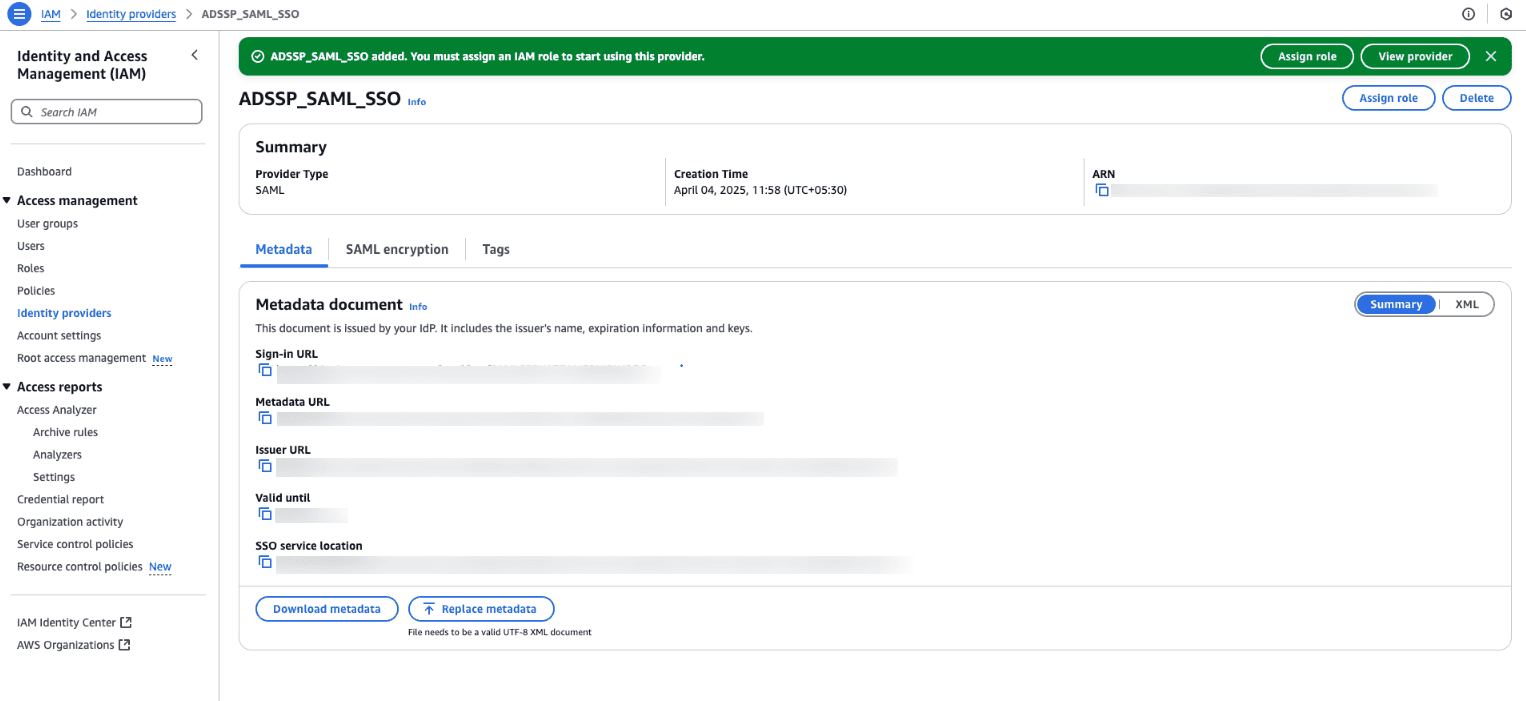
Fig. 3: Information about the SAML identity provider created in AWS.
Step 2: Create a SAML federated IAM role
- In the IAM console, navigate to Roles and click Create role.
- Choose SAML 2.0 federation as the trusted entity type.
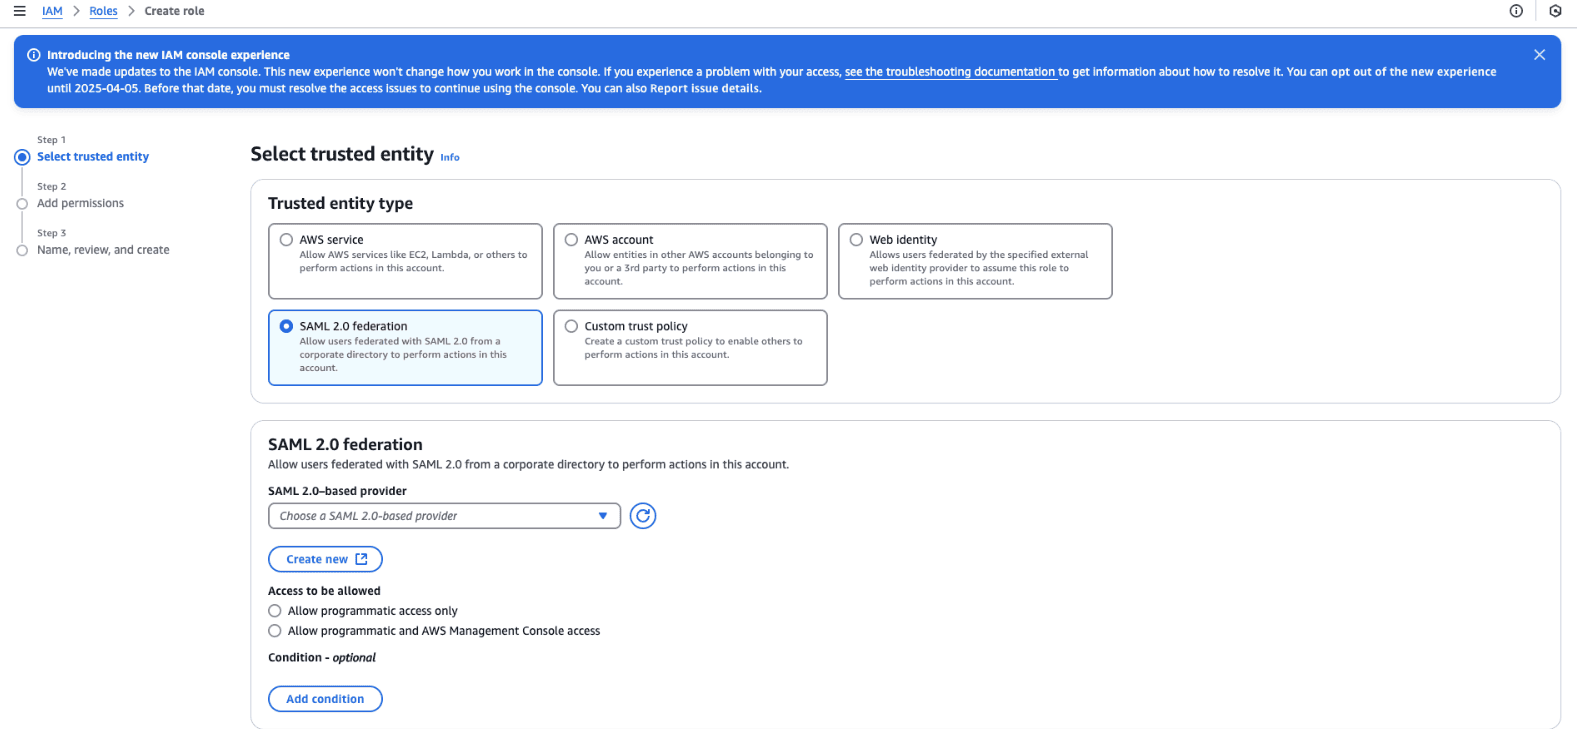
Fig. 4: Steps to create a SAML federated IAM role and define its permissions for AWS access.
- Select the SAML Provider created in the previous step.
- Do not select the following options:
- Allow programmatic access only
- Allow programmatic and AWS Management Console access
- Select SAML:sub_type as the Attribute and enter persistent as the Value.
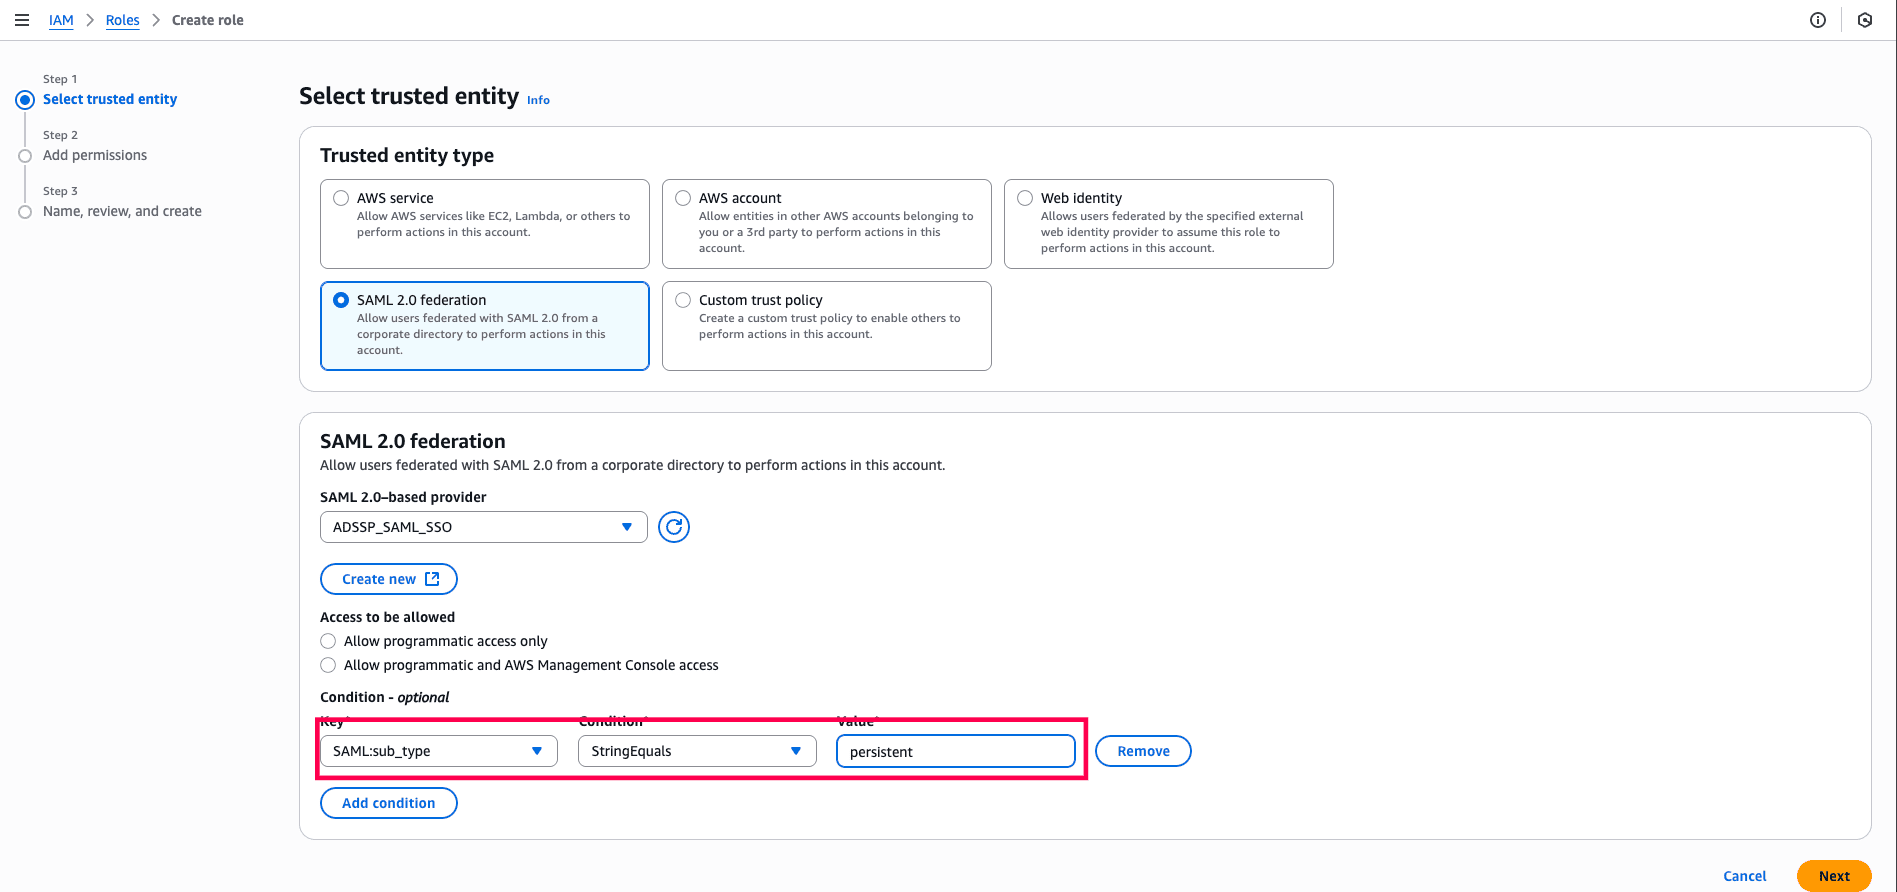
Fig. 5: Step to choose the corresponding Attribute and Value for the SAML federated role.
- Set a Role name and Description.
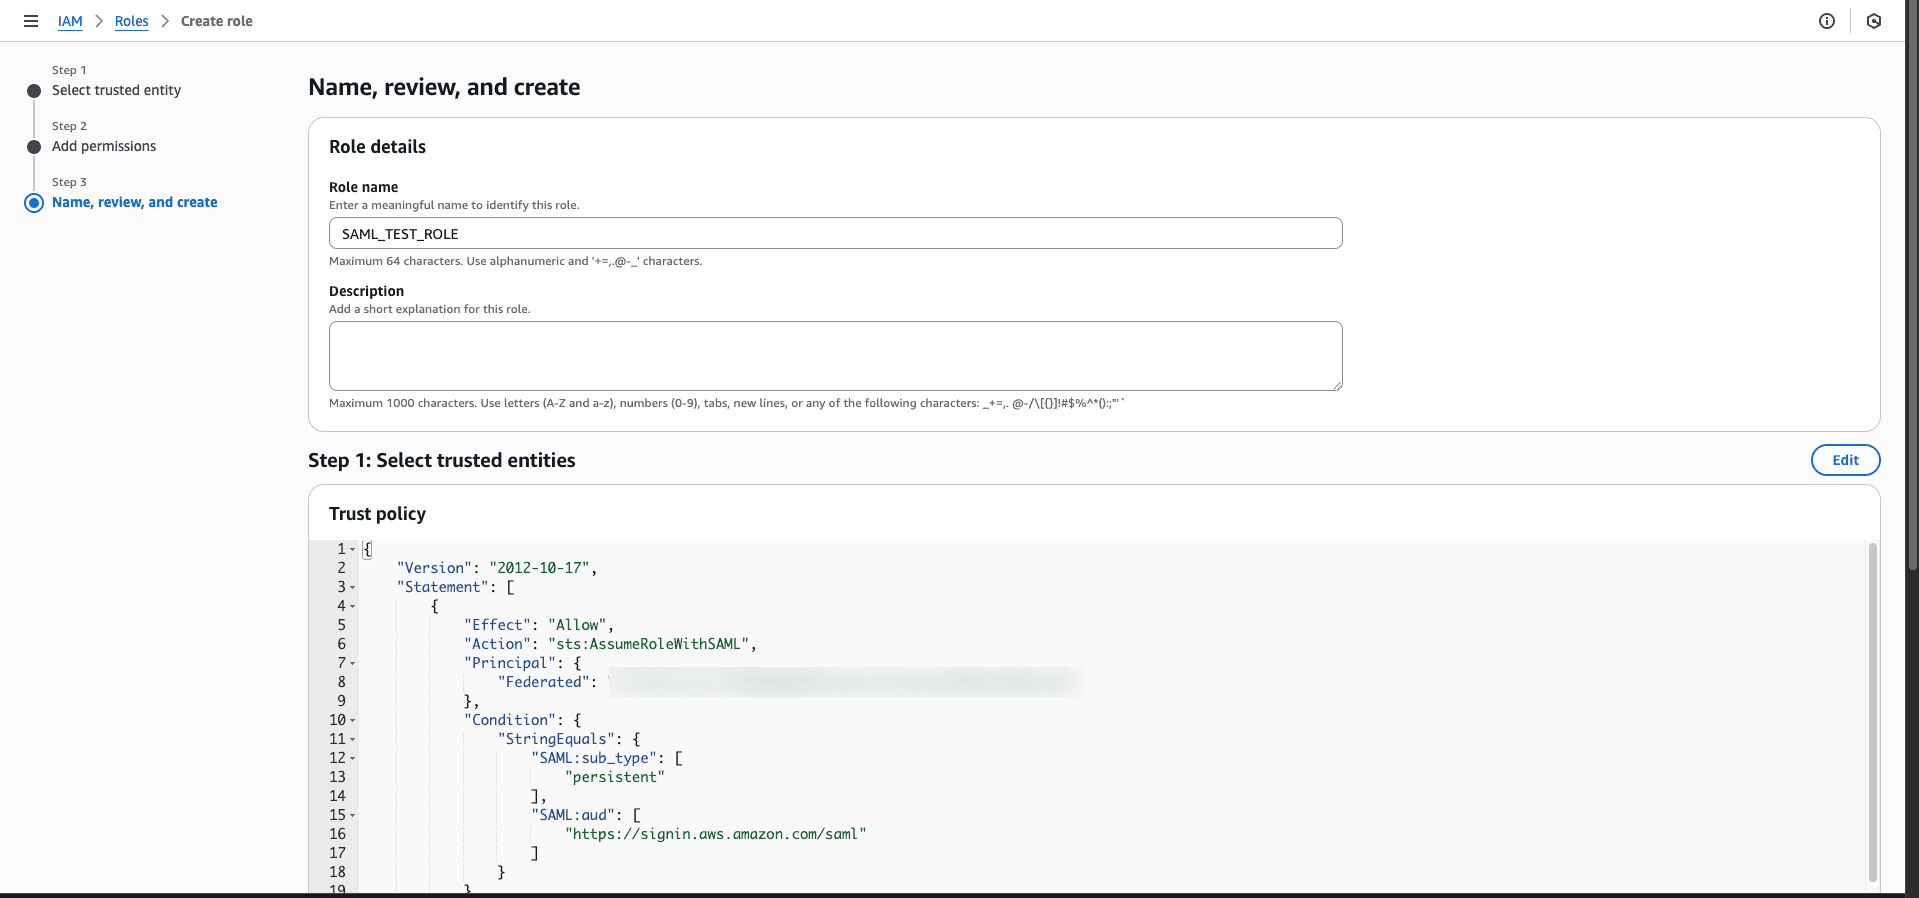
Fig. 6: Step showing where to assign a role name and description while creating a SAML federated IAM role in AWS for WorkSpaces access.
- Review the role details and click Create role.
Step 3: Modify the trust policy for the IAM role
- Select the newly created IAM role and click the Trust relationships tab.
- Click Edit trust policy.
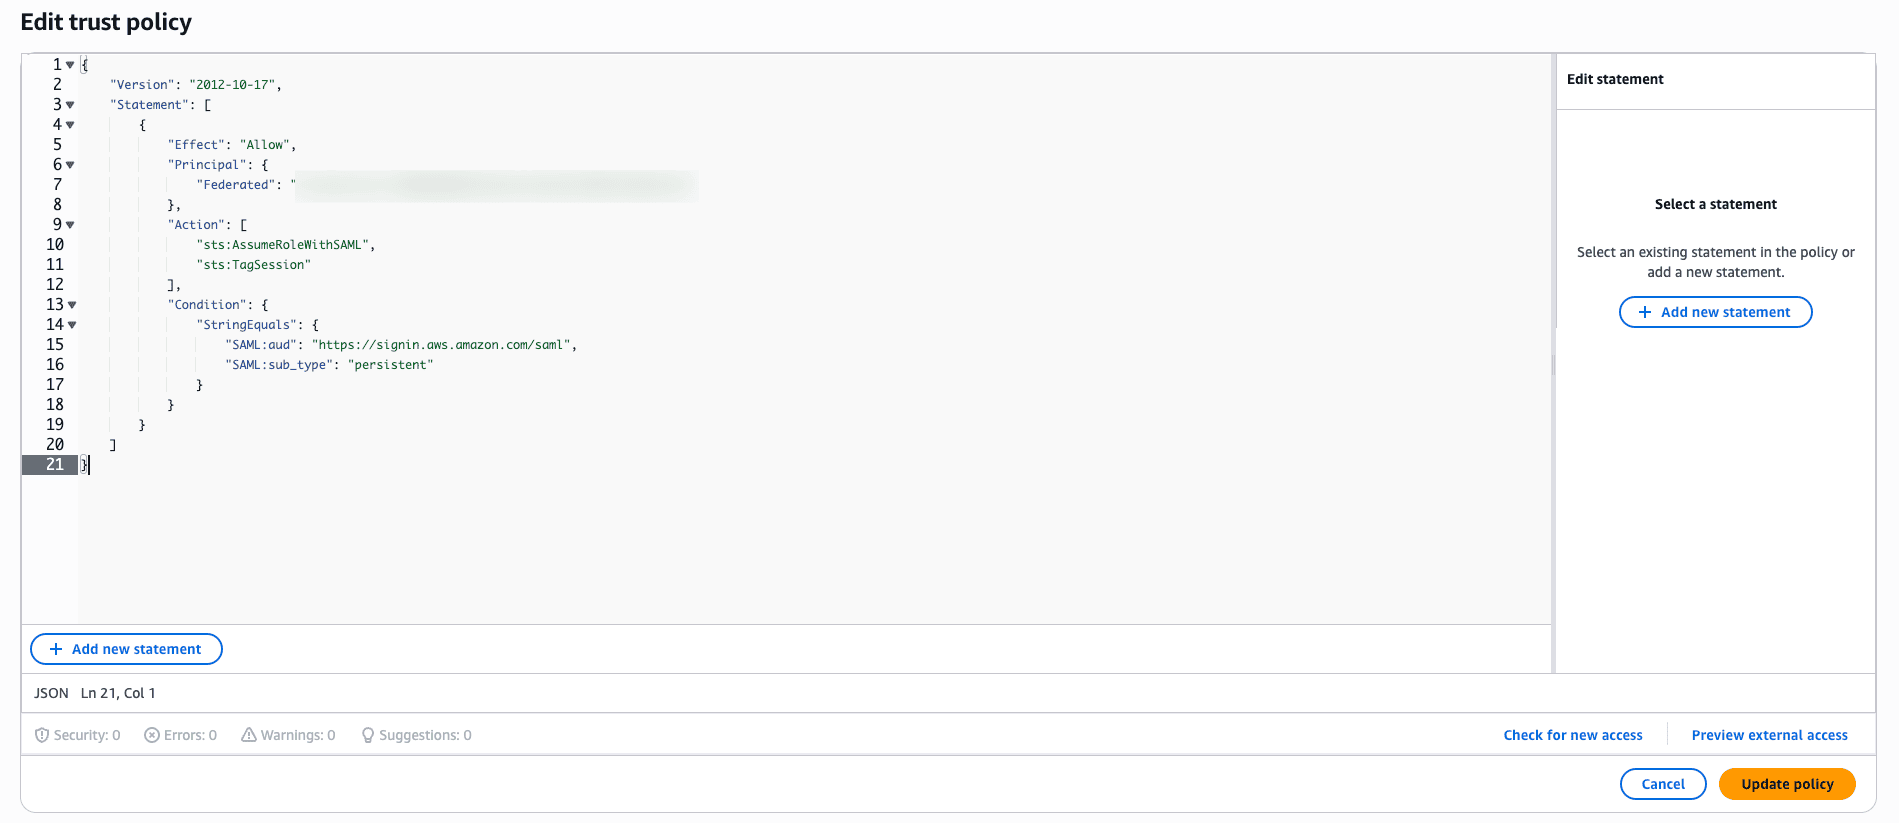
Fig. 7: Steps to modify the trust policy for the IAM role.
- Replace the placeholders in the JSON trust policy with the following:
- <ACCOUNT-ID-WITHOUT-HYPHENS> → Replace the Account ID with the value you obtain from the Profile section.
- <PROVIDER-NAME> → Replace with the name of the SAML provider you created in Step 1.
- Ensure that the Action field includes both sts:AssumeRoleWithSAML and sts:TagSession permissions.
- Click Update policy.
Step 4: Embed an inline policy for Amazon WorkSpaces SAML access
To allow SAML-based access to Amazon WorkSpaces, you need to add an inline policy to the IAM role.
- In the IAM role, click the Permissions tab. In the Permissions policies section, find the Add permissions drop-down and select Create inline policy.
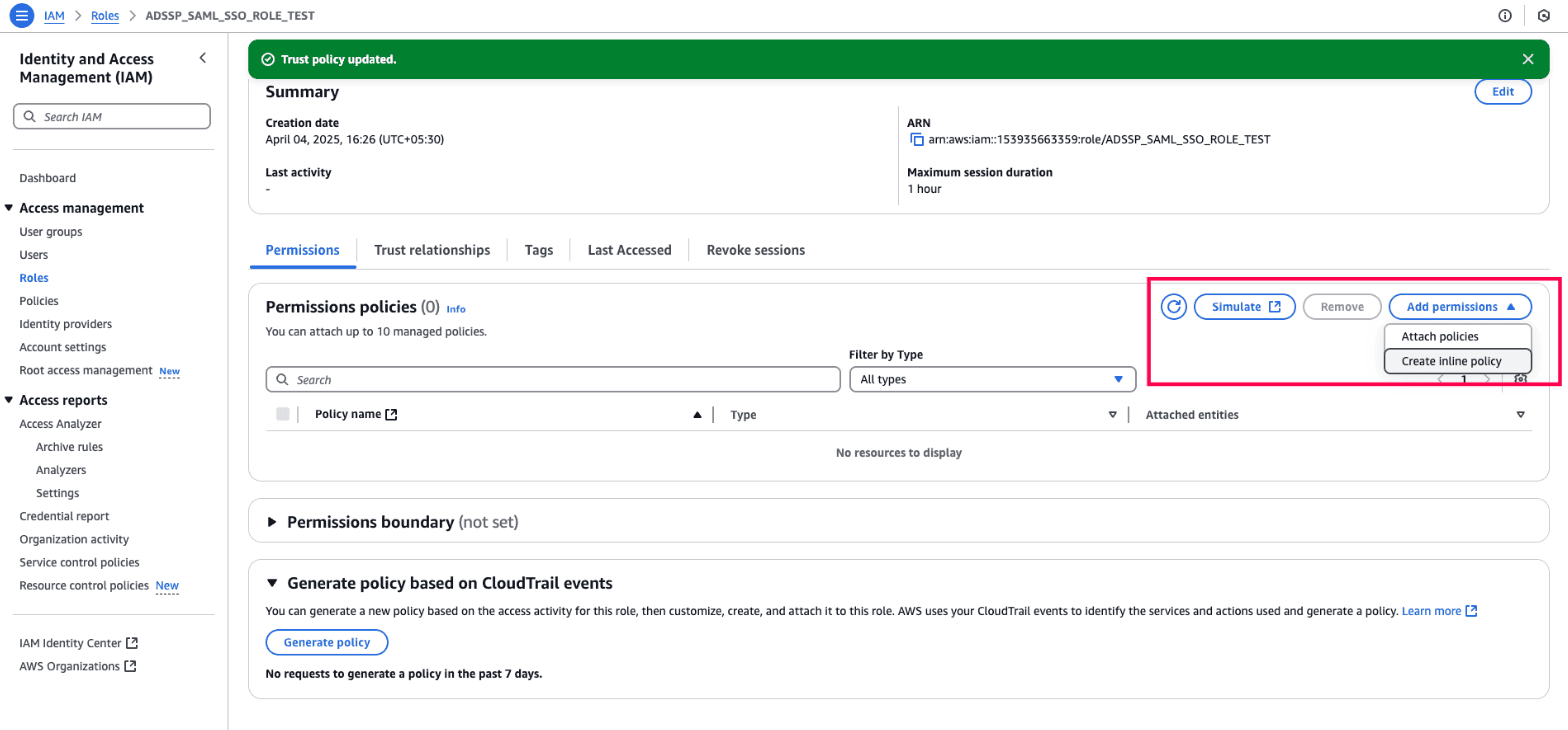
Fig. 8: Steps to add an inline policy to the IAM role to enable SAML-based access to Amazon WorkSpaces.
- In the Policy editor wizard, click the JSON tab.
- Replace the following placeholders:
- <REGION-CODE> → Replace this with the AWS Region where your WorkSpaces directory is located. You can locate the current region in the top-right corner of the AWS Management Console.
- <DIRECTORY-ID> → Replace the Directory ID with the value you obtain from the WorkSpaces management console.
- <ACCOUNT ID> → Replace the Account ID with the value you obtain from the Profile section.
Refer to the image below to identify the Directory ID placeholder.

Fig. 9: Step shows where to replace the Directory ID placeholder with your actual WorkSpaces Directory ID in the inline policy.
Refer to the image below to identify the Account ID placeholder.
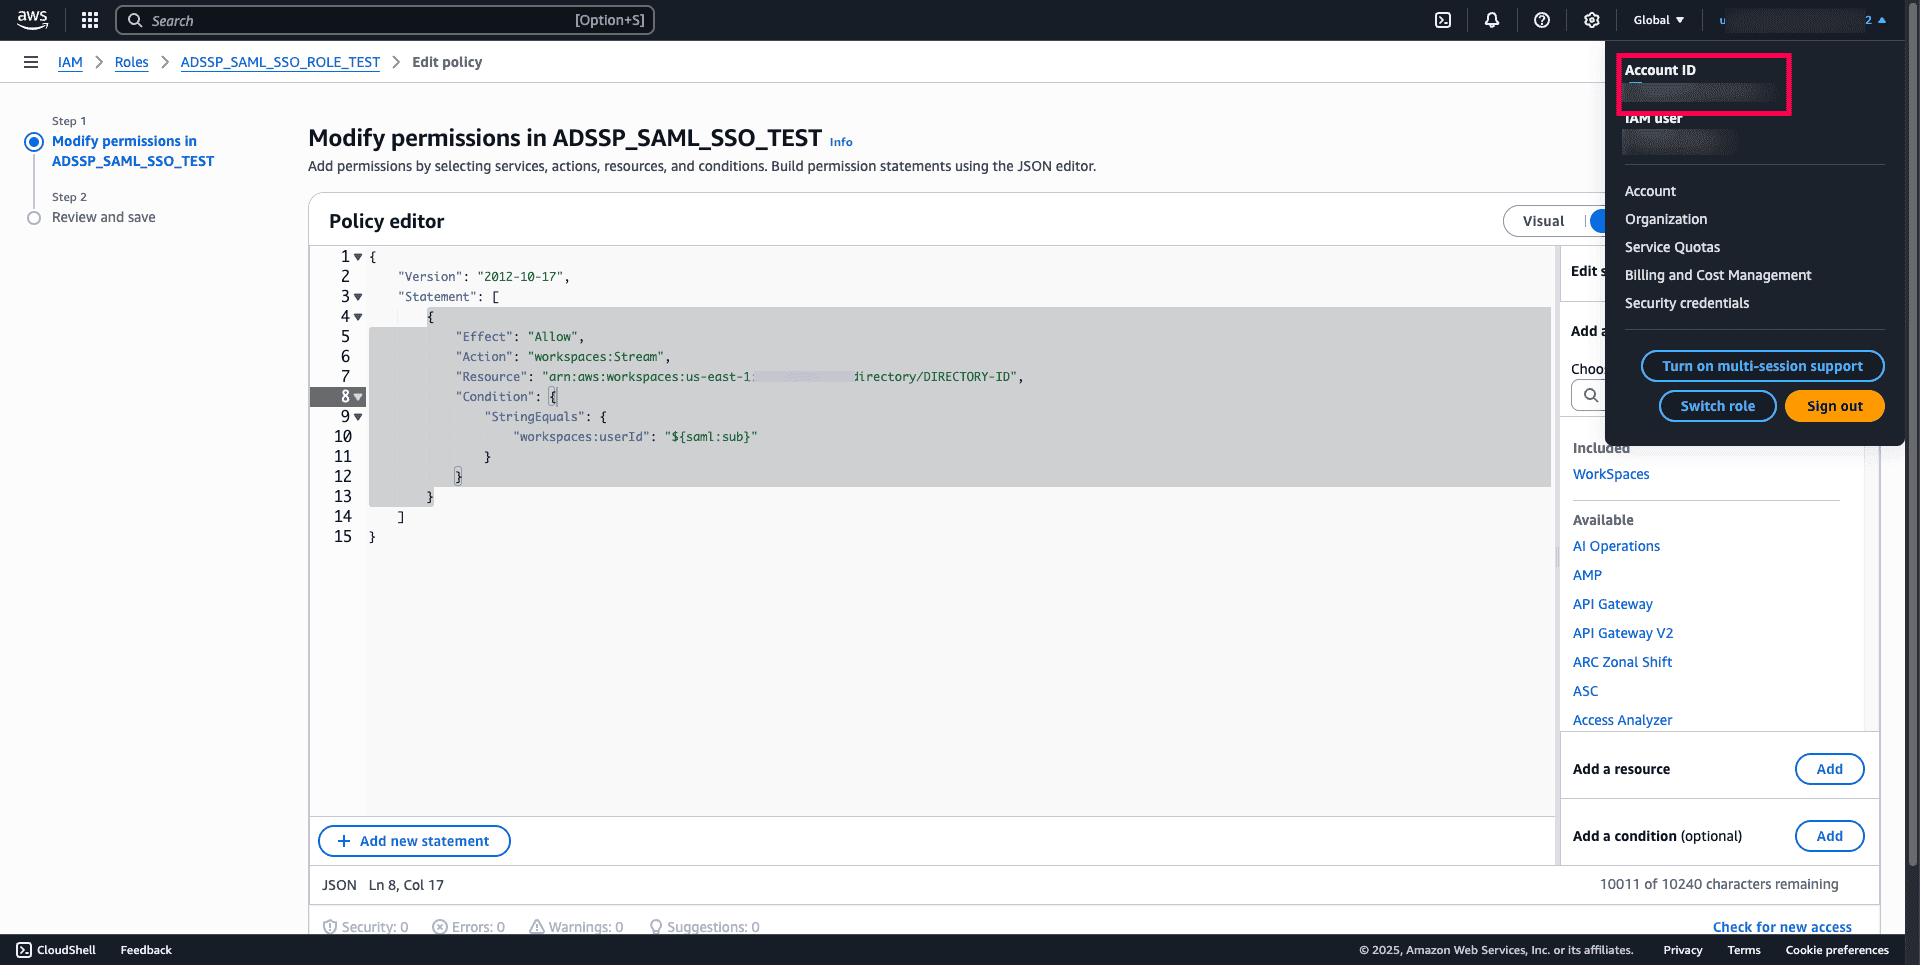
Fig. 10: Step shows where to replace the Account ID placeholder with your actual Account ID in the inline policy.
- Review the policy and click Create policy to apply it.
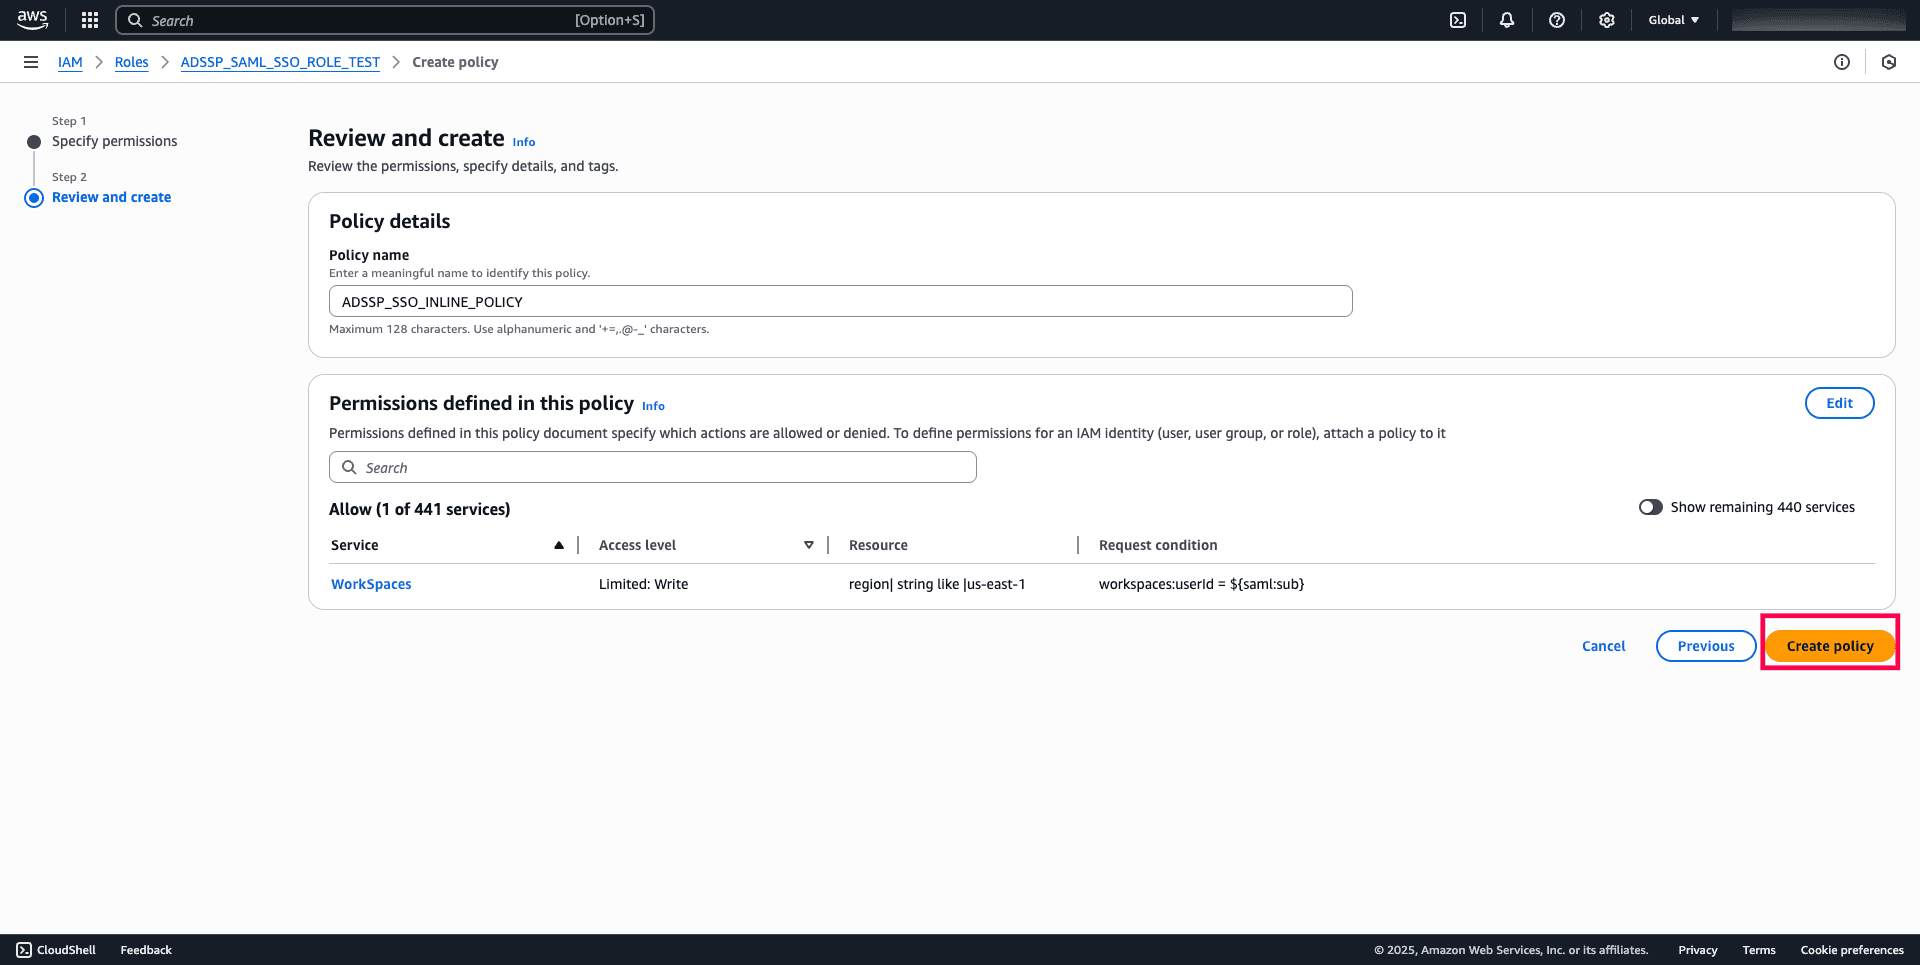
Fig. 11: Final step to review and apply the inline policy for enabling SAML-based access to Amazon WorkSpaces.
Step 5: Enable integration with SAML 2.0 on your WorkSpaces directory
- Sign in to the AWS Management Console and open the Amazon WorkSpaces console.
- In the navigation pane, select Directories.
- Choose on the Directory ID for your WorkSpaces.
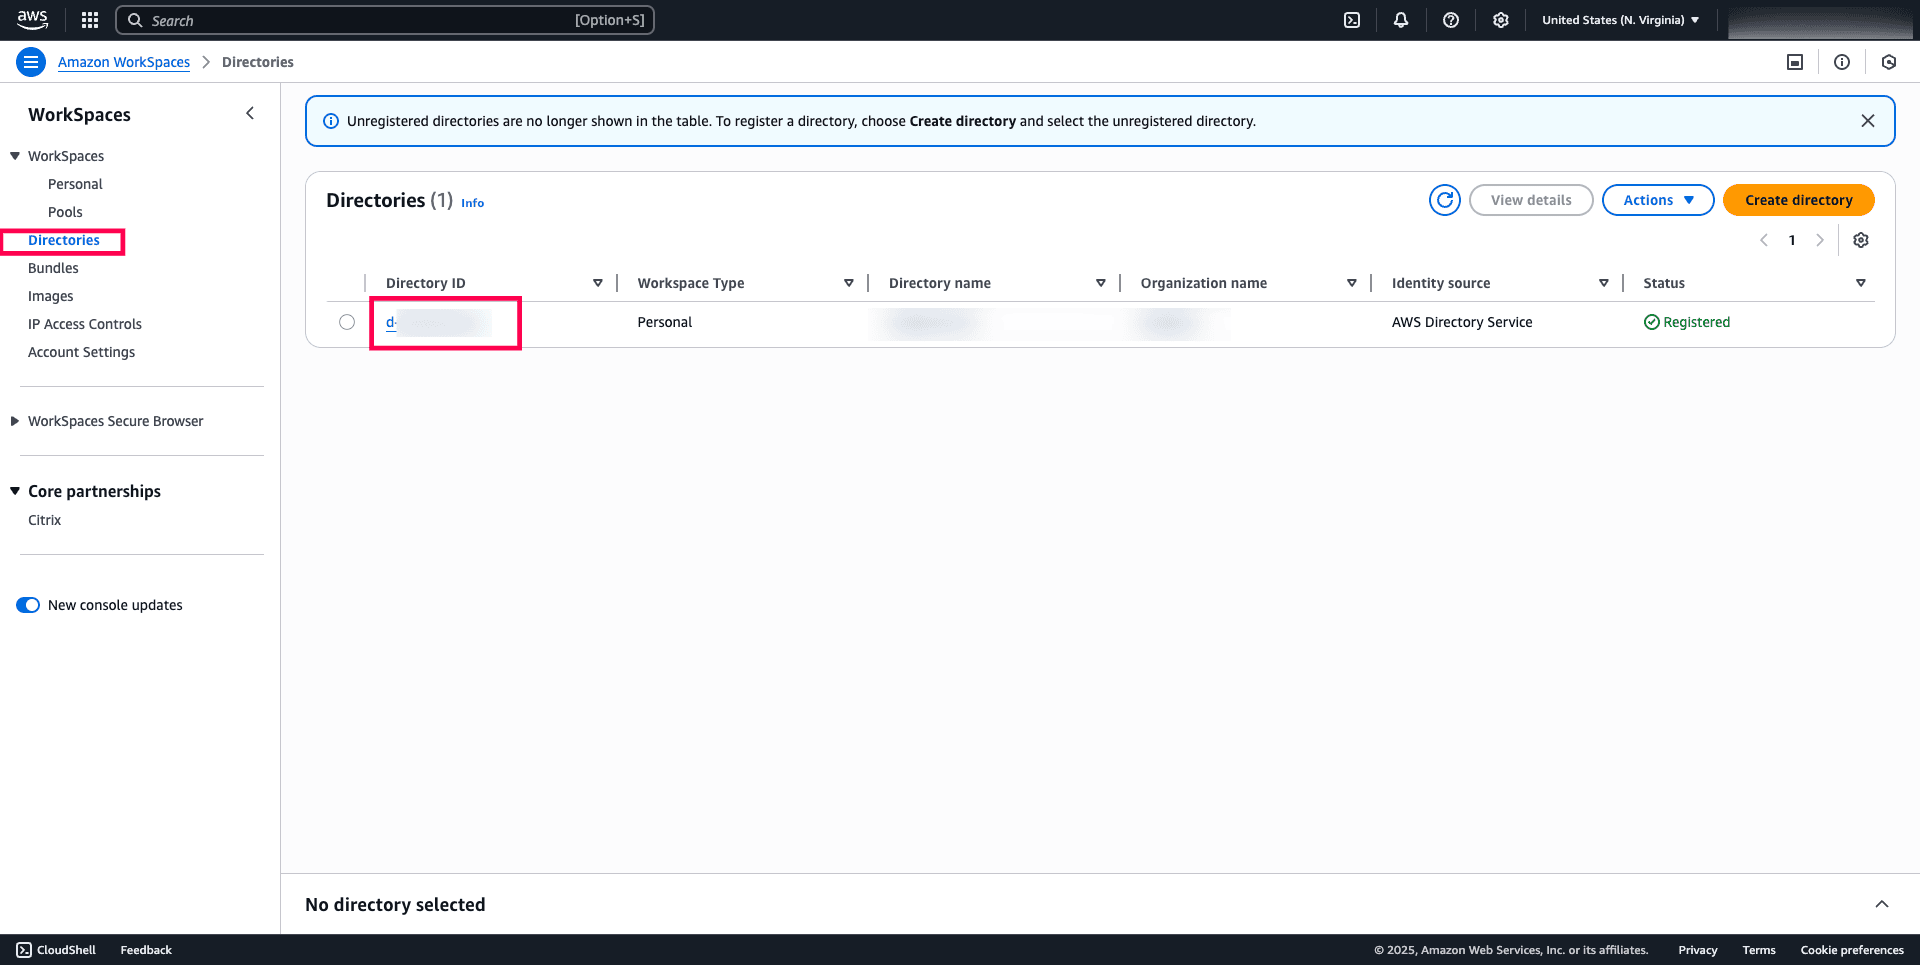
Fig. 12: Steps to select the desired Directory ID.
- Under the Authentication section, choose Edit authentication.
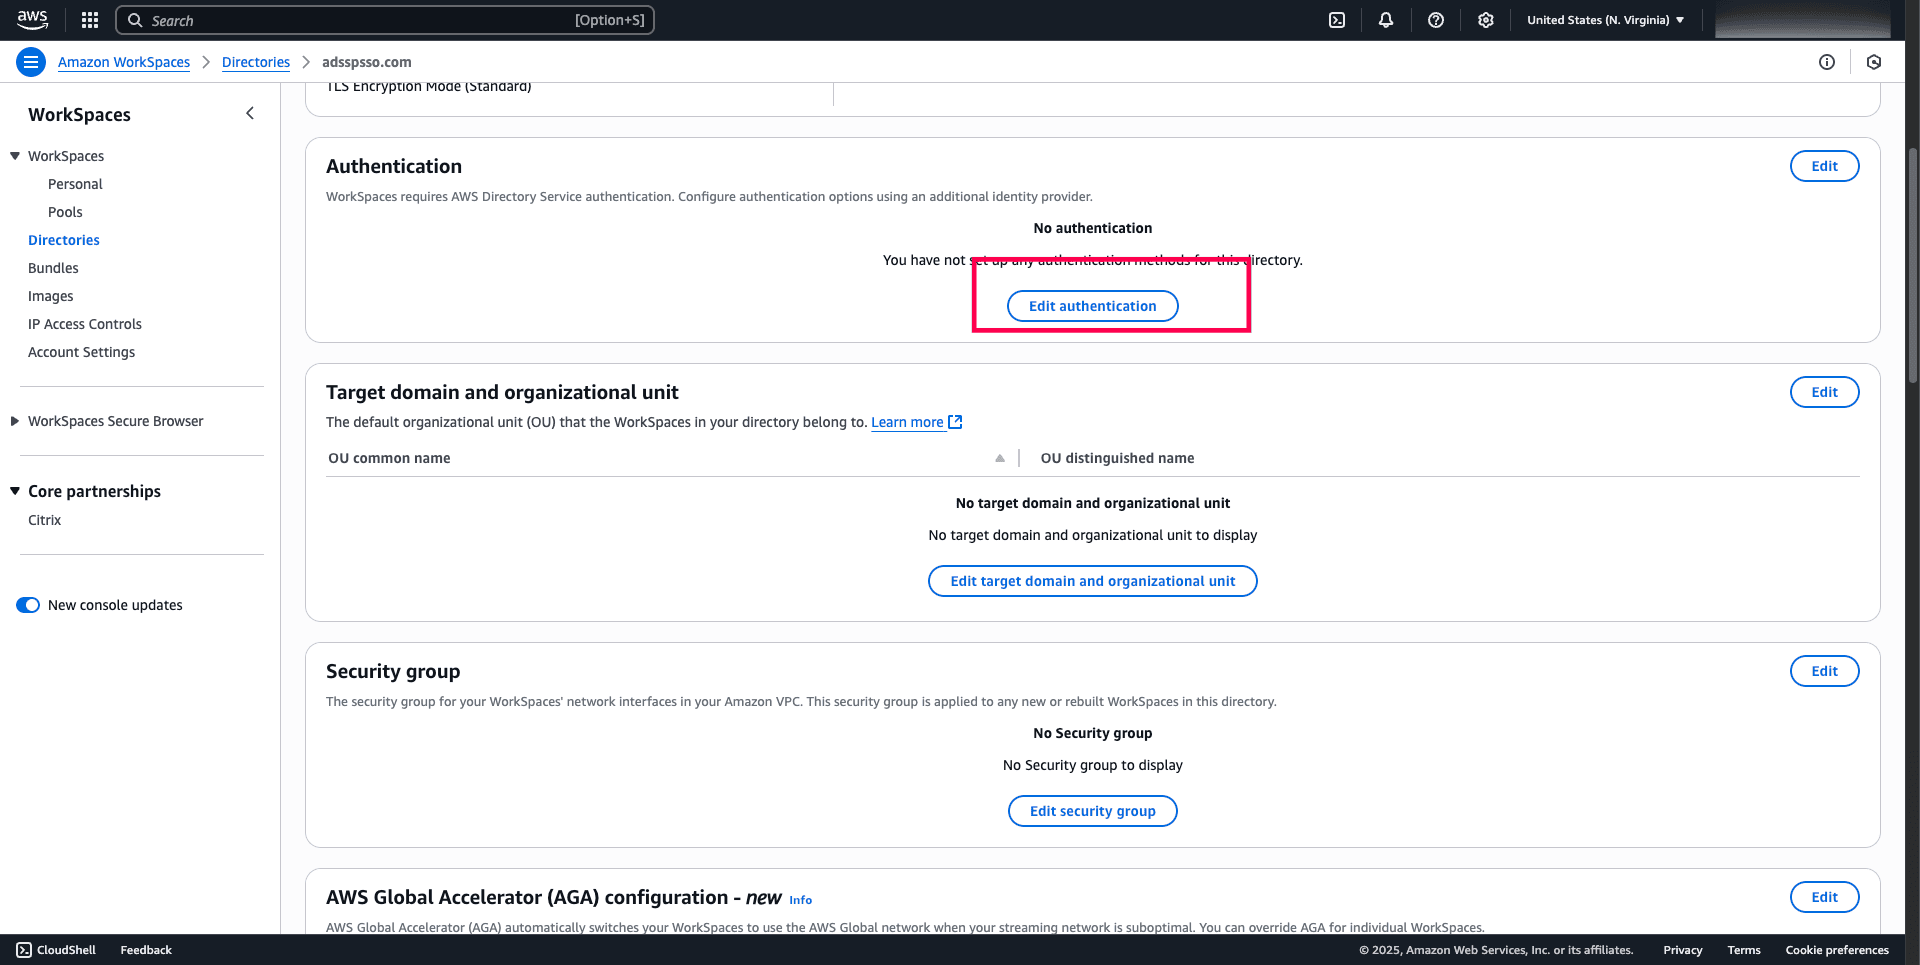
Fig. 13: Navigating to the authentication section in Amazon WorkSpaces to edit authentication.
- Choose Edit SAML 2.0 Identity Provider to configure SAML settings.
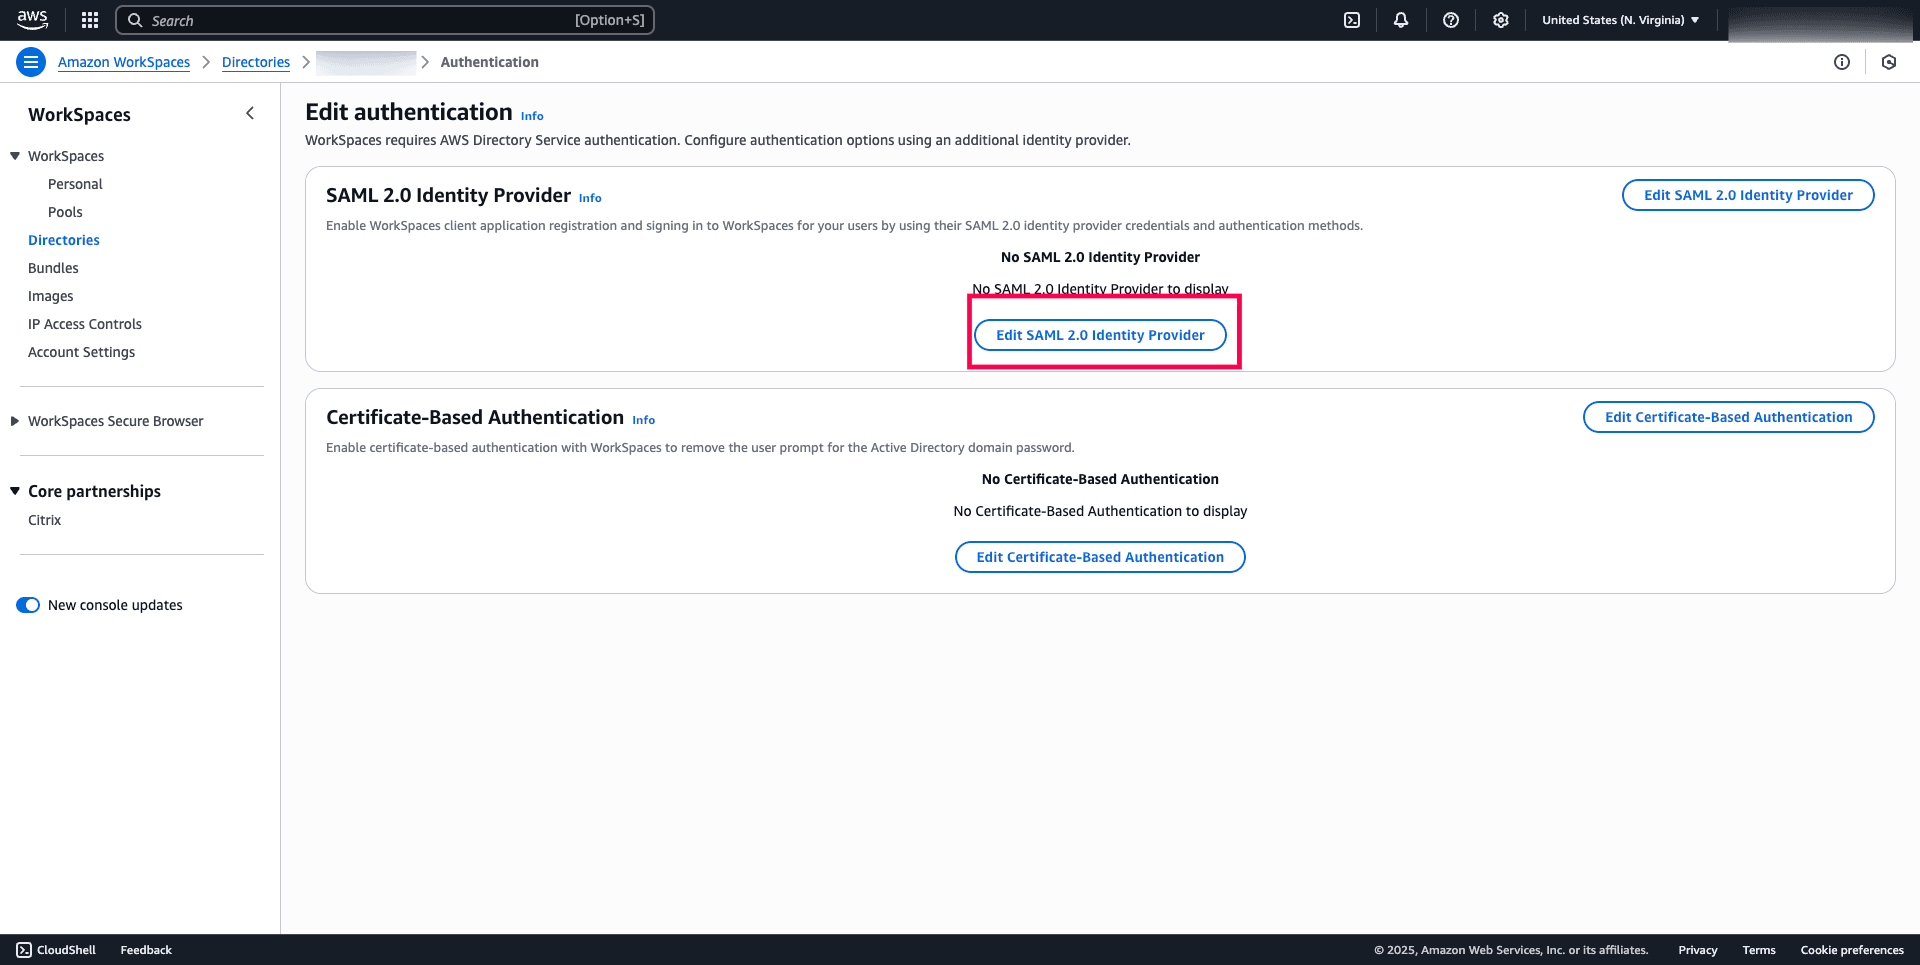
Fig. 14: Interface to configure SAML 2.0 Identity Provider settings for Amazon WorkSpaces.
- Check Enable SAML 2.0 authentication.
- Paste the Login URL copied from ADSelfService Plus into the User Access URL field, as outlined in the prerequisite above.
- Manage fallback settings based on your preference by checking or unchecking Allow clients that do not support SAML 2.0 to login.
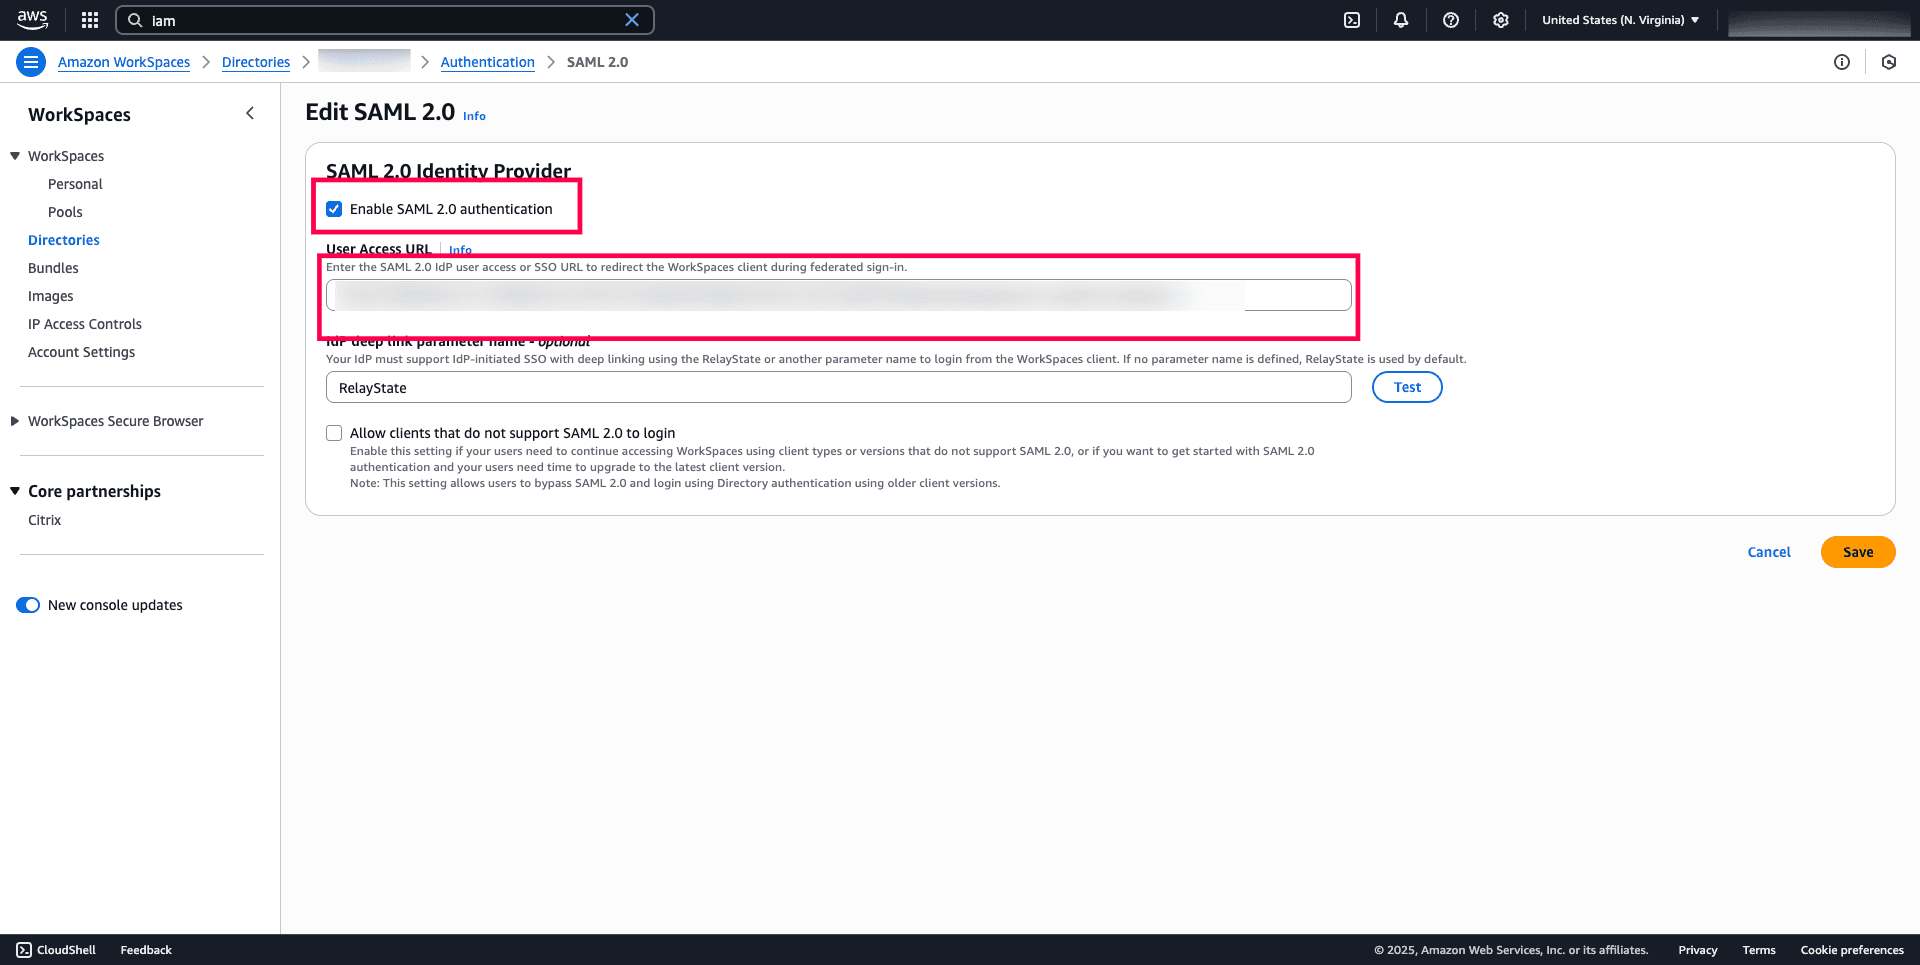
Fig. 15: Option to enable SAML 2.0 authentication and configure the User Access URL and IdP deep link for integration with ADSelfService Plus
- Choose Save.
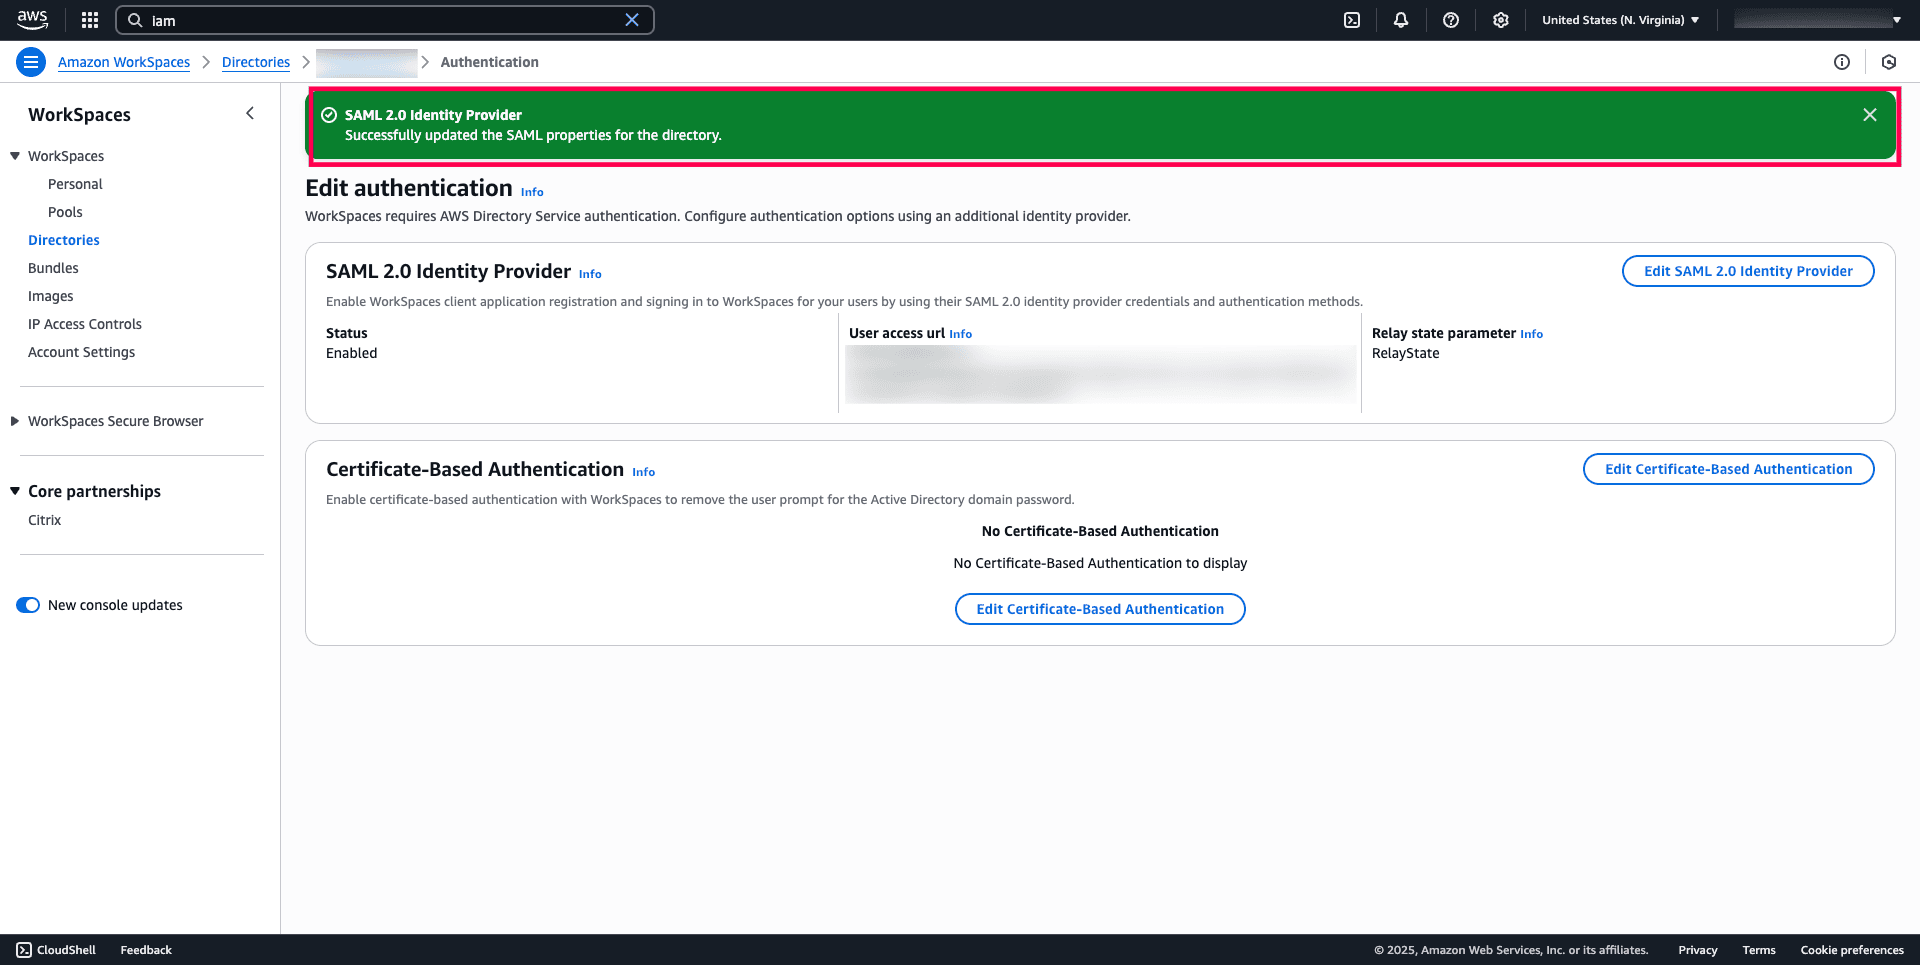
Fig. 16: Notification indicating that SAML properties were successfully updated for the Amazon WorkSpaces directory.
ADSelfService Plus (identity provider) configuration steps
- Log in to ADSelfService Plus as an administrator.
- Navigate to Application > Add Applications > Custom Application.
- Enter your Application Name and Description.
- Enter the Domain Name of the email address you use to log into the application. For example, if your email address is johndoe@mydomain.com, then mydomain.com is the domain name.
- Use the Assign Policies drop-down to select the policies to which you want this SSO configuration to apply. To learn more about creating an OU or a group-based policy, see this guide.
- Upload a Small Icon and Large Icon image to represent the Amazon WorkSpaces app in the ADSelfService Plus portal.
- In the SSO section, select the Enable Single Sign-On checkbox. From the Select Sign-On Method drop-down, select SAML.
- From the Supported SSO Flow(s) drop-down, select IdP Initiated.
- In the Upload Metadata field, you can upload the metadata available at AWS SAML Metadata, or you can manually enter the Entity ID and ACS URL corresponding to their AWS region from the provided link.
Note: Ensure that the value provided for the Entity ID matches the SAML:aud condition specified in the Trust Policy editor under Step 3.
- Under IdP Settings:
- Choose the RSA-SHA256 algorithm as the signature algorithm.
- Choose SIGNED as the SAML Response.
- Choose the Exclusive Canonicalization with comments as the Canonicalization Method and Email Address as the Name ID Format.
- Click Create Custom Application to save the configuration.
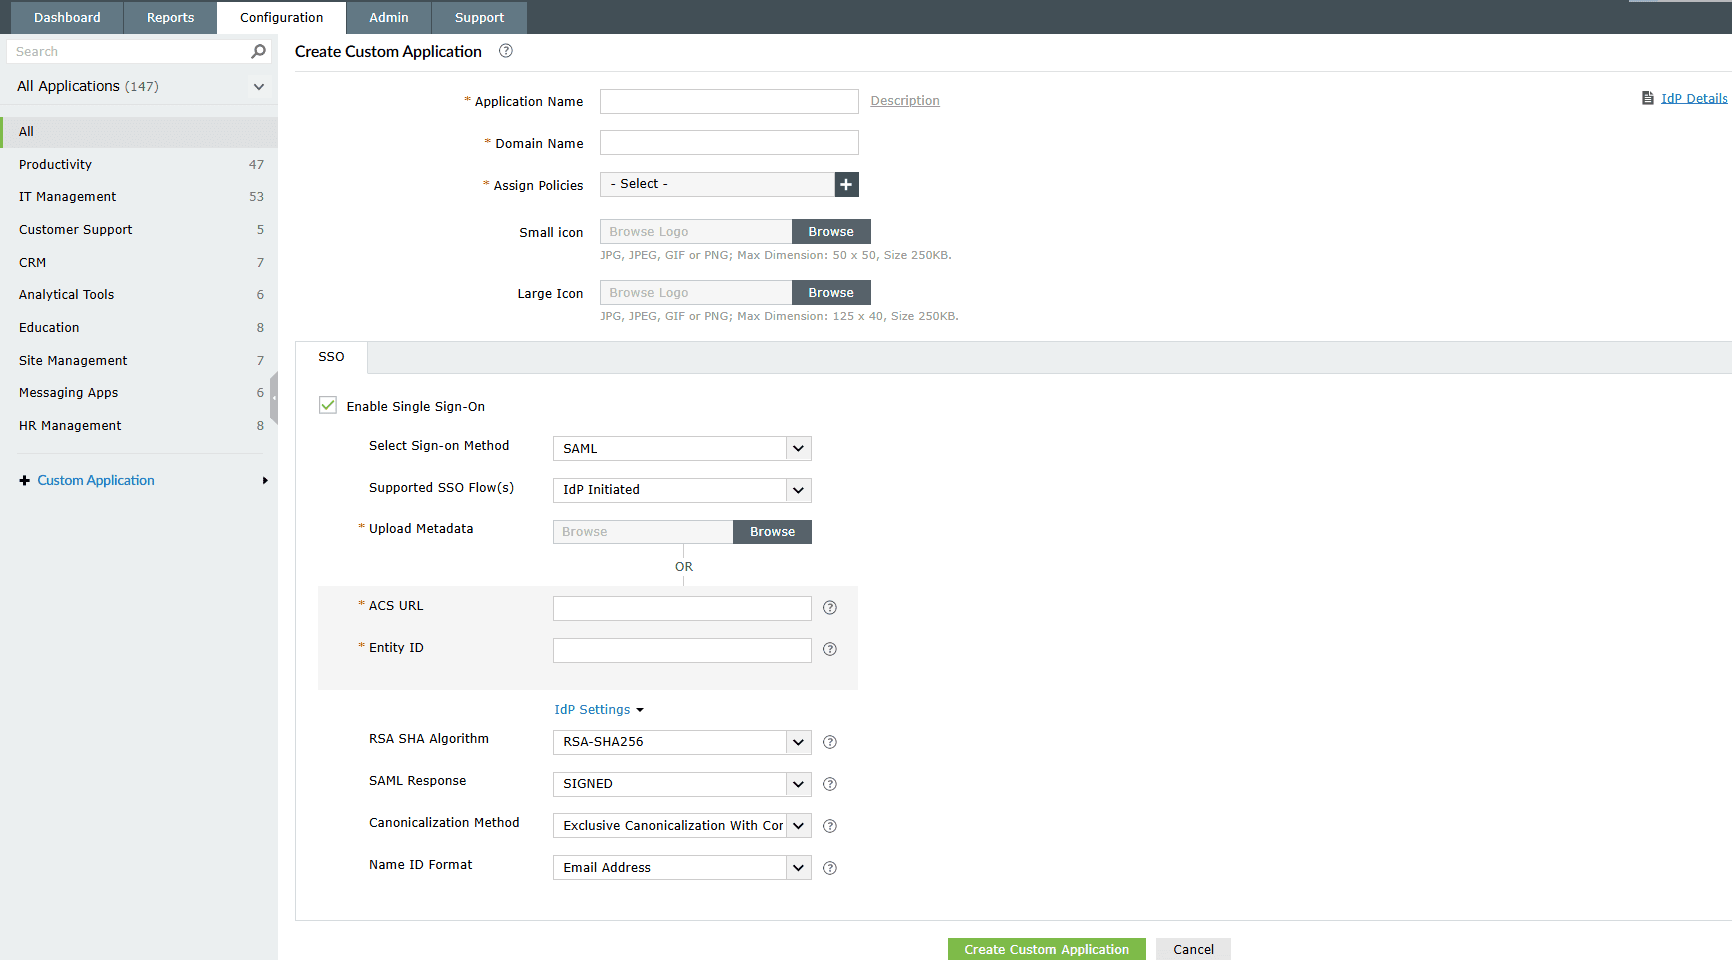
Fig. 17: Steps to configure a custom SAML SSO application for Amazon WorkSpaces in ADSelfService Plus.
Note: To proceed, it is necessary to configure the required SAML attributes. Please contact support for assistance.
The SAML-based SSO for Amazon WorkSpaces has been successfully configured. Through this integration, ADSelfService Plus protects user access to Amazon WorkSpaces using its MFA feature, combining strong security with a smooth login experience. Discover how to configure MFA here.
Related topics and articles
Configuring SAML SSO for Active Directory Federation Services (AD FS)
Configuring SSO for SAML-enabled custom enterprise applications
Configuring SSO and MFA for Cisco ASA
How to reach support
For further assistance, contact our support team here.
Last updated on: 19th June,2025.
Highlights of ADSelfService Plus
Allow Active Directory users to self-service their password resets and account unlock tasks, freeing them from lengthy help desk calls.
Get seamless one-click access to 100+ cloud applications. With enterprise single sign-on, users can access all their cloud applications using their Active Directory credentials.
Intimate Active Directory users of their impending password and account expiry via email and SMS notifications.
Synchronize Windows Active Directory user passwords and account changes across multiple systems automatically, including Microsoft 365, Google Workspace, IBM iSeries, and more.
Strong passwords resist various hacking threats. Enforce Active Directory users to adhere to compliant passwords by displaying password complexity requirements.
Enable Active Directory users to update their latest information themselves. Quick search features help admins scout for information using search keys like contact numbers.
