Knowledge Base

How to perform Google Workspace backups for mailboxes using RecoveryManager Plus

In this article:

Objective

This article will elaborate the steps to back up all the items in your Google Workspace mailbox using RecoveryManager Plus, a Google Workspace backup solution. It enables admins to set up scheduled backups to protect Gmail data from loss or corruption.

With RecoveryManager Plus, you can create backup schedules for both Google Workspace accounts and personal Google accounts, ensuring complete Google Workspace email backup coverage.

Prerequisites

  • Ensure that a Google Workspace domain is configured in RecoveryManager Plus. To learn how to add one, follow the steps listed here.
  • Configure a repository in RecoveryManager Plus with storage space equal to or greater than your total size of the mailboxes to be backed up.

Steps to backup Google Workspace mailboxes

  1. Login to RecoveryManager Plus as an administrator.
  2. Navigate to Google Workspace tab > Backup Settings.
  3. Click the Create Backup button located at the top-right corner of the screen.
  4. If you’ve configured multiple Google Workspace domains, choose the domain for which you wish to create a backup schedule from the Account drop-down box.
  5. Provide a name for the backup schedule.
  6. Select the user accounts for which you wish to create a backup schedule by clicking the add icon icon-add in the Select Users field.
  7. You can select all the users by selecting the check-box adjacent to the Display Name text. To search for individual users, use the search icon icon-search. After you’ve selected all users that you wish to backup, click Save.
  8. Select the services that you wish to backup. You can choose to backup any combination from the available options: Mail, Contacts, Calendar, and User Drive. For this particular scenario, chose Mail.
  9. Select the desired frequency at which the schedule must run from the options available.
    • Daily - Scheduler will run once every day at the scheduled time.
    • Weekly - Scheduler will run once every week on the specified day and time.
    • Monthly – Scheduler will run once a month on the specified date and time.
  10. Select the repository in which you wish to store the backups from the drop-down box.
  11. In the Item-level Retention field, enter the number of days/months/years for which the backups should be stored. Backups older than the specified age will be discarded. If you've set the retention period to 30 days, when the backup schedule runs on the 31st day, the items older than 30 days in the backup will be discarded. To learn more about how RecoveryManager Plus processes retention period, click here.
  12. You can also configure RecoveryManager Plus to store your backups forever, in which case backups will not be discarded.
    Note: Minimum retention period is 30 days.
  13. If you wish to encrypt your backups with AES-256, select the Encrypt Backup Data check-box and provide an Encryption Key.
  14. In Advanced Settings, specify the file types to be excluded from backups in the File Types to Exclude field.
  15. Click Save to save the scheduler and the back up will run at the specified time.
  16. Click Save & Run to save the scheduler and trigger the first backup process immediately.
1
 

Choose the user accounts to include in the backup schedule

1
 

Select the service type to be backed up

1
 

Configure the schedule and frequency for the backup to run

Backing up Google Workspace mailboxes

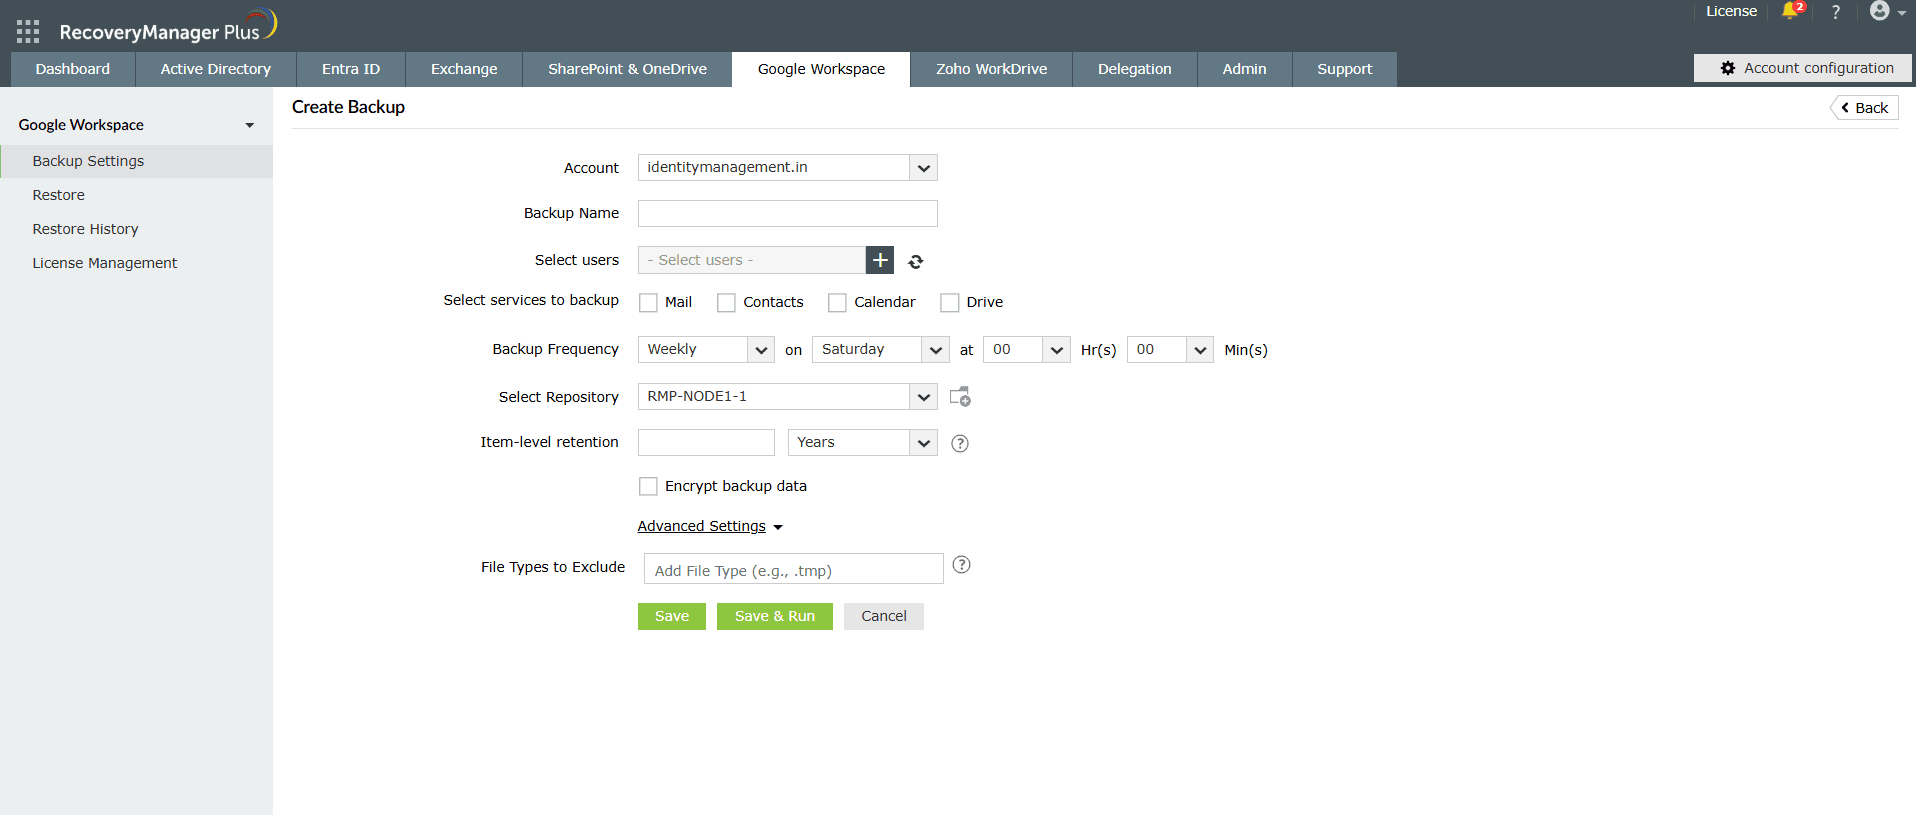
Figure 1: Backing up Google Workspace mailboxes in RecoveryManager Plus

Choose the user accounts to include in the backup schedule
Select the service type to be backed up
Configure the schedule and frequency for the backup to run

The selected Google Workspace mailboxes will now be periodically backed up. You can restore them to any of their backed-up versions, ensuring efficient and reliable Google Workspace backup and recovery.

Once a scheduler has been created, you can view the following information in the Backup Settings tab.

  • The name of the scheduler.
  • The repository in which the backups will be stored.
  • The services that will be backed up.
  • The last time the scheduler ran.
  • The status (success/failure) of the last backup. Clicking on the View Details link will provide the list of steps that the product performed and the status of each step. Finding out the step at which the scheduler failed will assist in troubleshooting any issue that the product might encounter.

Last updated on: 10-10-2025

Need further assistance?

Fill this form, and we'll contact you rightaway.

Request Support

  •  
  • *
     
  • *
     
  • *
     
  • By submitting you agree to processing of personal data according to the Privacy Policy.

"Thank you for submitting your request.

Our technical support team will get in touch with you at the earliest."

A single pane of glass for AD, Entra ID, Microsoft 365,
Google Workspace, Exchange, and Zoho WorkDrive backup.
  • » Personal WorkDrive backup
  • » Backup retention
  • » Incremental backup