How to get the changes to files and folders monitored
File Integrity monitoring helps you to monitor any changes such as addition, deletion or modification in your Windows system files and folders. You can generate and schedule reports that gives you precise integrity details. You can also trigger an alert upon any changes in the files/folders, by setting up an alert profile
Requisites for file monitoring
-
The Windows machine, whose files/folders are to be monitored, must be added as a host (Windows) in EventLog Analyzer server
-
An agent should be installed in that particular machine
Note: An agent installed in a particular machine can monitor only the files and folders of that machine.
Configuring File Integrity Monitoring
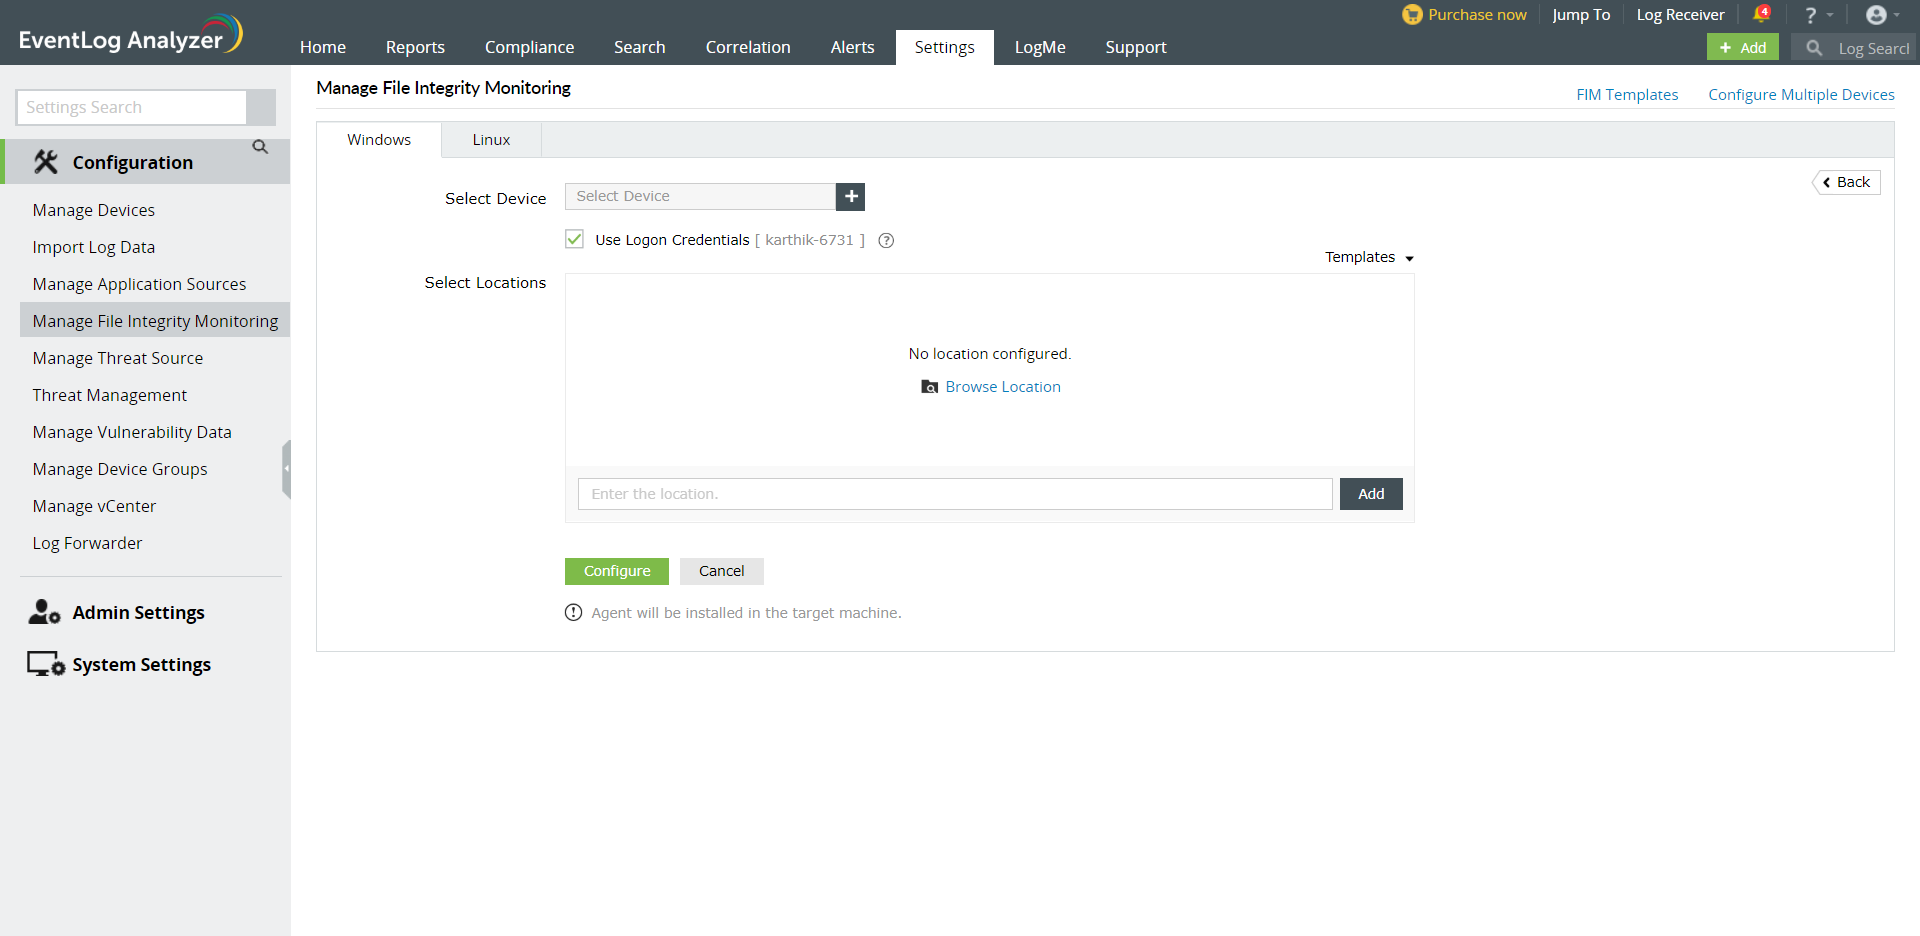
To configure File Integrity Monitoring, go to
- Home tab > File Monitoring > Monitoring List > Actions: Add or
- Settings tab > Configurations: File Monitoring > Add
-
If you want to monitor the files/folders in a location that is same across various hosts, then you can save the location as a template and assign it to a number of hosts
-
In the 'Assign host' field, you can either select the host from the auto-complete list or type the host name whose files/folders are to be monitored. You can select/enter multiple hosts only if the files/folders are in the same location across all the hosts
-
In 'Location(s) File(s)' field, type the location (absolute path) of the files/folders which are need to be monitored. Alternatively you can also import a text file that contains the location
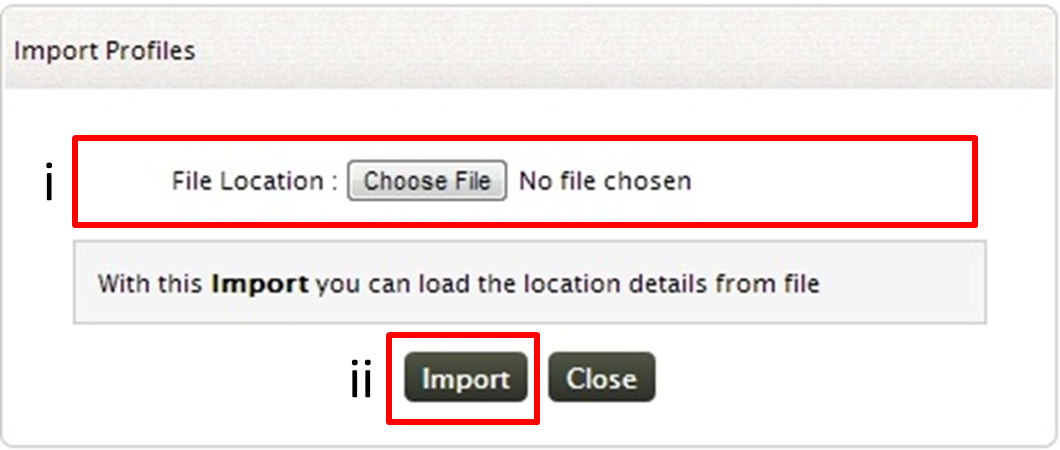
To import the text file click on 'Import' link
-
Browse and select the text file, that contains the location of the files/ folders that are to be monitored
- Click on Import button to import the text file
After specifying the Location of the files/folders as in Step 3, if you want the name of the user who initiated the critical changes in files/folders that are being monitored, then you need to enable the username field. For this, click on the Enable User name icon
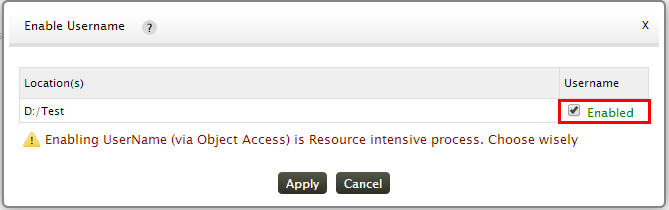
In the Enable Username window, click on the Username check box
Enabling Username via Object Access is a resource intensive process
-
'Exclude' field provides you an option to exclude certain sub-folders (contained in the folder specified above), from monitoring. Specify the location of the sub-folder in this field to exclude it from monitoring
-
Save the configuration by clicking on 'Save Monitoring' button
Note:
1. If an agent is already installed in the host for which you want to monitor the files, file monitoring will be enabled in the agent.
2. For versions prior to 8050, if you are already using an agent for log collection, it will be uninstalled and version 8050 agent will be installed.
3. If no agent is installed in the host for which you want to monitor the files, then an agent will be installed and then file monitoring will be enabled in the agent.
File Integrity Monitoring Dashboard
Once you have configured hosts for monitoring,upon clicking File Integrity Monitoring from the Home page,you will have the File Integrity Monitoring dashboard

-
The overview graph displays the overall changes happened to the files and folders added for monitoring
- The tabular section of the dashboard, displays host wise changes in the files/folders, that are added for monitoring
With +Add Alert option,you can trigger an alert upon any changes to the files and folders that are being added for monitoring
Generating and Scheduling Reports for File Monitoring
To view the file monitoring report, click on a host that has the files/folders for which you need the report for. This will open up the File monitoring Report page
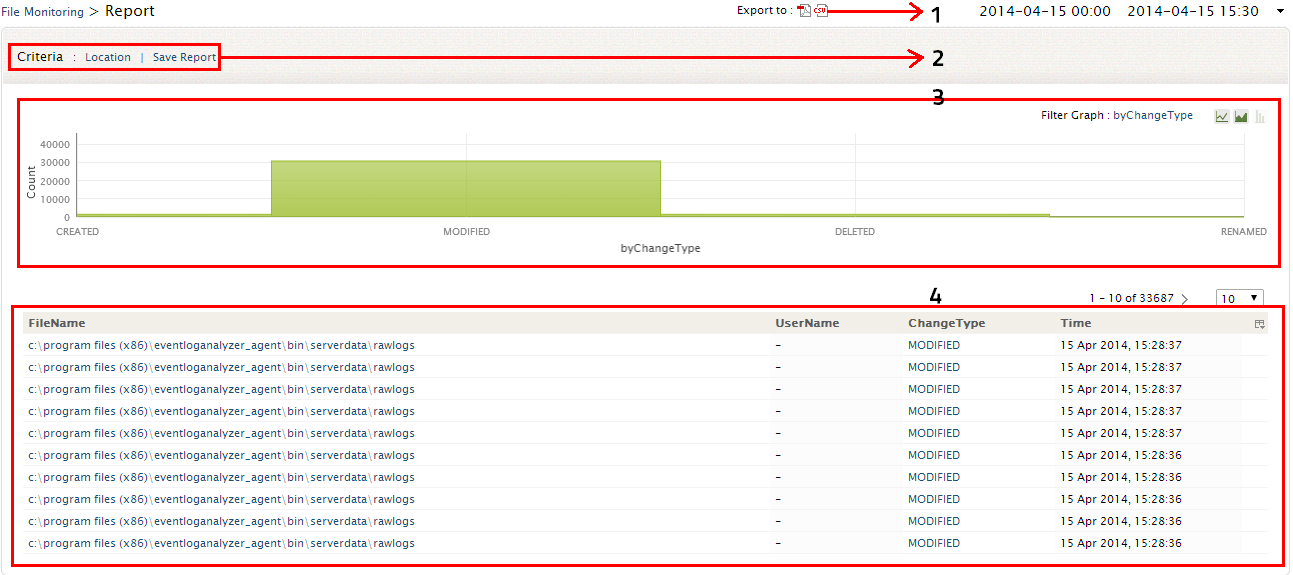
Upon clicking on any particular host, you can view the corresponding File Integrity Monitoring Report which has the intuitive dashboard and the FIM changes table
- At anytime, the File Integrity Monitoring report of particular host can be exported to PDF/CSV format by clicking on this icon.
- In the Criteria section you have both the Location Filter and Save Report options.
- Location filter option will allow you to change the location of the files/folders that are being monitored
- At any time you can save this File Integrity Monitoring report of a particular host and schedule them at regular intervals
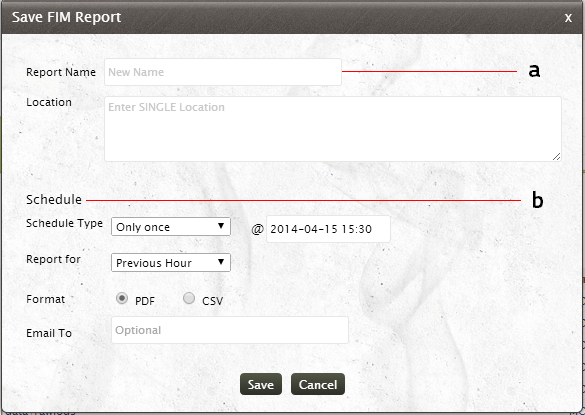
- Provide the name for the report and the location where the report is to be saved
- For Scheduling the report at regular intervals,
- Specify whether the report is to be scheduled Once or at regular intervals. If you want to schedule the report at regular intervals, specify the time interval (hourly, daily, weekly, monthly) at which the report is to be generated automatically
- Specify the exact time at which the report is to be generated. If the report is scheduled hourly/daily then specify the exact hour and minute at which the report is to be generated. Otherwise if the report is scheduled weekly, then specify the Day, Hour and minute at which the report is to be generated. If you have chosen monthly schedule for the report, then specify the Date, Hour and minute at which the report is to be generated
- Choose from the list -t he Time period for which the report is to be generated. You can generate the report for Previous Hour, Last 60 minutes, Previous day, Last 24 hours, Previous Week, Last 7 days, Previous Month and Last 30 days. Make use of the Time Filter option to select the time range for which the report is to be generated. You can select either Working Hours or Non - Working Hour time range. You can also define the Custom Time range for which the report will be generated
- You can also select the report format from the PDF and CSV options.
- To redistribute the reports via email, specify the email id(s) in the Email To option. You can specify multiple email ids separated by a comma.
Note:
1. You change the working and Non-Working hour settings in the Settings panel
2. Before redistributing the report through email, ensure email server is configured
- The graphical dashboard gives you the Event Count corresponding to the Change type. You can drill down to raw logs from this graph
- The FIM Reports table gives you the detailed information on changes in the file(s)/folder(s). It gives you the file location, User who did the change, what change (file creation, file deletion, modification, rename) was done and the time of change. Drill down to raw logs from this table
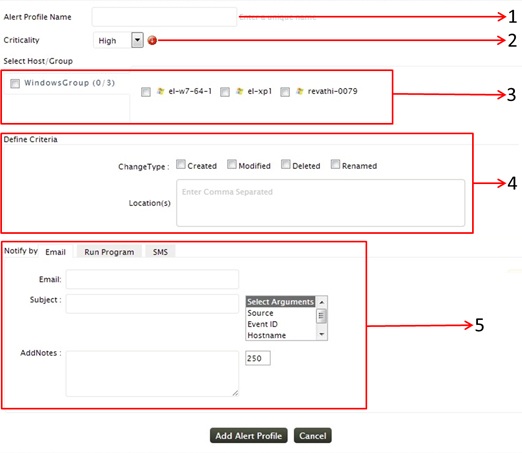
Setting up an alert for File Integrity Monitoring
With EventLog Analyzer, you can trigger an alert for any changes occurring to the files/folders that are being monitored
-
Provide a unique name for your alert profile
-
Choose the criticality level from High, Medium and Low for the alert profile
-
File Integrity monitoring alert could be set up only for the host for which file integrity monitoring has been configured. Only those hosts will be available for selection, in the 'Select Host/Group' field. You can select the Windows host group as such to have the alert for all the hosts added for monitoring. Alternatively, you can also select individual hosts as per your requirement
-
You can trigger the alert for any creation, deletion, modification or rename in the files/folders added for monitoring. The Location(s) field, narrows down your alerting criteria. Instead of generating alerts for changes in the entire file/folder,you can specify the alert to be triggered for changes in any sub-files/ sub-folders by specifying their location in this field
Note: When you have set up the alert for multiple host, ensure that the location of the file/folder you specified exists and is same for all the hosts
-
The triggered alert can be notified by Email, SMS. You can also remediate the alert condition by running a script using Run Program option.Before setting up the alert notification, you need to configure the Email and SMS settings
Click on the Add Alert Profile button for saving the alert profile

