ManageEngine Password Manager Pro - README
Overview
Welcome to ManageEngine Password Manager Pro!
This section provides information on how to install Password Manager Pro (PMP) in your system. This section also deals with the system requirements for PMP, how to install the solution, how to start and shutdown and how to connect web interface after successfully starting the server.
Prerequisite Software
There is no prerequisite software installation required to use PMP. The standard system (hardware and software) requirements as mentioned below plus an external mail server (SMTP server) are essential for the functioning of PMP server and to send various notifications to users.
System Requirements
Following table provides the minimum hardware and software configuration required by PMP:
| Hardware
| Operating Systems
| Web Interface
|
Processor
- 1.8 GHz Pentium® processor
RAM
Hard Disk
- 200 MB for product
- 10 GB for database
|
Windows
- Windows 2000 Server / Professional
- Windows Server 2003
- Windows Server 2008
- Windows Server 2008 R2
- Windows Server 2012
- Windows Server 2012 R2
- Windows XP Professional
- Windows Vista
- Windows 7
- Windows 8
Linux
- Ubuntu 9.x and above
- CentOS 4.4 and above
- Red Hat Linux 9.0
- Red Hat Enterprise Linux 5.3, 5.4, 5.5
- PMP normally works well with any flavor of Linux
Note: PMP can be installed in the VMs of the above OS |
HTML client requires one of the following browsers** to be installed in the system:
- IE 7 and above (on Windows)
- Chrome, Firefox, and Safari (on Windows, Linux and Mac)
**PMP is optimized for 1280 x 800 resolution and above.
Database
- PostgreSQL 9.2.4, bundled with the product.
- Supports MySQL, MS SQL Server 2005 and above also. MSSQL server should be installed in Windows
2003 Server and above.
|
Components of PMP
PMP consists of the following components:
- The PMP server
- PMP agent that helps in connecting to remote resources
- PostgreSQL 9.2.1 bundled with PMP. It runs as a separate process. It accepts connections only from the host in which it is running and is not visible externally
Installing Password Manager Pro
In Windows
- Download and execute ManageEngine_PMP.exe
- The installation wizard will guide you through the installation process
- Choose an installation directory - by default, it will be installed in C:/Program Files/PMP; Henceforth, this installation directory path shall be referred as "PMP_Home"
- In the final step, you will see two check-boxes - one for viewing ReadMe file and the other one for starting the server immediately after installation; if you choose to start the server immediately, it will get started in the background.
- If you choose to start the server later, after installation, you can start it from the Start >> Programs >> ManageEngine Password Manager Pro menu
- From the Start Menu, you can perform other actions such as stopping the server and uninstalling the product
In Linux
- Download ManageEngine_PMP.bin for linux
- Assign executable permission using command chmod a+x <file-name>
- Execute the following command: ./<file_name>
- Follow the instructions as they appear on the screen
- PMP is installed in your machine in the desired location. Henceforth, this installation directory path shall be referred as "PMP_Home".
Starting & Shutting Down PMP
In Windows
| Using Start Menu |
Using Tray Icon |
From Start >> Programs >> Password Manager Pro menu, you can do the following:
- Start PMP service
- Stop PMP service
- Launch Tray Icon
- View Help Documentation
- Uninstall the product
|
Once you installed PMP, in the windows tray area on the far right end of your task bar, you will find the icon  for PMP. for PMP.
Right click the tray icon and click the desired operation
- Start PMP service
- Stop PMP service
- PMP web console
|
In Linux
| Installing as Startup Service |
Starting & Stopping the Server as Service |
- Login as root user
- Open a console and navigate to <PMP_Home>/bin directory
- Execute "sh pmp.sh install"
(In Ubuntu, execute as "bash pmp.sh install")
- To uninstall, execute the script "sh pmp.sh remove"
|
To Start PMP as a service in Linux
- Login as root user
- Execute /etc/rc.d/init.d/pmp-service start
- PMP server runs in the background as service
To Stop PMP Server started as service in Linux
- Execute /etc/rc.d/init.d/pmp-service stop (as root user)
|
Connecting Web Interface
Automatic Browser Launch
Once the server is started successfully, a browser is automatically launched with the PMP login screen. As the connection is through HTTPS, you will be prompted to accept security certificate. Hit 'Yes' and then type the user name and password in the login screen and press Enter. For an unconfigured setup, the default user name and password will be admin and admin respectively. Every time you start the server, the browser will be automatically launched.
Launching the Web Client Manually
In the case of windows, you can also launch the web client manually from the Windows Tray. Right-click the PMP tray icon and click "PMP Web Console". A browser would be launched with the PMP login screen. As the connection is through HTTPS, you will be prompted to accept security certificate. Hit 'Yes' and then type the user name and password in the login screen and press Enter. For an unconfigured setup, the default user name and password will be admin and admin respectively. Every time you start the server, the browser will be automatically launched.
In the case of Linux, open a browser and connect to the URL
https://<hostname>:<portnumber>/
where hostname - host where Password Manager Pro Server is running; Default port - 7272
Example:
https://localhost:7272/
Connecting the Web Client in Remote Hosts
If you want to connect web clients in a different machine than the one in which PMP is running, open a browser and connect to the URL
https://<hostname>:port
As the connection is through HTTPS, you will be prompted to accept security certificate. Hit 'Yes' and then type the user name and password in the login screen and press Enter. For an unconfigured setup, the default user name and password will be admin and admin respectively. Every time you start the server, the browser will be automatically launched.
Using MS SQL Server as Backend
DeviceExpert supports PostgreSQL, MySQL and MSSQL databases as backend. PostgreSQL database is bundled with the product and by default, it is configured to run with PostgreSQL. In case, you wish to use MSSQL databases, follow the steps detailed below:
Important Note
- MS SQL server as backend is supported from PMP version 6400 only. Earlier versions do not have provision to run with MS SQL server.
- At present, PMP does not support migrating data from PostgreSQL to MS SQL database. That means, if you are already using PMP with PostgreSQL as backend database and if you have stored data, the data cannot be migrated to MSSQL server.
- If you are using an earlier version of PMP with MySQL as the backend database, data migration is supported.
Steps to Use MS SQL Server
To ensure high level of security, PMP has been configured to connect to SQL server only through SSL.
Summary of Steps:
- Create SSL certificate and install it in Windows Certificate Store (where SQL server is running)
- Get the certificate signed by a third-party CA or use self-signed certificate
- Import the SSL certificate to PMP
- Enable SSL Encryption in SQL Server
- Configure PMP to Connect to SQL Server
Step 1 & 2: Create SSL certificate and install it in Windows Certificate Store (in the machine where SQL server is running)
Prior to trying to connect PMP with SQL server, you need to enable SSL encryption in SQL Server. Here, you may create an SSL Certificate and get it signed by a Certificate Authority (CA) or it could be self-signed.
Option 1:
Generating the certificate and getting it signed by a third-party CA:
You can create the certificate using openssl and it involves two steps - generating private key and generating certificate. Use the following commands to create the certificate.
Generate private key
openssl genrsa -des3 -out server.key 1024
Generate a certificate request
Use the server private key to create a certificate request. Enter the passphrase for the key, Common Name, hostname or IP address, when prompted:
openssl req -new -key server.key -out server.csr
Here, for Common Name, specify the FQDN of the SQL Server.
- After generating the certificate, you need to get it signed by a third-party CA such as VeriSign, Thawte, RapidSSL etc or you may self-sign the certificate. Procedure for both have been explained below. Choose one based on your environment:
- Some of the prominent CAs are Verisign (http://verisign.com/), Thawte (http://www.thawte.com/), RapidSSL (http://www.rapidssl.com/). Check their documentation / website for details on submitting CSRs and this will involve a cost to be paid to the CA
- This process usually takes a few days time and you will be returned your signed server SSL certificate and the CA's root certificate as .cer files
- The server certificate has to be installed in the machine where SQL server is running. The CA root certificate has to be installed in PMP server.
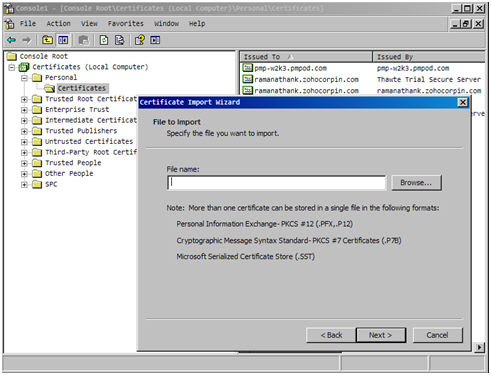
Install the server certificate in the machine where SQL server is running. You may use MMC to do this as shown below
- Open the MMC console by clicking Start >>> Run (in the machine where SQL server is running). In the Run dialog box type: MMC
- On the Console menu, click Add/Remove Snap-in. Click Add and then click Certificates. Click Add again.You will be prompted to open the snap-in for the current user account, the service account, or for the computer account. Select the Computer Account.
- Select Certificates (Local Computer) >> Personal >> Certificates
- Right-click Certificates >> Click All Tasks >> Import
- Browse select the certificate to be installed
Install the CA's root certificate in PMP
- Copy the CA's root certificate and paste it under <Password Manager Pro Installation Folder>/bin directory
- From <Password Manager Pro Installation Folder>/bin directory, execute the following command:
importCert.bat <name of the root certificate pasted as explained above>
- This adds the certificate to the PMP certificate store.
Option 2:
Creating a self-signed certificate
If you want to create a self-signed certificate and use it, you need to carry out the following steps in the machine where SQL server is installed:
Create a self signed certificate using the certificate creation tool makecert.exe and install it in the machine where SQL Server is running
- Execute the following command from the machine where SQL server is installed
makecert.exe -r -pe -n "CN=pmptestlab.manageengine.com" -b 01/01/2011 -e 01/01/2036 -eku 1.3.6.1.5.5.7.3.1 -ss my -sr localMachine -sky exchange pmptestlab.manageengine.com.cer
Here, for CN, enter the FQDN of the SQL server replacing the example entry pmptestlab.manageengine.com.
- The above command will install a self signed certificate in your local store. It will also store the certificate in the file pmptestlab.manageengine.com.cer
Install the server certificate in PMP
- Copy the server certificate and paste it under <Password Manager Pro Installation Folder>/bin directory
- From <Password Manager Pro Installation Folder>/bin directory, execute the following command:
importCert.bat <name of the server certificate>
This adds the certificate to the PMP certificate store.
Step 3: Enable SSL Encryption in SQL Server
To enable SSL for SQL Server,
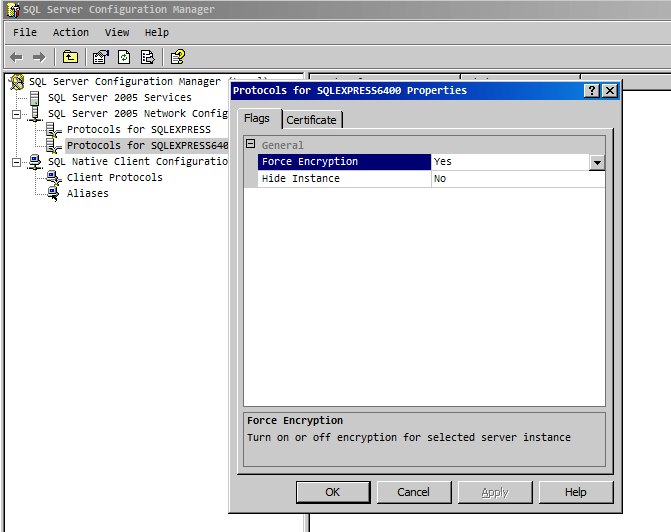
- In the machine where SQL server is running, click Start, in the Microsoft SQL Server program group, click Configuration Tools, and then click SQL Server Configuration Manager.
- Expand SQL Server Network Configuration, right-click the protocols for the server you want, and then click Properties. (This is the Protocols for <instance_name> section in the left pane of the tool, not a specific protocol in the right pane.)
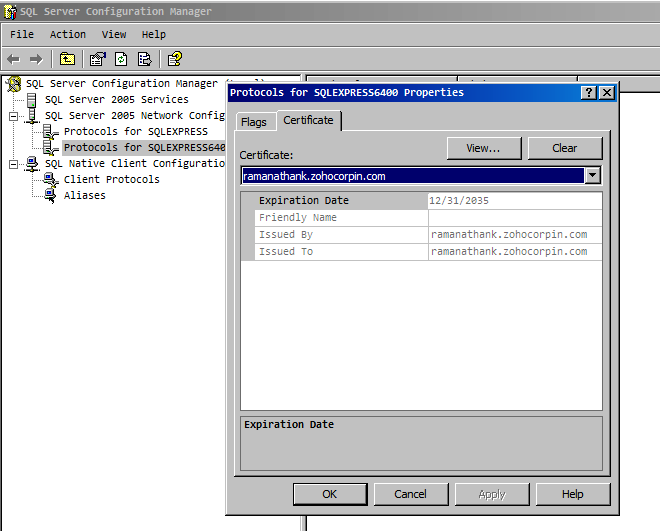
- On the Certificate tab, configure the Database Engine to use the certificate.
- When the ForceEncryption option for the Database Engine is set to Yes, all client/server communication is encrypted and clients that cannot support encryption are denied access.
- When the ForceEncryption option for the Database Engine is set to No, encryption can be requested by the client application but is not required.
- SQL Server must be restarted after you change the ForceEncryption setting.
For more details, refer to the section "Configuring SSL for SQL Server" in Microsoft's knowledge base article available at http://msdn.microsoft.com/en-us/library/ms189067.aspx
Step 4: Execute ChangeDB.bat in PMP
(Important Note: If you are already using PMP with MySQL and wish to migrate data to MS SQL Server, skip this step and proceed to the next section)
Now, you need to provide the details about the SQL server to PMP by editing the file ChangeDB.bat (Windows) or ChangeDB.sh (Linux)
- Navigate to <Password Manager Pro Installation Folder>/bin folder and execute ChangeDB.bat (Windows) or sh ChangeDB.sh (Linux)
- Select 'Server Type' as SQL Server and enter other values
- Host Name: The name or the IP address of the machine where MSSQL server is installed.
- Port: The port number in which PMP must connect with the database. Default is 1433. Since PMP connects to MSSQL only in SSL mode, it is recommended that you create a dedicated database instance running in a specific port for PMP.
- Database Name: Name of the PMP database. Default is "PassTrix". If you want to have a different database name, you may specify here. PMP will take care of creating the Master Key, Symmetric Key etc.
- Authentication: The way in which you would like to connect to the SQL server. If you are connecting to the SQL server from Windows, you have the option to make use of the Windows Single Sign On facility provided PMP service is running with a service account, which has the privilege to connect to SQL server. In that case, choose the option "Windows". Otherwise, select the option "SQL". It is recommended to choose the option 'Windows' as the username and password used for authentication are not stored anywhere.
- User Name and Password: If you have selected the option "SQL", specify the user name and password with which PMP needs to connect to the database. The username and password entered here will be stored in database_params.conf file in PMP. So, you need to take care of hardening the host.
Here, you have the option to use even your Windows login credentials, if you are connecting to the database from Windows. In this case, you need to enter the username as <domain-name>\<username>
- Encryption Key: The key with which your data is to be encrypted and stored in the SQL server. You may either leave it "Default" making PMP to generate a key. If you want to have your custom key, select the option "Custom".
- If you have selected the option "Custom:" If you have chosen the option 'Custom', you need to create a new database, create Master Key, create Certificate (this will be certificate name) and Create the Symmetric Key using AES 256 encryption.
You need to do the following steps:
Create Database -> For details, refer to http://msdn.microsoft.com/en-us/library/aa258257(v%3dsql.80).aspx
Create Master Key -> For details, refer to http://technet.microsoft.com/en-us/library/ms174382.aspx
Create Certificate -> For details, refer to http://msdn.microsoft.com/en-us/library/ms187798.aspx
Create Symmetric Key -> For details, refer to http://msdn.microsoft.com/en-us/library/ms188357.aspx
After doing the above, you need to provide certificate name and symmetric key name in the GUI.
- Finally, click "Test" to ensure that the connection settings are proper and then click "Save"
Important Note:
After performing the above steps, navigate to <Password Manager Pro Installation Folder>/conf directory and move the master_key.key file to a secure location. SQL Server encrypts data with a hierarchical encryption and key management infrastructure. Each layer encrypts the layer below it by using a combination of certificates, asymmetric keys, and symmetric keys. One among them is the Database Master Key, which in turn is created by Service Master Key and a password. This password is stored in PMP under <Password Manager Pro Installation Folder>/conf directory in a file named master_key.key. It is highly recommended that you move the master_key.key file to a secure location. This is to ensure data security.Take care to keep this key safe. You will require it while performing High Availability and Disaster Recovery. If you lose this key, you will have to configure MS SQL server setup all over again.
For more details on encryption and key management in MS SQL, refer to this MSDN document http://msdn.microsoft.com/en-us/library/ms189586.aspx
Migrating Data from MySQL/PostgreSQL to MS SQL Server (applicable only for PMP builds 6401 and later)
If you are already using PMP with MySQL/PostgreSQL and wish to use MS SQL as backend database, you may follow the steps below to migrate the data. (These steps are only migrating the data from MySQL to MS SQL server. You should have already completed steps 1, 2 and 3 above to use MS SQL as backend database).
Important Note:
Before trying database migration, please take necessary precautions with regard to the following aspects:
1. Personal Password Management
- In case, you / other users in your organization have used 'Personal Password Managerement' in PMP with the option of specifying own encryption key, which is NOT stored in PMP, the above migration procedure will NOT take care of migrating the personal passwords. Users will have to be advised to use the 'Export Passwords' option in the personal passwords section before this migration is attempted.
2. Bundled Database Only
- PMP provides the migration option only if your current PMP installation uses the database bundled with the prooduct. In case, you are using an external database, this procedure does NOT apply.
Step 1
- Take a copy of the entire Password Manager Pro Installation folder and keep it somewhere. If something goes wrong with data migration, this will serve as a backup copy.
- Shutdown PMP server. Also, make sure that the mysqld / postgres process is not running.
Step 2
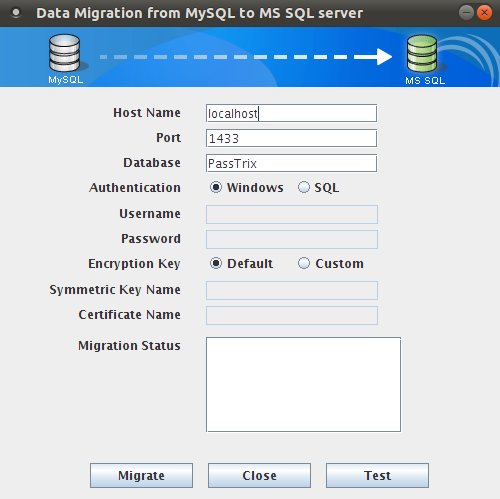
- Navigate to <Password Manager Pro Installation Folder>/bin folder and execute MigrateDB.bat (Windows) or sh MigrateDB.sh (Linux). In the pop-up, select to read the "Best Practices Guide" first and later choose the option "Go to Migration Set Up".
In the window that opens up, enter the details:
- Host Name: The name or the IP address of the machine where MSSQL server is installed.
- Port: The port number in which PMP must connect with the database. Default is 1433. Since PMP connects to MSSQL only in SSL mode, it is recommended that you create a dedicated database instance running in a specific port for PMP.
- Database Name: Name of the PMP database. Default is "PassTrix". If you want to have a different database name, you may specify here. PMP will take care of creating the Master Key, Symmetric Key etc.
- Authentication: The way in which you would like to connect to the SQL server. If you are connecting to the SQL server from Windows, you have the option to make use of the Windows Single Sign On facility provided PMP service is running with a service account, which has the privilege to connect to SQL server. In that case, choose the option "Windows". Otherwise, select the option "SQL". It is recommended to choose the option 'Windows' as the username and password used for authentication are not stored anywhere.
- User Name and Password: If you have selected the option "SQL", specify the user name and password with which PMP needs to connect to the database. The username and password entered here will be stored in database_params.conf file in PMP. So, you need to take care of hardening the host.
Here, you have the option to use even your Windows login credentials, if you are connecting to the database from Windows. In this case, you need to enter the username as <domain-name>\<username>
- Encryption Key: The key with which your data is to be encrypted and stored in the SQL server. You may either leave it "Default" making PMP to generate a key. If you want to have your custom key, select the option "Custom".
- If you have selected the option "Custom:" If you have chosen the option 'Custom', you need to create a new database, create Master Key, create Certificate (this will be certificate name) and Create the Symmetric Key using AES 256 encryption. You need to do the following steps:
Create Database -> For details, refer to http://msdn.microsoft.com/en-us/library/aa258257(v%3dsql.80).aspx
Create Master Key -> For details, refer to http://technet.microsoft.com/en-us/library/ms174382.aspx
Create Certificate -> For details, refer to http://msdn.microsoft.com/en-us/library/ms187798.aspx
Create Symmetric Key -> For details, refer to http://msdn.microsoft.com/en-us/library/ms188357.aspx
After doing the above, you need to provide certificate name and symmetric key name in the GUI
Step 3
- Finally, click "Test" to ensure that the connection settings are proper and then click "Migrate". The status of data migration will be displayed in the textbox
- After the end of data migration, start PMP server
Troubleshooting Tip
If database migration is attempted when PMP server is running, you will encounter this error in the DB Migration GUI: "Server seems to be running. Shutdown PMP server and try again" and the GUI will remain open. In case, you get this error even after shutting down the server, you need to delete the .lock file under <PMP-Installation-Folder>/bin folder and then try migration. If the issue persists, contact PMP support with the .lock file.
Important Note:
After completing the migration, start PMP server and navigate to "Admin >> Resource Additional Fields" and "Admin >> Accounts Additional Fields". Open the GUI and click "Save". This will take care of restoring the additional fields added you in the migrated instance too.
Migrating data from MySQL to PostgreSQL (applicable only for builds 6801 and later)
If you are already using PMP with MySQL and wish to use PostgreSQL as backend database, you may follow the steps below to migrate the data.
- Stop PMP server and make sure mysqld process is not running.
- Open a command prompt and navigate to <Password Manager Pro Installation Folder>/bin directory
- Execute MigrateMySQLToPgSQL.bat (in Windows) or MigrateMySQLToPgSQL.sh (in Linux)
- Start PMP server. Now, PMP will run with PostgreSQL as backend database
Quick Start Guide
Refer to the "Work flow in PMP" section of help documentation.
For any assistance, please contact passwordmanagerpro-support@manageengine.com / Toll Free: + 1 925 924 9500
Managing PMP Encryption Key (from PMP 6402 onwards)
PMP uses AES-256 encryption to secure the passwords and other sensitive information in the password database. The key used for encryption is auto-generated and is unique for every installation. By default, this encryption key is stored in a file named pmp_key.key under <PMP_HOME>/conf folder. For production instances, PMP does not allow the encryption key to be stored within its installation folder. This is done to ensure that the encryption key and the encrypted data, in both live and backed-up database, do not reside together.
We strongly recommend that you move and store this encryption key outside of the machine in which PMP is installed - in another machine or an external drive. You can supply the full path of the folder where you want to move the pmp_key.key file and manually move the file to that location and delete any reference within PMP server installation folder. The path can be a mapped network drive or external USB (hard drive / thumb drive) device.
PMP will store the location of the pmp_key.key in a configuration file named manage_key.conf present under <PMP_HOME>/conf folder. You can also edit that file directly to change the key file location. After configuring the folder location, move the pmp_key.key file to that location and ensure the file or the key value is not stored anywhere within the PMP installation folder.
PMP requires the pmp_key.key folder accessible with necessary permissions to read the pmp_key.key file when it starts up every time. After a successful start-up, it does not need access to the file anymore and so the device with the file can be taken offline.
Important Note: You need to take care of sufficiently protecting the key with layers of encryption (like using Windows File Encryption for example) and access control. Only the PMP application needs access to this key, so make sure no other software, script or person has access to this key under any circumstance. You also need to take care of securely backing up the pmp_key.key file yourself. You can recover from PMP backups only if you supply this key. If you misplace the key or lose it, PMP will not start.
Rotating Encryption Key
Though the encryption key is being securely managed outside of PMP, periodically changing the encryption key is one of the best practices. PMP provides an easy option to automatically rotate the encryption key.
How the key rotation process work?
PMP will look for the current encryption key present in pmp_key.key in the path specified in manage_key.conf present under <PMP_HOME>/conf folder. Only if it is present in the specified path, the rotation process will continue. Before rotating the encryption key, PMP will take a copy of the entire database. This is to avoid data loss, if anything goes wrong with the rotation process.
During the key rotation process, all passwords and sensitive data will be decrypted first using the current encryption key and subsequently encrypted with the new key. Later, the new key will be written in the pmp_key.key file present in the location as specified in the manage_key.conf file. If there occurs any error while writing the key, rotation process will not continue. At the end of successful rotation process, PMP will write the old encryption key in the same file that contains the new key.
To rotate the encryption key (if you are NOT using High Availability)
- The current encryption key (pmp_key.key file) should be present in the location as specified in the manage_key.conf file. Also, ensure that PMP gets read/write permission when accessing the pmp_key.key file.
- PMP server should be stopped
- Open a command prompt and navigate to <PMP-Installation-Folder>/bin directory and execute RotateKey.bat (in Windows) or sh RotateKey.sh (in Linux)
- Based on the number of passwords managed and other parameters, the rotation process will take a few minutes to complete
- Once you see the confirmation message about successful completion of the rotation process, you can start the PMP server.
To rotate the encryption key (if you are using High Availability setup)
- The current encryption key (pmp_key.key file) should be present in the location as specified in the manage_key.conf file. Also, ensure that PMP gets read/write permission when accessing the pmp_key.key file.
- PMP Primary and Standby servers should be stopped
- Open a command prompt in PMP Primary installation and navigate to <PMP-Installation-Folder>/bin directory and execute RotateKey.bat (in Windows) or sh RotateKey.sh (in Linux)
- Based on the number of passwords managed and other parameters, the rotation process will take a few minutes to complete. You will see confirmation message upon successful completion of the rotation process
- You need to copy the new encryption key from Primary installation and put it in the location from where the standby looks for pmp_key.key file as specified in the manage_key.conf file. (That means, you need to copy the pmp_key.key file in Primary and put it in the location as specified in the manage_key.conf file). Then you can start primary and standby servers.
Managing PMP Database Password
- Apart from the AES encryption, the PMP database is secured through a separate password, which is auto-generated and unique for every installation
- The password for the database can be stored securely in the PMP itself
- There is also option to store it at some other secure location accessible to the PMP server
Leaving it to PMP
- If you choose to leave it to PMP, you need not do anything. PMP will take care of it automatically
Storing it by yourself
- By default, the database password is present in the file <PMP Installation Folder>/conf/database_params.conf file
- If you choose to manage the database key by yourself, you need to store this configuration file somewhere securely and instruct the location of the file to PMP
- If you are starting PMP as service, go to <PMP Installation Folder>/conf/wrapper.conf (in Windows) / <PMP Installation Folder>/conf/wrapper_lin.conf (in Linux) and edit the following entry under "Java Additional Parameters"
wrapper.java.additional.9=-Ddatabaseparams.file=<full path of the database_params.conf file location>
- If you are starting PMP from command line or through Start >> Programs, you need to edit the file system_properties.conf present in <PMP Installation Folder>/conf directory. In this file, edit the following entry under "Splash Screen default Properties"
databaseparams.file=<full path of database_params.conf file>
Note: If you misplace the conf file or lose it, PMP will not start. So, take care to save it in a secure location.
Ports Used by PMP
PMP uses the following two ports:
- PostgreSQL port : 2345
- Web client port : 7272
Licensing
There are three license types:
- Evaluation download valid for 30 days capable of supporting a maximum of 2 administrators
- Free Edition licensed software allows you to have 1 administrator and manage up to 10 resources. Valid forever.
- Registered Version - need to buy license based on the number of administrators required and the type of edition Standard/Premium/Enterprise:
- Standard - If your requirement is to have a secure, password repository to store your passwords and selectively share them among enterprise users, Standard Edition would be ideal.
- Premium - Apart from storing and sharing your passwords, if you wish to have enterprise-class password management features such as remote password reset, password alerts and notifications, application-to-application password management, reports, high-availability and others, Premium edition would be the best choice.
- Enterprise Edition - If you require more enterprise-class features like auto discovery of privileged accounts, integration with ticketing systems and SIEM solutions, jump server configuration, application-to-application password management, out-of-the-box compliance reports, SQL server / cluster as backend database, Enterprise edition will be ideal.
Features Matrix
| Standard Edition |
Premium Edition |
Enterprise Edition |
- User / User group Management
- Password Repository
- Password Policies
- Password Sharing and Management
- Audit / Audit Notifications
- AD / LDAP integration
- Auto Logon Helper
- Offline Access
- Password change listener
- Backup and Disaster Recovery
|
- All Features of Standard Edition
- Password Alerts and Notifications
- Remote Password Reset (on demand, scheduled and rule based)
- for Windows, Windows Domain, Windows Service Accounts, Windows Scheduled Accounts, Flavours of UNIX and Linux, Cisco, HP ProCurve and Juniper Netscreen Devices, MS SQL Server, MySQL Server, Oracle DB Server and Sybase ASE, LDAP Server
- Instant Verification of Passwords for Synchronization with Remote Systems
- Password Access Control Workflow
- Privileged Session Recording
- Reports
- Password Management APIs for Application to Application Password Management
- Two-Factor Authentication - RSA, PhoneFactor, Google Authenticator
- High Availability Architecture
|
- All Features of Premium Edition
- Privileged Accounts Discovery
- Ticketing System Integeration
- Real Time Alerts & SIEM Integeration
- Jump Server Configuration
- Federated Identity Management
- Radius Based TFA
- Out of the Box Complaince Reports
- SQL Server / Cluster as Backend Database
- Privileged Session Shadowing and Termination
- Customer Password Reset Listener
- Custom Reports
- RESTful APIs for integration with third-party applications
|
For more information and to get license, contact mailto:sales@zohocorp.com
Moving PMP Installation Within Same Machine / From One Machine to Another
If you want to move the PMP installed in one machine to another or to a different location within the same machine, follow the procedure detailed below:
Procedure
If you are using the PostgreSQL database bundled with PMP
If you are using MySQL as backend database
- Stop PMP server / service, if running
- If you have installed PMP to run as a startup service, remove it as service before proceeding further.
- See the table below for the procedure to remove it as service.
- Take a zip of the entire PMP installation folder; move the zip to a different machine or to a different location in the same machine as required Then, install it to run as service.
| Installing as Startup Service in Windows |
Installing as Startup Service in Linux |
To install as service using batch file
- Open a console and navigate to <PMP_Installation_Folder>/bin directory
- Execute the command pmp.bat install
To remove as service using batch file
- Open a console and navigate to <PMP_Installation_Folder>/bin directory
- Execute the command pmp.bat remove
|
- Login as root user
- Open a console and navigate to <PMP_Home>/bin directory
- Execute "sh pmp.sh install"
(In Ubuntu, execute as "bash pmp.sh install")
- To remove as service, execute the script "sh pmp.sh remove"
(In Ubuntu, execute as "bash pmp.sh remove")
|
Note:
- In this option, you will not be able to uninstall the program through windows Add/Remove programs console. If you want to uninstall anytime, just delete the entire installation folder.
- You need not reapply the license after moving the installation