RecoveryManager Plus service pack
We recommend users to move to the latest version, RecoveryManager Plus 6.3 Build 6321 (Jun 2026).
# Additional steps
If you updated to build 6051 from build 6020 through 6048, please follow the additional steps listed here.
* Post-upgradation Steps:
- Start RecoveryManager Plus and wait for the data migration to complete.
- Once the data migration is complete, the RecoveryManager Plus login screen will be visible. Stop RecoveryManager Plus once the login screen is visible before you update the product using the next service pack.
If the product is stuck in the migration screen for a long time, contact support@recoverymanagerplus.com.
Note: We strongly recommend you to take backups before migrating. This helps you prevent accidental loss of data.
- If your build number isUpdate to build numberSHA256 checksum hash value
- 6051 to 6320Download and update to 632185c710df1b6df9b93e71368d99ebc3a3dd6fe12f58473c3e60e860f84f91ad07
- 6020 to 6050Download and update to 605119fc978c942e5c5faef28a8fb2e7fdecfe6cc51cde31f0c7c40e9b1ba55de534
- 5450 to 6017Download and update to 602071920541a039de4fdc7a0513b12ac777605f063ff3a897adbd402cc5ffcf14ba
- 5350 to 5440Download and update to 602071920541a039de4fdc7a0513b12ac777605f063ff3a897adbd402cc5ffcf14ba
- 5210 to 5340Download and update to 5350b903456c167b2f94bc34769673fbc2a94720ce4412b9dbfc68ac0675779a2e6f
- 5040 to 5201Download and update to 5210afffe1ad83632f7ef911036ac4ead8cbc7b8c54a5e65b1b28dae355baa68cd16
- 5003 to 5031Download and update to 5040f2aa4df7e4af899a818a6877aa7d384d1bb963da068d524796e86caa1216483b
Instructions for applying the service pack
- 1Shut down RecoveryManager Plus.
- If the product runs as an application, click Start → All Programs → RecoveryManager Plus → Stop RecoveryManager Plus.
- If the product runs as a Windows service, right-click Start and click Run. Type services.msc in the box provided. From the list that appears, find and stop ManageEngine RecoveryManager Plus.
- 2Back up RecoveryManager Plus by zipping the contents of the <RecoveryManagerPlus> directory.
- 3If you have configured an external database server (MS SQL or PostgreSQL) in RecoveryManager Plus, back up the external database.
- 4If you use an MS SQL database,
- 5If you use a PostgreSQL database, open Command Prompt. Navigate to <RecoveryManagerPlus>/bin and execute the UpdateManager.bat file.
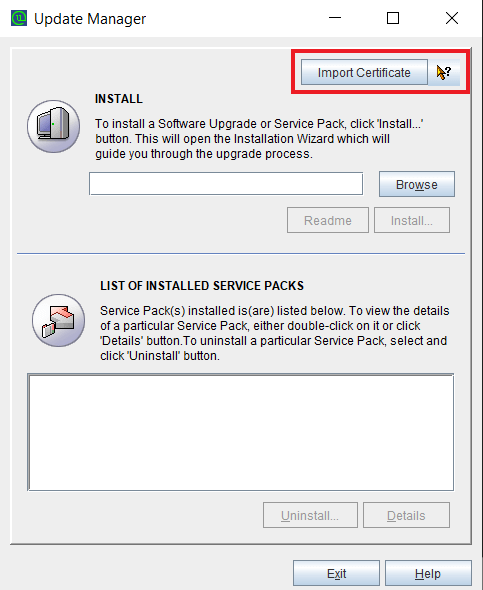
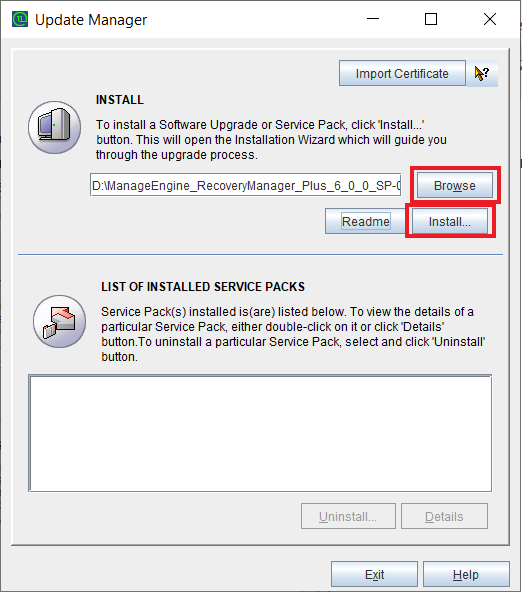
- 6Click Browse and select the PPM file you have downloaded.
- 7Click Install. Depending on the amount of data to be migrated, the installation procedure might take a few minutes. Please do not terminate the process prematurely. During this step, the certificate that verifies the service pack's integrity is automatically imported by the Update Manager tool.
- 8If the automatic certificate import fails, please import the certificate manually by following the steps listed here. Otherwise, click Close and then Exit to quit the Update Manager tool.
- 9Start RecoveryManager Plus.
- If the product runs as an application, click Start → All Programs → RecoveryManager Plus → Start RecoveryManager Plus.
- If the product runs as a Windows service, right-click Start and click Run. Type services.msc in the box provided. From the list that appears, find and start ManageEngine RecoveryManager Plus.
Steps for manually importing the security certificate:
- 1Download the certificate by clicking this link.
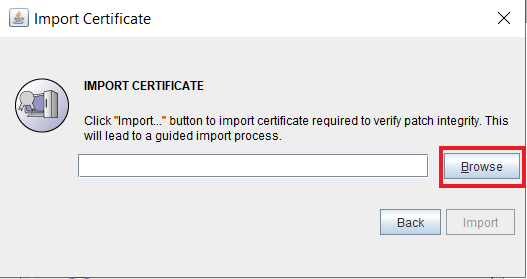
- 2Once downloaded, click Import Certificate in the Update Manager tool to open the Import Certificate wizard.
- 3Click Browse and select the downloaded certificate file.
- 4Click Import.
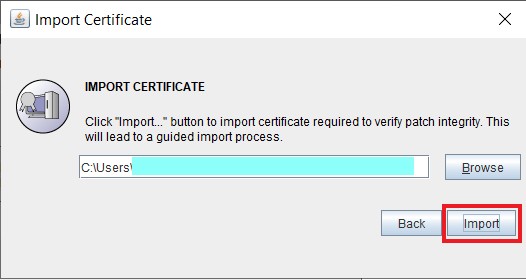
- 5Once imported, click Browse and select the downloaded PPM file.
- 6Click Install. Depending on the amount of data to be migrated, the installation procedure might take a few minutes. Please do not terminate the process prematurely.
- 7Once the installation is complete, click Close and then Exit to quit the Update Manager tool.
- 8Start RecoveryManager Plus.
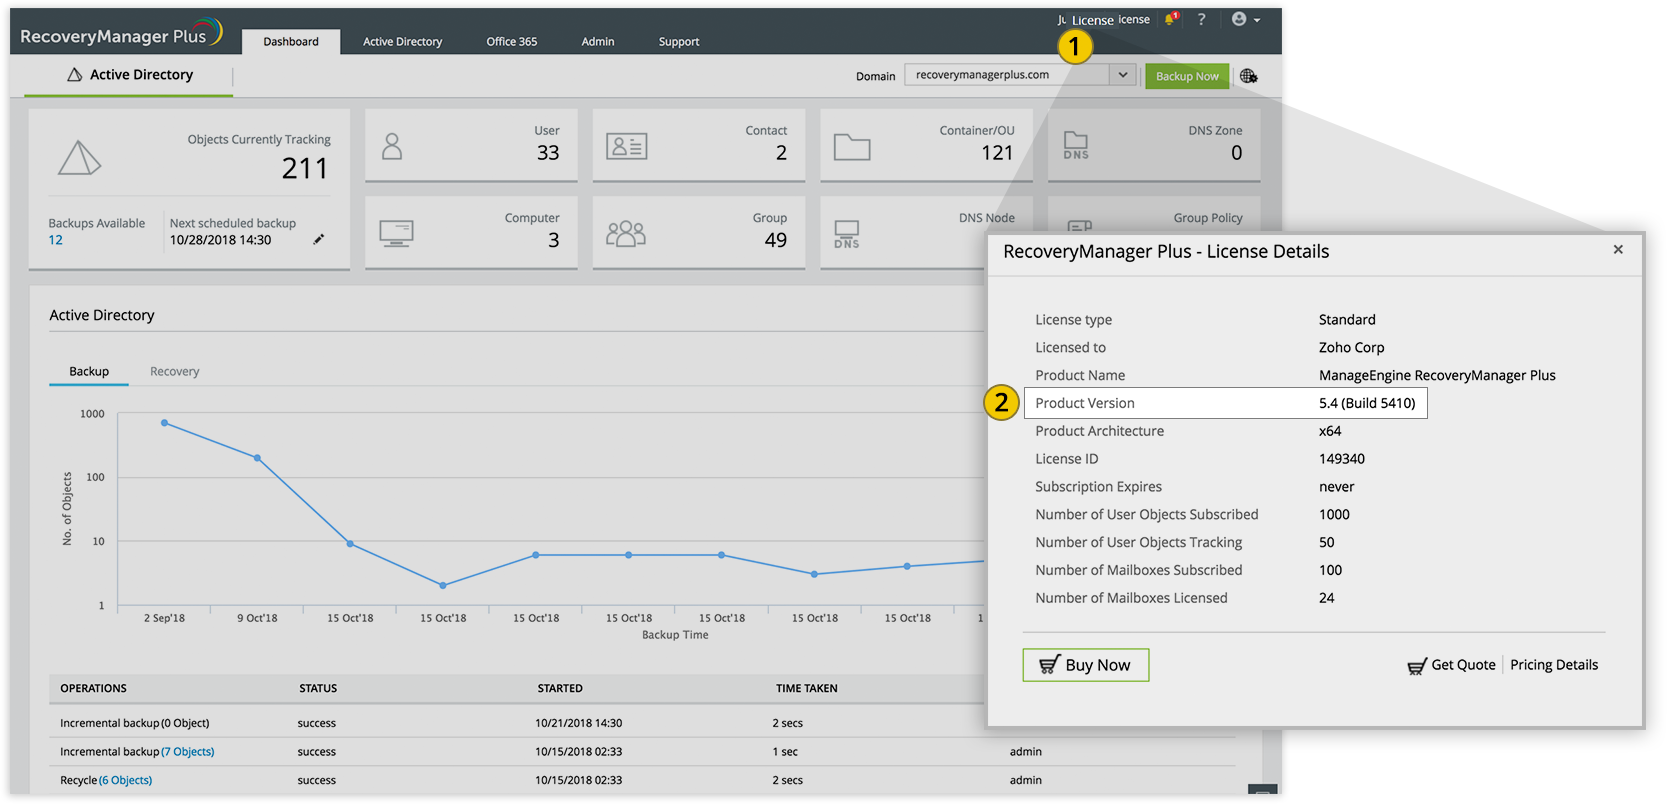
How do I find my current build number?
- 1Log in to the RecoveryManager Plus web client.
- 2Click License in the top-right corner.
- 3The build number can be found on the pop-up that appears.
Need help?
You can contact RecoveryManager Plus Support at any time for assistance in upgrading RecoveryManager Plus to the latest version.