
Help Center
Quick Start
- Overview
- System requirements
- Minimum privileges required
- Default port configuration
- Installing DataSecurity Plus
- Uninstalling DataSecurity Plus
- Starting DataSecurity Plus
- Launching DataSecurity Plus
- Configuring your solution
- Licensing details
- Applying a license
File Auditing
- About File Auditing
- Domain configuration
- File server configuration
- Failover cluster configuration
- NetApp server configuration
- Nutanix server configuration
- EMC Isilon server configuration
- Workgroup configuration
- Amazon FSx configuration
Setting up File Audit
Dashboard
Reports
Alerts
Configuration
Storage Configuration
File Analysis
- About File Analysis
- Domain configuration
- File server configuration
- Workgroup configuration
- SMB File Server Configuration
- On-Demand Reports
Setting up File Analysis
Dashboard
Reports
Alerts
Configuration
Data Risk Assessment
- About Data risk assessment
Setting up Data risk assessment
Dashboard
Reports
Ownership analysis
Configuration
Endpoint DLP
- About Endpoint DLP
- Domain configuration
- Workstation configuration
- Device group configuration
- Workgroup workstation configuration
Setting up Endpoint DLP
Reports
Alerts
Prevention policies
Configuration
Cloud Protection
- About Cloud Protection
- Gateway Server Installation Steps
- Gateway Configuration in Endpoint
- Gateway Cluster Configuration
- Gateway Server Management
- Certificate Authority Configuration
- Two-way SSL configuration
- Manage Certificate Trust Store
- Threat Analytics Database
- Manage Banned Applications
- Manage Authorized Applications
- Regenerating gateway server access key
- Updating gateway server
- Gateway Server Failover
- Load Balancer Configuration
- Global Insight
- Application Insight
- User Insight
- Shadow Application Insight
- Banned Application Insight
- Cloud App Discovery
- Activity Overview
- File Transfer Insights
- Control Policies
- Application Insights
- Actor Insights
- Shadow App Discovery
- GenAI Insights
- Cyber Threat Analytics
- CIPA Compliance
Setting up Cloud Protection
Dashboard
Reports
Control Policies
Storage Configuration
Policy Management
Administrative settings
- Technician configuration
- Notification filters
- Manage agent
- Agent settings
- SIEM integration
- Business hours configuration
- Two-factor authentication
- Workgroup configuration
- Security policy
Email configuration
General settings
- Connection
- Personalize
- DataSecurity Plus Server
- Privacy Settings
- Disk utilization
- Schedule Retention Policy
Release notes
2026
2025
2024
2023
2022
2021
2020
2019
2018
2017
2016
2015
Troubleshooting
- HTTP communication failure
- Dormant DataEngine
- Secure Gateway server failure
- RPC communication failure
- Cloud Protection Gateway server failure
- Known issues and limitations
- Known errors and solutions
- Report discrepancy in File Analysis
Guides
- Agent document
- How to Migrate/Move DataSecurity Plus
- How to apply SSL certificate
- How to automate DataSecurity Plus database backup
- How to set alerts in DataSecurity Plus
- How to secure your DataSecurity Plus installation
Data identifiers
Data identifiers, formerly called data discovery rules, define what counts as sensitive data in your organization. Each identifier defines a specific type of regulated data—such as credit card numbers, government-issued ID numbers, bank account details, or healthcare data—which can then be used to identify sensitive data across your environment. DataSecurity Plus offers built-in identifiers and enables custom identifier creation to detect organization-specific or industry-specific data.
How data identifiers work
Each data identifier is built around one or more match conditions and each condition uses either regular expressions or a keyword list to describe what to look for.
A regular expression (regex) is a sequence of characters that forms a specific pattern. For example, the pattern \b\d{3}-\d{2}-\d{4}\b matches a US Social Security number—three digits, a hyphen, two digits, a hyphen, and then four digits. Regular expressions are useful for identifying structured data that follows a predictable format. For a comprehensive guide on constructing regular expressions, refer to the regex configuration guide.
A keyword list matches exact words or phrases. For example, a keyword list containing customer name, credit card, or confidential will match with content where those terms appear. Keyword lists are useful when the sensitive content is defined by specific terminology rather than a format—such as locating files containing a specific individual's name or ID to fulfill a Data Subject Access Request.
Viewing default identifiers
DataSecurity Plus includes a library of over 100 built-in data identifiers that cover a wide range of sensitive data spanning multiple countries and compliance frameworks. To view and explore prebuilt data identifiers, follow these steps:
- Select Risk Analysis from the applications drop-down.
- Go to Configuration > Data Discovery Settings > Data Identifiers.
- Use the Country, Information type, or Compliance filters to narrow down the list.
- Click the edit icon next to any default identifier to view its match conditions.
Note: Default data identifiers cannot be modified. To use one as a starting point for a custom identifier, click Create a copy. For help in creating a custom data identifier, click here.
Creating a new data identifier
To create a new data identifier, follow these steps:
- From within the Risk Analysis page, go to Configuration > Data Discovery Settings > Data Identifiers.
- Click + Create Data Identifier.
- Enter a name and description for the identifier.
- Under Tags, select up to three tags to categorize the identifier for easier filtering.
- Under Match Conditions, you can configure multiple conditions. For each condition, select an Identifier Type from the drop-down. You can select Regular Expressions or Keyword List.
- If you selected Regular Expressions, click the plus icon (+) , add your regex patterns in the Add Regex Pattern panel, choose a validator, then click Close.
- If you selected Keyword List, click the plus icon (+), add your keywords in the Add Keywords panel, and click Close.
- Select a Confidence Level for the condition.
Note: Confidence level is a self-assigned rating that helps you filter and prioritize matches in reports. It does not affect detection accuracy. Learn more about confidence level.
- Enable Proximity Matching if you want to increase detection accuracy. Proximity matching requires a secondary identifier to appear near the primary identifier for a match to be confirmed. Learn more about proximity matching.
- Enter a value in the Proximity Distance field. This defines the number of characters within which the supporting identifier must appear, either before or after the primary identifier.
- Select a Supporting Identifier Type from the drop-down. You can select Regular Expressions or Keyword List.
- Add the supporting regular expressions or keywords using the plus icon (+).
- To add another condition, click Add More, then repeat steps 5-7.
Note: You can add up to five conditions for each data identifier. Multiple conditions are evaluated with OR logic, meaning a file is flagged if any one condition is matched.
- If you want to delete a condition, click Remove condition below it.
- Click Save.
Note: Validators help improve match accuracy by running a checksum on discovered data. Learn more about validators.
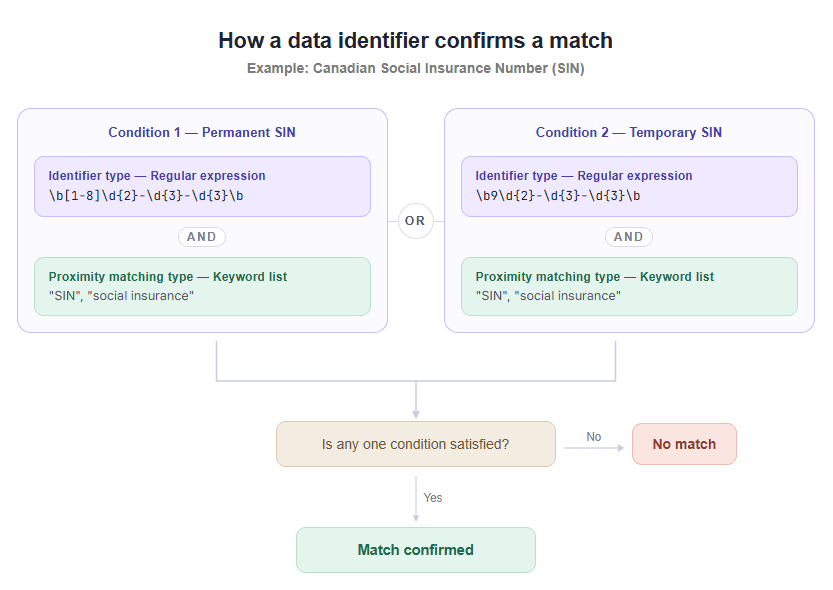
Within a condition, primary and supporting identifiers are evaluated with AND logic, meaning a condition is matched only if both are found. Across multiple conditions, OR logic applies and a file is flagged if any one condition is matched.
The diagram below illustrates this using a Canadian Social Insurance Number (SIN) as an example. Canada issues two formats of SIN—a permanent SIN for citizens and permanent residents, where the number begins with digits one through eight, and a temporary SIN for foreign workers and international students, where the number always begins with nine. Since both formats are valid and could appear in files, two conditions are configured—one for each format.
Understanding detection criteria
Regex validators
When configuring a match condition, you can select a validator for your regex pattern. A validator runs a checksum algorithm on discovered data to verify whether it is structurally valid before reporting it as a match. This reduces false positives.
However, selecting the wrong validator will cause valid matches to be ignored. If you are unsure which validator applies to your pattern, select None. This ensures that matches will be reported directly without additional verification, allowing you to review and refine from there.
How checksum algorithms work
Checksum algorithms apply a mathematical formula to characters and verify that the result matches an expected value. In data discovery, this helps distinguish a set of characters that merely look like sensitive data from characters that are actually valid.
For example, the Luhn algorithm—used to validate payment card numbers—works by running a calculation across all characters in a sequence and checking that the total is divisible by 10. Real card numbers will always satisfy this check. So a number like 1234 5678 9012 3456 would match a credit card regex pattern, but the Luhn algorithm would flag it as invalid because its digits do not produce the expected result, thereby preventing a false match.
Confidence level
Confidence level is a self-assigned rating that reflects how accurately a regex or keyword list can identify the intended data without producing false positives. It does not affect detection—DataSecurity Plus will still report all matches. However, it lets you filter results in reports by confidence level, so you can prioritize reviewing high-confidence matches separately from low-confidence ones.
Set the confidence level based on how precise you think your match condition is.
For example, if you want to identify a US Social Security number, a regex that matches any nine-digit number is broad and likely to flag unrelated content. This can be assigned a low confidence. A regex that matches the exact format of a US Social Security number, such as \b\d{3}-\d{2}-\d{4}\b, with specific separators and word boundaries is far more precise and unlikely to produce false positives. This can be assigned a high confidence.
Proximity matching
Proximity matching is an optional secondary criterion within a condition that increases detection accuracy. When enabled, the condition is considered a match only if a supporting identifier is also found within a defined character window around the primary identifier.
When to use it
Use proximity matching when your primary regex or keyword is broad enough to produce false positives on its own.
Example: If you want to discover credit card numbers, your primary identifier will be a regex for a 16-digit number. This will match any 16-digit sequence in a file. With proximity matching, you can now add keywords like Visa or card number as supporting identifiers to ensure that only sequences appearing near those keywords are confirmed as matches.
Choosing the proximity distance
The Proximity Distance defines the number of characters within which the supporting identifier must appear, either before or after the primary identifier. A smaller value enforces a tighter relationship between the two. A larger value accommodates varied document layouts where the supporting identifier may appear further away.
Best practice: Start with 100 and adjust based on how your target data typically appears in files.
Mapping data identifiers to data discovery policies
Data identifiers must be added to a data discovery policy to activate them in scans. Learn how to do this on the policy configuration page.