How to configure SSO for Microsoft 365 (previously Office 365)
ADSelfService Plus supports AD-based SSO for Microsoft 365 and any other SAML-enabled application. Upon enabling Microsoft 365 SSO in ADSelfService Plus, all users have to do is simply log in to ADSelfService Plus' end-user portal. Once logged in, users can securely access Microsoft 365 and all supported SAML applications in one click, without having to reenter their usernames and passwords each time.
On this page:
Benefits of implementing AD-based SSO for Microsoft 365 with ADSelfService Plus
Reduce password fatigue
Relieve users from having to remember different usernames and passwords for each enterprise application.
Streamline application access
Enable one-click access to all applications from a single portal.
Increase user adoption rate of applications
Increase usage of applications by making them readily available in a unified location.
ADSelfService Plus supports both identity-provider (IdP)-initiated and service-provider (SP)-initiated SAML SSO for Microsoft 365.
IdP-initiated SSO for Microsoft 365
- Users log in to the ADSelfService Plus end-user portal.
- From the ADSelfService Plus self-service portal, they can click the Microsoft 365 icon in the Applications dashboard.
SP-initiated SSO for Microsoft 365
- Users can access their Microsoft 365 domain via a URL or bookmark.
- They will automatically be redirected to ADSelfService Plus' portal for login.
- Once they've signed in, they'll be automatically redirected and logged in to the Microsoft 365 portal.
SAML SSO configuration for Microsoft 365
Before you begin
Important:
Prerequisites
Make sure you have administrator access in ADSelfService Plus and Microsoft 365 before you start configuring SSO for Microsoft 365. Additionally, ensure that PowerShell is installed on your machine and that you can connect to Microsoft 365. The SSO settings must be configured simultaneously in ADSelfService Plus and Microsoft 365. Meeting these prerequisites will streamline the process and ensure that the configuration is completed before the default session timeout limit in ADSelfService Plus.
Limitations
- SSO can be enabled only for domains that are verified in Microsoft 365/Entra ID.
- SSO cannot be enabled for onmicrosoft.com domains that are created by Microsoft.
- SSO cannot be enabled for the default domain (the primary domain in which users are created). It can only be configured for custom domains.
- Federated domains, i.e., domains in which SSO has been enabled, cannot be configured for password synchronization.
Fail-safe solution
Federation settings (SSO) are strictly applied domain-wide, affecting all users. Any SSO configuration errors, account mapping issues, or ADSelfService Plus server downtime will result in login failures.
To prevent this, creating a global administrator account in the default domain is mandatory. This account enables global admins to troubleshoot any issues that may arise during the implementation of SSO for Microsoft 365.
- Download and install ADSelfService Plus if you have not already.
- Link Microsoft 365 and on-premises AD user accounts:
- Using Microsoft Entra Connect
- GUID as sourceAnchor: If you have Microsoft Entra Connect, then use it to update the sourceAnchor attribute in Microsoft 365 with AD's GUID attribute value.
- Another unique AD attribute as source Anchor: If you have already assigned a different attribute value other than GUID for the sourceAnchor attribute, then use the Account Linking option in ADSelfService Plus to map it with the corresponding attribute in AD.
- Using a third-party tool to convert GUID to ImmutableID
- Convert GUID to ImmutableID: If you don’t have Microsoft Entra Connect, then you can download a third-party tool to convert GUID to ImmutableID. Use the tool to convert the GUID value of each user to ImmutableID values and update them in Microsoft 365.
- Update the ImmutableID value in Microsoft 365: Once you have converted the GUID to ImmutableID, you need to update the value in Microsoft 365 for each user using the PowerShell commands given below.
- Command to update ImmutableID attribute while creating new users
Click to copy
$cred = Get-Credential
Connect-MsolService -Credential $cred
New-MsolUser -UserPrincipalName "user01@mycompany.com" -ImmutableId
"<immutable_id>" -DisplayName "user 01" -FirstName "user" -LastName "01"
-LicenseAssignment "<service_pack>" -UsageLocation "<location>"
- Command to update ImmutableID attribute for existing users
Click to copy
Set-Msoluser -UserPrincipalName "<user_mailID>" -ImmutableID “ <immutable_id> ”
- Reconfigure or update SSO settings
If you are already using SSO for Microsoft 365 from another IdP or want to update ADSelfService Plus SSO settings, then you must first disable SSO in Microsoft 365. Once that has been done, disable SSO in Microsoft 365 by executing the command given below using PowerShell, and replacing the items with information specific to your setup:
Click to copy
$dom = "mycompany.com"
Set-MsolDomainAuthentication -DomainName $dom -FederationBrandName
$dom
-Authentication Managed
Getting the SAML details from ADSelfService Plus
- Navigate to the Configuration > Password Sync/Single Sign On > Add Application.
- Select Microsoft 365/Azure in the list of applications provided.
- Click IdP Details in the top-right corner of the screen.
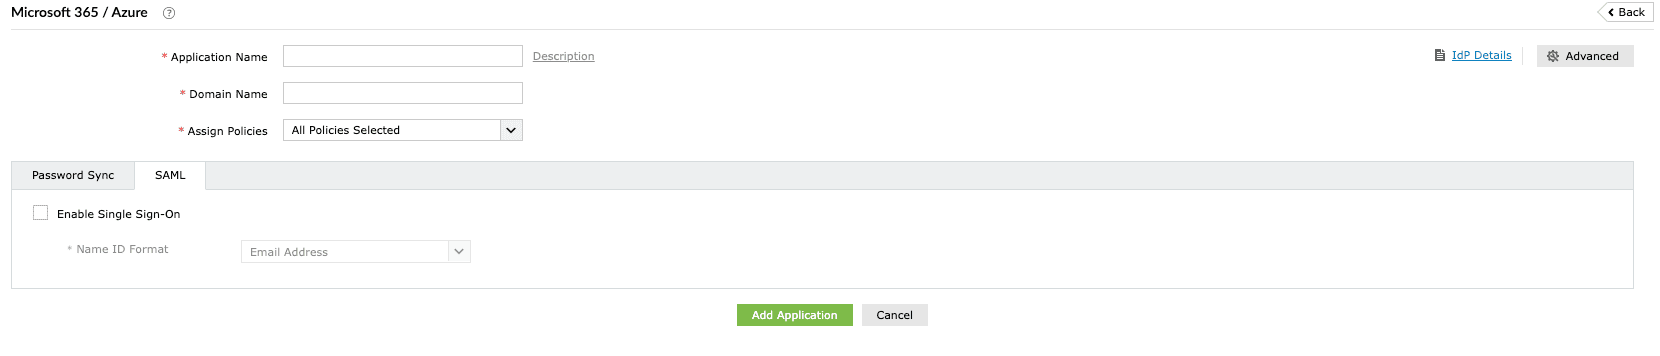
Fig. 1: Microsoft 365 SAML SSO configuration in ADSelfService Plus.
- In the pop-up that appears, copy the Entity ID, Login URL, and Logout URL, and download the SSO certificate by clicking Download Certificate.
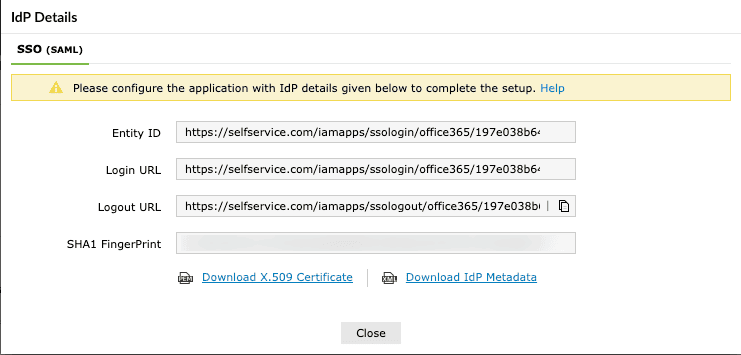
Fig. 2: Obtaining IdP details for Microsoft 365 SSO configuration.
Configuring SSO settings in Microsoft 365
- Open PowerShell with admin rights.
- Enter the following command:
Click to copy
$cred = Get-Credential
- In the pop-up that appears, enter the username and password of your Microsoft 365 administrator account.
- Connect with MsolService using the following command:
Click to copy
Connect-MsolService -Credential $cred
- Now, get a list of your Microsoft 365 domains by entering the following command:
Click to copy
Get-MsolDomain
- Enter the domain for which you would like to enable SSO:
Click to copy
$dom = "mycompany.com"
- Enter the Login URL and Entity ID values from Step 4 for the $url and $uri commands, and the Logout URL value for the $logouturl command.
Click to copy
$url = "<login URL value>"
For example, $url =
"https://selfservice.com/iamapps/ssologin/office365/
1352163ea82348a5152487b2eb05c5adeb4aaf73"
$uri = "<entity ID value>"
For example, $uri =
"https://selfservice.com/iamapps/ssologin/office365/
1352163ea82348a5152487b2eb05c5adeb4aaf73"
$logouturl = "<logout URL value>"
For example, $logouturl =
"https://selfservice.com/iamapps/ssologout/office365/
1352163ea82348a5152487b2eb05c5adeb4aaf73"
- Now copy the SSO certificate file content from Step 4 and pass it as the value for the following command:
Important: Please edit the file so that there aren’t any new lines before pasting the content into the file.
Click to copy
$cert = "MIICqjCCAhOgAwIBAgIJAN..........dTOjFfqqA="

Fig. 3: Configuring Federation Settings in Microsoft 365.
- Next, run the following command to enable SSO in Microsoft 365:
Click to copy
Set-MsolDomainAuthentication -DomainName $dom -FederationBrandName $dom -Authentication Federated -PassiveLogOnUri $url -SigningCertificate $cert -IssuerUri $uri -LogOffUri $logouturl -PreferredAuthenticationProtocol SAMLP
- Test the configuration by using the following command:
Click to copy
Get-MSolDomainFederationSettings -DomainName "mycompany.com" | Format-List *
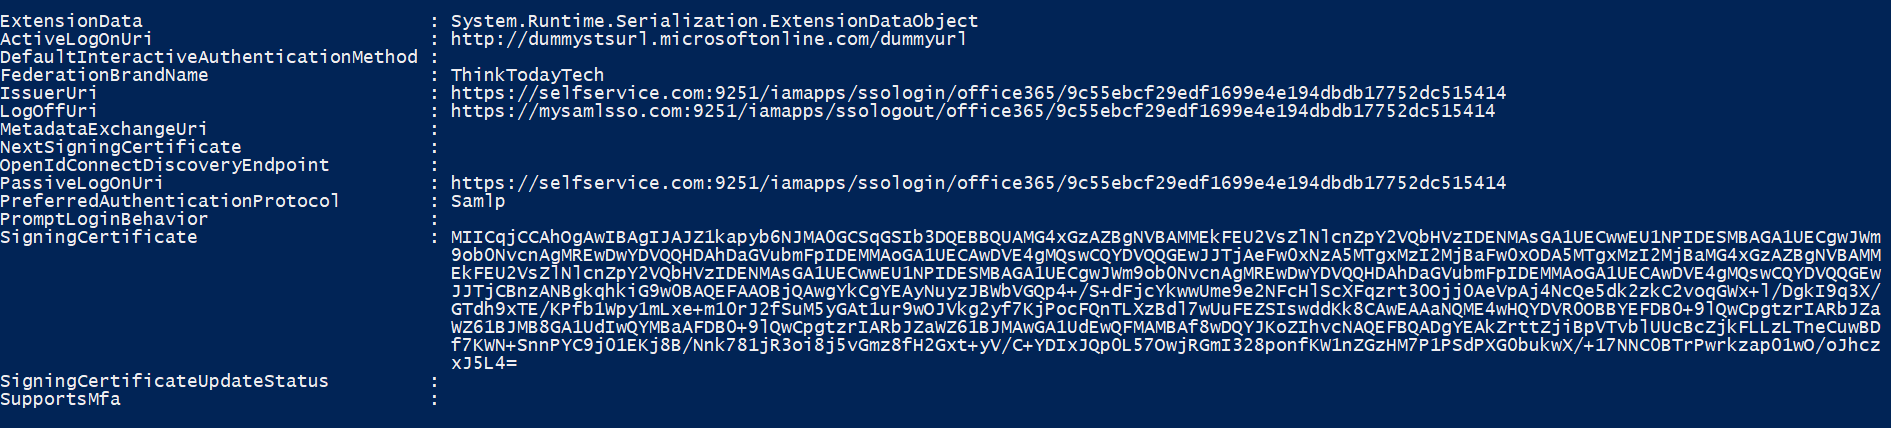
Fig. 4: Verifying Federation Settings in Microsoft 365.
Adding your Microsoft 365 SSO setup in ADSelfService Plus
- Now, switch to ADSelfService Plus’ Microsoft 365/Azure SSO configuration page.
- Enter the Application Name and Description.
- In the Domain Name field, enter the domain name you used in Step 10.
- In the Assign Policies field, click the drop-down box and select the policies for which you wish to enable SSO. The policy you select will determine which users have SSO enabled for Microsoft 365.
- Select the SAML tab and check the Enable Single Sign-On checkbox.
- Choose the Name ID format that has to be sent in the SAML response. The Name ID format will specify the type of value sent in the SAML response for user identity verification.
Note: Use Unspecified as the default option if you are unsure about the format of the login attribute value used by the application
- Click Add Application.
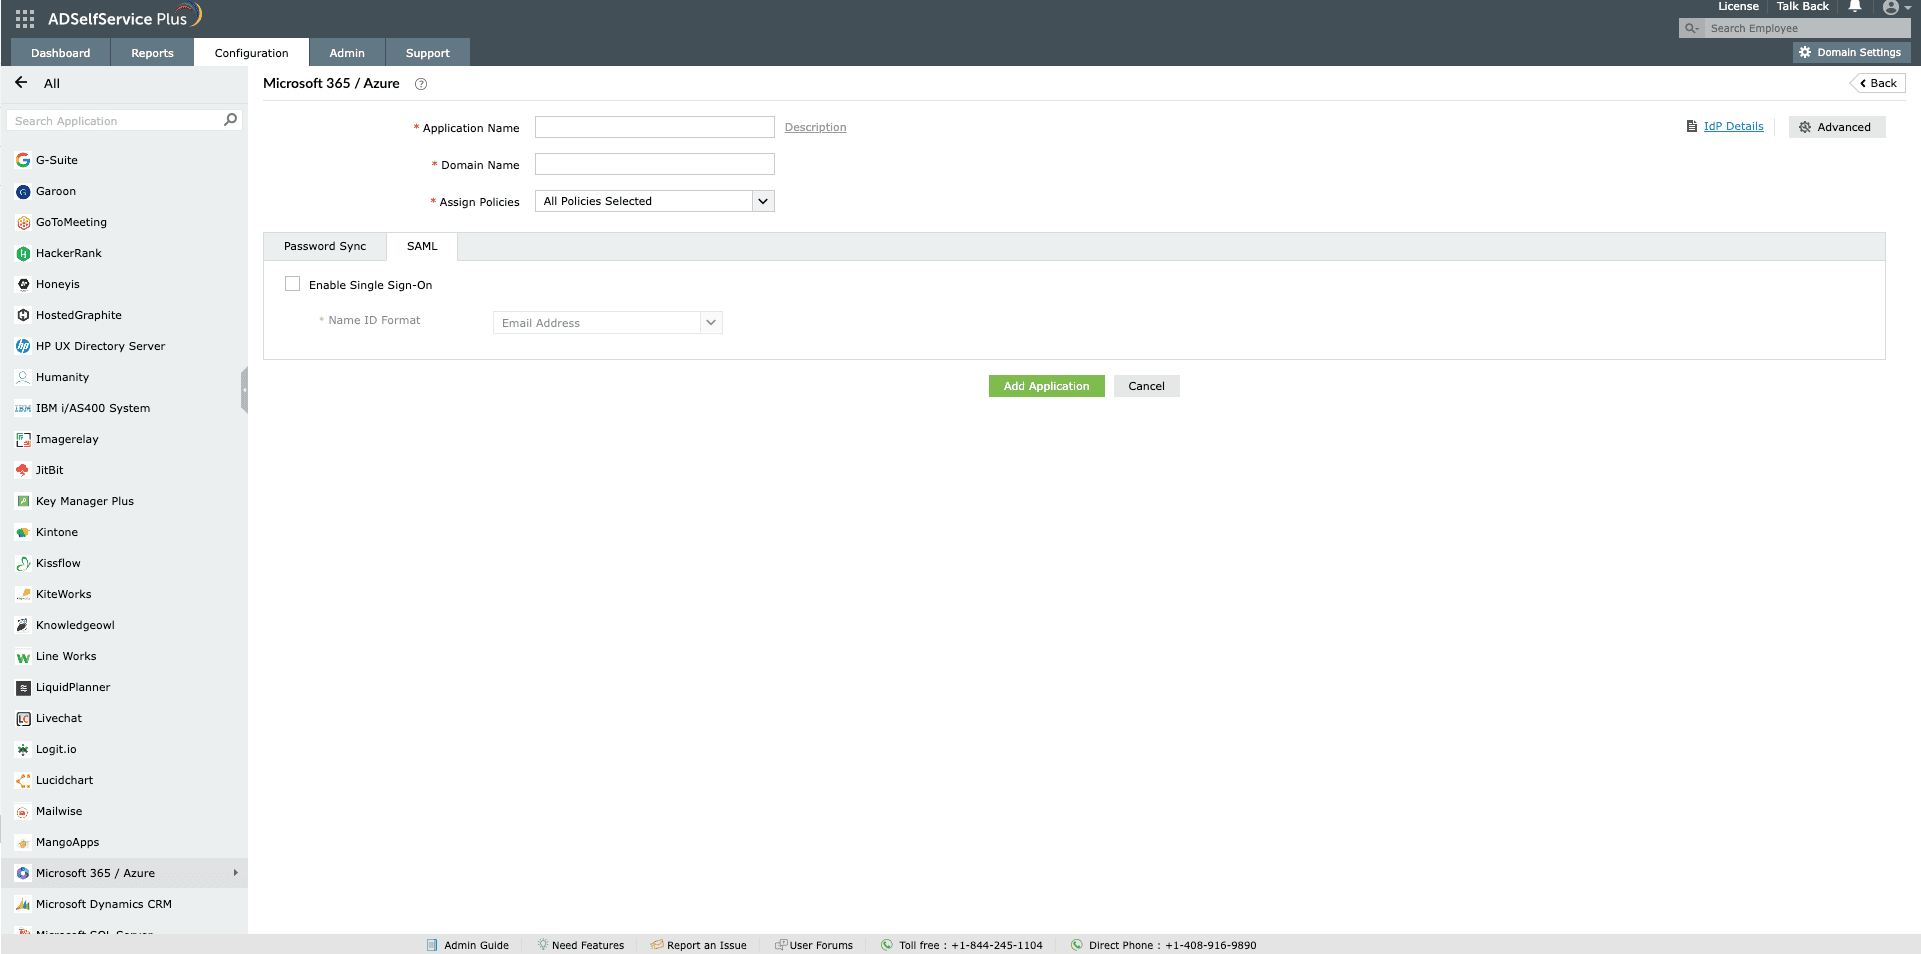
Fig. 5: Microsoft 365 SSO configuration window in ADSelfService Plus.
- Now, users can log in to their Microsoft 365 accounts automatically without having to enter their username and password again.
Troubleshooting steps
- Case: Users are unable to log in to Microsoft 365
Possible causes and solutions
Cause 1: The federation settings apply domain-wide for all users. Any error in the configuration or account mapping in the federation settings will cause login failures.
Solution: Test the federation settings in a test environment before implementing them in your production environment.
Cause 2: Timestamp mismatch between ADSelfService Plus and Microsoft 365.
Solution: Ensure that the time on the ADSelfService Plus instance is synchronized accurately with the time in your region.
Cause 3: Mapping attribute mismatch
Solution: Ensure that the attribute value chosen as the Source Anchor in Microsoft Entra ID matches the attribute value in the Account Linking window in ADSelfService Plus.
Unify access to cloud and on-premises applications with SAML SSO
Highlights
Free Active Directory users from attending lengthy help desk calls by allowing them to self-service their password resets/ account unlock tasks. Hassle-free password change for Active Directory users with ADSelfService Plus ‘Change Password’ console.
Get seamless one-click access to 100+ cloud applications. With enterprise single sign-on, users can access all their cloud applications with their Active Directory credentials. Thanks to ADSelfService Plus!
Intimate Active Directory users of their impending password/account expiry by mailing them these password/account expiry notifications.
Synchronize Windows Active Directory user password/account changes across multiple systems, automatically, including Office 365, G Suite, IBM iSeries and more.
Ensure strong user passwords that resist various hacking threats with ADSelfService Plus by enforcing Active Directory users to adhere to compliant passwords via displaying password complexity requirements.
Portal that lets Active Directory users update their latest information and a quick search facility to scout for information about peers by using search keys, like contact number, of the personality being searched.