


How to Create a Master BitLocker Recovery Key for All Endpoints
Key Points
Pre-Configuration
Generating the Master Recovery Certificate
Deploying the DRA Protector to Endpoints
Key Security and Lifecycle Considerations
Exporting the Lost DRA Private Key
Unlocking OS Drive using DRA Private Key
Deleting DRA Protectors
Overview
In large Windows environments, BitLocker recovery often depends on individual 48-digit recovery passwords stored per device. When these passwords are unavailable, recovery becomes operationally difficult and may result in permanent data loss.
To address this at scale, BitLocker supports a certificate-based recovery mechanism known as a Data Recovery Agent (DRA). Instead of managing recovery passwords per device, administrators generate a single certificate pair that acts as a master recovery key:
- A public certificate (.cer) is deployed to all managed endpoints and added as a BitLocker protector.
- A private certificate (.pfx) is securely retained by the organization and can unlock any drive protected by the corresponding public key.
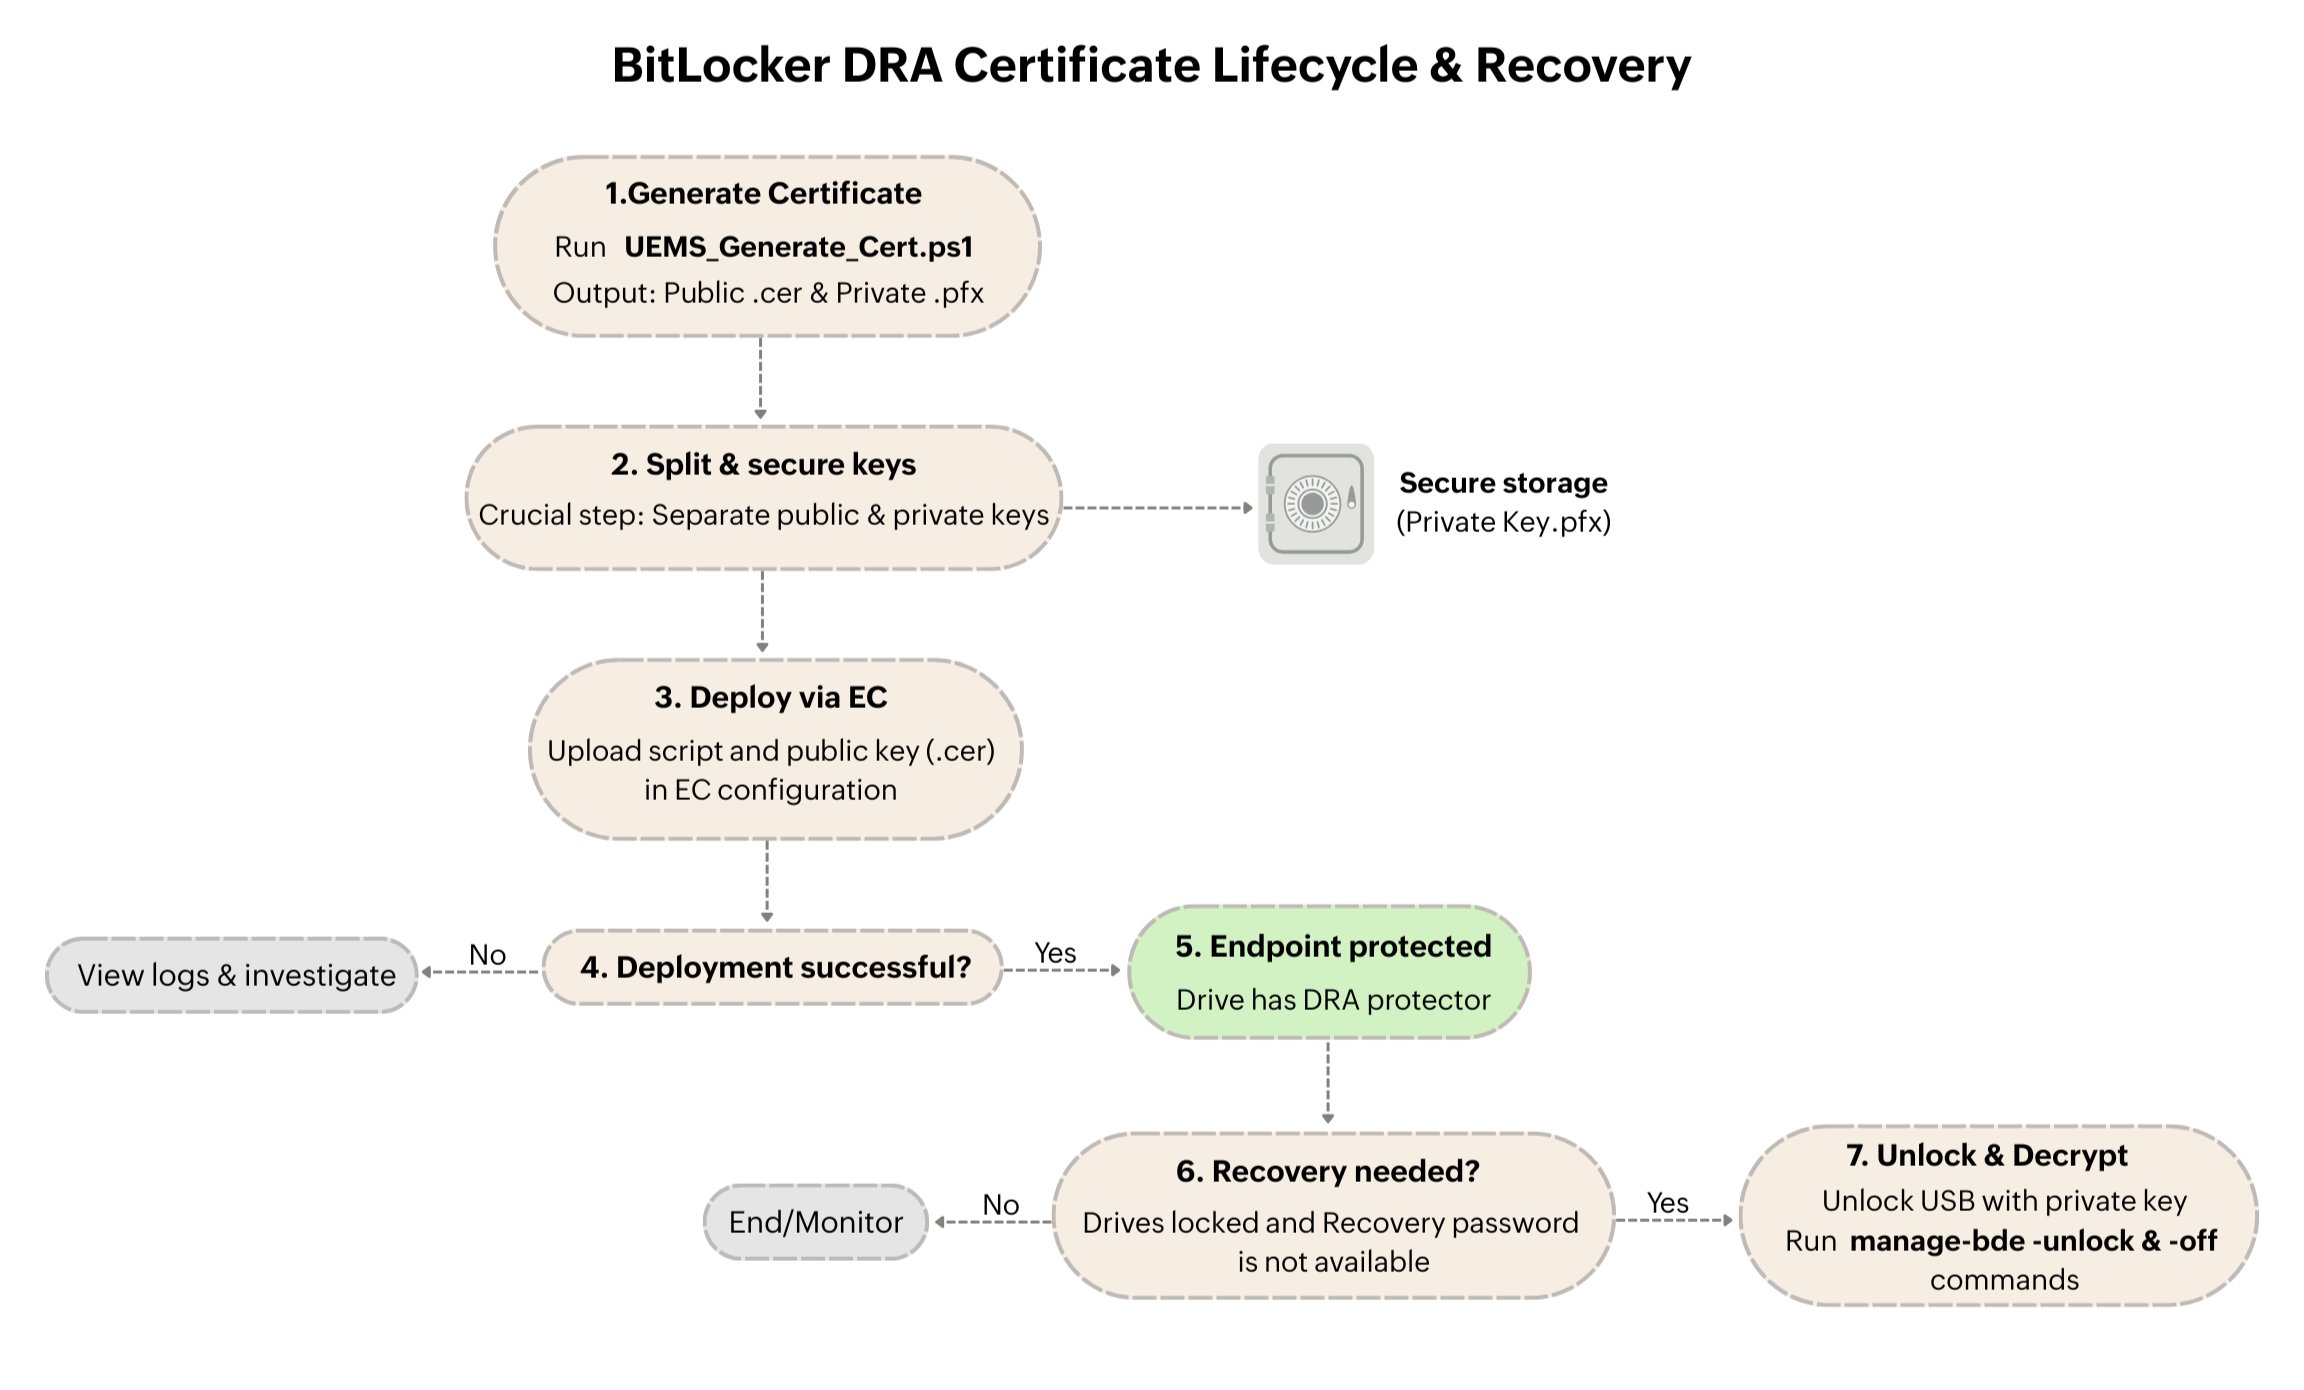
When managed through Endpoint Central, this approach provides centralized, controlled, and auditable BitLocker recovery across the organization without weakening BitLocker’s encryption model.
Centralize BitLocker recovery with DRA using ManageEngine Endpoint Central!
Pre-Configuration
Before creating and deploying a master recovery key, review the following prerequisites to ensure successful enforcement.
Supported Operating Systems
Ensure endpoints run Windows editions that support BitLocker DRA:
Windows Client Operating Systems
- Windows 7 — Enterprise, Ultimate
- Windows 8 / 8.1 — Pro, Enterprise
- Windows 10 — Pro, Enterprise, Education
- Windows 11 — Pro, Enterprise, Education
Windows Server Operating Systems
- Windows Server 2008 / 2008 R2
- Windows Server 2012 / 2012 R2
- Windows Server 2016
- Windows Server 2019
- Windows Server 2022
PowerShell Availability
- Windows PowerShell 5.1 or later must be present.
- Scripts must be executed with administrative privileges.
Security Planning
- Identify a secure, controlled system where the certificate will be generated.
- Decide where the private key (.pfx) will be stored (for example, offline USB storage or a secure vault).
- Limit access to the private key to authorized recovery personnel only.
Generating the Master Recovery Certificate
This step creates the certificate pair that forms the foundation of centralized BitLocker recovery.
- Download this certificate generation script.
- Open Windows PowerShell as Administrator on the chosen secure system.
- Run the following command and replace <path to certificate> with the actual path of the file:
PowerShell.exe -ExecutionPolicy Bypass -File "<path to certificate>\UEMS_Generate_Cert.ps1" - Running this script generates a BitLocker DRA Certificate and exports the following two files to the script's directory. When prompted, create a strong password to protect the private key.
- Public Key (.cer): Deploy this file to all endpoints to configure the BitLocker DRA protector on the drives.
- Private Key (.pfx): Store this file securely (e.g., on a USB) along with the given password. This key is required to unlock any drive encrypted with the corresponding Public Key.
The certificate is also installed in the local certificate store of the system where it was generated, enabling future export if required.
Deploying the DRA Protector to Endpoints
Once the master recovery certificate is created, the public key must be deployed to all managed devices so it is added as a BitLocker protector.
Add the Deployment Script
- Download the DRA deployment script.
- In the Endpoint Central console, navigate to Configuration → Script Repositories.
- Select Create/Modify Script → Add Script.
- Browse for and select the provided UEMS_BLM_DRA_Script.ps1 file.
Click Add Script.

Configure Deployment
- Navigate to Configuration → Windows → Custom Script → Computer.
- Select the UEMS_BLM_DRA_Script.ps1 script added in the previous step.
- In the Dependency Files field, browse for and select the generated .cer file [This .cer file has to be in this specific name (UEMS_BLM_PublicKey.cer) to work correctly].
Configure the following settings:
- Frequency: Once
- Logging: Enabled (Enable Logging for troubleshooting)
- Run as: System User
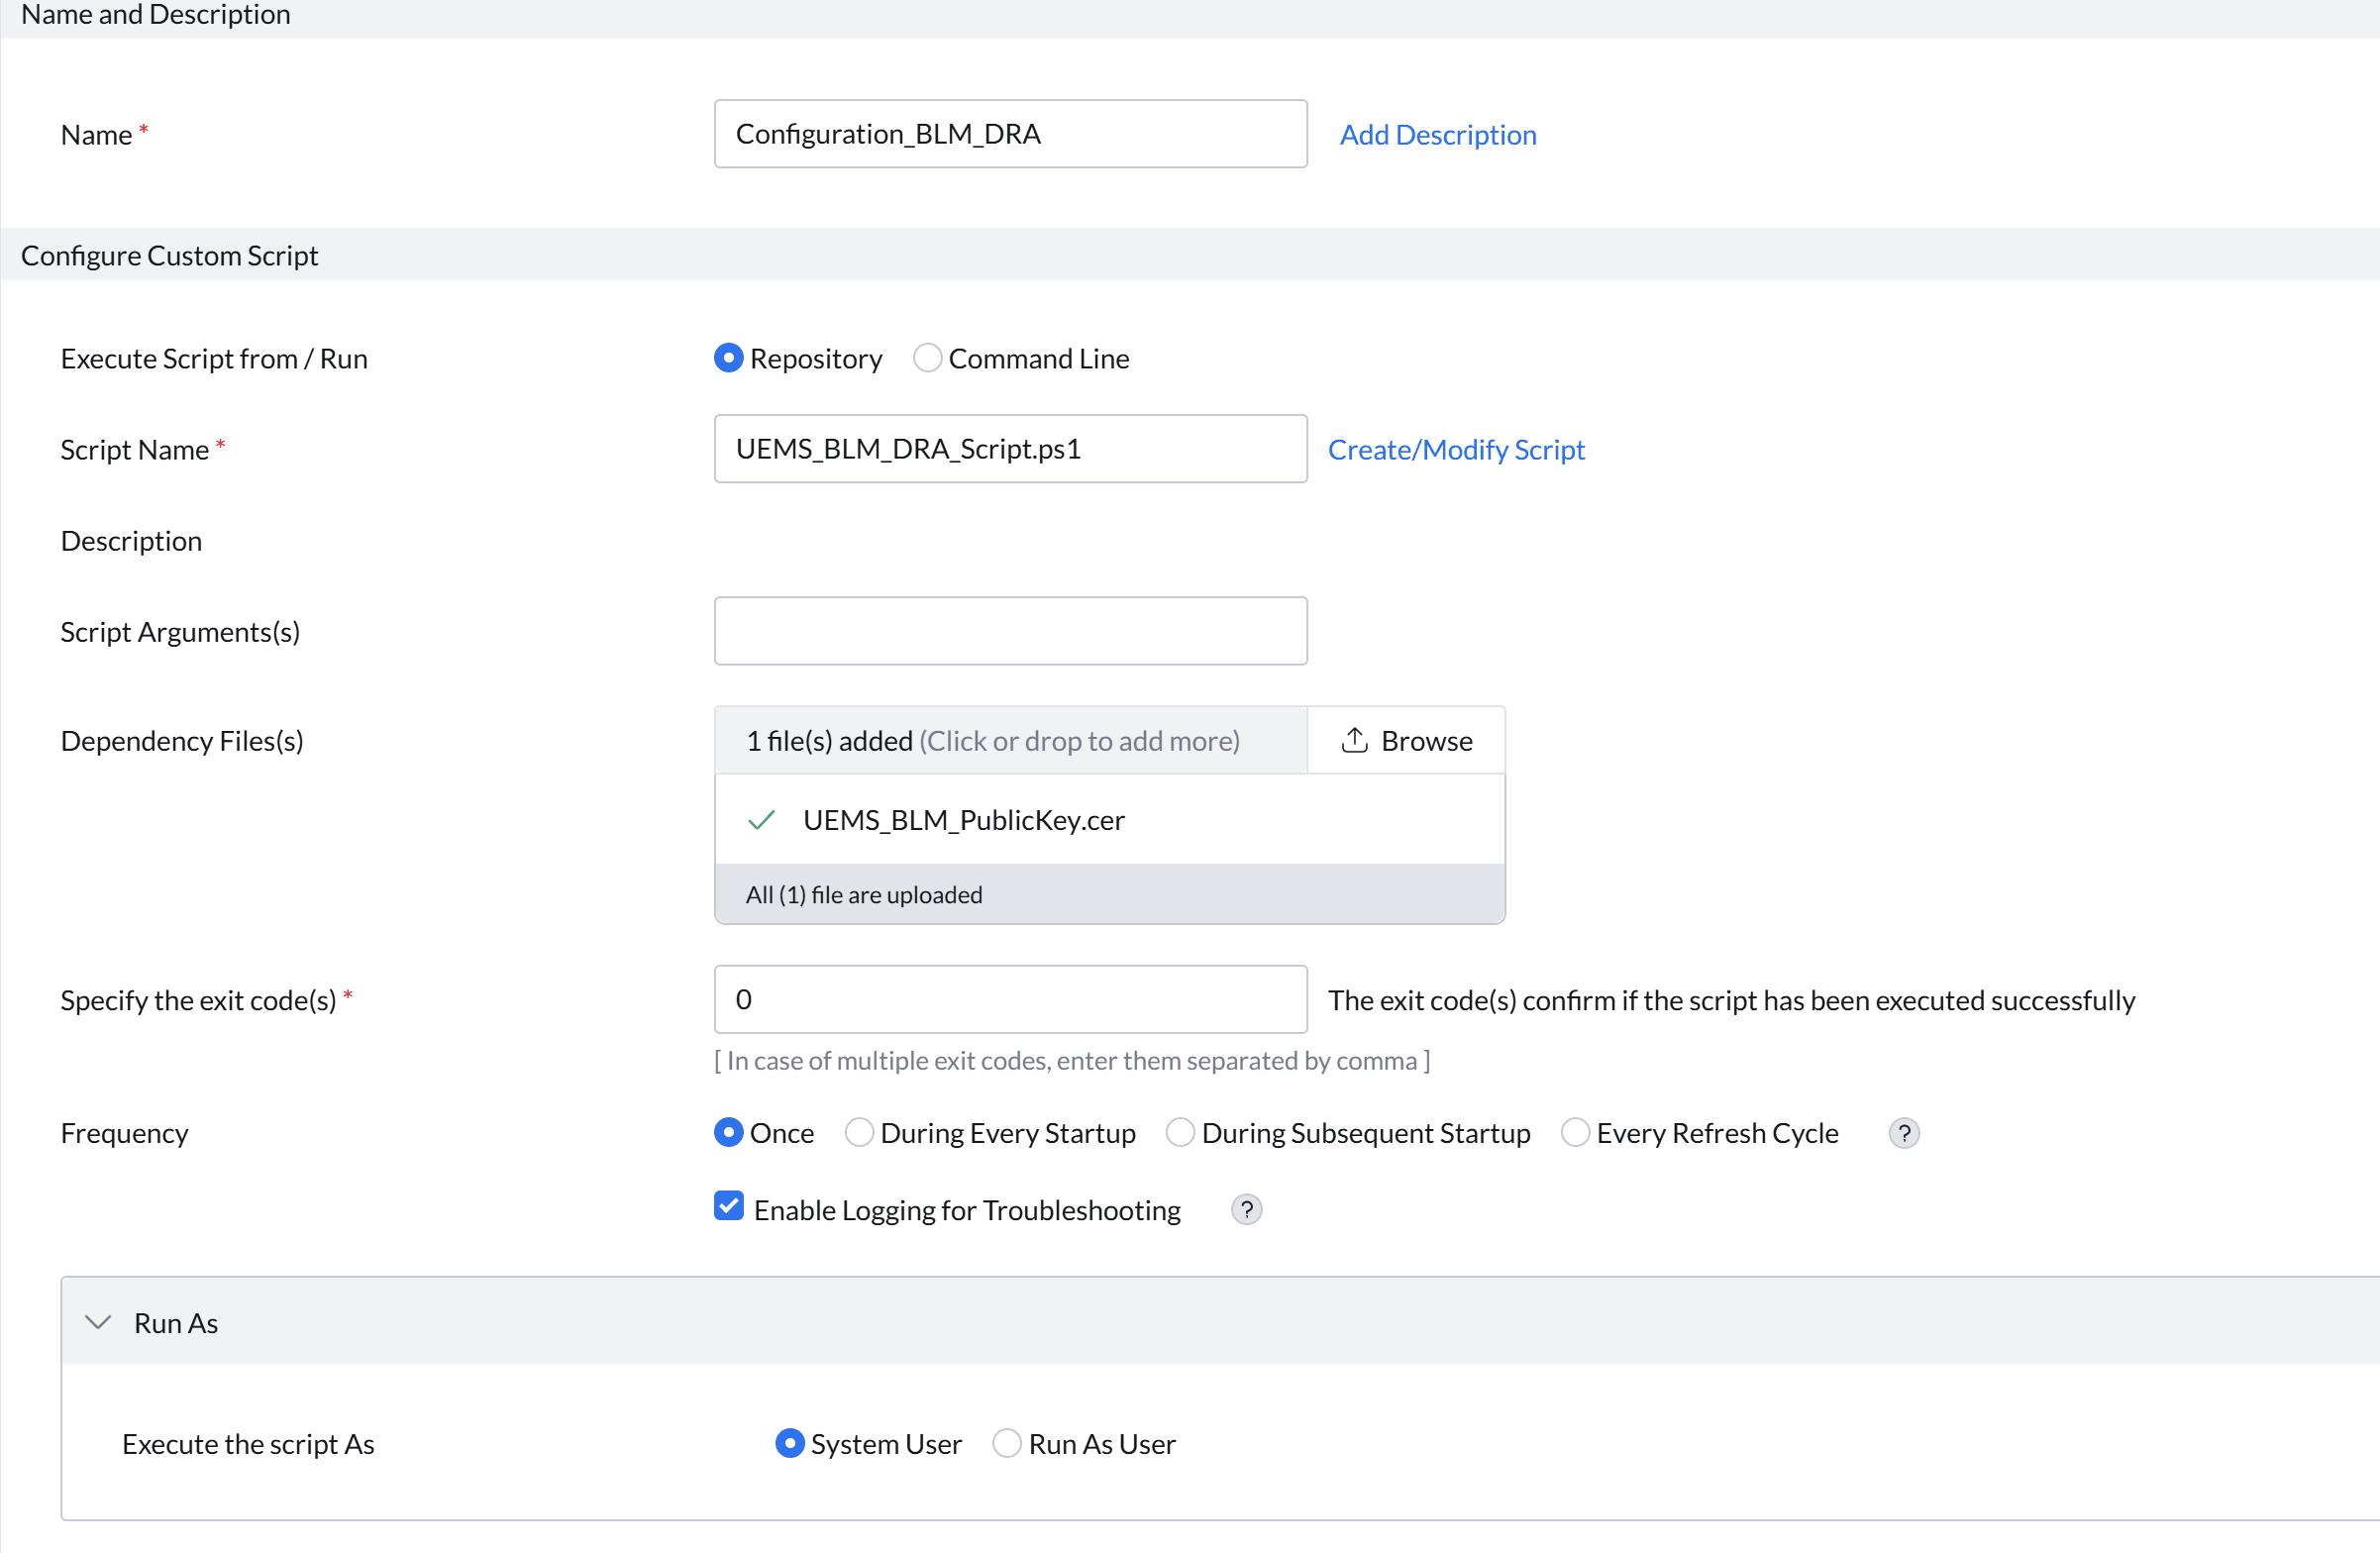
Click Deploy. Deploy the configuration to the required device groups.
Note: The DRA Protector is added immediately for the drives that are already encrypted (except for locked drives) and for those that are not encrypted yet, the DRA Protector will be added automatically once the drive becomes encrypted.
Verify Execution
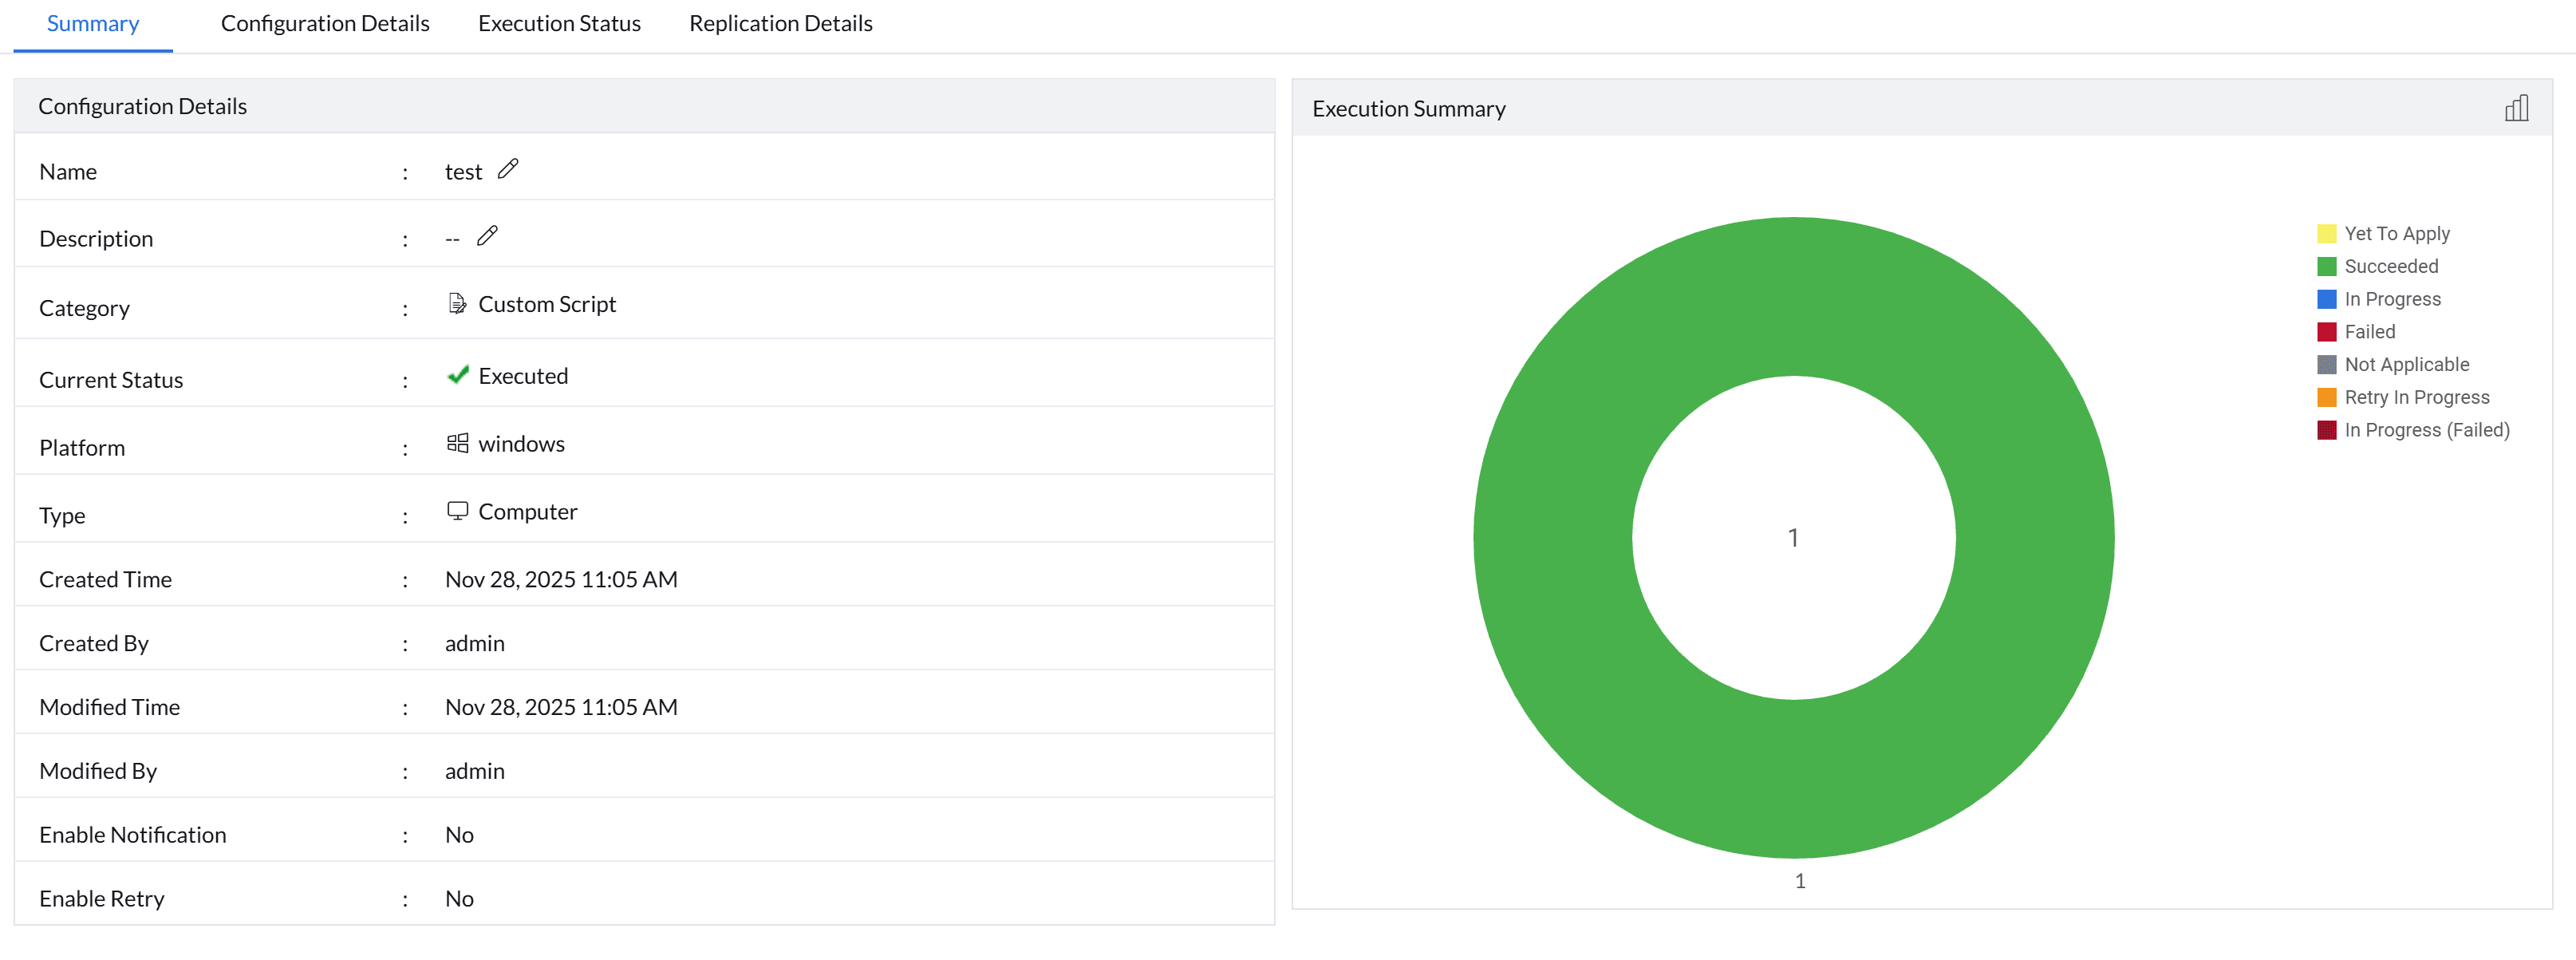
Navigate to Configuration > All Configuration and select the deployed configuration to view the summary.
- Success: A green status indicates the configuration executed successfully.
Failure: If the configuration failed, investigate the cause by selecting the configuration, clicking Execution Status, and then selecting View Log.
What Happens After Deployment
After successful deployment, each BitLocker-encrypted drive gains an additional recovery protector tied to the DRA certificate. The existing encryption remains unchanged; no re-encryption is required. During recovery scenarios where the standard recovery password is unavailable:
- The drive can be unlocked using the private .pfx file and its password.
- This applies uniformly across all endpoints that received the public key.
This establishes a single, organization-controlled recovery mechanism that works across devices without relying on per-machine recovery keys.
Key Security and Lifecycle Considerations
Private Key Protection
- The private key and its password are critical assets.
- If both are lost and the certificate is removed from the original system, recovery becomes impossible for drives protected by that DRA.
- Do not delete the certificate from the certificate store of the generation system.
Key Recovery and Rotation
- If the private key file is lost, it can be re-exported from the original system where the certificate was generated.
- If the certificate itself is lost or compromised:
- Remove existing DRA protectors from endpoints.
- Generate a new certificate pair.
- Redeploy the updated public key organization-wide.
Operational Impact
- DRA does not replace standard BitLocker recovery passwords; it complements them.
- Administrators gain a controlled fallback mechanism without reducing endpoint security posture.
Exporting the Lost DRA Private Key
- Download this script.
- Run these steps on the same machine where the certificate was originally generated.
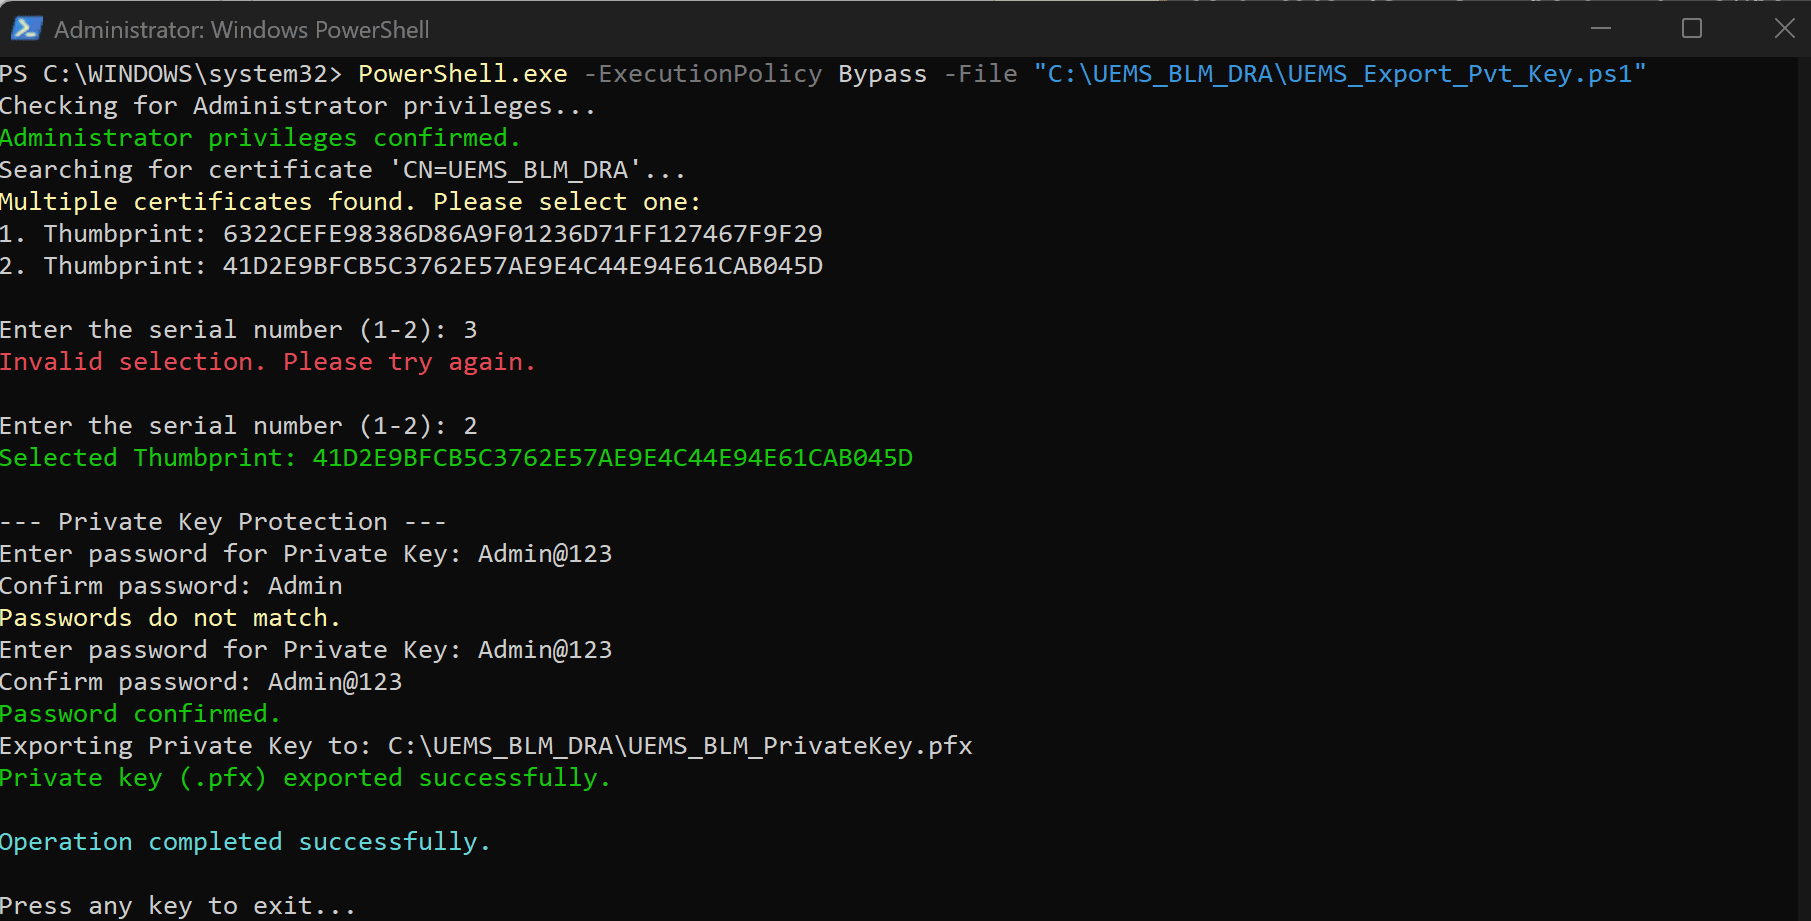
- Execute the following command in Windows PowerShell with Administrator and replace
with the actual path of the file: PowerShell.exe -ExecutionPolicy Bypass -File "<path to certificate>\UEMS_Export_Pvt_Key.ps1" - If the machine contains only one DRA certificate named UEMS_BLM_DRA, the script will automatically detect it and proceed to export the private key after prompting you to set a password for the .pfx file.
- If multiple DRA certificates exist on the machine (for example, if the provided generate script was executed multiple times), the script will list all matching certificates and prompt you to select the correct one by its Thumbprint.
- To identify the correct Thumbprint, you can verify the public key that is already deployed to endpoints. On any endpoint where the public key protector is added, run the following command:
manage-bde -protectors -get <DriveLetter>: After selecting the correct Thumbprint, the script will prompt you to set a password and will then export the private key (.pfx) to the same directory where the script is executed.
Unlocking OS Drive using DRA Private Key
Follow the steps below to unlock the OS drive using DRA Private Key in boot-up:
- Access Command Prompt in Recovery Mode:
- If the Recovery Password is unavailable, press Esc when prompted for the Recovery Key.
- Navigate to Troubleshoot > Advanced Options > Command Prompt.
Unlock the Drive: [USB Device which have the respective .pfx should be connected to the machine]
- Run the following command to unlock the drive using the Private Key (saved on the USB device) and replace <Path to .pfx file on USB> with the actual path of the .pfx file in the USB:
manage-bde -unlock C: -certificate -cf "<Path to .pfx file on USB>" -pin - When prompted, enter the password created during the .pfx file export.
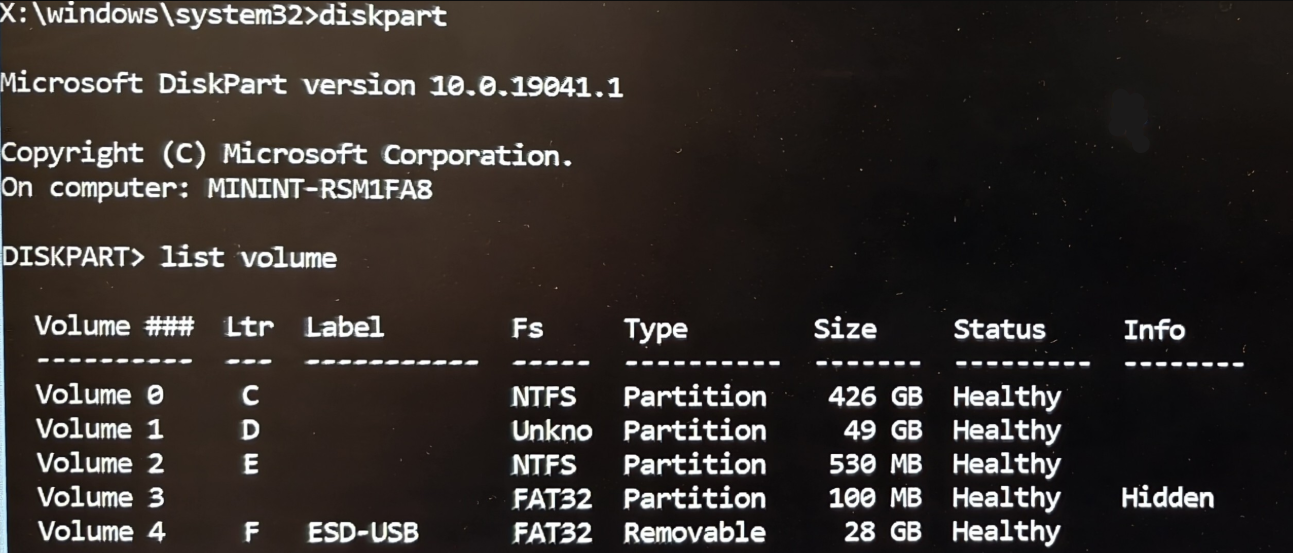
- To find the USB drive letter, run the below command and it will show the Drive Letter with label USB:
diskpartlist volume

- Run the following command to unlock the drive using the Private Key (saved on the USB device) and replace <Path to .pfx file on USB> with the actual path of the .pfx file in the USB:
- Decrypt the Drive:
The drive is now unlocked, but it will lock again upon exiting the Command Prompt. To prevent this, we recommend decrypting the drive using the following command:manage-bde -off C: - Verify Decryption Status:
Decryption takes time. Do not restart until the Conversion Status displays Fully Decrypted. Monitor the progress using the status command:manage-bde -status C: - Once fully decrypted, close the Command Prompt and restart the machine.
Deleting DRA Protectors
Add the Deletion Script
- For deleting all DRA protectors available in the machine, download this script and for deleting specific DRA protectors, download this script.
- In the Endpoint Central console, navigate to Configuration → Script Repositories.
- Select Create/Modify Script → Add Script.
- Browse for and select the provided UEMS_Delete_Specific_DRA_Protectors.ps1 or UEMS_Delete_All_DRA_Protectors.ps1 file.
- Click Add Script.
Configure Deployment
- Navigate to Configuration → Windows → Custom Script → Computer.
- Select the UEMS_Delete_Specific_DRA_Protectors.ps1 or UEMS_Delete_All_DRA_Protectors.ps1 script added in the previous step.
- In the Dependency Files field, browse for and select the exact .cer public key file which needs to be deleted [This .cer file have to be in this specific name (UEMS_BLM_PublicKey.cer) to work correctly].
- Configure the following settings:
- Frequency: Once
- Logging: Enabled (Enable Logging for troubleshooting)
- Run as: System User
- Click Deploy. Deploy the configuration to the required device groups.
Verify Execution
Navigate to Configuration > All Configuration and select the deployed configuration to view the summary.
- Success: A green status indicates the configuration executed successfully.
- Failure: If the configuration failed, investigate the cause by selecting the configuration, clicking Execution Status, and then selecting View Log.
Start your 30-day free trial and manage unlimited endpoints — secure and protected!