Self Service Portal for Software Deployment
Table of contents
- Introduction to Self Service Portal
- Making Self Service Portal accessible to users
- Self Service Portal settings
- Publish software to Self Service Portal
- Configuring Package Settings
- Enable or Disable Allow User to Interact with the Installation/Uninstallation Window
- Install software from Self Service Portal
- Disassociating a Package from Self Service Portal
- Request for Approval
- Points to consider
- Related Documents
Introduction to Self Service Portal
As a part of IT administration, you will have the need to deploy various software to various users/computers. This is not only a routine task, but also consumes a lot of your time and effort. You will have to deploy multiple software configurations to the required target. We add another easy approach to accomplish software deployment, by introducing Self Service Portal. Self Service Portal allows you to publish software to the target users/computers. Unlike manual software deployment, you can publish the list of software to the group (target users/computers). You can empower the users to install software based on their needs. This helps you to save a lot of time and enhances productivity.
Self Service Portal is compatible with Mac (version 10.12 and above) and Windows operating systems.
Making Self Service Portal Accessible to Users
To enable users to access the Self Service Portal, follow these steps:
- Navigate to Agent tab >Settings > Agent Settings > Agent Tray Icon.
- Enable Show Agent Icon in the System Tray. Make sure Show Self Service Portal Menu is enabled.
- Click on Save Changes.
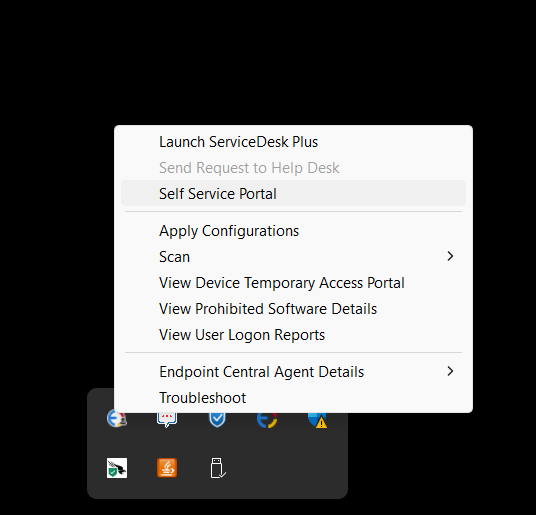
Users can access self service portal from any one of the following methods:
- Launching self service portal from Endpoint Central agent tray
- Double clicking on the self service portal shortcut, from the user's desktop
- Choosing self service portal from the start menu
- Right-clicking the agent tray icon in the system tray and selecting "Self Service Portal"
Self Service Portal Settings
- You can customize how you want the Self Service Portal (SSP) to be displayed for users by navigating to Software Deployment > Settings > SSP settings.
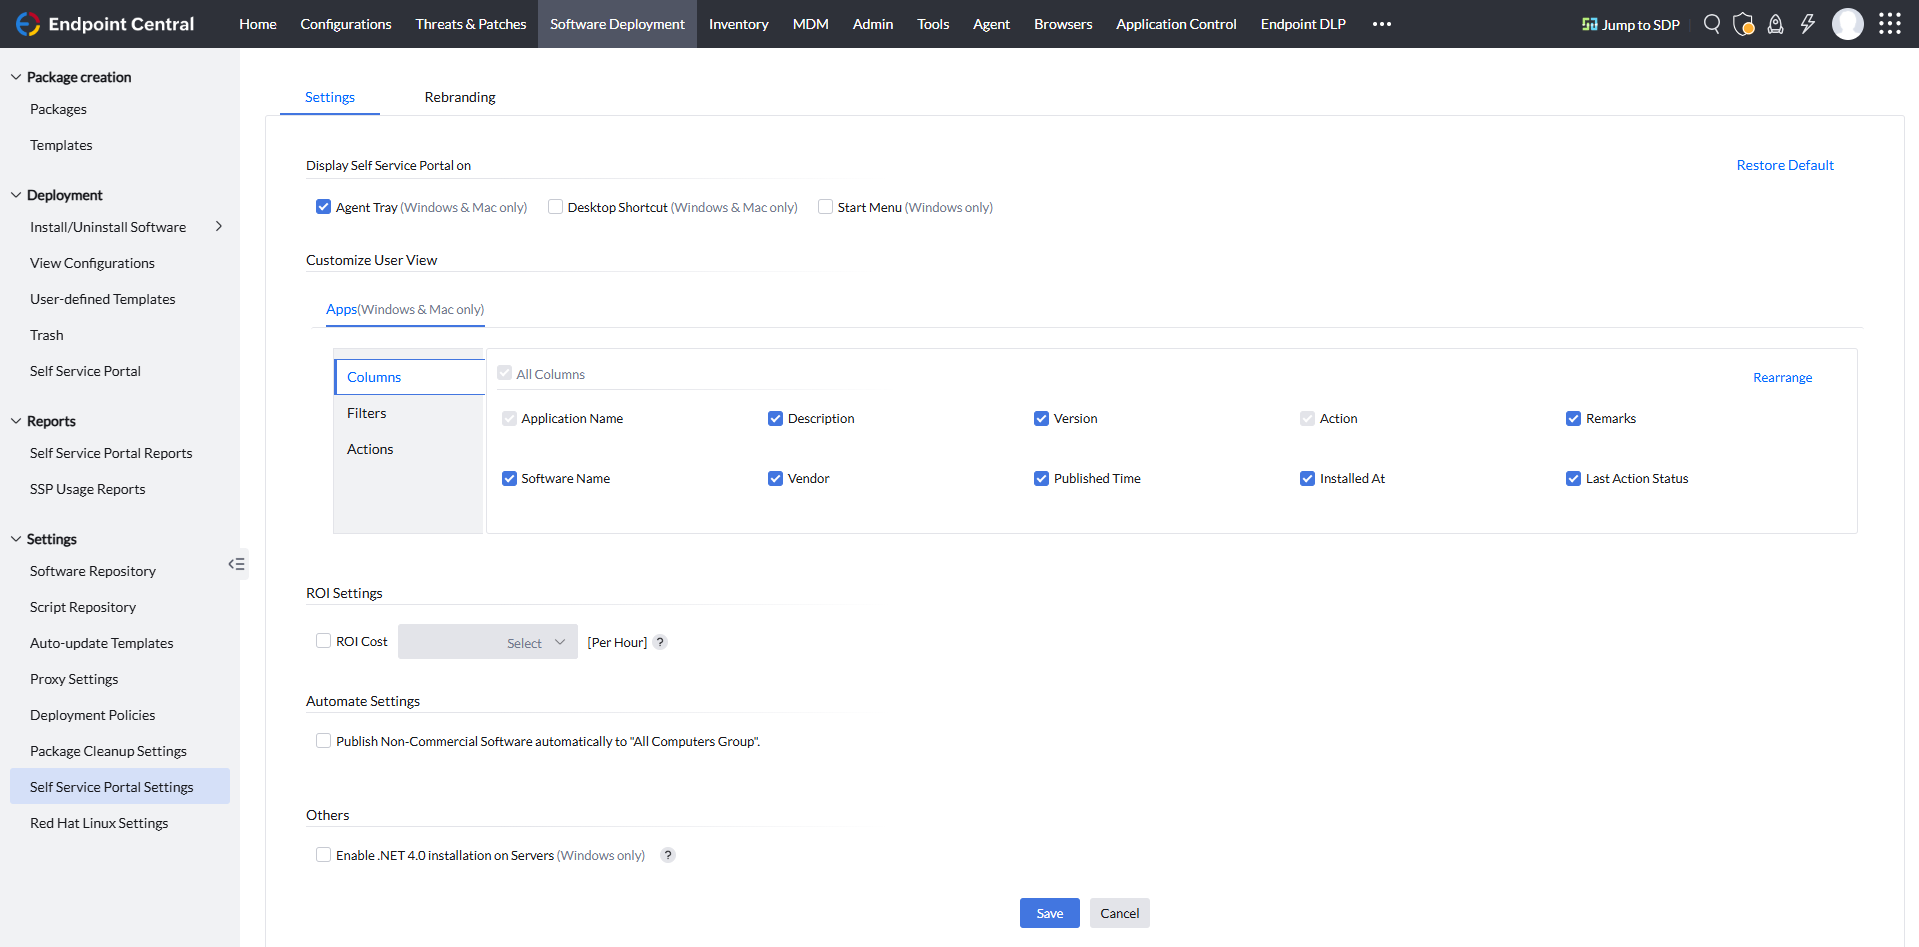
- Display Self Service Portal on - You can choose to display the SSP for users either in the agent tray, as a desktop shortcut, or in the start menu.
- Customize User View - Here, you can configure all the software-related details that you want to be displayed and also define the actions that users can perform.
- ROI Settings - The SSP reports can provide insights into the Return on Investment (ROI) obtained by using the SSP.
- Automate Settings - By selecting this option, you can automate the publication of non-commercial software to the SSP of all computers. If you are using Endpoint Central integrated with ServiceDesk Plus, commercial software can also be published to all computers. However, users will need to raise a request for approval before installing the software.
- .NET 4 should be installed on the managed computers for the self-service portal to work. .NET 4 will be automatically installed on the managed computers. You can choose to install it on the server machines by enabling the checkbox under self-service settings.
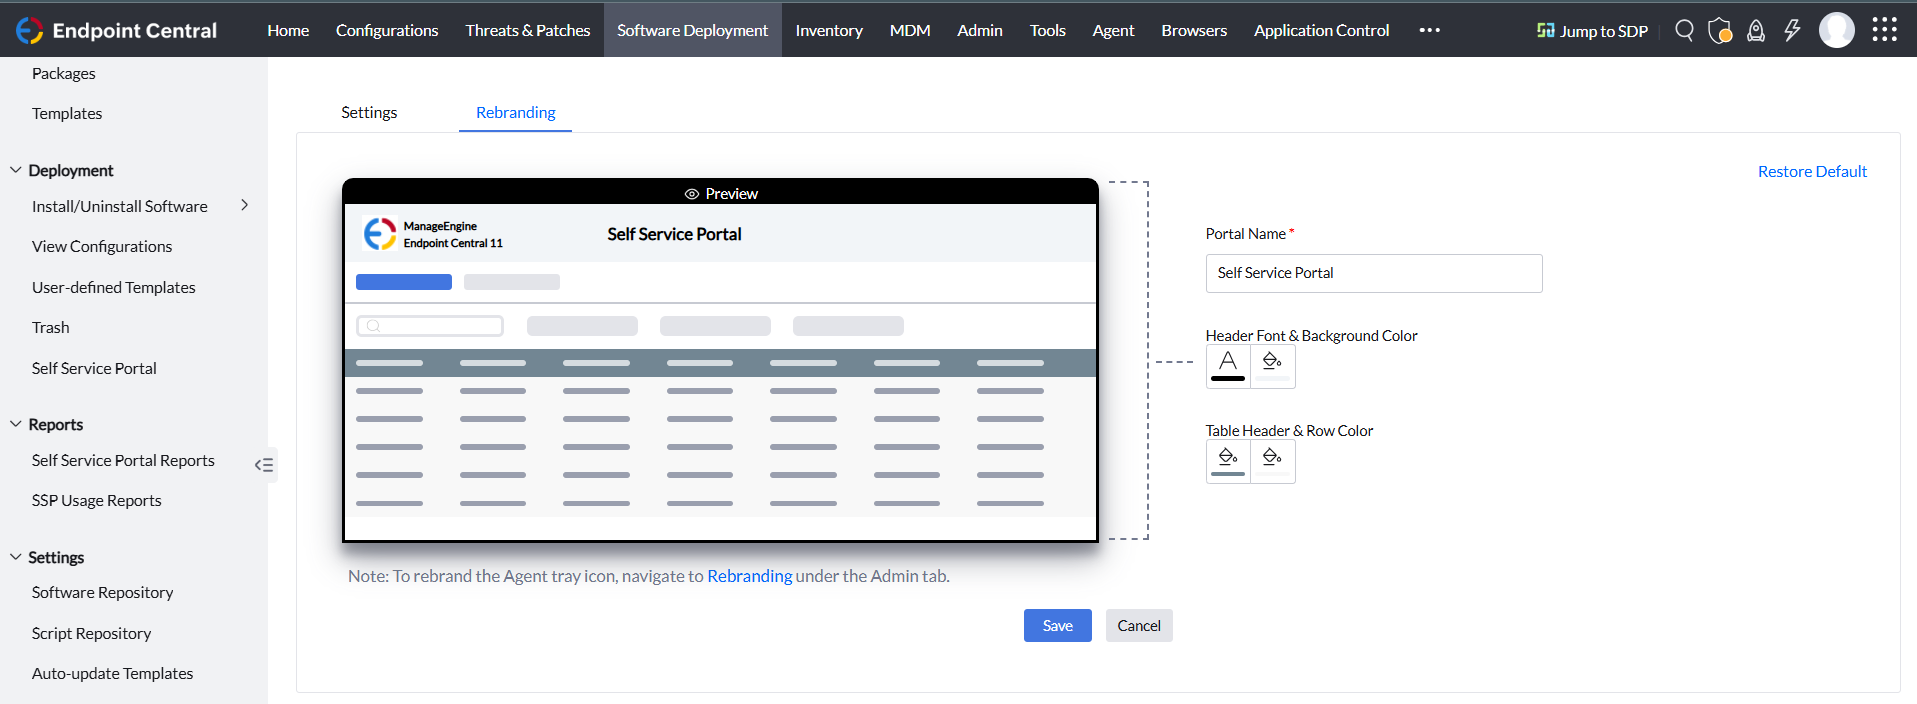
- Rebranding tab - You can modify the theme of the SSP by rebranding it with your company's logo/name. Additionally, you can customize the color of the header and table. Rebranding will help users easily recognize that the software is distributed by their IT team, encouraging them to use it.
Publishing Software to Self Service Portal
When a software is published from the server, the same will be updated on the target computer during the subsequent 90 minutes refresh cycle. You can add/remove software which were published in the self service portal. When multiple versions of a software is being published, you can see multiple entries of the same software on the self service portal with the difference in its version. List of software on the self service portal will be synced once in every 90 minutes. User can also choose to sync it manually by clicking on "Sync Now" icon on the right corner of the Self Service Portal. When a software is successfully published for a computer/user for the first time, you will find self service portal added to the agent tray, start menu and as a desktop shortcut on the target computer.
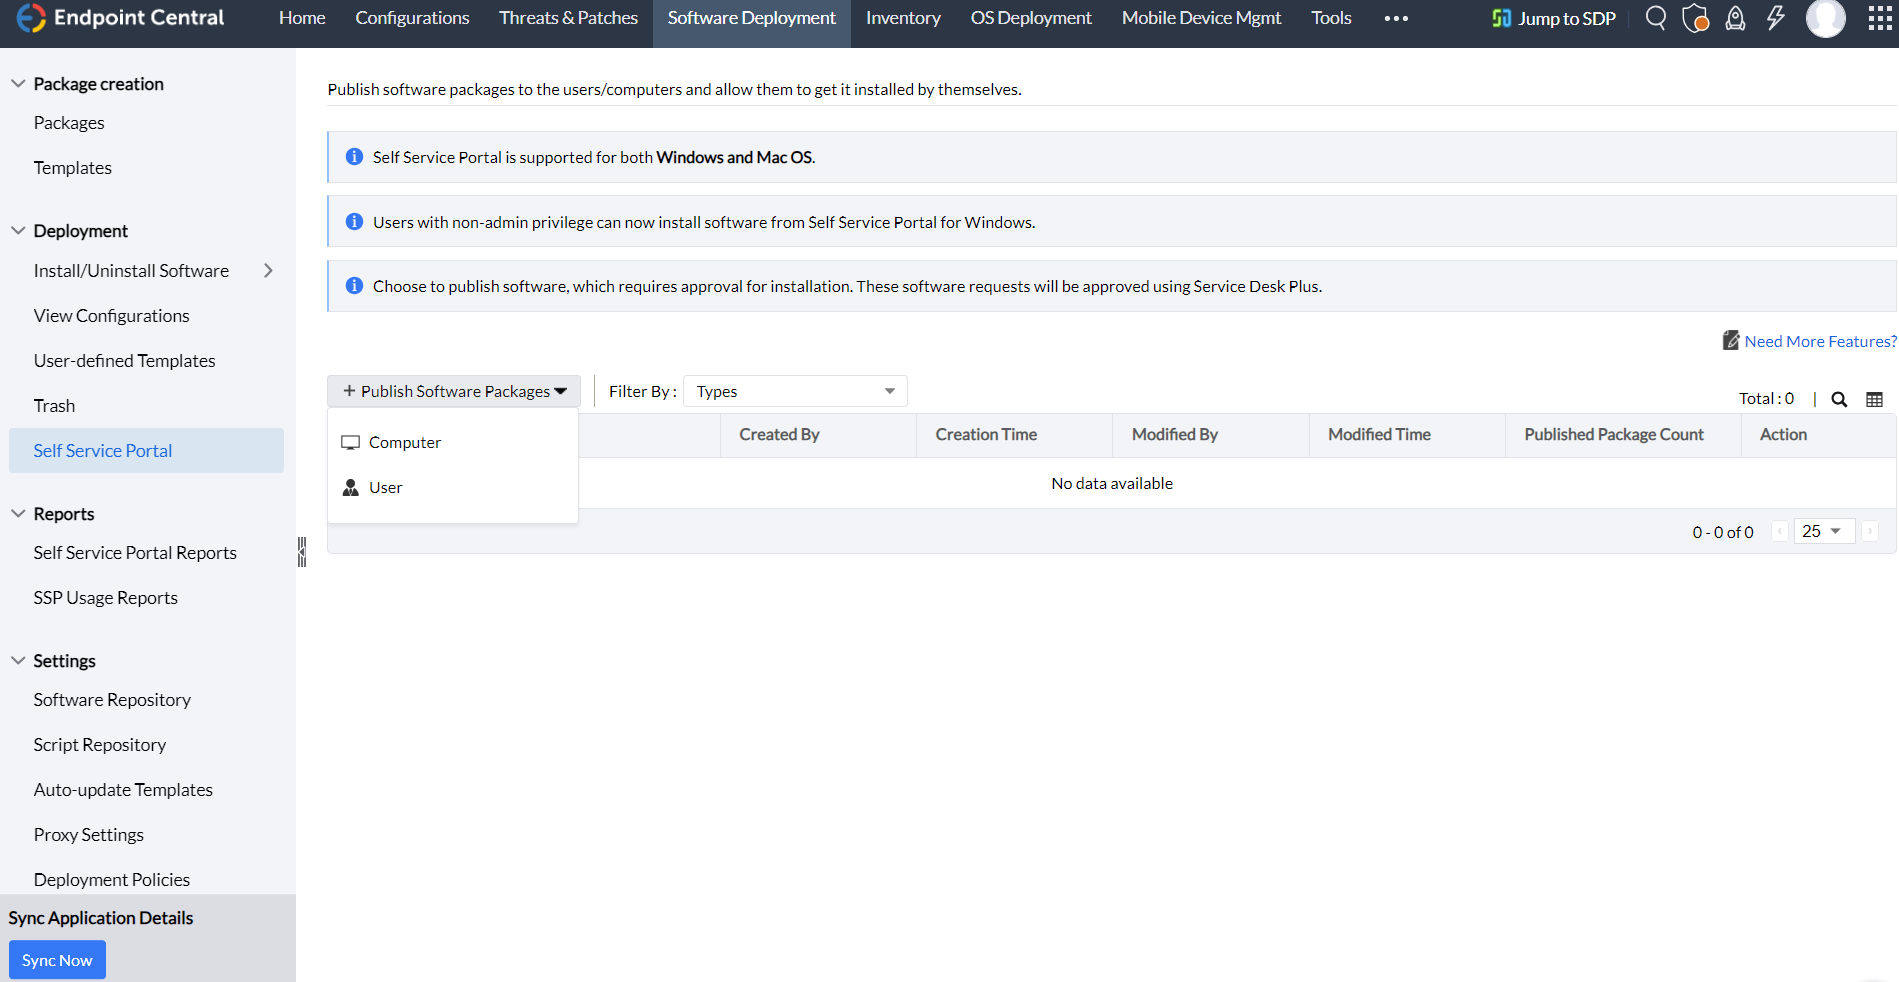
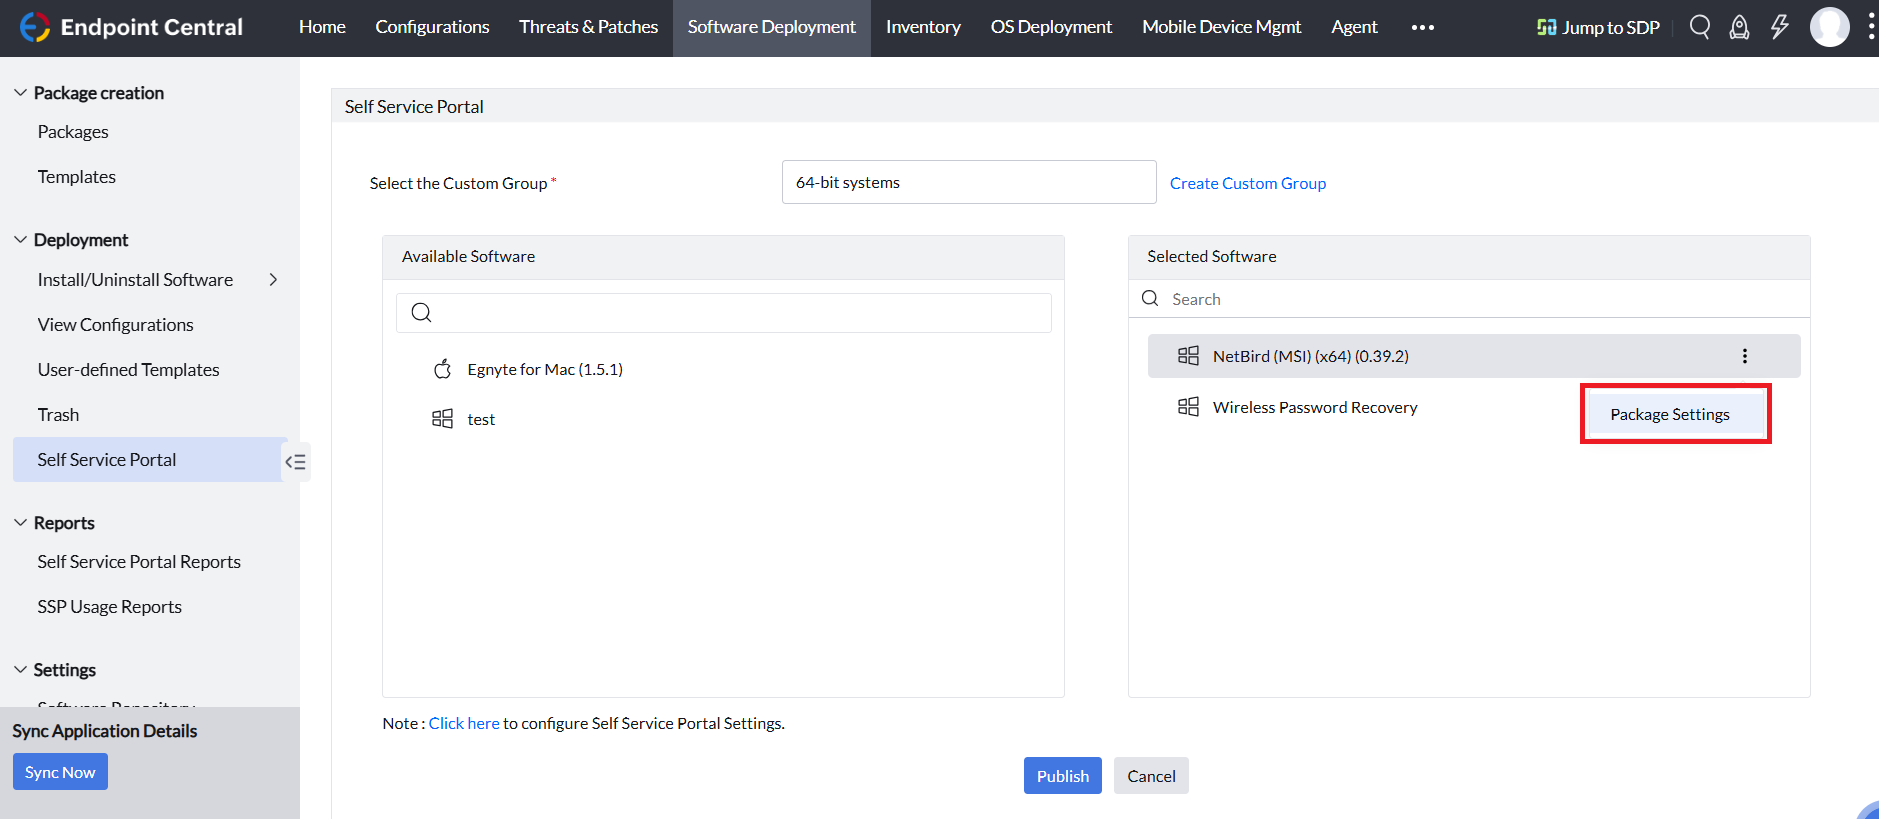
To publish software through the Self-Service Portal, Navigate to Software Deployment tab > Deployment > Self-Service Portal.
For publishing software to a new custom group, follow these steps:
- Go to Publish Software Packages.
- Enter the name of the group in Select the Custom Group option.
- Choose the software to be published from Available Software and move it to the Selected Software list.
- Click Publish.
To publish software to a custom group you've already created, proceed as follows:
- Select the Group Name.
- Click Associate Package.
- Move the software to be published from the available software list to the selected software list.
- Click Publish.
Configuring Package Settings
Follow the steps to configure the Package Settings
- Navigate to the published software in the Selected Software list.
Click the three dots icon and select Package Settings
Specify the "User account" using which the software needs to be installed.
- System User:The software will be installed or uninstalled using SYSTEM user account privileges.
- Run As User: The software will be installed or uninstalled using the configured user's credentials We recommend choosing the Domain Admin credentials to avoid access level issues.Using this option will be helpful when certain software requires administrator permissions, which the standard users may not have.
- Target User(Software Packages Published for Users):The software is installed or uninstalled using the user's privilege chosen in the Define Target section.
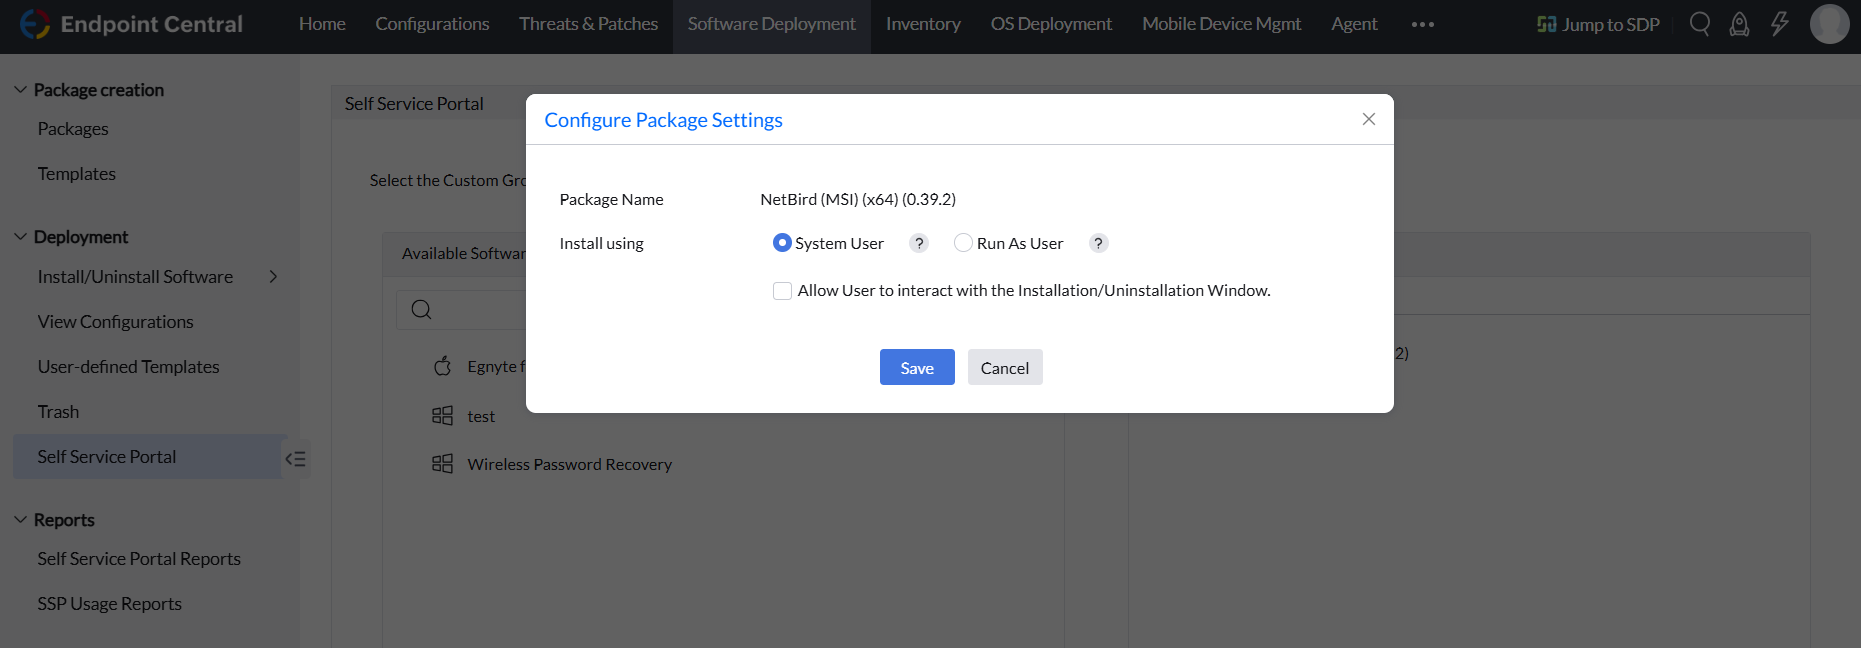
Configuring Package Settings for Published Software in Computer Group

Configuring Package Settings for Published Software in User Group
Enable or Disable Allow User to Interact with the Installation/Uninstallation Window
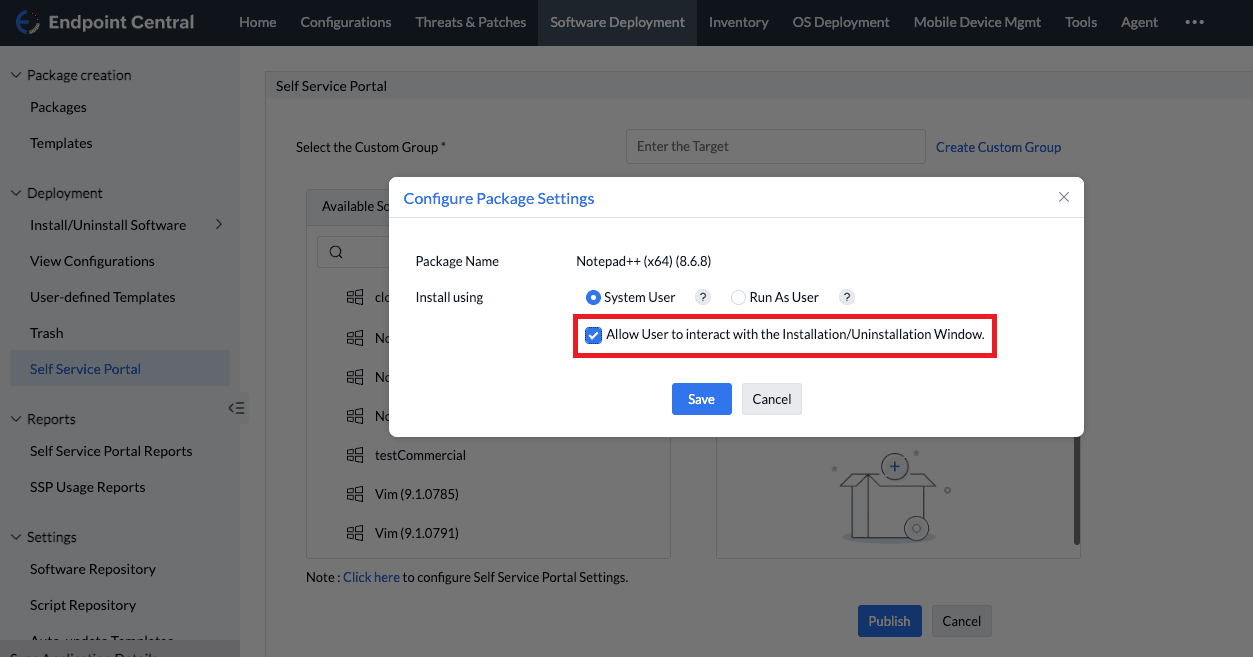
Upon selecting Sytem User under Install using option, you can select Allow User to interact with the Installation/Uninstallation Window to allow the target users to interact with the software installation or uninstallation wizard.
For example, when a software needs input from the user like, selecting the installation folder, agreeing to the privacy policy, uploading license file, etc., you can enable the "Allow User to interact with the Installation/Uninstallation Window" option.
If a published software does'nt require user interaction during installation/uninstallation, you can disable the option for that particular software.
Note:If you publish a software with System User and "Allow User to interact with the Installation/Uninstallation Window" option enabled, the end user will gain system user privileges during installation, even if they are a standard user. Therefore it is crucial to verify the software's behavior before enabling this option.
Installing Software from Self Service Portal
On opening the self service portal, users can see the list of software that are published. To sync the software published on the Self Service Portal with the control panel, ensure that the names and versions of the applications in both places match correctly. To update the details,
- Navigate to the Software deployment tab→Packages
- Click Add package for new package addition or modifythe existing package
- Go to Advanced settings and under Package Properties update the Control panel application name in the Application Name field & Control panel version name in Version field.
As the applications sync between the Control Panel and the Self-Service Portal the following actions appear:
- Install: Displayed when the published software package includes installation command and not yet installed.
- Uninstall: Displayed when the uninstallation command for the published software package is configured and the software is already installed on the device.
- Upgrade: Displayed when the installed software version is lower than the version published in the software package.
- Downgrade: Displayed when the software version that is already installed is higher than the published software version.
Reinstall: Displayed when the published software package is already installed via Self Service Portal, but the control panel software name & version, uninstallation command attributes are not configured in software packages
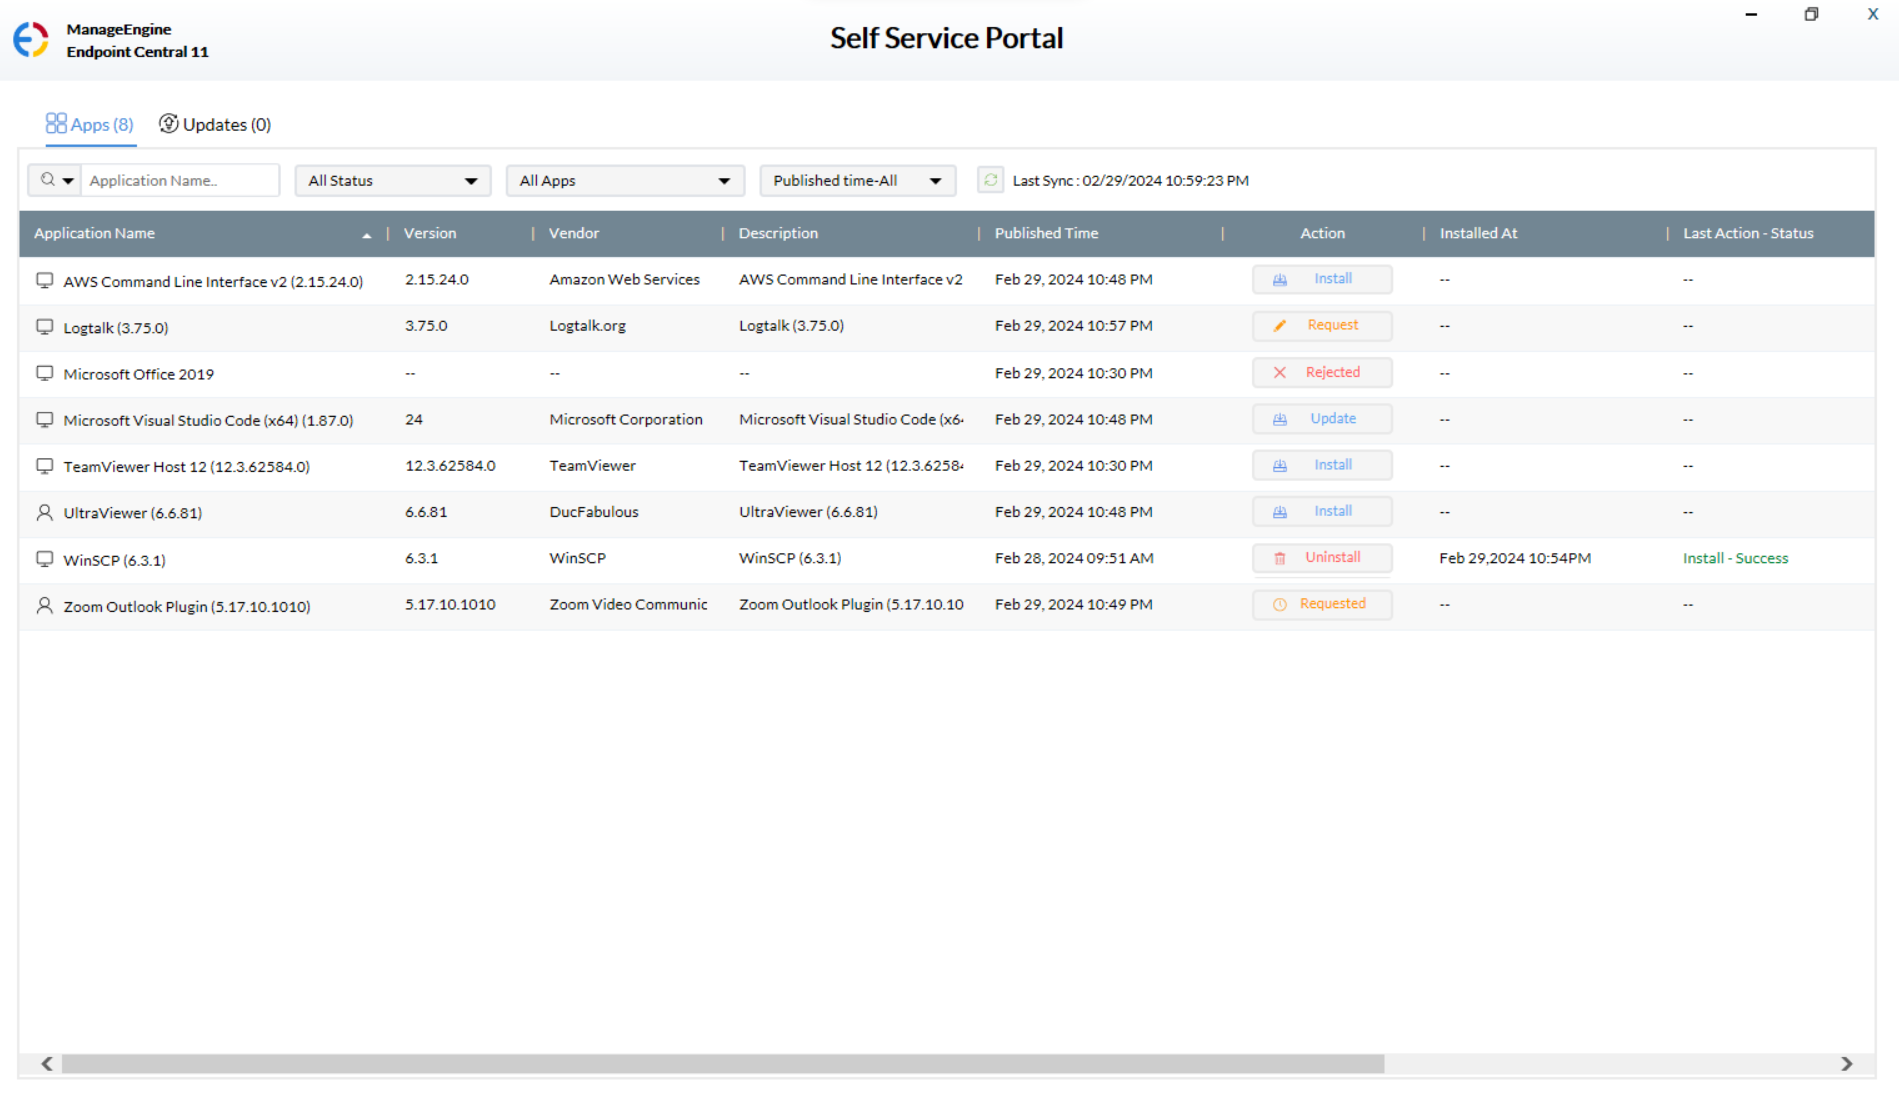
When a user chooses to install more than one software at a time, installation will be initiated for the first software and the rest will be queued. Software will be deployed sequentially. If the user has uninstalled the software manually, then the uninstallation status will not be reflected on the self service portal.
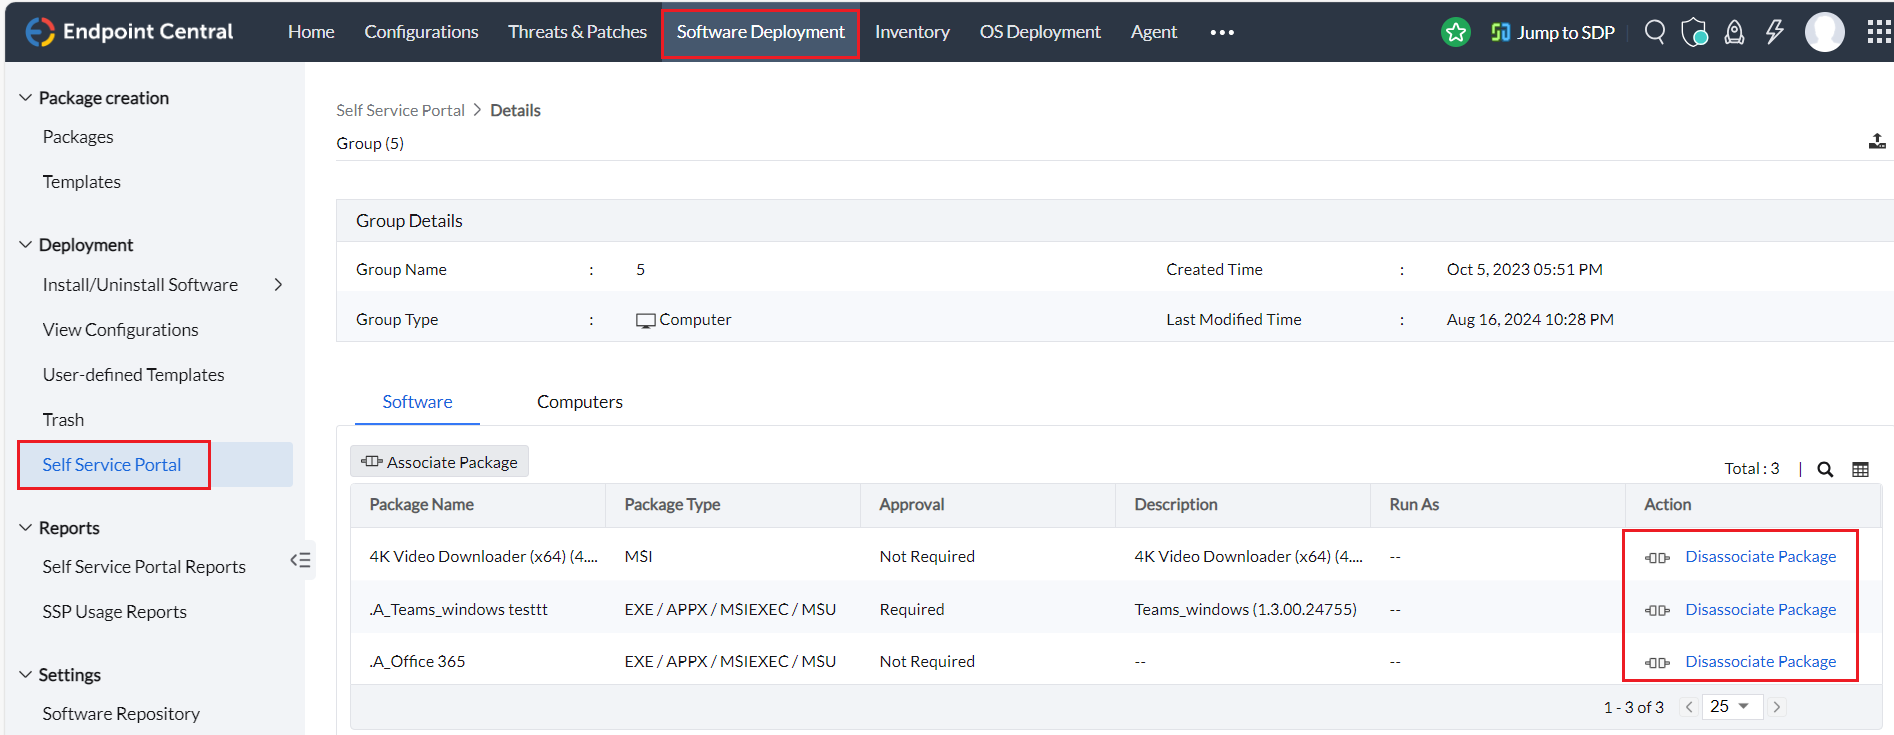
Disassociate a package from self service portal
- Navigate to Software Deployment > Self Service Portal in the Endpoint Central console.
- You'll see the custom groups to which various software packages are published.
- Select the relevant custom group, which will display the different packages published to that group.
- Click on Disassociate Package next to the package you want to remove.
- Confirm the action in the popup that appears to complete the disassociation.
Request for Approval
This feature is supported only for customers who use Endpoint Central version 92080 and above, integrated with ServiceDesk Plus (9203).
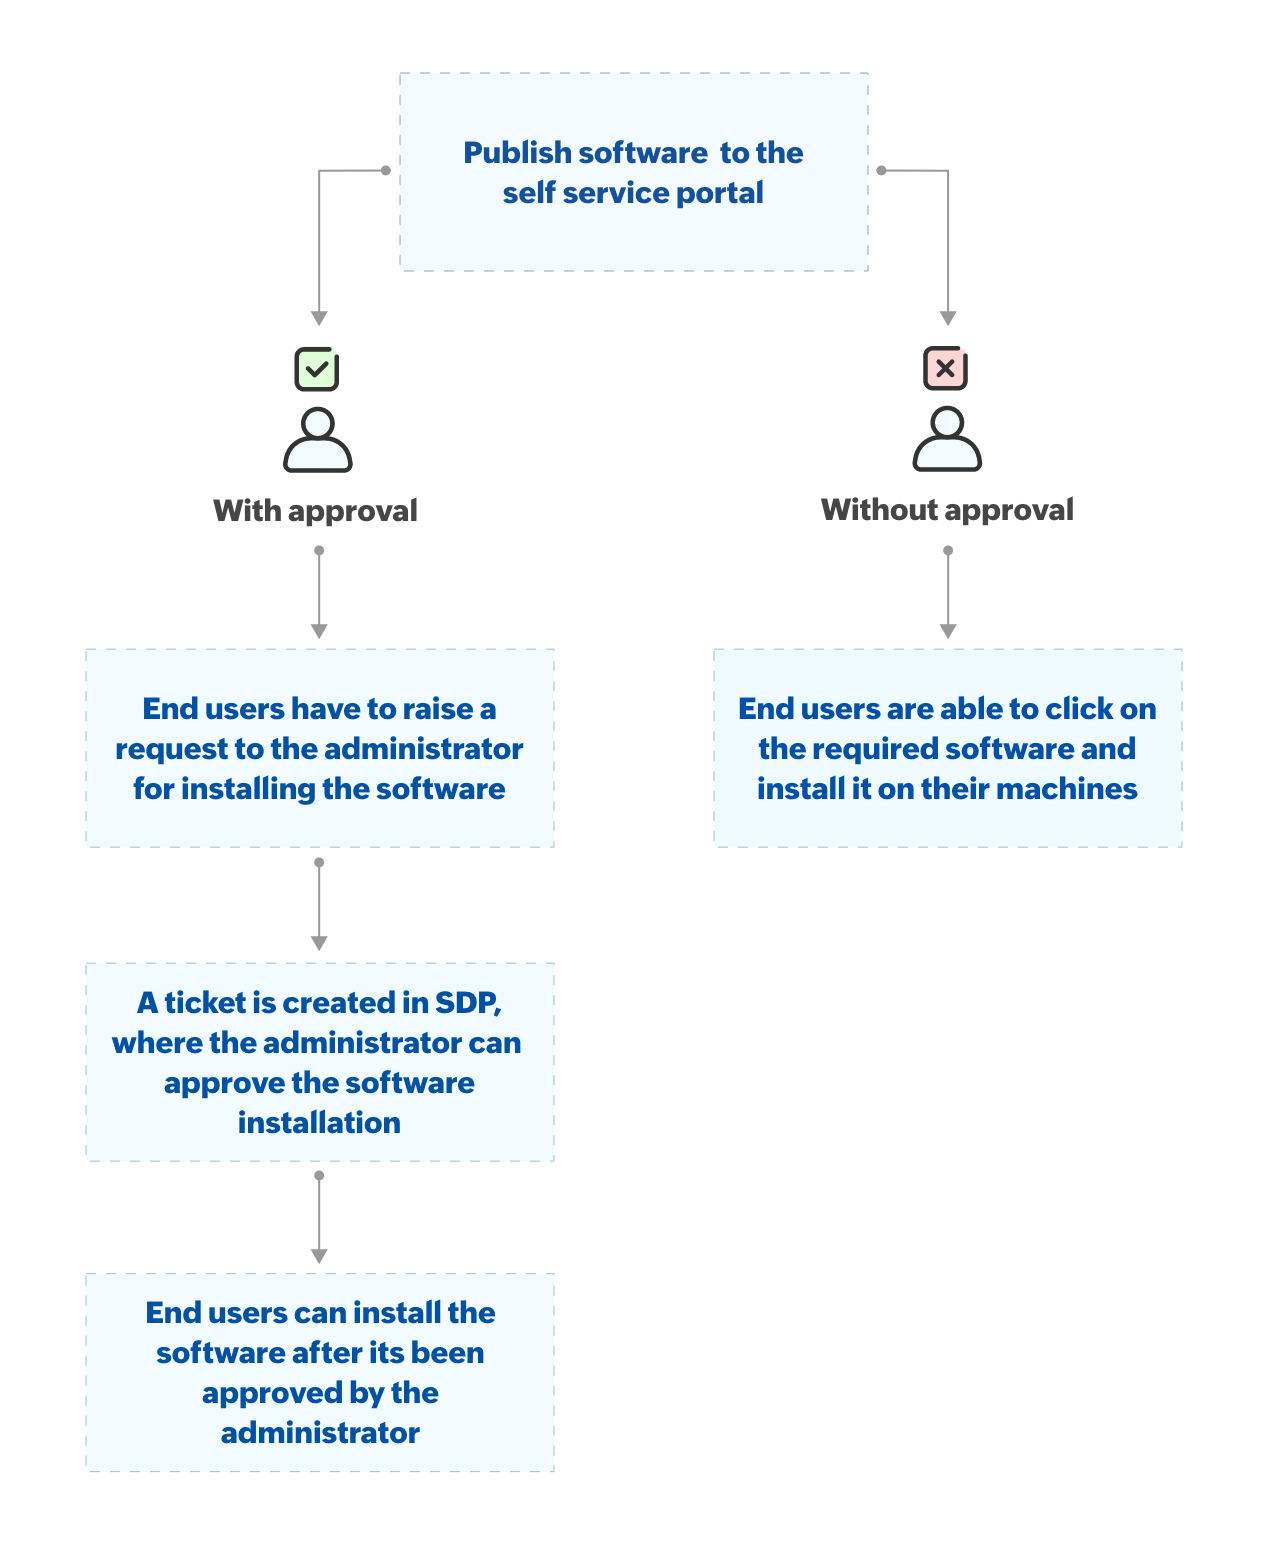
You can choose to publish software to all the users, however limit the users from installing software which are not essential. If you are using Endpoint Central integrated with ServiceDesk Plus, then you can choose the approval mode while publishing software, as "with approval" or "without approval". If you choose to publish software using "without approval", the users will be allowed to install the software by clicking on it. If you have chosen, to publish a software with approval, then the user will not be allowed to install the software, but can raise a request for approval. A help desk ticket will created and updated in the ServiceDesk plus, once the technician approves the request, users will be allowed to install the software. After the user installs the software, the status will be updated back to ServiceDesk Plus and the help desk ticket will be closed automatically.
This feature is available only for Windows.
Points to consider
- Removing a published software will not uninstall the software from the target computer, however the software will not be listed in the self service portal.
- When a commercial/paid software is published, users will have to key in/activate the license manually.
- User-based publishing of software packages is not supported for Mac.
- Remote office and custom group technicians can publish software packages to computer based groups (that are within their scope) using the self service portal.
- Remote office and custom group technicians can deploy packages using Self Service Portal only in the static custom groups created and last modified by them.
- Additionally Custom group technicians can deploy packages to static unique custom groups which is assigned as a scope to them.
Related Documents
If you face any issues with Self Service Portal, kindly contact support.