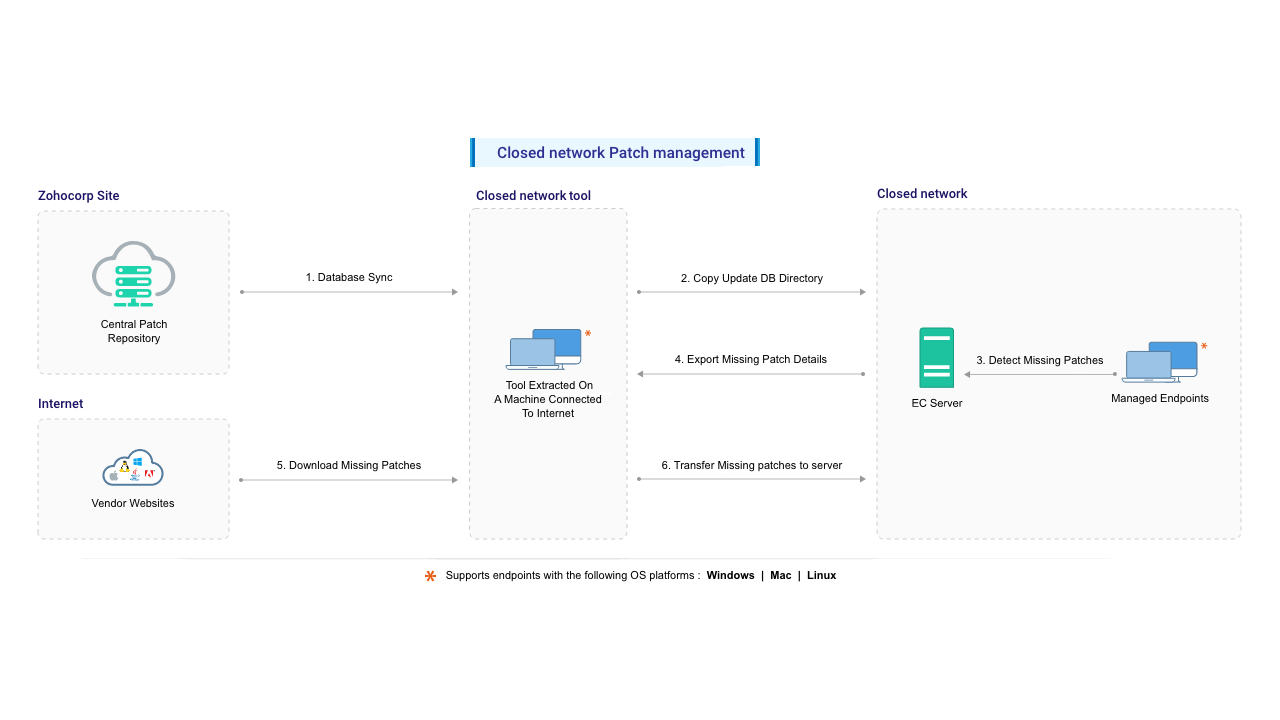
Patch Management for Closed Networks
When the Endpoint Central server is deployed in an environment without direct Internet access, core patching functions—such as vulnerability database synchronization, automatic patch downloads, and vendor update retrieval—cannot be performed online.
This limitation applies to closed networks, where outbound Internet connectivity is intentionally blocked, irrespective of where the server is placed. A Demilitarized Zone (DMZ) is one such placement scenario. A DMZ is a segmented network zone positioned between an internal network and external or untrusted networks, designed to host systems that require strict access control and isolation. While DMZs can allow tightly controlled Internet access, they are frequently configured without outbound connectivity in high-security environments, effectively operating as closed networks.
In more restrictive setups, such as air-gapped networks, the Endpoint Central server is fully isolated, with no physical or logical connectivity to external networks.
Although these environments differ in network topology and isolation level, they share a common constraint: the Endpoint Central server cannot communicate directly with external update sources. As a result, patching and vulnerability remediation must be performed using offline or manual workflows. The following steps explain how to manually synchronize vulnerability data, download required patches using an Internet-connected system, and deploy them to the target computers within the restricted environment.
- Configure Proxy Settings
- Configure Patch Database Settings
- Download and setup the Closed Network Tool
- Updating the Vulnerability Database
- Download the required patches
Configure Proxy Settings
The steps given below will guide you to configure the proxy settings:
- Open Endpoint Central console and navigate to Admin -> Proxy Server, under Server Settings.
- Click Edit under the Proxy server icon.
- Select No connection to Internet.
- Click OK to save changes.

Configure Patch Database Settings
To configure the patch database settings, follow the steps below:
- Open Endpoint Central console and navigate to Admin -> Patch Database Settings, under Patch Settings.
- Under Schedule Vulnerability Database Update, disable Schedule.

This prevents the DB sync from being initiated without the necessary data in the <installdirectory>/conf/CRSData directory because the updatedb folder in the above-mentioned directory will get erased after a successful sync. So, the upcoming DB sync will get failed if the required folder is expunged.
Download and setup the Closed Network tool
Follow the steps below to download and set up the Closed Network tool:
- Download this zip and extract it on a computer with an internet connection.NoteIf the computer does not have direct internet connection, open the downloadMgr.propfile available within the extracted location and provide the details of the proxy server, port and authentication details.
- You have successfully configured the tool and it is ready to be used. Configuring Proxy and setting up the tool are one time operations, whereas Updating the Vulnerability Database and downloading the required patches need to be done every time you want to scan for vulnerabilities and deploy the latest missing patches.
Updating the Vulnerability Database
Follow the steps below to update the vulnerability database:
- Go to the machine where you have extracted the downloadMgr.prop, open a command prompt and navigate to the extracted directory.
- Execute the following command depending on the operating system of the machines you manage:
- If you manage only Windows & Mac:
patchsync.bat -c updatedb -b <BUILD_NUMBER> - If you manage all three, Windows, Mac and Linux:
patchsync.bat -c updatedb -i linux -b <BUILD_NUMBER> - Verify that you have entered the build number of the installed Endpoint Central server and that it is in the correct format. For example, 11.3.2400.1 or 113240001.
NoteYou can find the build number by clicking on your profile located in the top-right corner of the Endpoint Central console. - If you manage only Windows & Mac:

- This will download the latest vulnerability information from the Central Vulnerability Database to the local computer. This download will take some time and after completion, the necessary information will be updated in the updatedb directory.
- Copy the updatedb directory to the Endpoint Central Server to <Installation Directory>/conf/CRSData directory.
- From the web console, navigate to Threats & Patches -> Update Now, and click on the Update Now button under Update Vulnerability DB. This will copy the necessary information from the updatedb directory to the local database present in the server. Now, the local database will have the latest patch information.
- Now, scan the computers in the network to identify the missing patches.NoteYou will not be able to view all the missing patches unless scanning is completed for all the computers. Ensure that all the computers are scanned, before manually downloading the missing patches.
The next step is to download the missing patches from the computer with internet connection and copy it back to this computer.
Download the required patches
- You can manually download the required patches from the vendor sites and upload it to the console using Upload Patches option.
- To download the patches, you would first require the details of the missing patches. To get this, go to the Missing Patches view, select the patches to be exported, and click Export Missing Patches button. This will export the details of the missing patches that has not been downloaded and the dependent patches which should be downloaded as downloadUrlJson.txt.

- Copy this file to the directory in the computer where you had extracted the UpdateManager.zip file.
- Open a command prompt and execute the command:
patchsync.bat -c dwnpatch -f downloadUrlJson.txt - This will download all the missing patches to the store directory. Once all the files are downloaded, copy the contents of the store directory and copy it to the Endpoint Central Server to <Installation_Dir>/webapps/DesktopCentral/Store directory (this is the default location; if this has been changed copy it to the appropriate location)
- You should then update this information to the Endpoint Central Server database so that all these patches are shown in the Downloaded Patches view. To do this, open the Downloaded Patches view and click Update Downloaded Patches button.

- All the manually downloaded patches will appear in the view from where you can deploy them to the required computers.
Now, you can successfully manage vulnerabilities and have configured the patch management process in a closed network.
To run the tool in Linux environment :
- For DB Update excluding linux :
./patchsync.sh -c updatedb -b <BUILD_NUMBER> - For DB Update including linux :
./patchsync.sh -c updatedb -i linux -b <BUILD_NUMBER> - For managing Linux systems, use the below command: ./patchsync.sh -c dwnpatch -f downloadUrlJson.txt
Follow the below pre-requisite steps:
1. Set the correct Java version
- For Java 8 builds:
Make sure jre_1_8_0_192 is installed.
Set JAVA_HOME as:JAVA_HOME="/usr/lib/jvm/jre_1_8_0_192"
- For Java 11 builds:
Install java-11-openjdk-amd64.
Set JAVA_HOME as:JAVA_HOME="/usr/lib/jvm/java-11-openjdk-amd64"
For further steps to run the tool in Linux set-up, follow from the Download and Setup the Closed Network Tool.