Windows App Management
Windows machines play a pivotal role in corporate productivity, with many organizations relying on them as a key part of their workforce. Installing and updating applications can be a challenging task for IT admins, as it often involves manual distribution and installation. MDM simplifies this process by enabling you to distribute the app to multiple devices through groups and install them silently without user intervention. MDM supports the following modes of app management:
- MSI apps: Traditional Windows application software that can be added as MSI packages.
- Enterprise apps (APPX/MSIX): These require a Code Signing Certificate (CSC) for deployment.
Note: Windows Store app management is no longer available due to of Microsoft's discontinuation of the service.
Managing MSI software applications
You can distribute and install software on Laptops, Desktops and Surface Pro tablets by adding the MSI package to MDM. You need to add the MSI package to MDM server and provide the relevant details. The added MSI package initiates software installation on the machines, after distribution. This is supported only for Windows 10 or above.
Distributing MSI software to Laptops, Desktops and Surface Pro tablets
Follow the steps given below, to add an MSI package to the App Repository:
- On the MDM server, navigate to Device Mgmt and select App Repository.
- Click on Add App and select MSI Software. For MSI source, provide the software MSI package file on which the requisite details gets automatically pre-filled. If you're using MDM On-Premises, go directly to Step #4.
- In case you're using MDM Cloud, the requisite details are to be manually specified. To know information such as MSI Product Code, MSI version etc., you need to download this PowerShell script. Once downloaded, open Command Prompt and run the following command:
Usage - PowerShell -ExecutionPolicy Bypass -NoLogo -noninteractive <path_to_the_downloaded_powershell_script> -Path <path_to_the_MSI_file> -Properties "ProductCode,ProductVersion,ProductName"
Once the above command is run, you'll get a JSON file containing all the requisite details, which is then to be specified in MDM. You can also use third-party software Orca MSI editor to achieve the same. - You can also optionally specify Command Line Args, which specifies the additional setup for the MSI installation. Assuming the package is to be installed as an Administrator, you can provide the Command Line Arg /a. To know more regarding Command Line Args, refer to this.
- After providing the other required details, click on Save. Now, this software has been added to the App Repository and is ready to be distributed to machines and it can be installed silently as explained here.
Note: Windows Store app management has been discontinued as Microsoft has deprecated the service.
Code Signing Certificate(CSC)
In case you need to distribute apps only to Windows 10 or above devices, you can use third party CA-signed certificates or self-signed certificates to sign the app. In case you're using CA-signed certificates to sign the app, ensure you upload the CA root certificate on the MDM server. Self-signed certificates are auto-generated when building a Windows enterprise, using Visual Studio. You can navigate to the output location to obtain the certificate and upload it on MDM server. Ensure the CSC uploaded is the .cer file for the certificate used to sign the MSIX app.
Generating/Using CA-signed/self-signed certificates
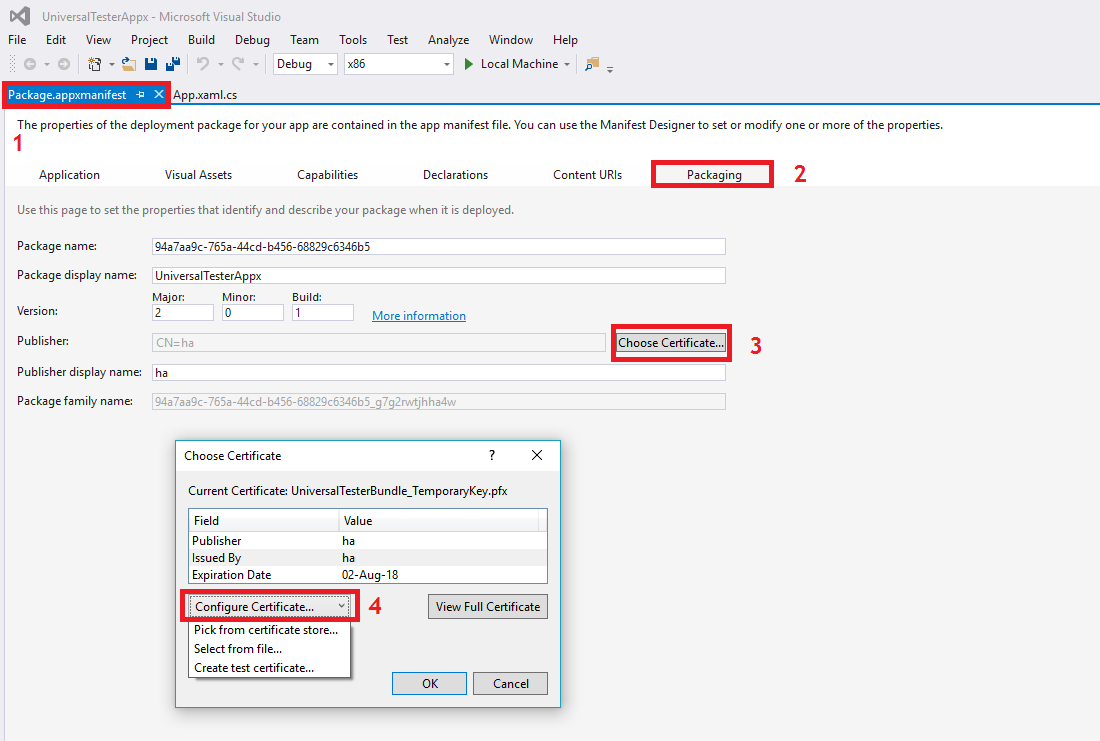
To sign the enterprise app with either CA-signed certificate or self-signed certificate, follow the instructions given below:
- In Visual Studio, go to the package.appmanifest tab and select Packaging.
- Click on Choose Certificate button present against Publisher and select Configure Certificate.
- Choose the appropriate option from the dropdown i.e., Select from file, in case you already have a third party CA-signed certificate or Create test certificate, in case you want you generate a self-signed certificate.
Signing enterprise apps
Provide the following command on the command line, if you are signing appx file:
BuildMDILAPPX.ps1 -appxfilename <ME MDM app appx file> -pfxfilename <path_to_PFX_Certificate_File> -password <private_key_provided_for_PFX_certificate>
Identifying Package Family Name
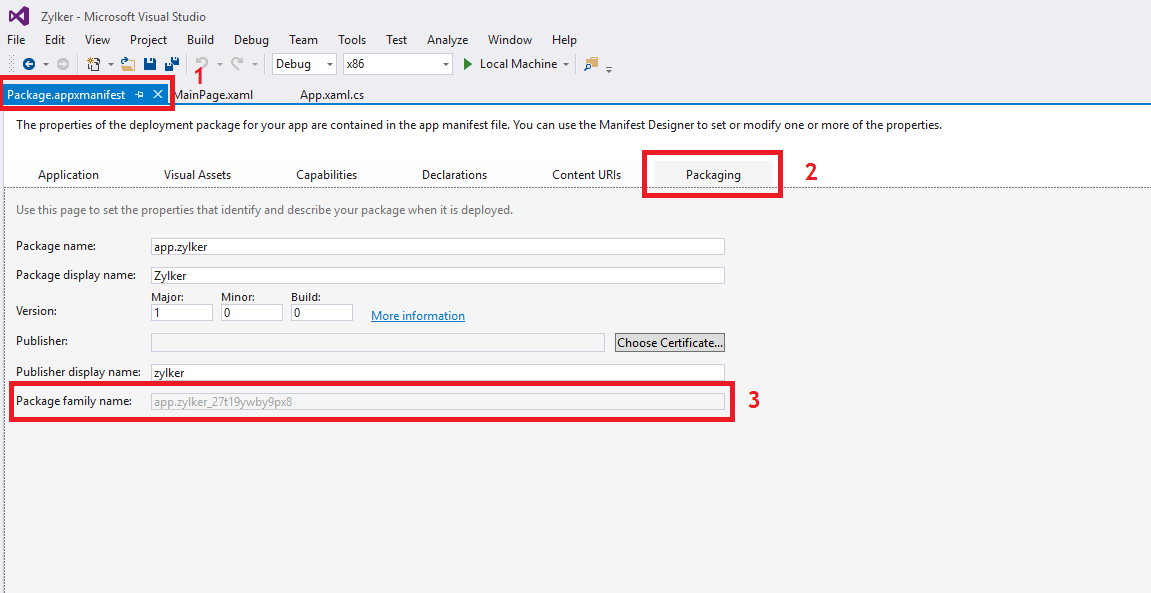
If you're adding .appx or .appxbundle files to the App Repository, you need to provide a package family name, which can be obtained as explained below:
- In Visual Studio, go to the package.appmanifest tab and select Packaging.
- Copy the Package Family Name present and provide it while adding the app to the App Repository
Creating MSIX apps
MSIX is a Windows app package that provides modern packaging experience to all Windows apps. With the MSIX packaging tool, admins can create an MSIX package from an .exe or .msi app. With MDM, admins can silently install MSIX apps on devices running Windows 10 version 1803 or above. Follow the steps given in this document to create MSIX apps.
Distributing enterprise apps
After the Code Signing Certificate (CSC) is uploaded, you can distribute enterprise apps as explained below:
- Add the signed Windows enterprise app as explained here. In case you are uploading .appx or .appxbundle file, provide the Package Family Name as explained here.
- In case you are uploading an .msix file, ensure you remove the version number, architecture and file extension from the file name to generate the bundle identifier. The file name of an MSIX has the following format: package name[_version number_architecture_]_hash.msix. The bracketed information needs to be removed to generate the bundle identifier.
- Distribute it to devices and/or groups. Ensure you select Force install enterprise apps for Distribution Options, which lets the apps get installed silently on devices.
App Configurations
App Configurations lets you customize the apps to suit the needs of the organization. You can also secure devices by restricting apps from accessing data and/or resources of the managed devices. The app developer provides a set of key and their value, that specifies the configurations, which have to be entered on the MDM server. These configurations are pushed automatically with the apps.The app developer must support app configurations for the app, to implement it using MDM.
Pushing app configurations based on user-specific/device-specific parameters such as E-mail, UDID etc., to different users can be a cumbersome task as the app configuration needs to be modified every time before it is pushed. However, MDM supports dynamic variables which ensures once the app configurations with user-specific/device-specific parameters are setup using dynamic varaiables, they needn't be configured again as the dynamic variables fetches all the required data from device/enrollment details.
Dynamic Variables
Here is the table of parameters for which MDM supports dynamic variables:
| PARAMETER | DYNAMIC VARIABLE |
|---|---|
| Device UDID | %udid% |
| Device Name | %devicename% |
| User Name | %username% |
| %email% | |
| Domain name | %domainname% |
| Serial Number | %serialnumber% |
| IMEI | %imei% |
| Exchange ID | %easid% |
| UPN | %upn% |
| APN Username | %apn_username% |
| APN Password | %apn_password% |
NOTE: The above mentioned configurations when pushed to the devices will fall under the app's container titled Managed.App.Settings.