What is Geo-Tracking & How to track geo location of your devices?
Geo-Tracking is a security capability in mobile device management (MDM) solutions, that enables IT admins to track the real-time physical location of roaming-users' devices (iOS, Android, Windows, Macs). To obtain the geographical location of the managed mobile device, you need to have the ME MDM app installed in it. How exactly does Geo-tracking work? Mobile Device Manager Plus uses a combination of GPS, Wifi, and GSM to obtain the most accurate location of the device through the ME MDM geotracker app. Mobile Device Manager Plus does not maintain any history of records about the physical location of the devices, unless Location History is enabled. You can use this feature only to locate the recent location of the managed mobile device.
Click here to know how to permanently enable Location Services for location tracing and ensure users cannot disable it, on Android and iOS devices.
Location History and Lost Mode are available in Professional, Free, and Trial editions of MDM.
Enabling Location Services in the managed devices for GPS geotracker
To locate the device using MDM, Location Services must be enabled in the device and the Location Services must be set to Always On for ME MDM app. Follow the steps below to enable Location Services:
- Enabling Location Services in iOS devices
- Enabling Location Services in Android devices
- Enabling Location Services in Windows devices
Geotracker for iPhones: Enabling Location Services in iOS devices
Follow the steps mentioned below to enable Geo-tracking on the end users' mobile devices:
Once ME MDM app is installed, open the app and provide the app with permission for Location Services to enable location tracing.
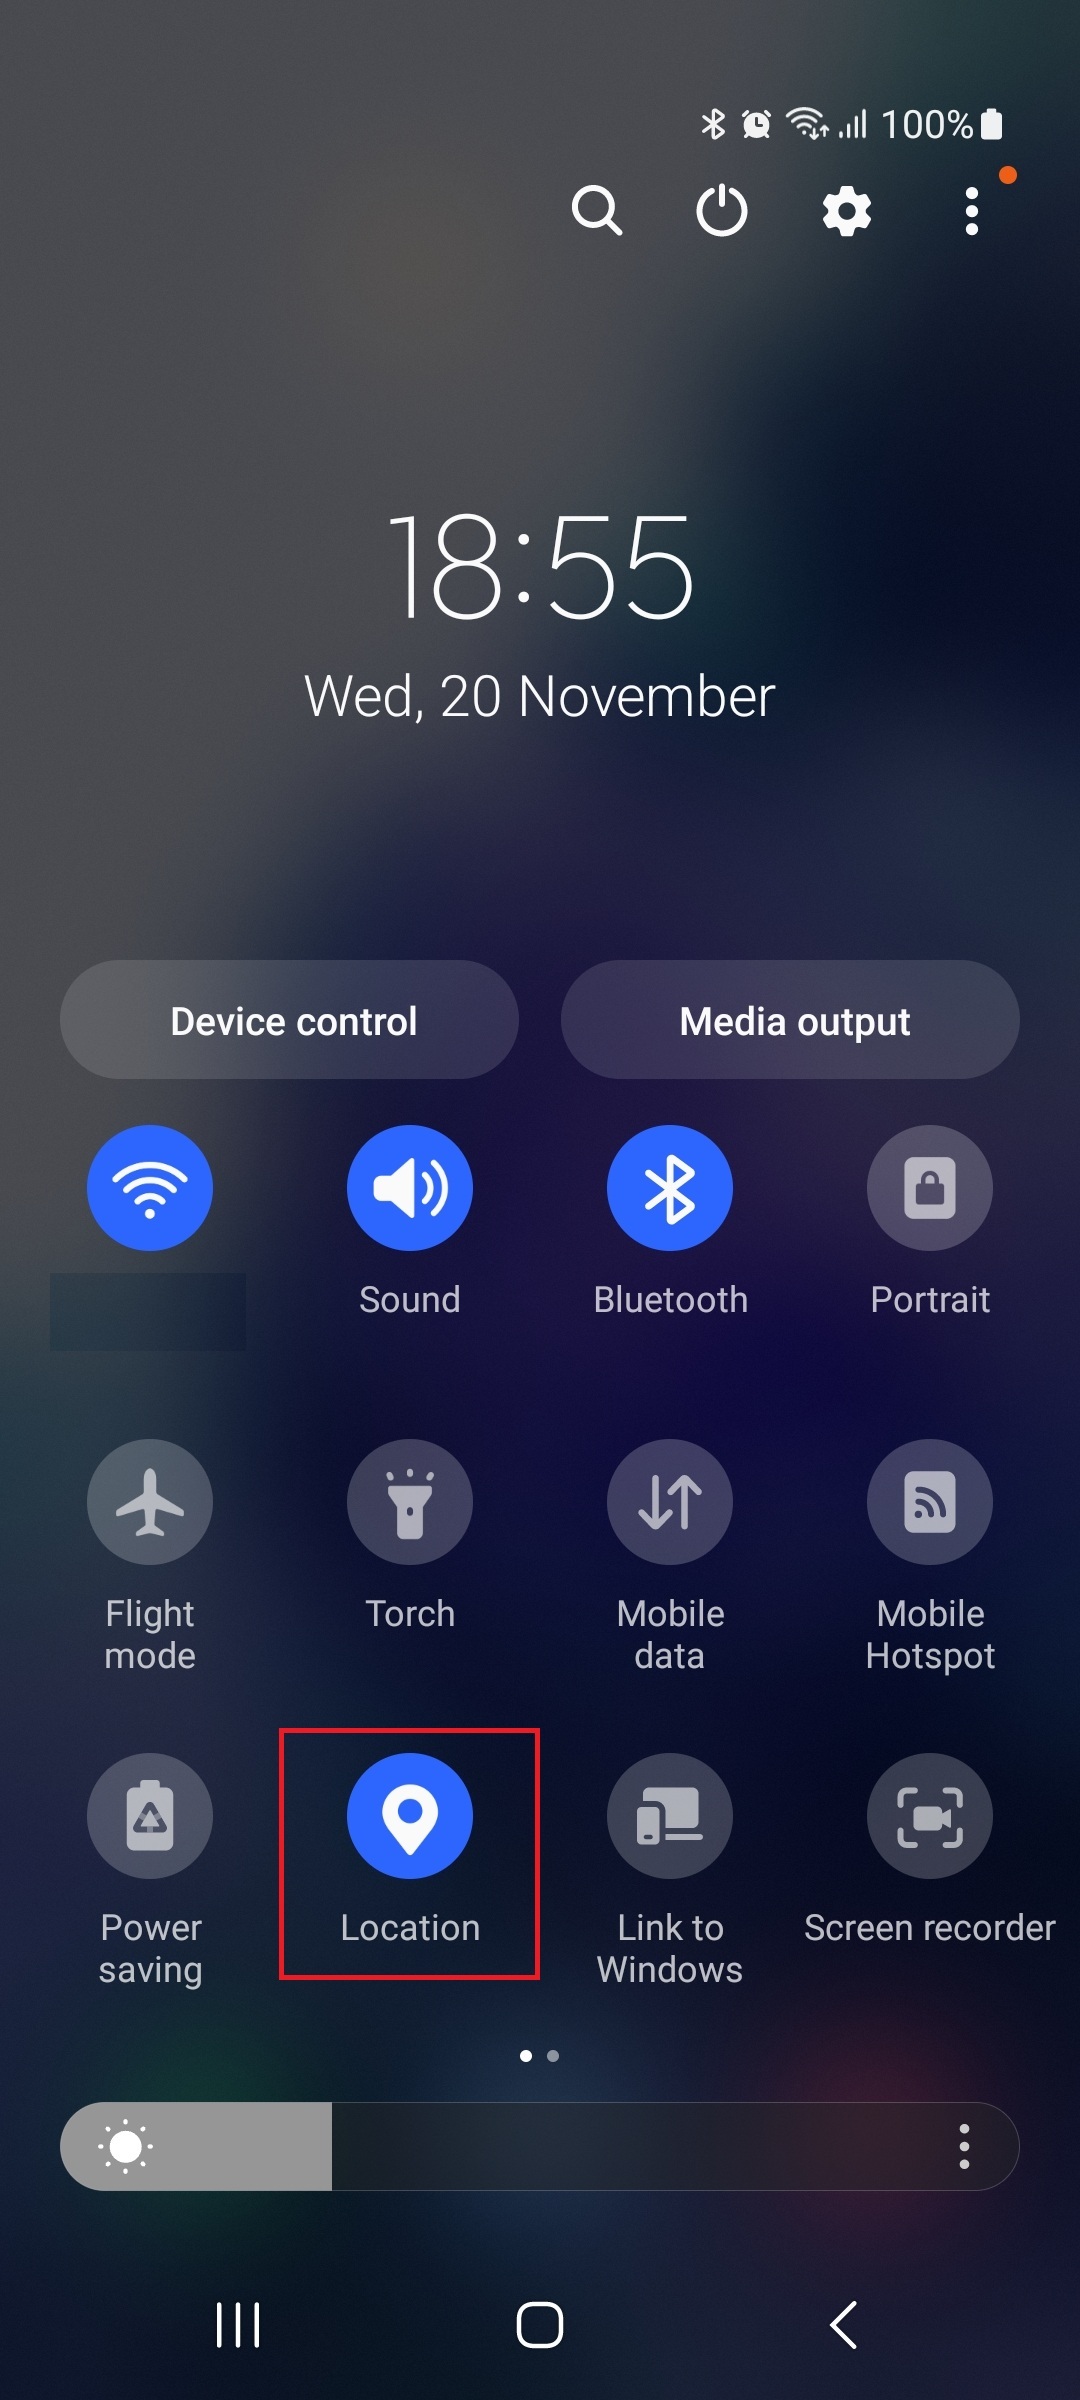
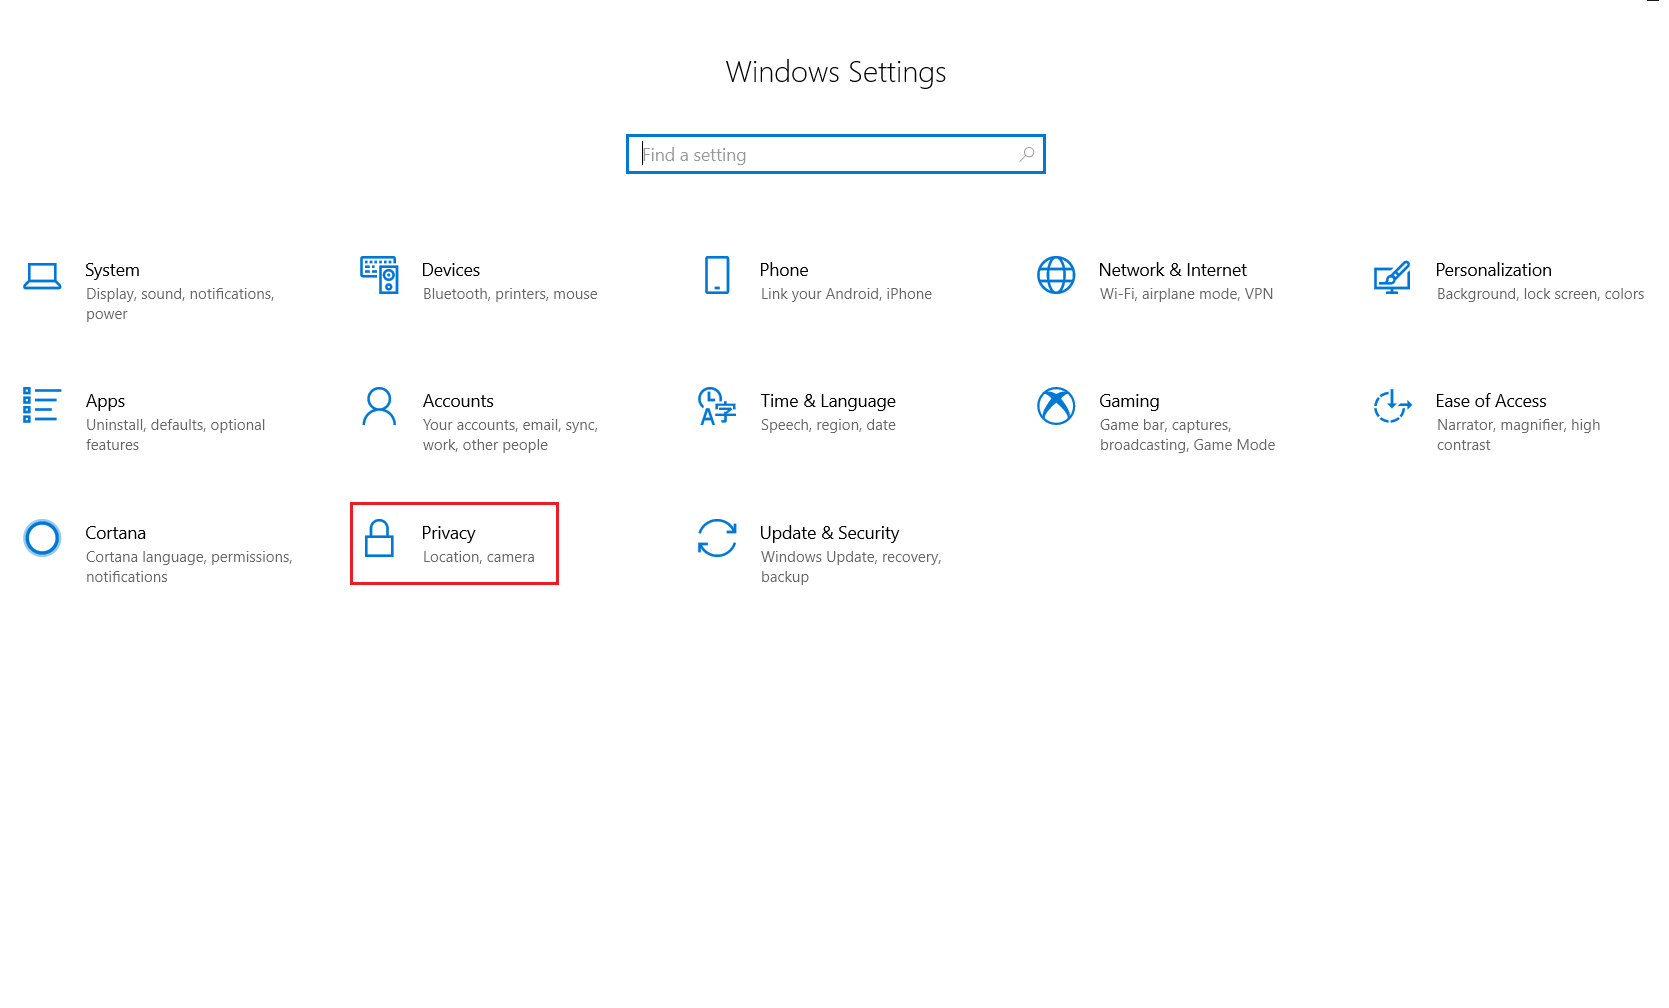
- Select Settings icon on the managed mobile device.
![]()
- Select Privacy, go to Location Services and turn it On.
![]()
![]()
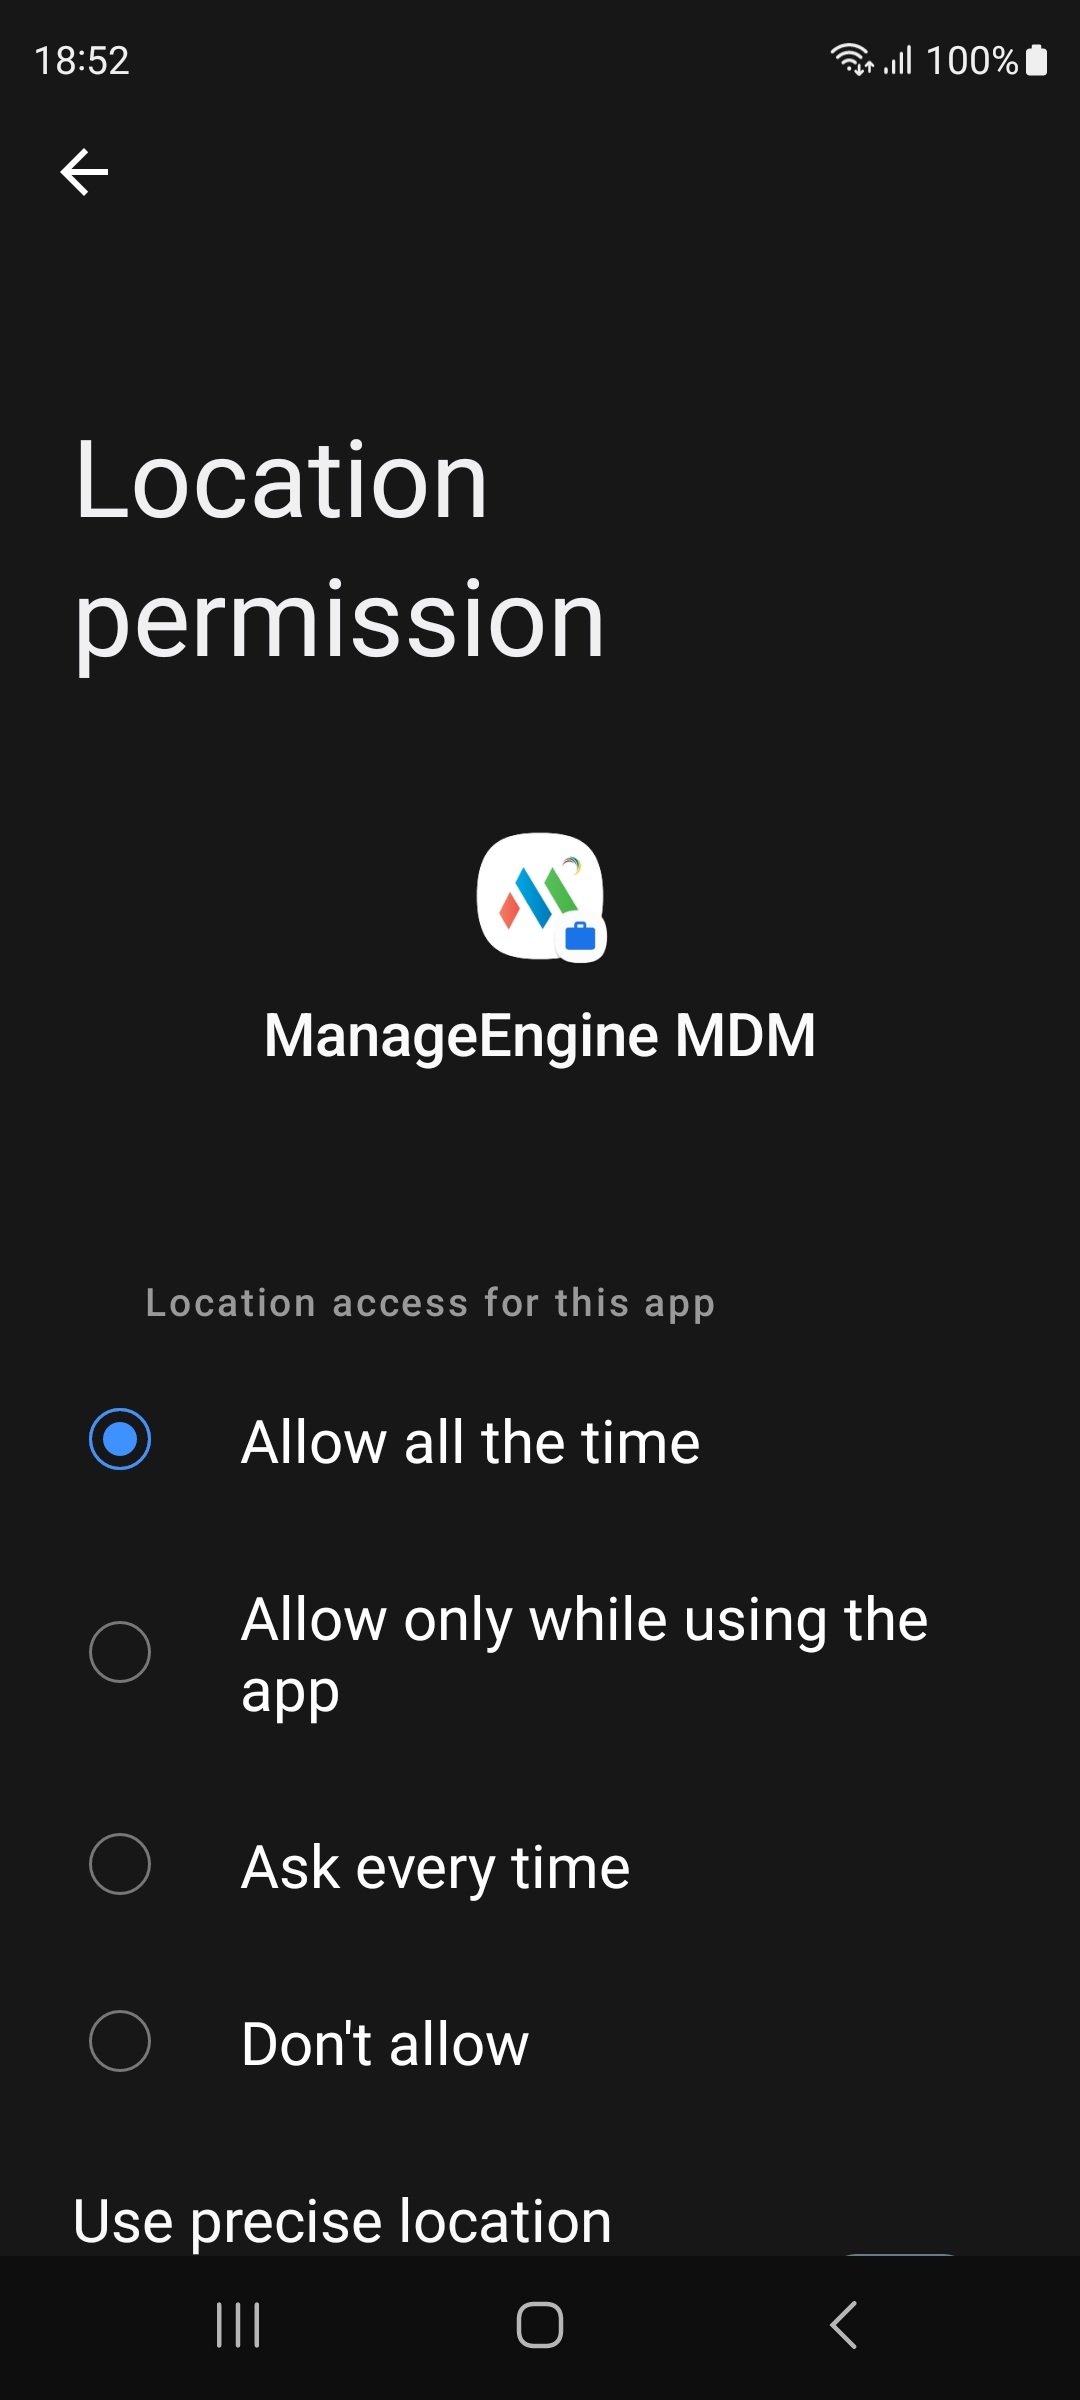
- Allow ME MDM app to access location.
![]()
You have successfully enabled Location Services on iOS devices for the geo tracking system. In a few days after setting the Location Services to Always On, Apple might prompt the user to check if the location needs to be enabled at all times for ME MDM app. This notification will appear only once and can be ignored.
On iOS devices, users can allow in-use authorization for ME MDM app to access device's location. This option ensures that ME MDM app or the geo tracking system will access location only when the app is being actively used or is running in the background. In devices runing iOS 13 or above, Apple also provides Allow Once option to allow ME MDM app or a geotracker to temporarily access device's location.
![]()
If Allow Once is chosen, the user will be prompted every time the user opens the app. When the user clicks on Allow Once or Allow While in Use, the user will be indicated that MDM is actively using location whenever location services is being accessed by ME MDM in the status bar.
![]()
Note: It is recommended to choose Always On for location tracking to receive constant and precise location data of devices.
ME MDM or the Geotracker app fetch the location details only when there is a significant change (at least 500m) in the location of the mobile device. Due to this, the location shown on the MDM server might be the last location rather than the current location in case of iOS devices for certain scenarios.
Android Geotracker: Enabling Location Services in Android devices
Follow the steps mentioned below to enable to Geo-tracking on the users' mobile devices:
- Expand the Status Bar in the the managed device and click on the Locationicon
- Click Agreeto enable Location Services for ME MDM
- Check Location Settings and ensure ME MDM is listed under Recent location requests.
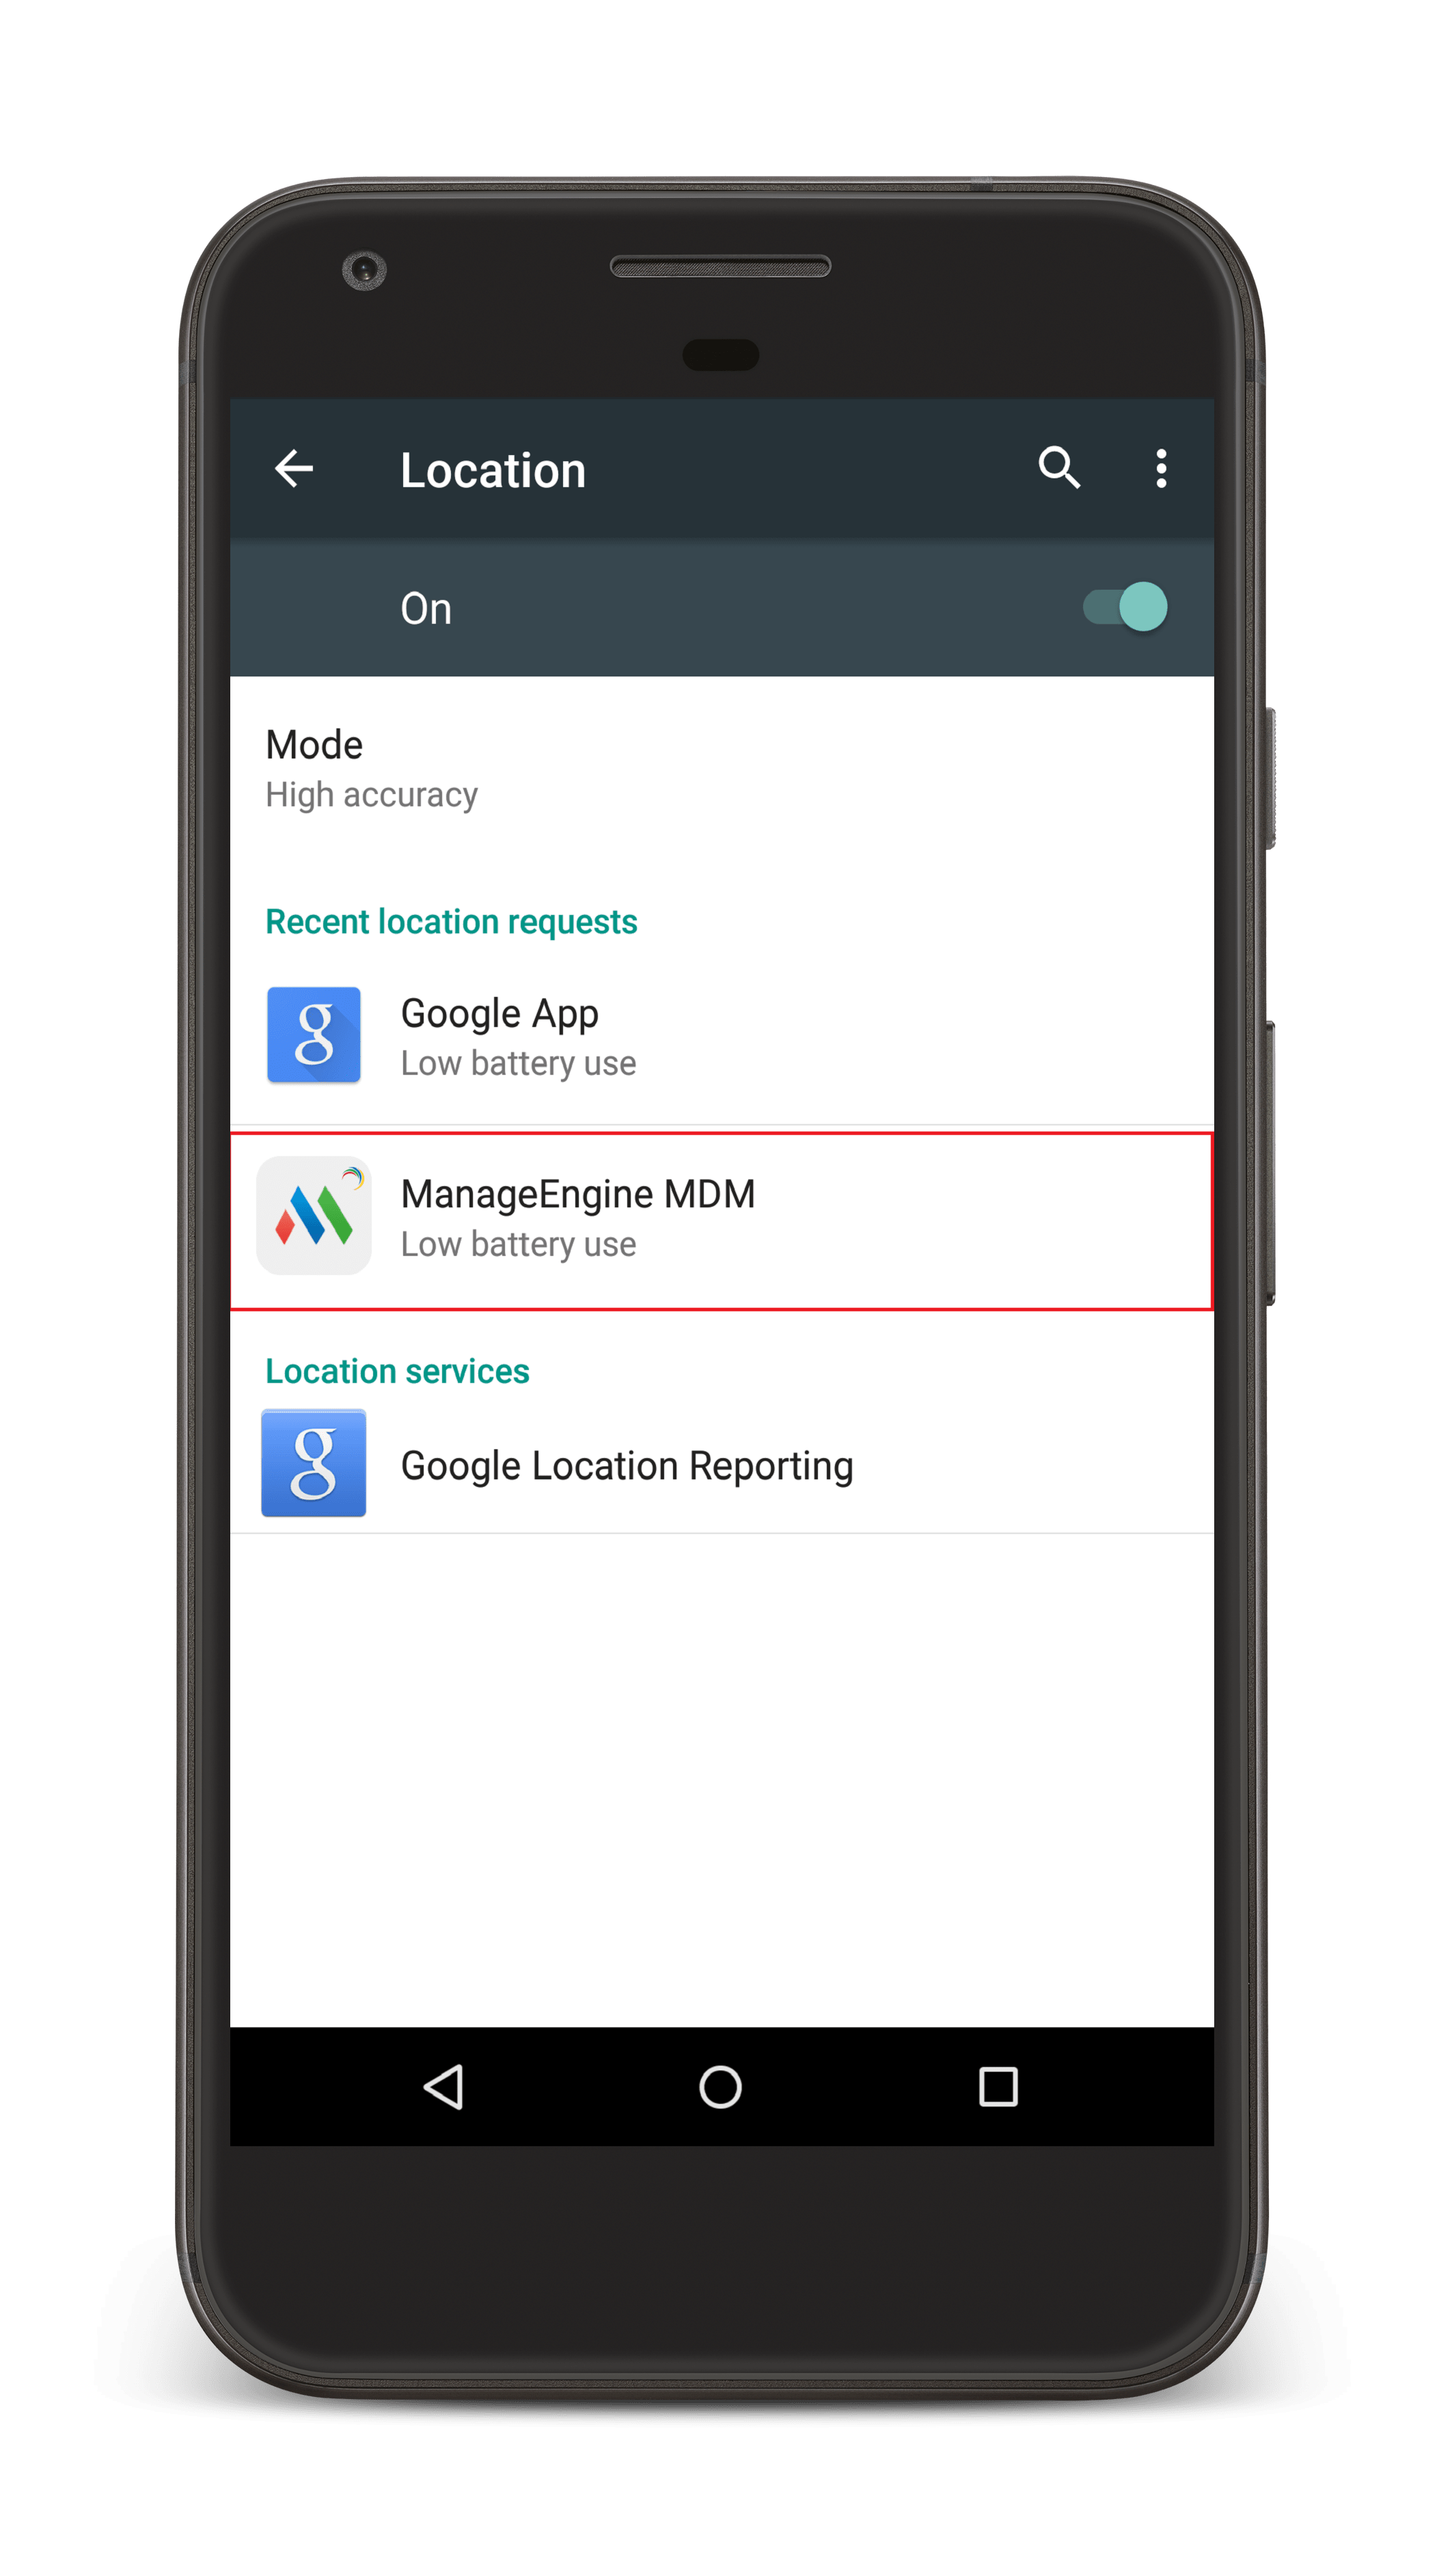
You have successfully enabled location services on Android devices.
For Android devices running OS 6.0 or above, the user has to enable location tracking, under runtime permissions for ME MDM app. To ensure location tracking is always on and is set on high accuracy mode without any user intervention, enroll the device as Device Owner and enable GPS to be Always On, using Restrictions policy.
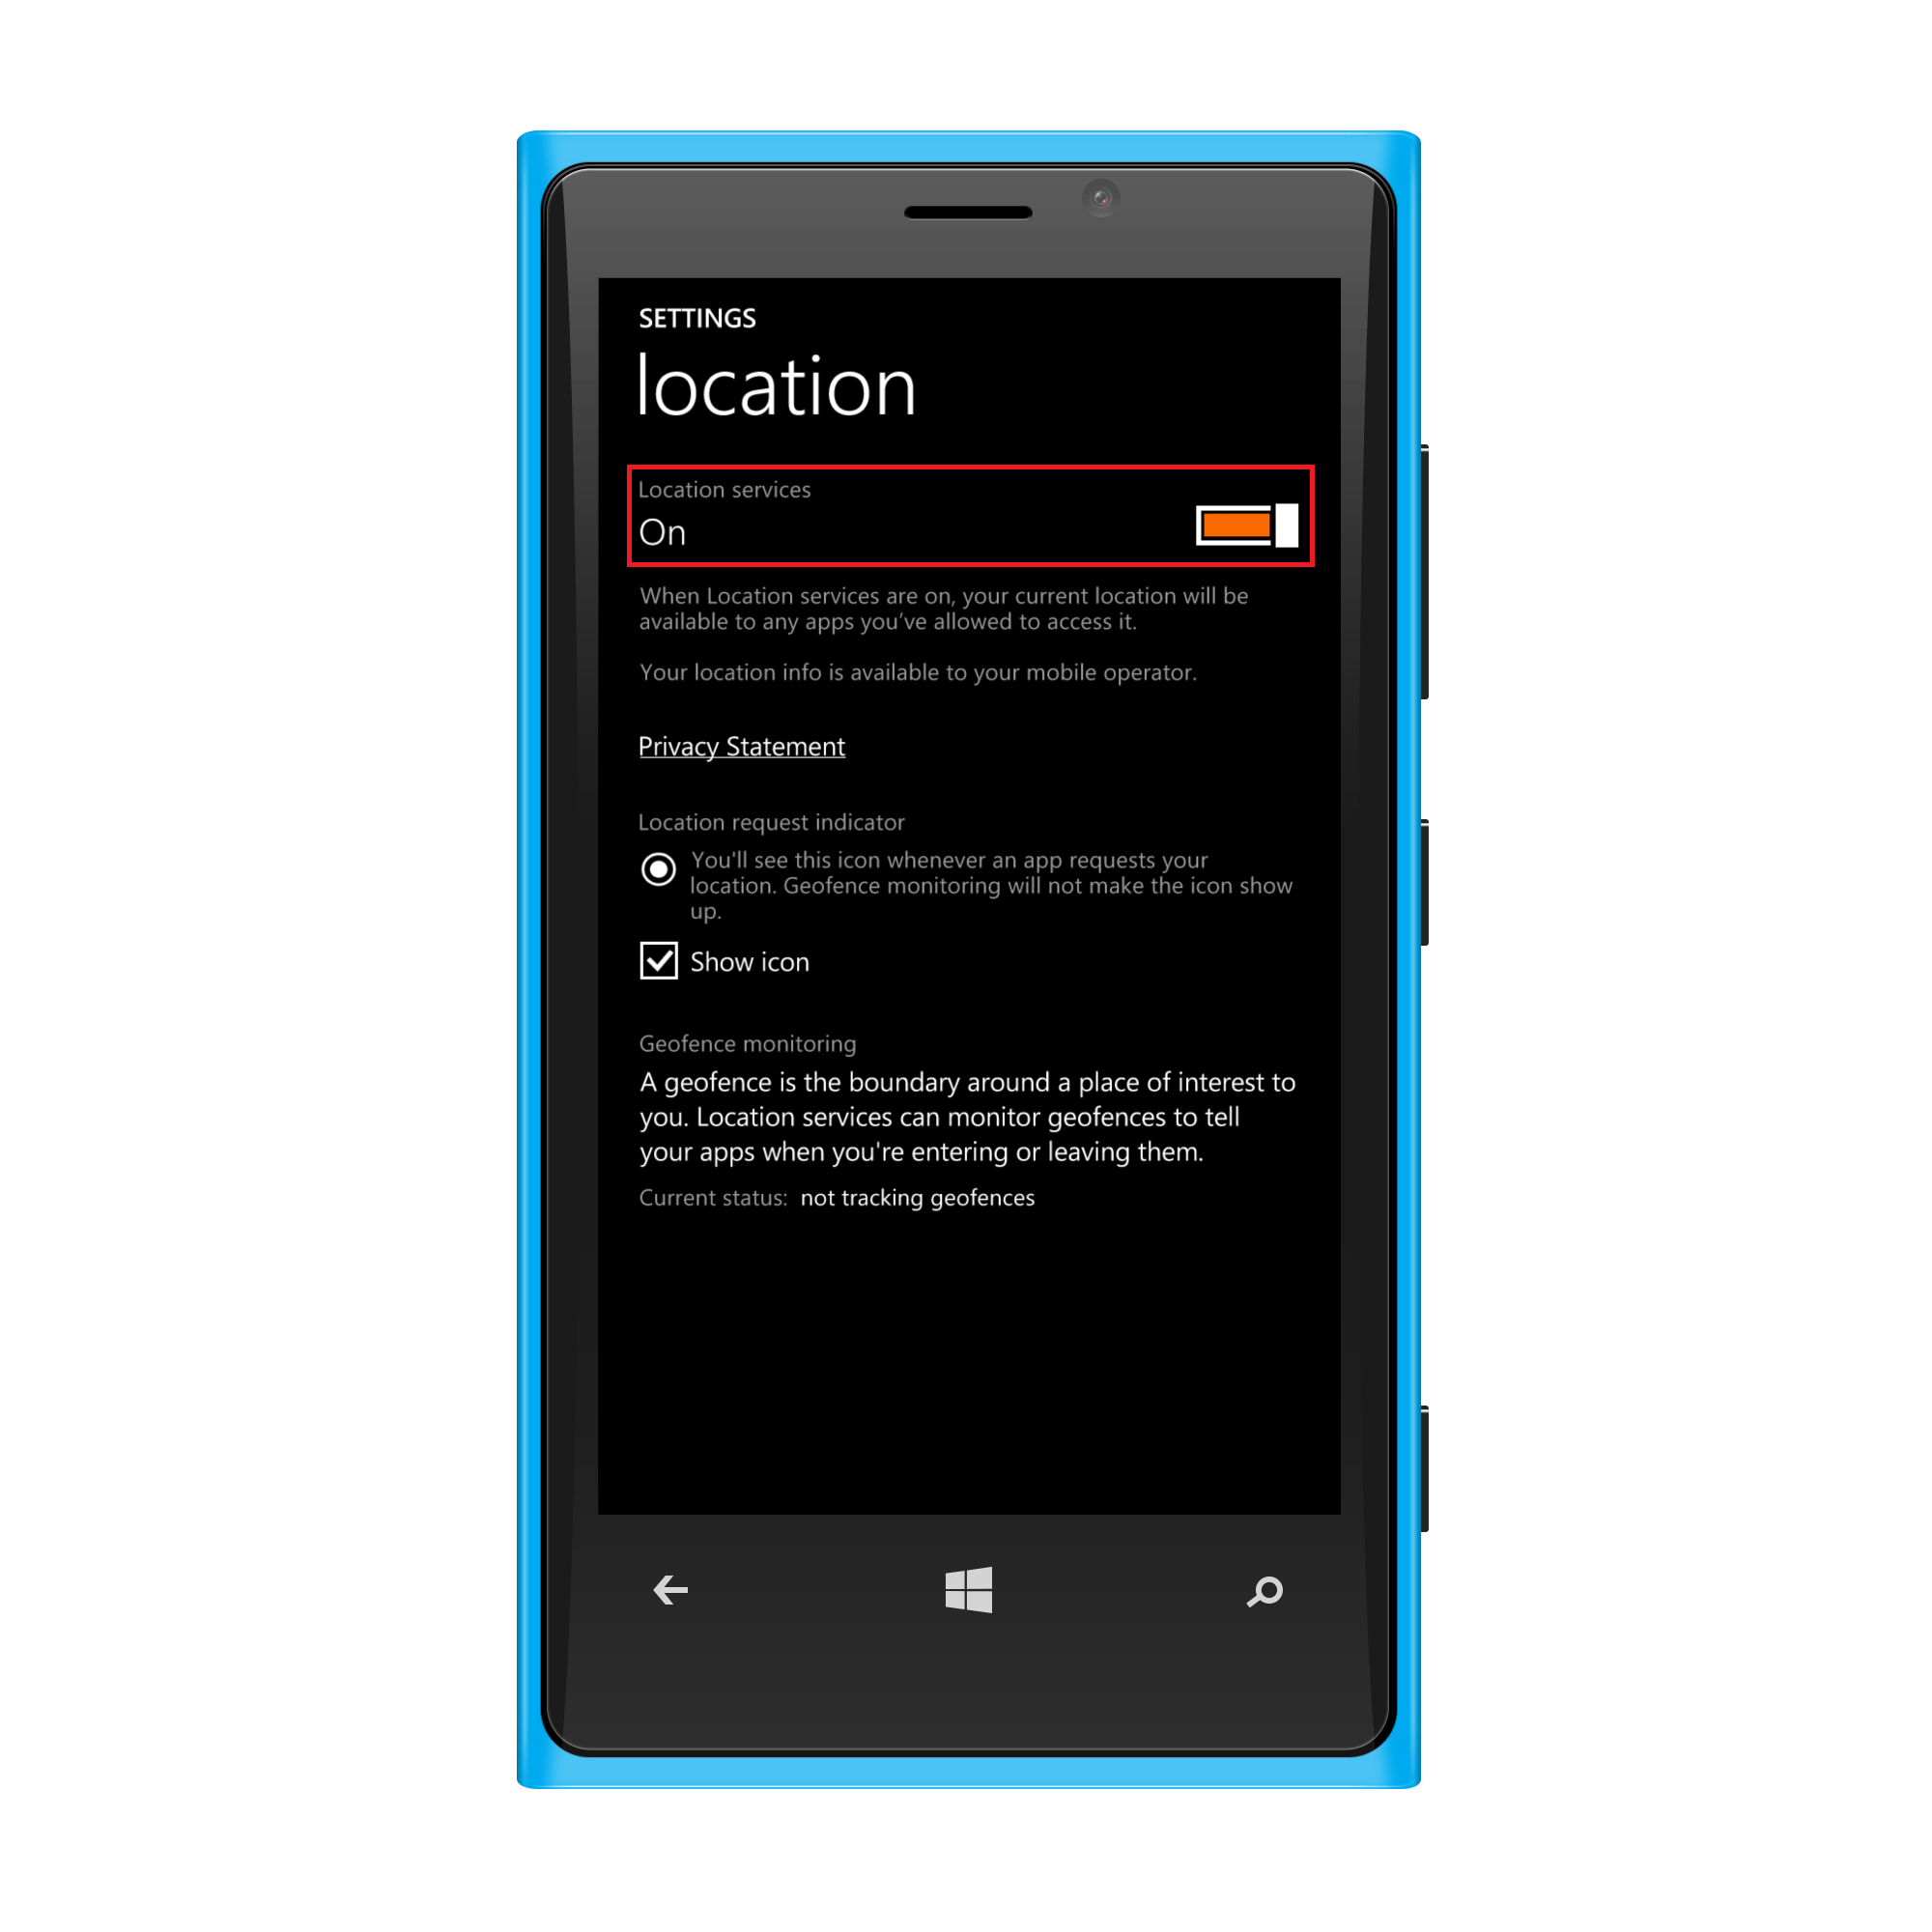
Enabling Location Services on Windows devices
The navigation is same for Windows phones, laptops, desktops and Surface Pro tablets. Follow the steps mentioned below to enable to Geo-tracking on Windows 10 or above devices:
- Select Settings icon on the managed device.
- Select Privacy from the list provided in Settings.
- Select Location from the list provided in Privacy under App permissions.
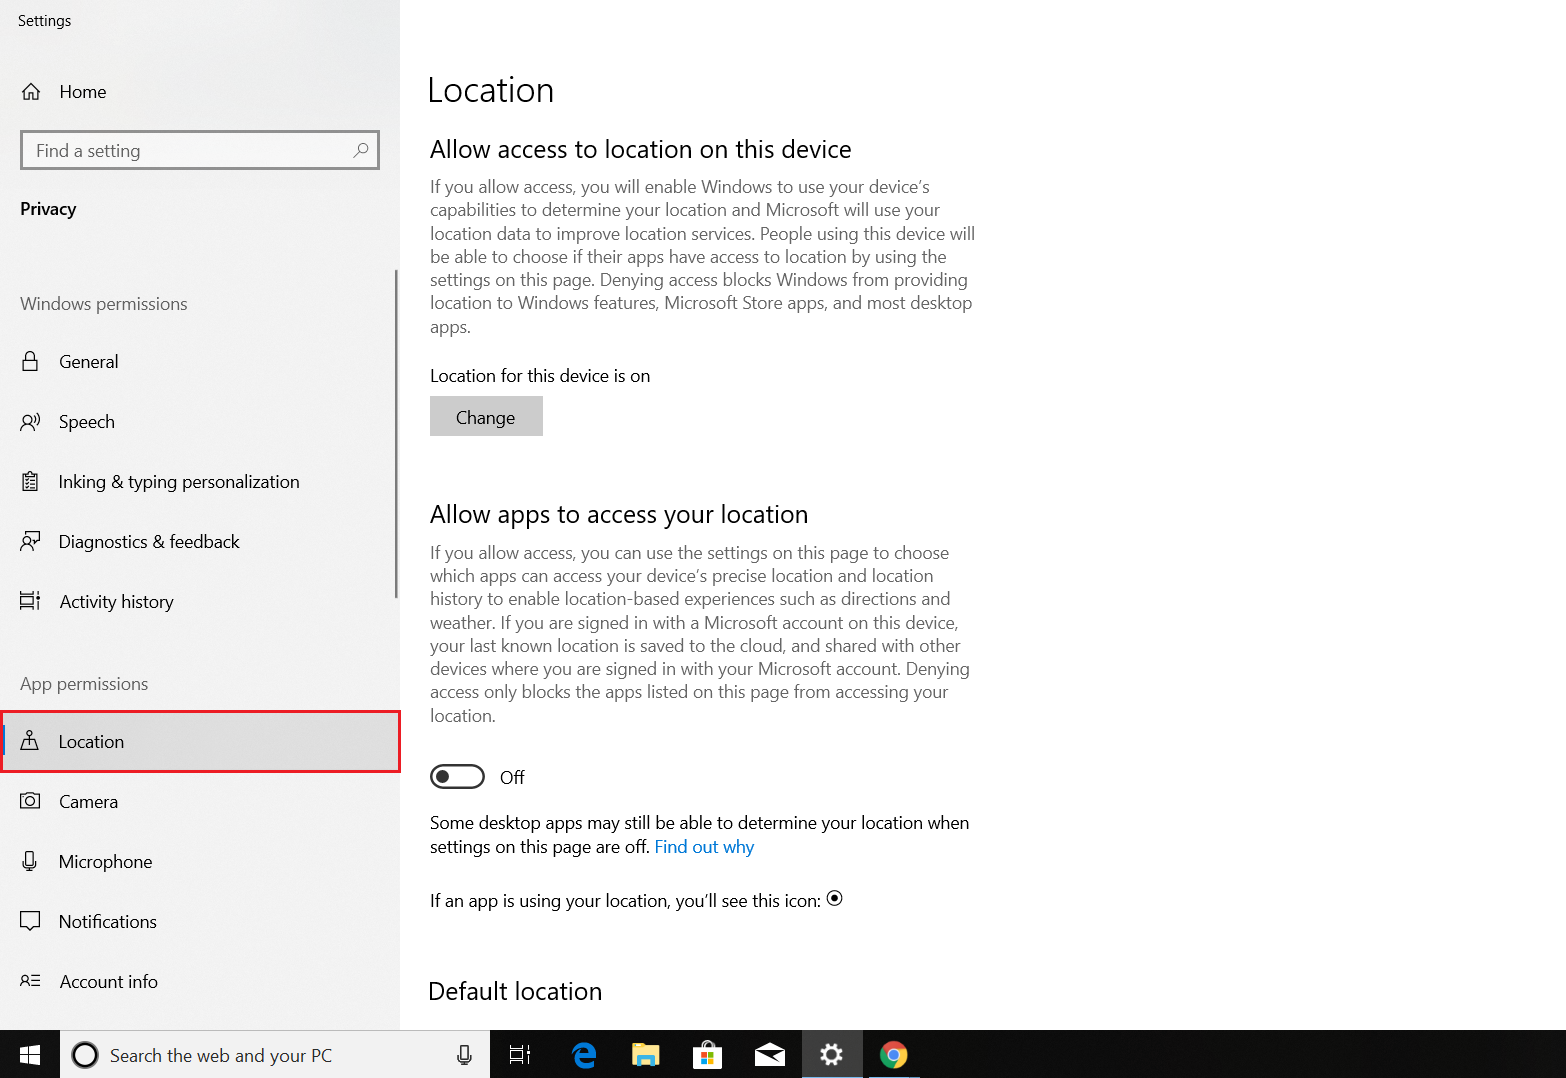
- Now, select the Location toggle and turn it On.
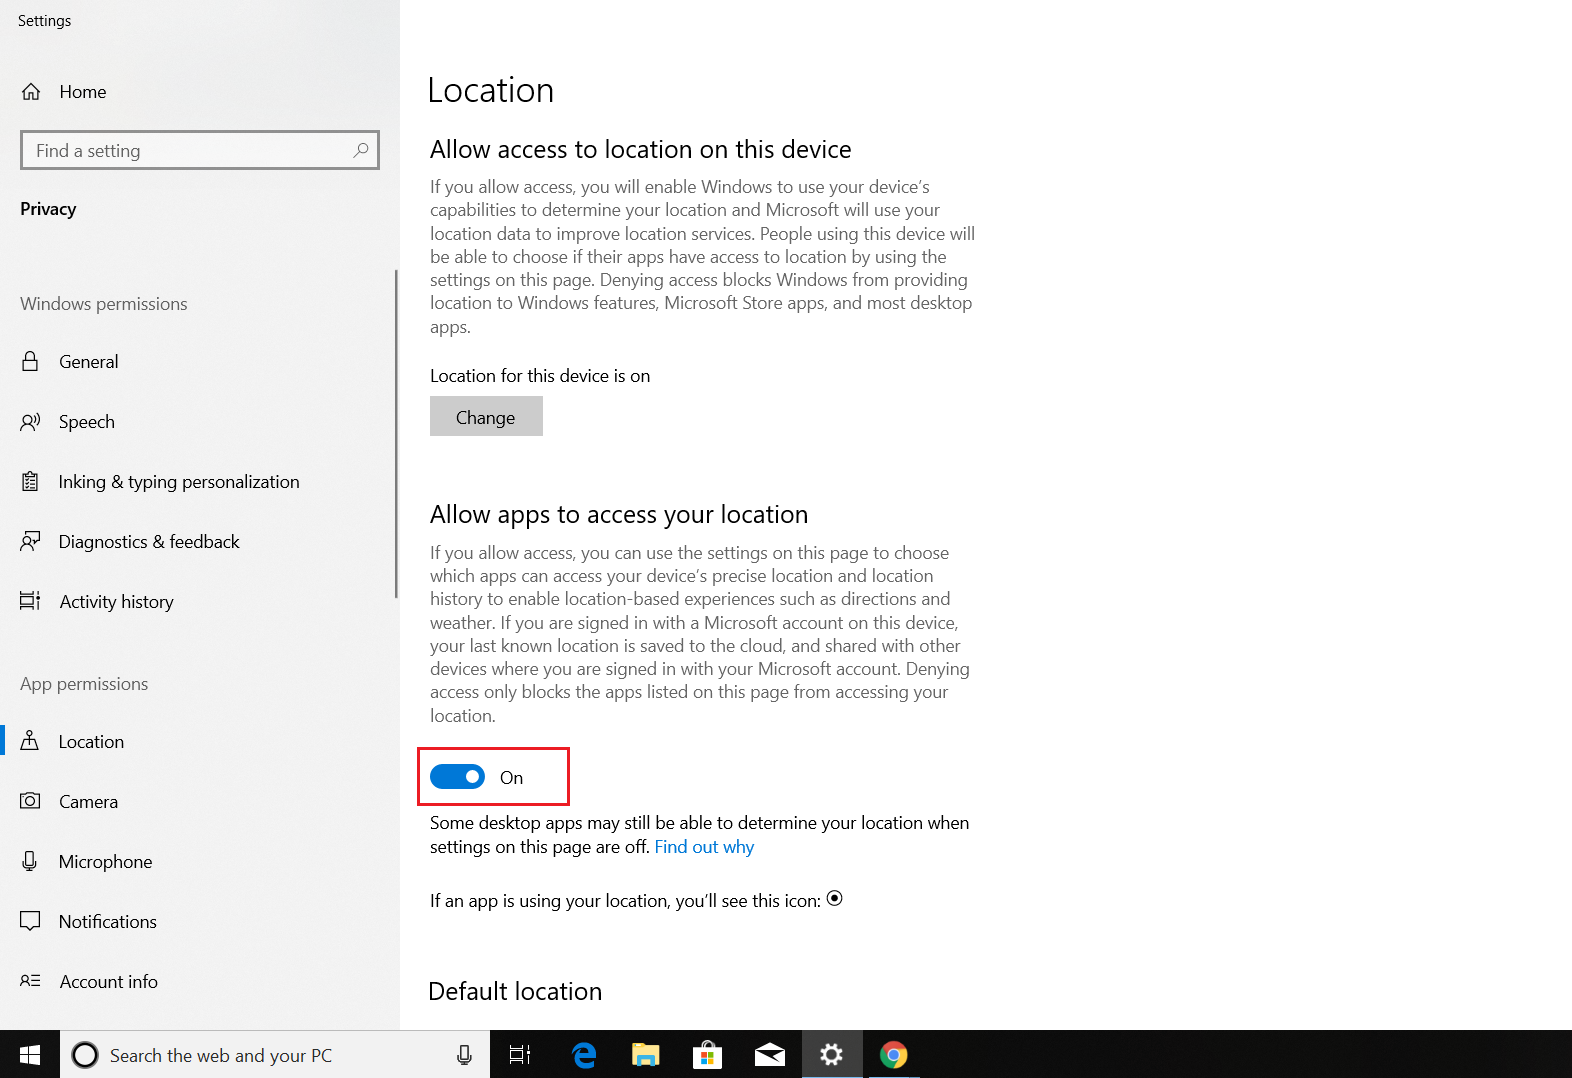
You have successfully enabled location services on your Windows device and can now find the location of the device.
Follow the steps mentioned below to enable to Geo-tracking on Windows 8/8.1 devices:
- Select Settings icon on the managed device.

- Select location.
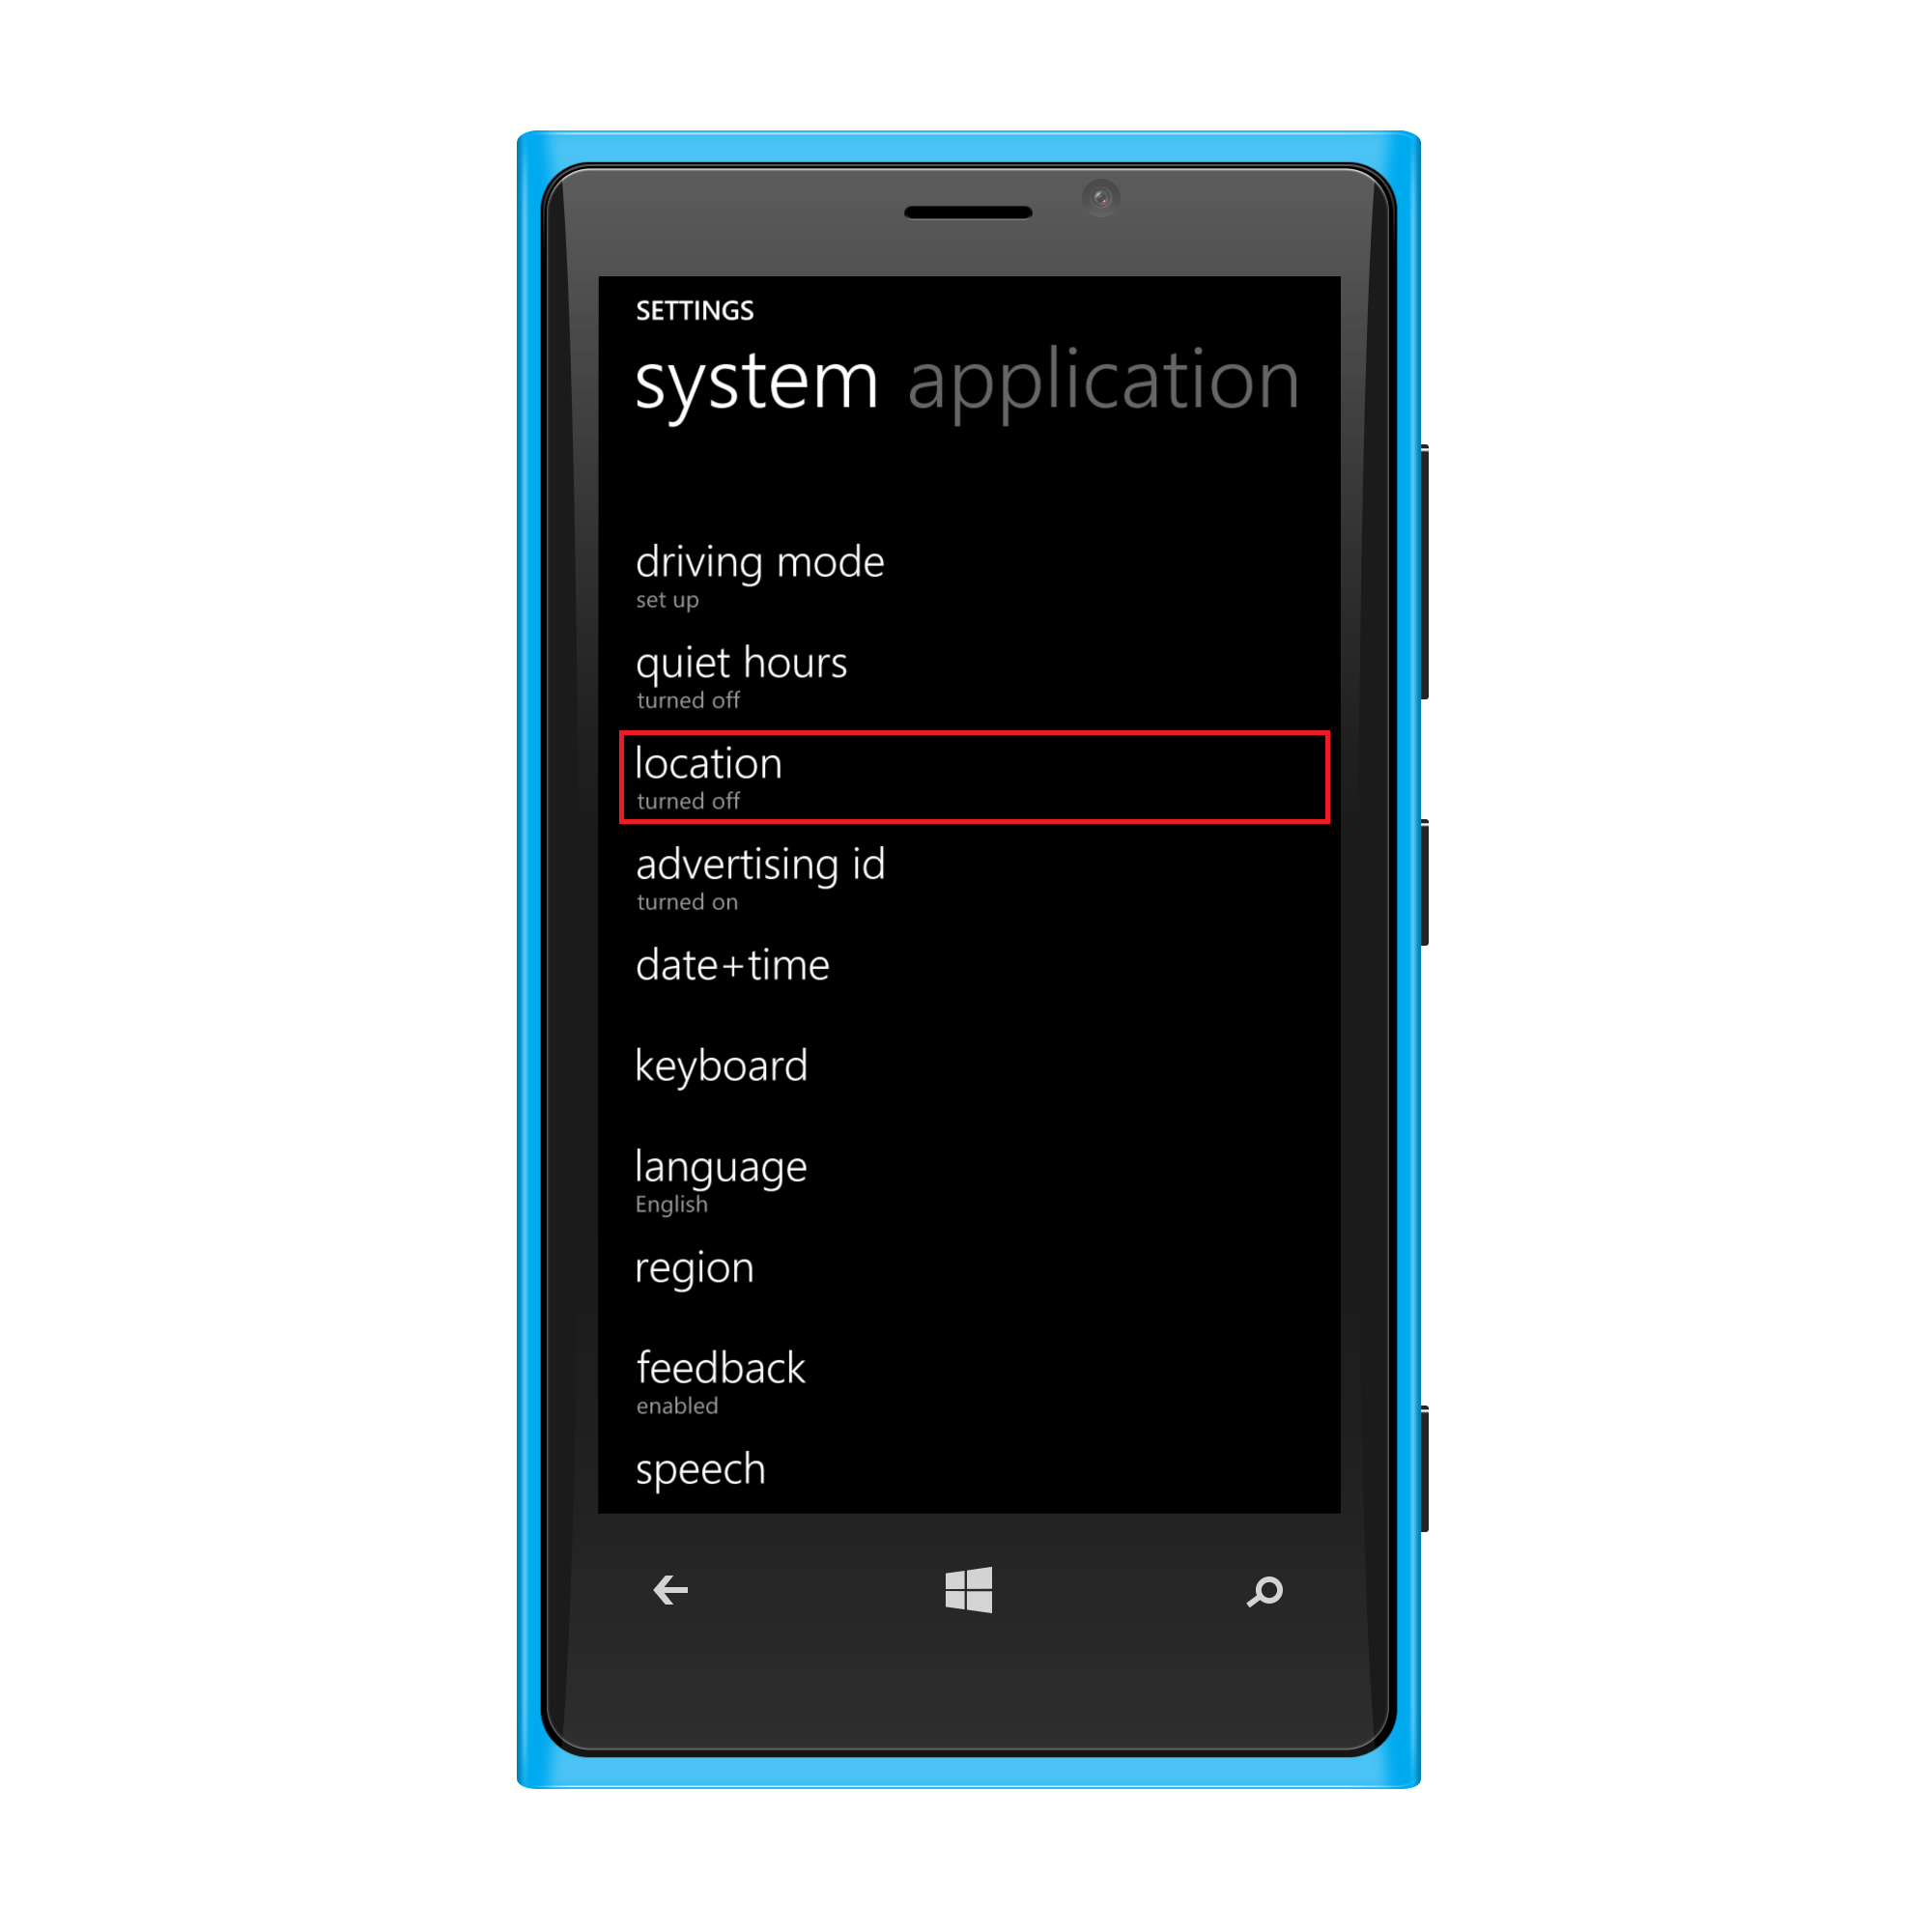
- Select the location services to turn on location services on the device in case it is turned off.

- Now, the Location services settings is turned On.
You have successfully enabled location services on your Windows phone and can now locate the device.
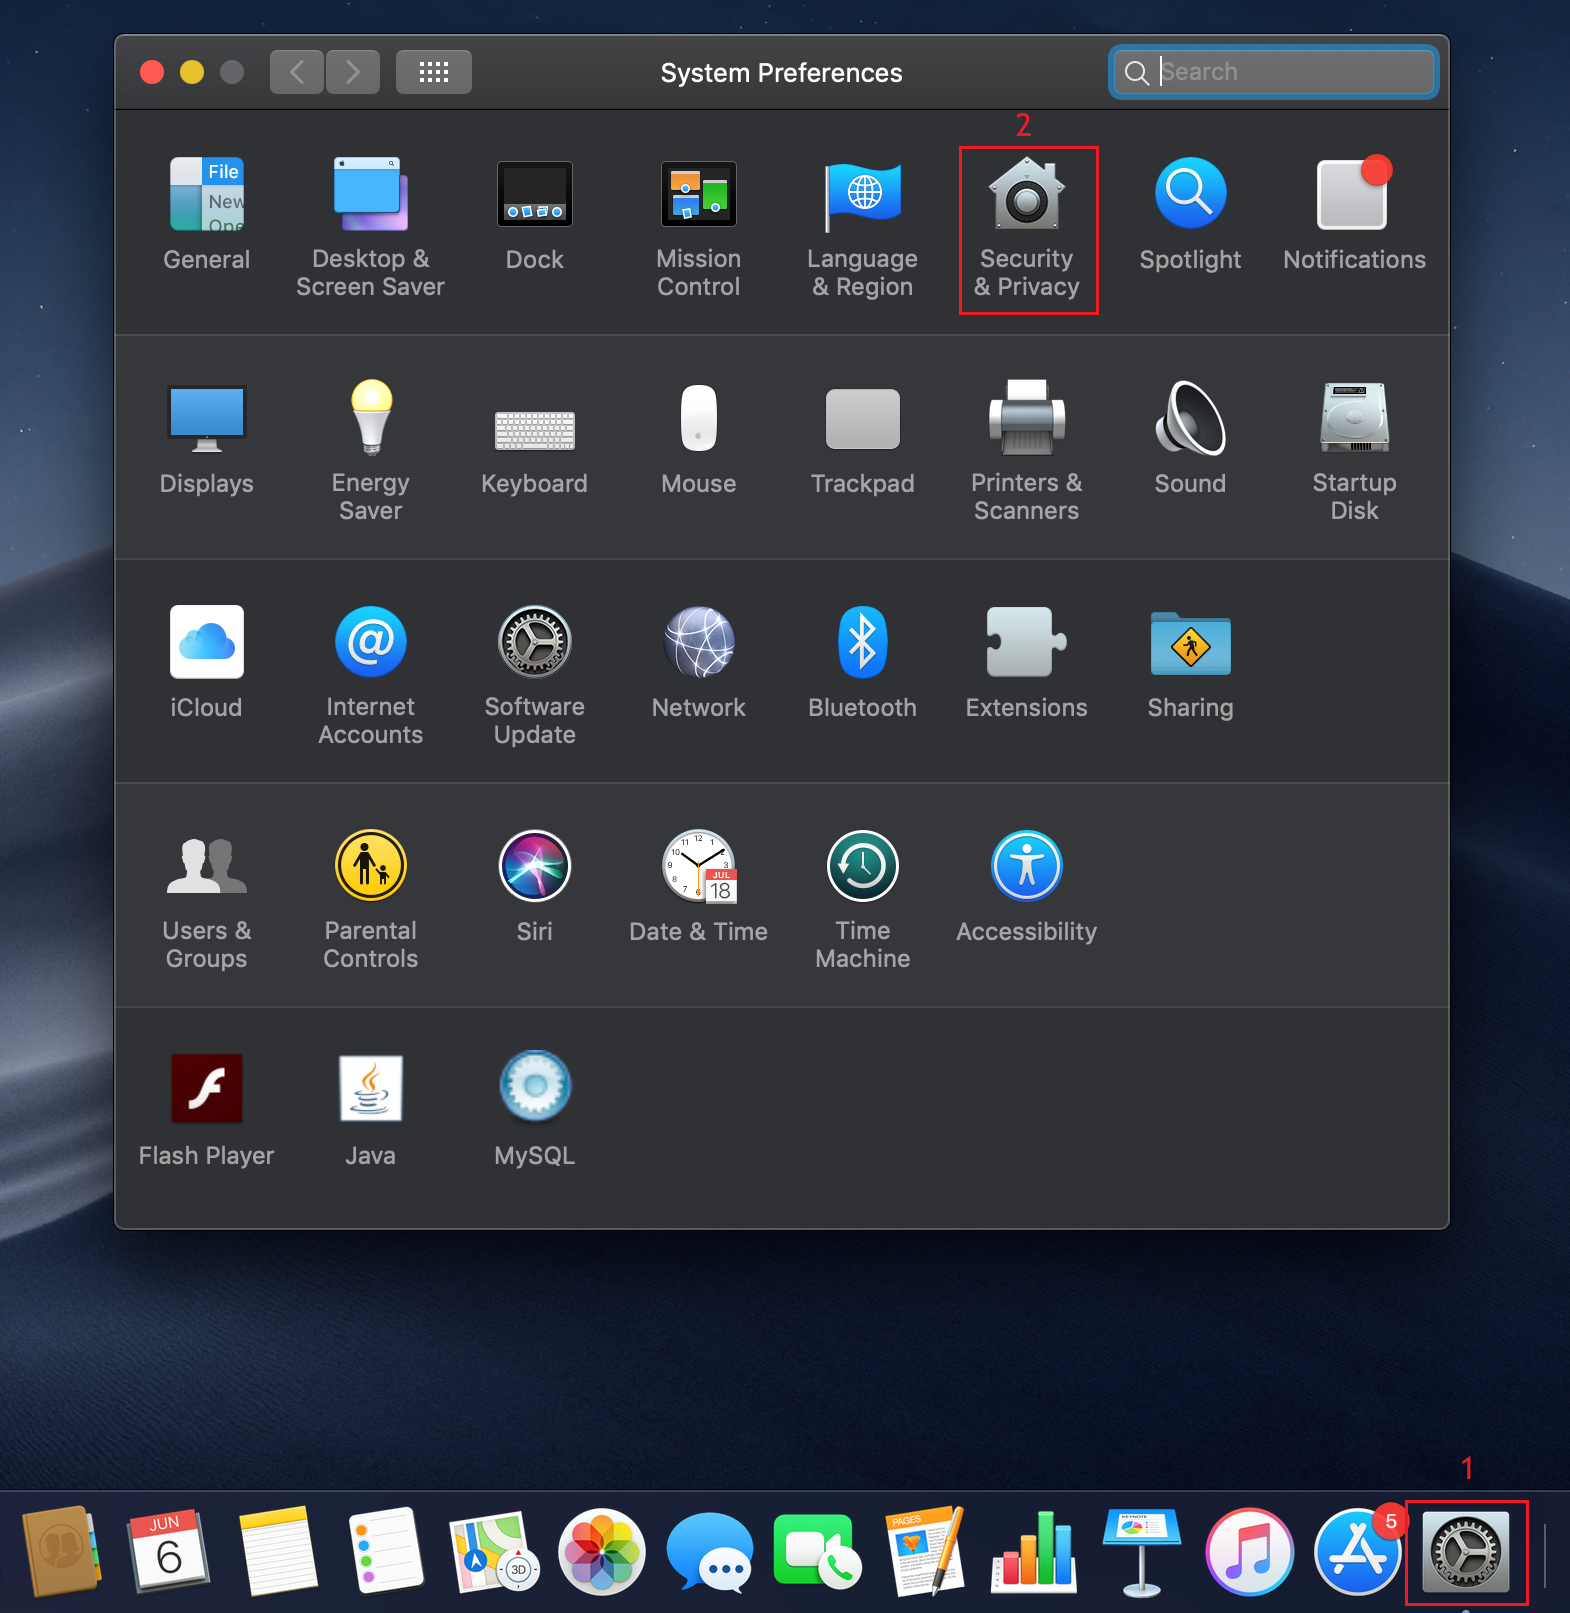
Enabling Location Services on Mac devices
NOTE:
- The ME MDM app cannot be pushed to macOS devices. The Mac agent deployed on the device is used to track the location of the device.
- If location services are disabled under System Preferences on the macOS device, once Geotracking is enabled from the MDM server, a prompt will be displayed. This prompt is shown every 6 hours if the macOS device is running.
Follow the steps given below to enable Location Services in Mac devices.
- On the Mac device, go to System Preferences app and click on the Security and Privacy icon from the System Preferences window.
- Click on the Privacy tab. If the padlock on the lower left is locked, click on it to unlock with your admin username and password and choose Unlock.
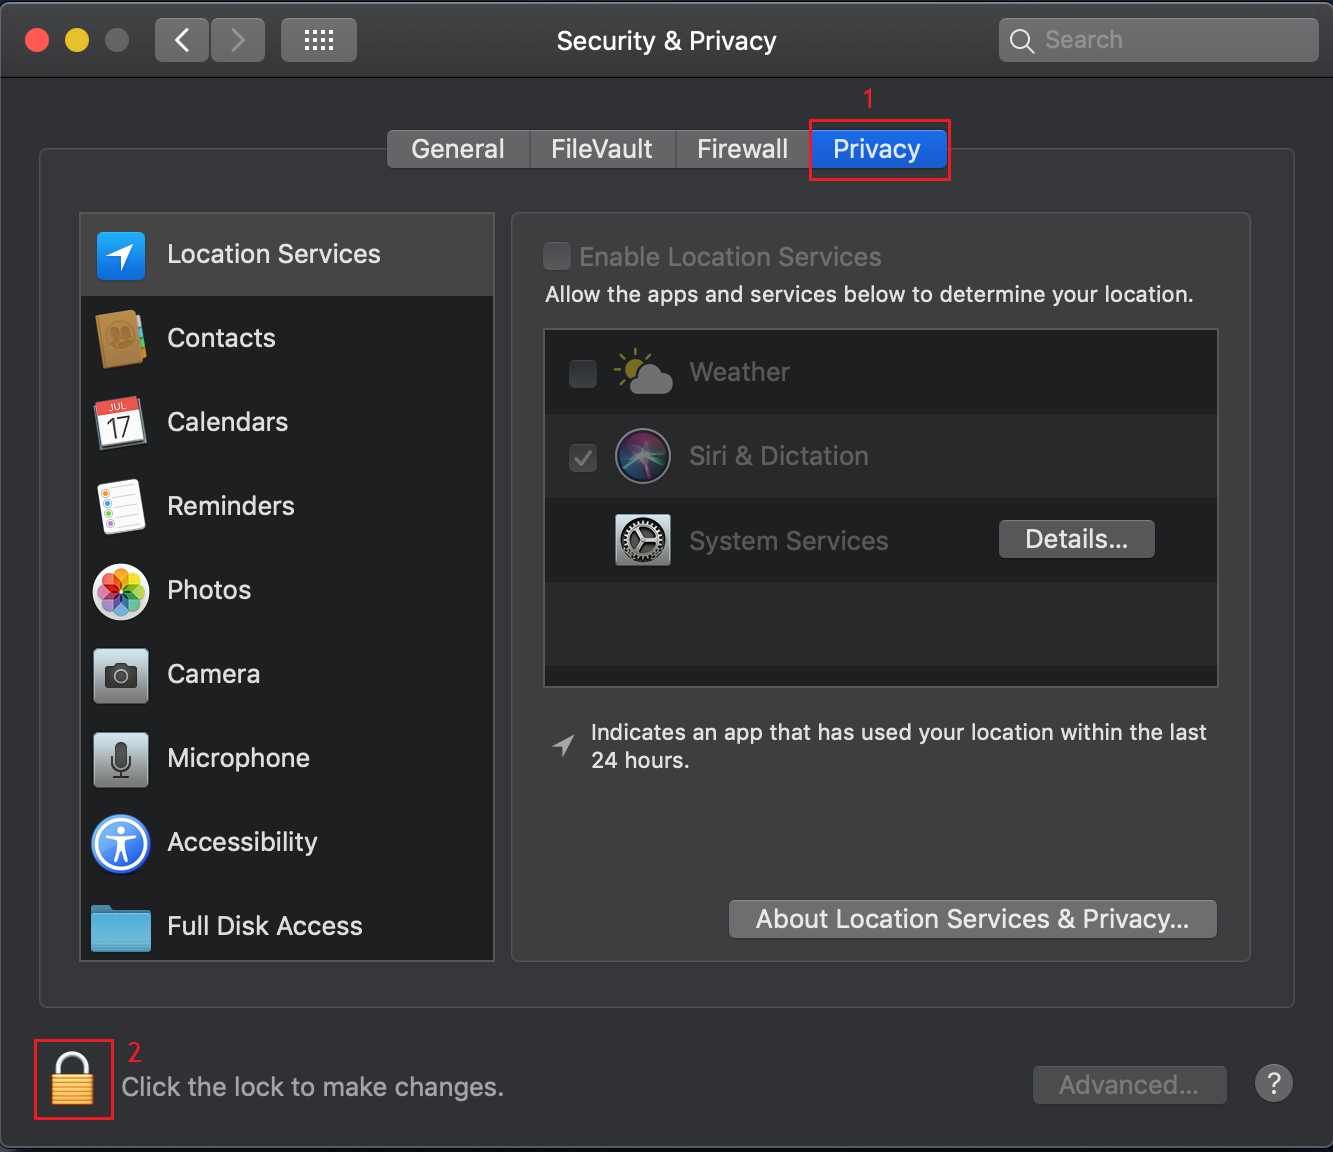
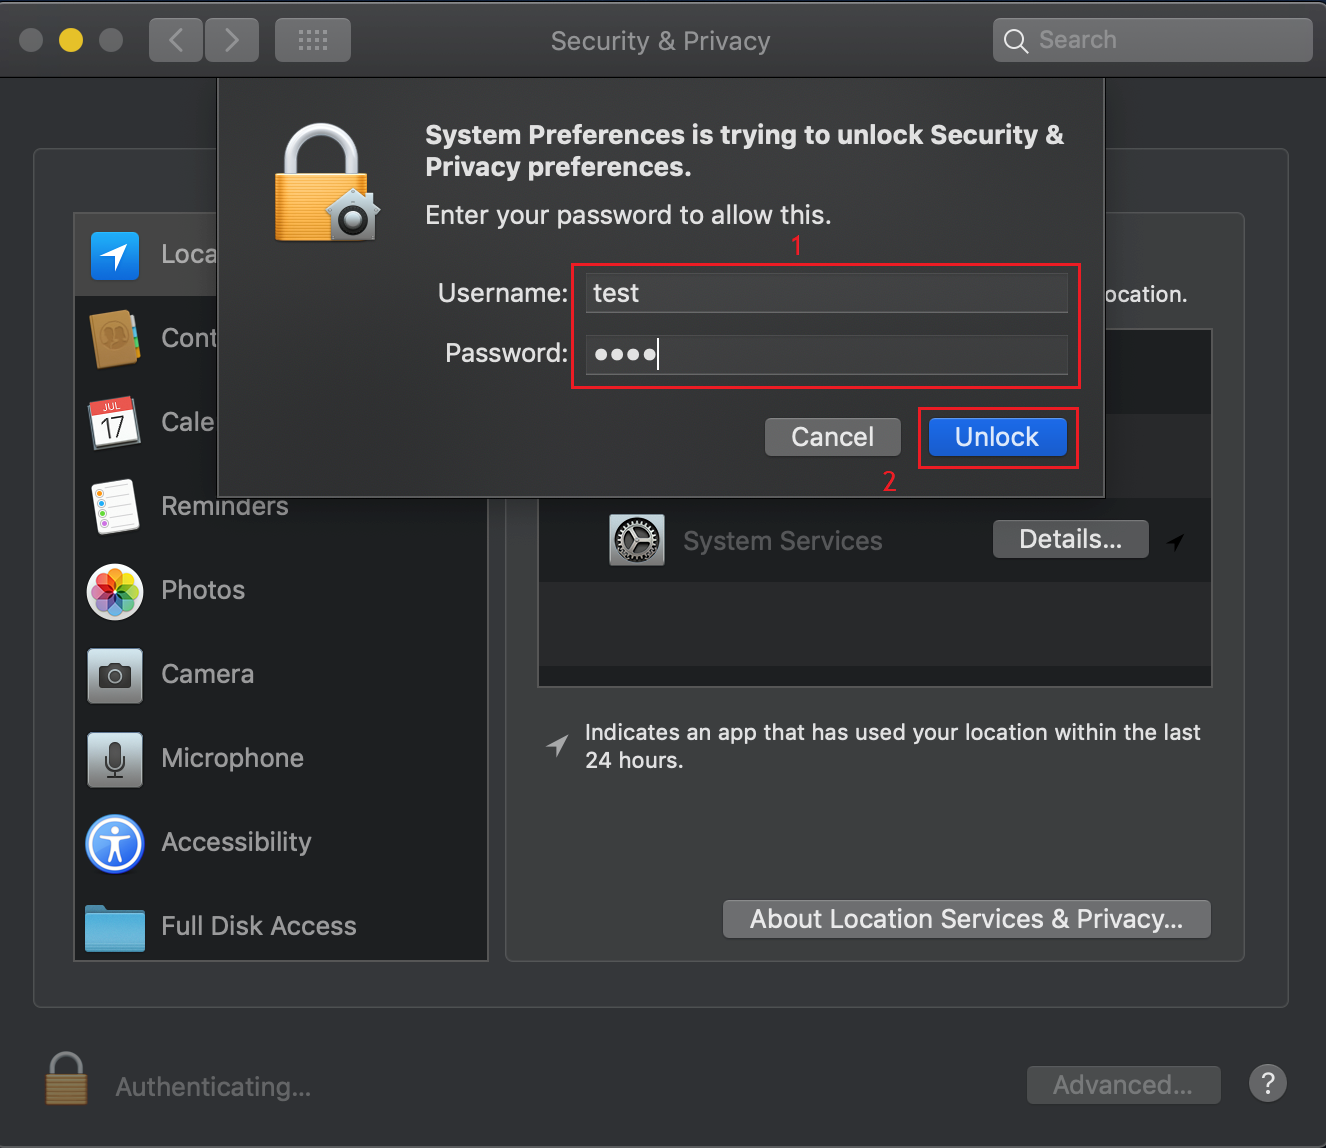
- Check Enable Location Services checkbox and choose the ME MDM app from the options listed.
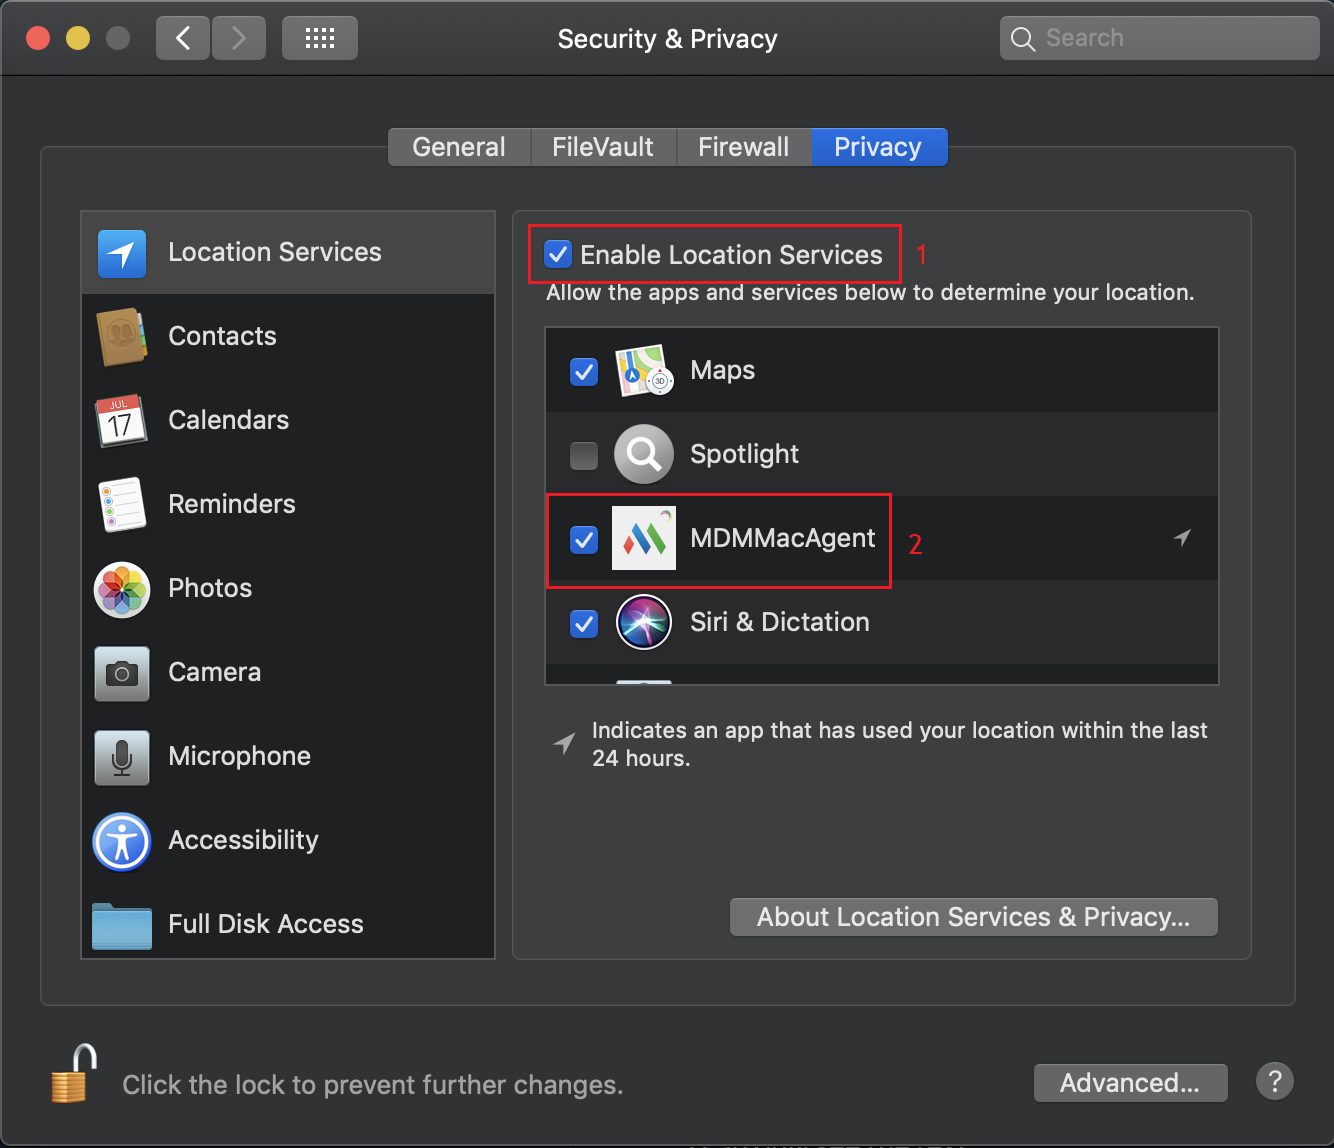
Location Services is successfully enabled on the Mac device. MDM will fetch location information for Macs once every 4 hours or when the device moves a distance of 100 m. This distance can be configured from Inventory -> Geo-Tracking -> Save location history on moving. Choose between 100 m, 500 m or 1 km and Save.
How to track geo location of your devices?
Follow the steps mentioned below to enable Geo-Tracking services for all enrolled devices:
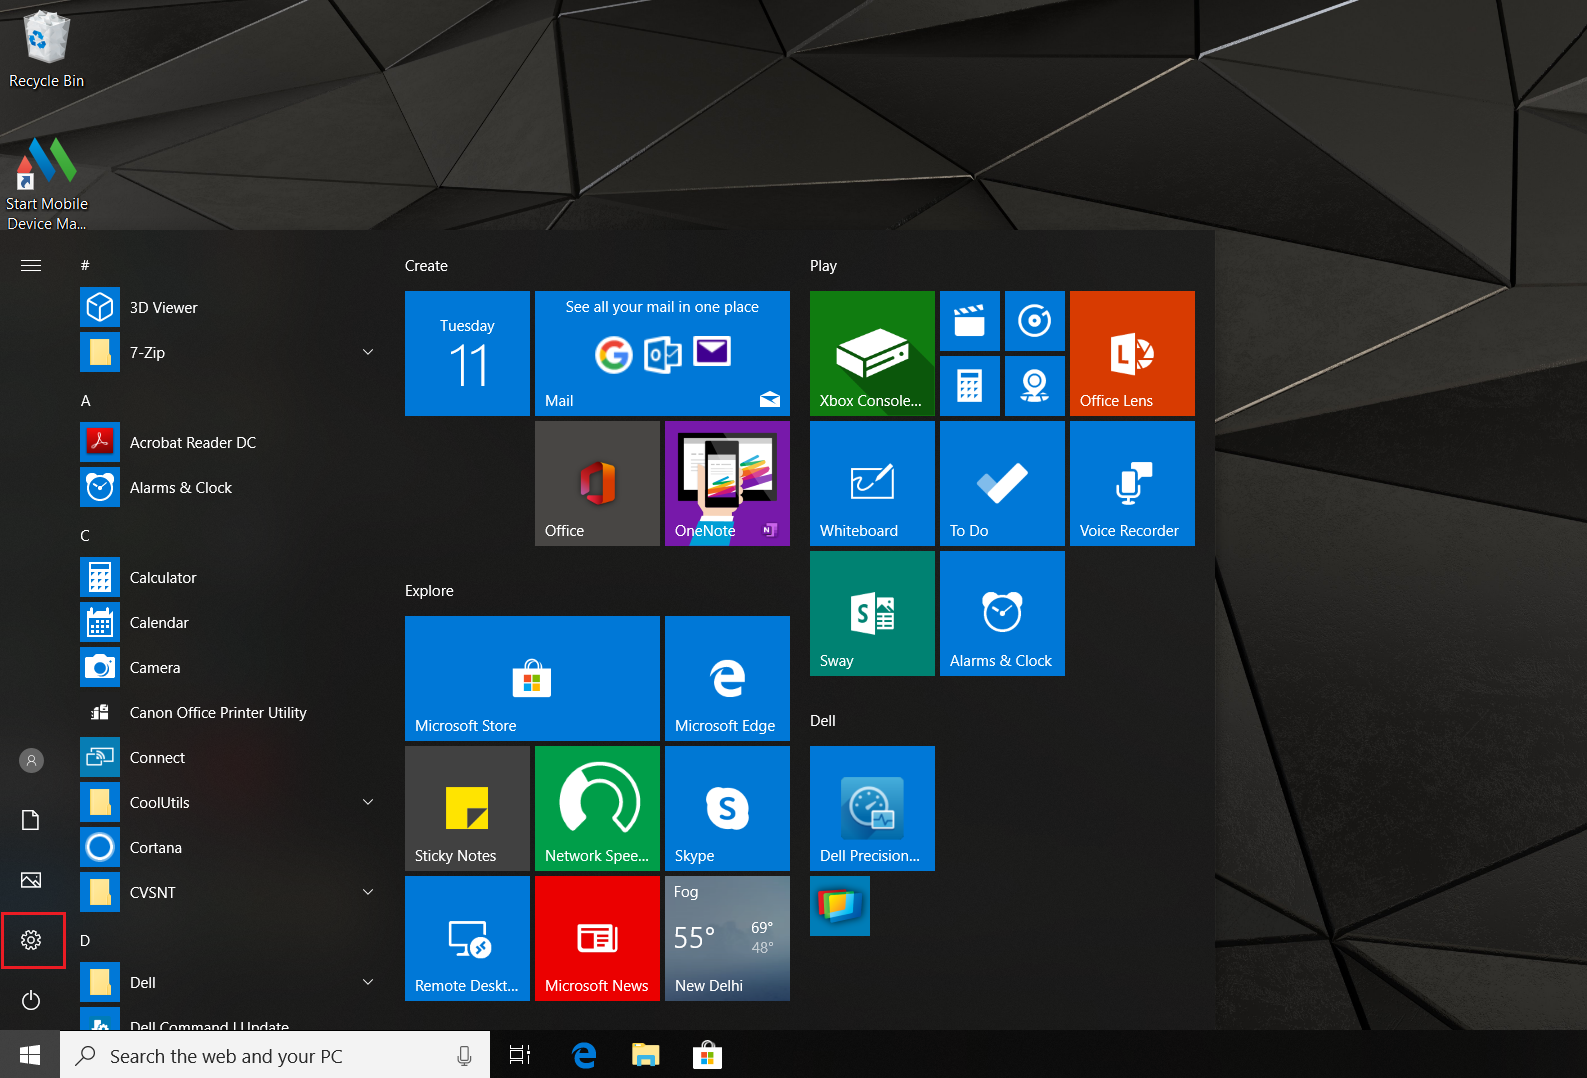
- *On the web console, click on Inventory tab and select Geo-Tracking from Inventory Settings.
- Enable Geo-Tracking under Configure Geo-Tracking Settings
- Select All Devices to track the location details on all the managed devices.
- On choosing All Devices, you are given the option tobrowse andselect Group(s) which you want to exclude from Geo-Tracking. The devices for which you do not require location tracking can be grouped and excluded.
- Click Save Changes to save the settings.
If you enable Geo-Tracking for a device which is present in any excluded group(s), you can remove the device from the excluded group(s) to enable Geo-Tracking. Alternatively, you can also choose to create a new group to add the device and enable Geo-Tracking.
Follow the steps mentioned below to view the location of all managed mobile devices:
- *On the web console, under Inventory,
- Click Location Data to view the device locations.
Geo-Tracking for specific devices
Follow the steps mentioned below to enable Geo-Tracking services for selective devices:
- *On the web console, click on Inventory tab and select Geo-Tracking from Inventory Settings.
- Enable Geo-Tracking under Configure Geo-Tracking Settings
- Choose Selected Groups to track the location details on the managed devices present in the group(s) selected.
- You can include selective devices into specific Groups, browse and select those group(s) to which you wish to apply Geo-Tracking settings.
- Click Save Changes to save the settings.
- When a newly enrolled device is added to a Group which is already selected for Geo-Tracking, then the settings are automatically applied to the device and the location of the device can be tracked.
- When any newly enrolled device is assigned to a Group which is excluded from Geo-Tracking, then the location details of the device cannot be accessed.
ME MDM app is automatically distributed to all the managed iOS devices if ME MDM app is not installed on the managed device. For MDM to track the location, the devices should meet the following criteria:
- ME MDM App should be installed on the managed mobile device
- The managed device should have connection to the internet, it can be either Wi-Fi or mobile data connectivity.
- Location Services should be enabled on the managed device and ME MDM App should have permissions to use it. Refer this for enabling Geo-Tracking for iOS devices, Android devices and Windows devices.
Enabling Geo-tracking for a long period of time might drain the battery.
Follow the steps mentioned below to view the location of the managed mobile device:
- *On the web console, under Inventory, click on Devices
- Select the Device and view the Device Details.
- Click on Location tab. You can see the location of the mobile device by latitude and longitude.
Location of the device is updated only when the device switches tower and when the end user opens the App Catalog on their mobile device.
Geo-Tracking for lost devices
In countries where usage of device location data is prohibited. However, there rises a predicament when you want to locate missing devices. To overcome this, MDM provides you Lost Mode, whereby you can track missing devices. Lost Mode is similar to FindMyiPhone and Find My Device/Find My Phone as it lets you track managed devices only when they're lost. Lost Mode lets you mark the lost devices, get their location, lock the devices and even wipe the data. Location data can be used to retrieve the device if it has been misplaced, while the other commands such as device lock and data wipe can be used if the device is stolen.
You can locate devices and enable Lost Mode, only by marking devices as lost. For marking the device as lost, *you need to select the device in the Inventory tab, go to Geo-Tracking tab in device details and click on Enable Lost Mode, and follow the instructions to enable Lost Mode. Lost Mode is supported for iOS and Android.
To configure Geo-Tracking settings to locate devices only when lost, *click on Inventory tab, select Geo-Tracking and for the Track devices option, select When Lost. However, Lost Mode can work in both cases - track device location at all times or track device location only when lost.
Lost Mode for iOS
When Lost Mode is enabled in Supervised devices running iOS 9.3 or later, ME MDM app need not be installed. Even if Location Services is fully disabled in the device, MDM can still locate the device. Another important feature in Lost Mode for iOS devices is that a message and contact number can be displayed in the lock screen. This can be beneficial in returning the misplaced device to its rightful owner. If the device has been misplaced, you can use Remote Alarm command by which the device raises a sound alarm.
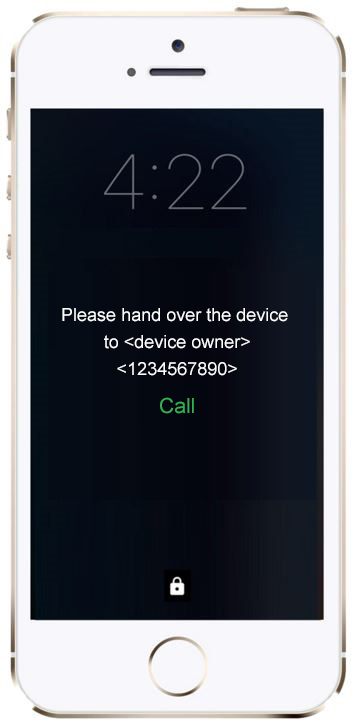
The above screenshot shows a sample message and contact number displayed in the lock screen. Clicking on call button allows a call to be made to the contact number specified. Further, the device is locked on enabling Lost Mode and can be unlocked only through MDM, ensuring unauthorized access is completely restricted.
For other iOS devices including unsupervised iOS devices, not all capabilities of Lost Mode are supported.ME MDM app must be installed in the device and Location Services must be enabled for ME MDM app, to obtain the location details. However, the other location-indepent functionalities of Lost Mode can be still used - you can lock the device, display message and contact details in the lock screen and wipe the device if need be.
Security commands - Remote Lock, Restart and Shutdown cannot be executed when the device is in Lost Mode.
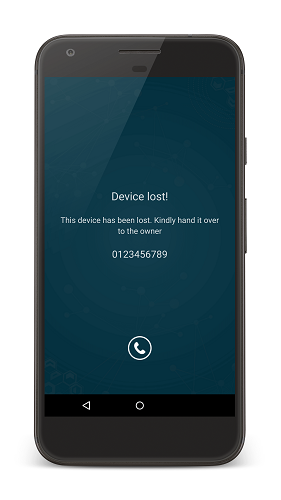
Lost Mode for Android
As in iOS devices, Lost Mode in Android lets you
- Obtain location and track the device location real-time
- Lock the device
- Provide an optional message and contact number on the lock screen
- Option to call the specified contact number by clicking the call button present in the lock screen.
You can also wipe the device to ensure there is no unauthorized access of corporate data present in the device. Also, an additional option available for Lost Mode in Android, is resetting the passcode. You can reset the passcode in the device and have the new passcode mailed to the user. This ensures unauthorized access is restricted, even if the existing device passcode is known.
The biggest problem when it comes to locating lost devices is that the functionalities required to locate the device, such as Wi-Fi, Location Services etc., can be disabled in the device, rendering Lost Mode impractical. However, MDM by default ensures some of the required capabilities are enabled by default once the device is marked as lost . The advantage of using Lost Mode is that it can enable functionalities, if they have been disabled by the user. For example, if a device doesn't have Location Services switched on, MDM can still locate the device using Lost Mode. Lost Mode ensures Location Services gets enabled automatically in the background with zero admin action/user intervention.
The following table specifies the list of all features which are enabled by Lost Mode silently, irrespective of whether it has been enabled/disabled in the device.
| Functionality/Device Type | Samsung devices | Non-Samsung devices | |
|---|---|---|---|
| Device Owner | Profile Owner | ||
| Enabling Wi-Fi |  |
|
|
| Enabling Location Services | |
|
 |
| Restricting switching off the device | |
|
|
| Restricting safe booting | |
|
|
| Restriting Factory Reset | |
|
|
| Restricting USB debugging | |
|
|
| Restricting USB data transfer | |
|
|
| Restrict killing background processes | |
|
|
Device Owner and Profile Owner are only supported for devices running Android 5.0 or later versions.
In Non-Samsung devices provisioned neither as Profile Owner and Device Owner, only Wi-Fi gets enabled automatically through Lost Mode, irrespective of whether it is enabled or not
Lost Mode on Chrome OS devices
Mobile Device Manager Plus MSP enables IT admins to remotely enable Lost Mode on Chromebooks when they're lost or stolen.
Pre-requisites
To enable Lost Mode on Chrome OS devices, ensure the following pre-requisites are met:
- The devices must be provisioned in the G Suite Admin Console and managed by Mobile Device Manager Plus MSP.
- The devices must be running on Chrome OS 40 or above.
Enabling Lost Mode on Chrome OS devices
Follow the steps given below to enable Lost Mode:
- On the MDM console, navigate to Inventory and select the device on which Lost Mode needs to be enabled.
- Under Actions, select Enable Lost Mode.
- While enabling Lost Mode, you can optionally provide a message and contact information to be displayed in case the device is found. Click on Next
- For auditing purposes, you will have to provide a ticket ID and a optional message outlining the reason for enabling Lost Mode.
- Click on Enable Lost Mode, to lock down the device in Lost Mode.
Once Lost Mode is enabled, the following actions are performed on the device.
- The current users will be logged out of the device and it'll be locked down with the configured message. New users will not be able to log in to the device, untill Lost Mode is disabled by the admin from the MDM console.
- The device status on G Suite Admin Console will be modified as Disabled.
NOTE: Locating Chromebooks is currently not supported.
Track devices instantly
Administrators can locate the enrolled devices instantly. Follow the steps mentioned below to track the geographic location of the devices on demand:
- *On the web console, under Inventory, click Devices
- Select the Device which needs to be located
- Under Actions, click Locate the Device, you can view the location of the device.
You can now locate the geographical location of the enrolled devices instantly.
Location History
Location History as the name suggests, tabulates the list of locations traversed by the device. Location History stores data up to 30 days, which is ideal if the locations are to be viewed at a later time. The biggest advantage with Location History, is that the tracking can be customized to suit the needs of the organization. MDM provides 3 different options for storing the list of location(s) based on distance traversed. For storing locations when device movement is miniscule, choosing the option of tracking the device on moving 100m is ideal. In such a case, the location update frequency is more, ensuring even the smallest of movements are covered. The other two options cater to relatively larger distances, with one option tracking devices on moving 500m and the other for tracking devices on moving 1km. The first option of tracking devices on moving 100m, consumes more battery and cellular data due to frequent location updates, while the other two options consume relatively lesser cellular data and battery. Another advantage is that the Location History data can be exported as a CSV file. This is ideal if the Location History data is to be shared.
Location History can be configured as explained below:
- On the MDM server, click on Inventory tab. Select Geo-Tracking present under Inventory Settings.
- Enable the option Location History and also the details as to when the location details is to be saved.
- Click on Save Changes to save the configuration.
Location History cannot be obtained in the following cases:
Choosing a Map for enabling Geo tracker on Google Maps
MDM allows you to view the devices using Zoho Maps directly on the console but if you prefer Google Maps it provides you with an option to export the device locations and view them on your Google Maps. Follow the steps given below to use Google Maps to view device locations-
- Click on View in Google Maps to view the devices on Google Maps.
- Follow the steps that are displayed on the window, to download the CSV file of device locations.
- Open My Google Maps and click on Create a new map.
- Provide a name and description to help identify the map for later use.
- Click on Import to upload the CSV file downloaded from the MDM console.
- Check if Latitude and Longitude has been selected, then click on Continue.
- Choose the appropriate option to be displayed as the title of the markers, preferably the device name.
- Click on Finish to display the device locations.