Device Management
The devices to be monitored by Log360 Cloud can be managed in this section. Devices can be added, edited, or deleted. All the devices that are being monitored can be viewed. The device management page contains three tabs namely Windows devices, Syslog devices and Other devices.
Windows Devices
- Add a Windows Device
- Update a Windows device
- Enable/Disable a Windows device
- Delete a Windows device
- Change monitor interval for a Windows device
- Configure Event Source files
- View RSoP Data
- Bulk device updation
Add a Windows Device
To add a new Windows device, follow the steps given below.
- Ensure Log360 Cloud agent is installed on at least one Windows device in your network.
Note:
- When a domain is added in Log360 Cloud, all devices in the domain will be auto discovered and listed on clicking the +Add device(s) button on the Device Management page (Settings → Configurations → Devices). Alternatively, you can install the Log360 Cloud Agent on a domain machine for auto discovery of all devices in the domain.
- When you rename an AD device in domain, the device name automatically gets renamed in device management too.
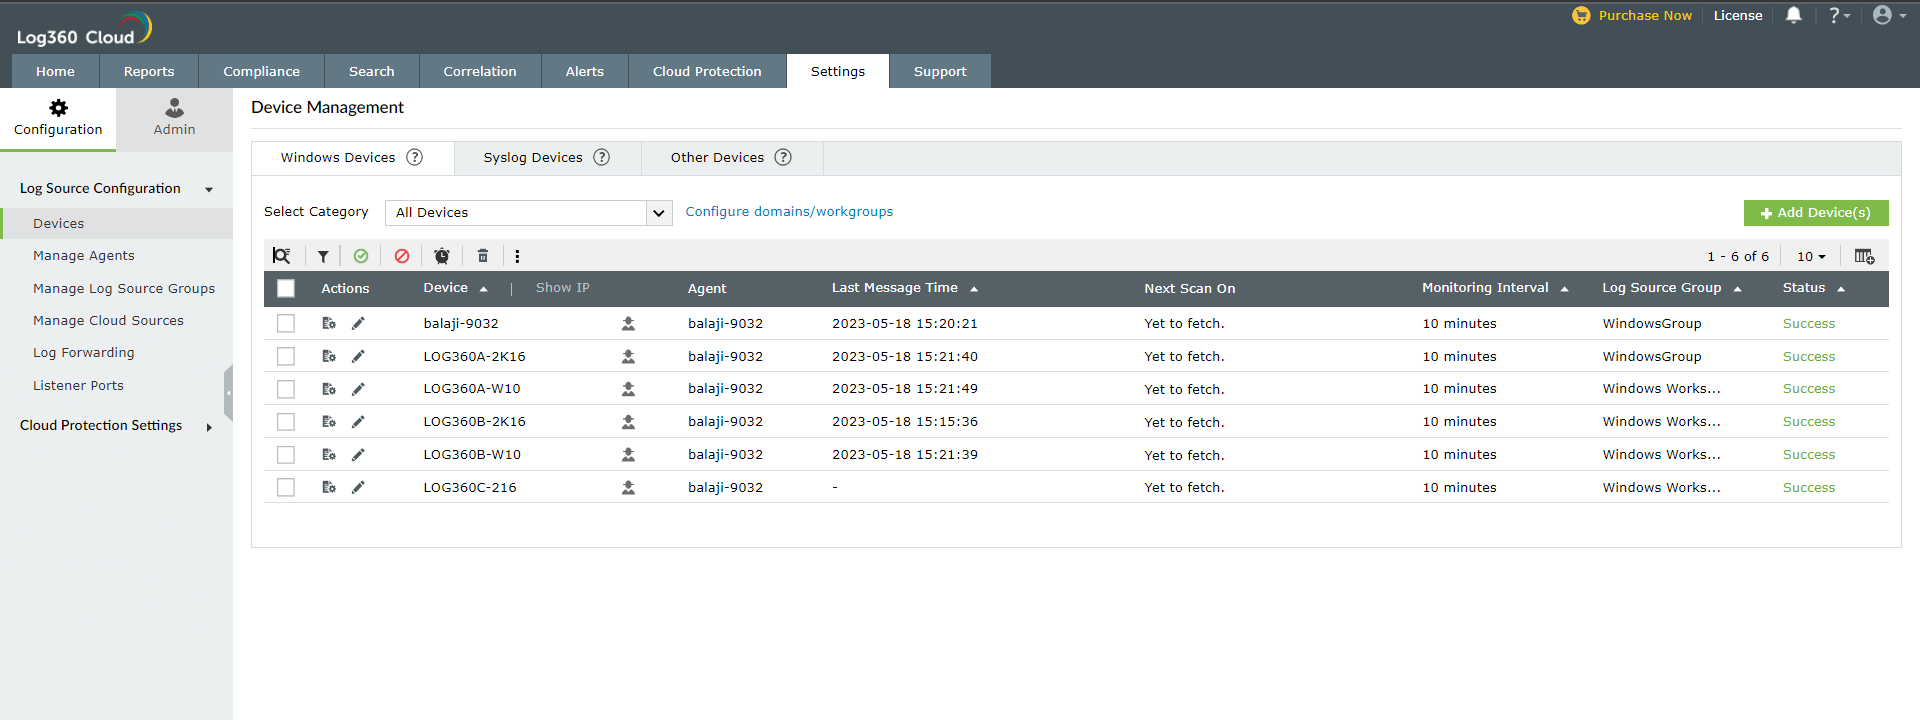
- Open Log360 Cloud and select the Settings tab. Then navigate to Devices under Configuration.
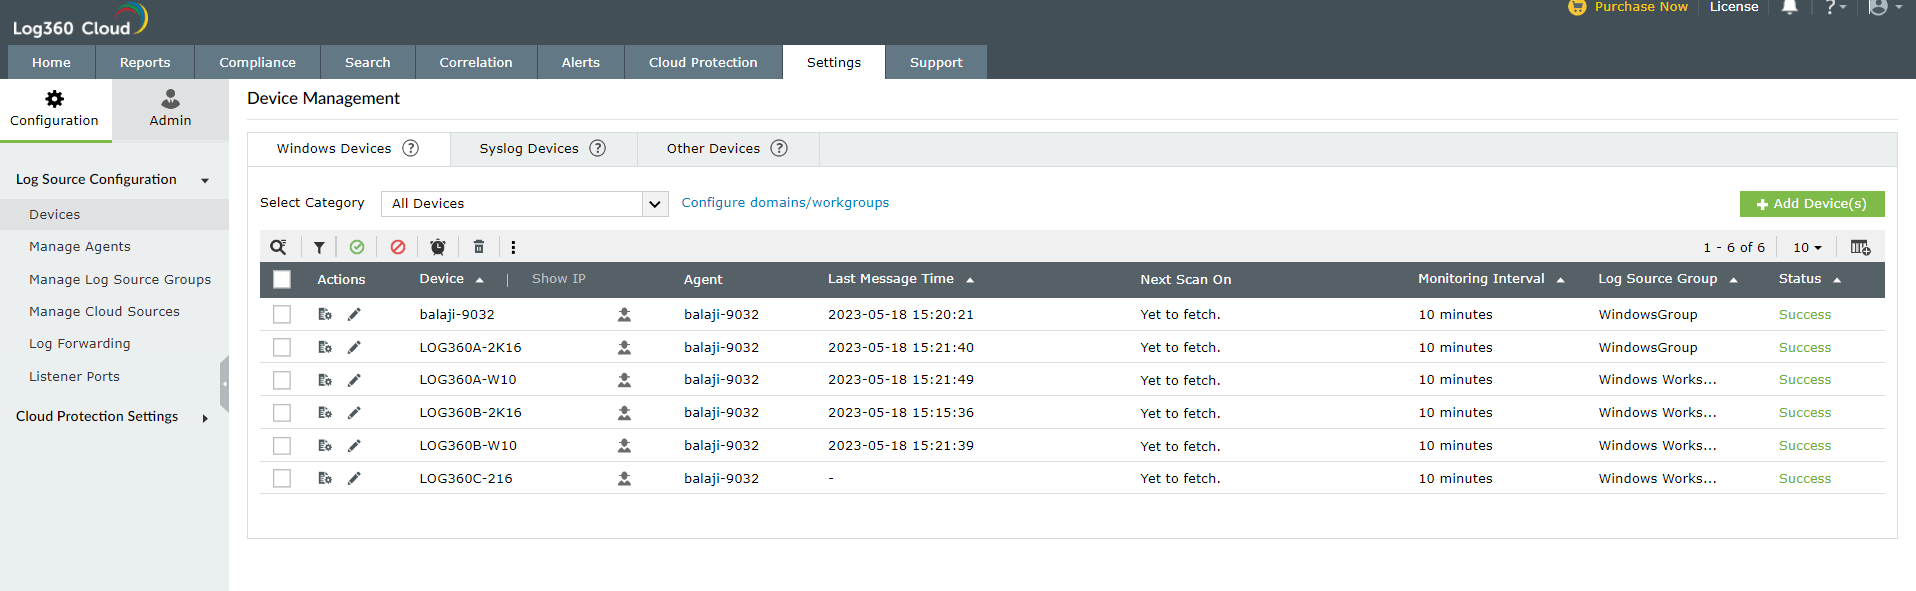
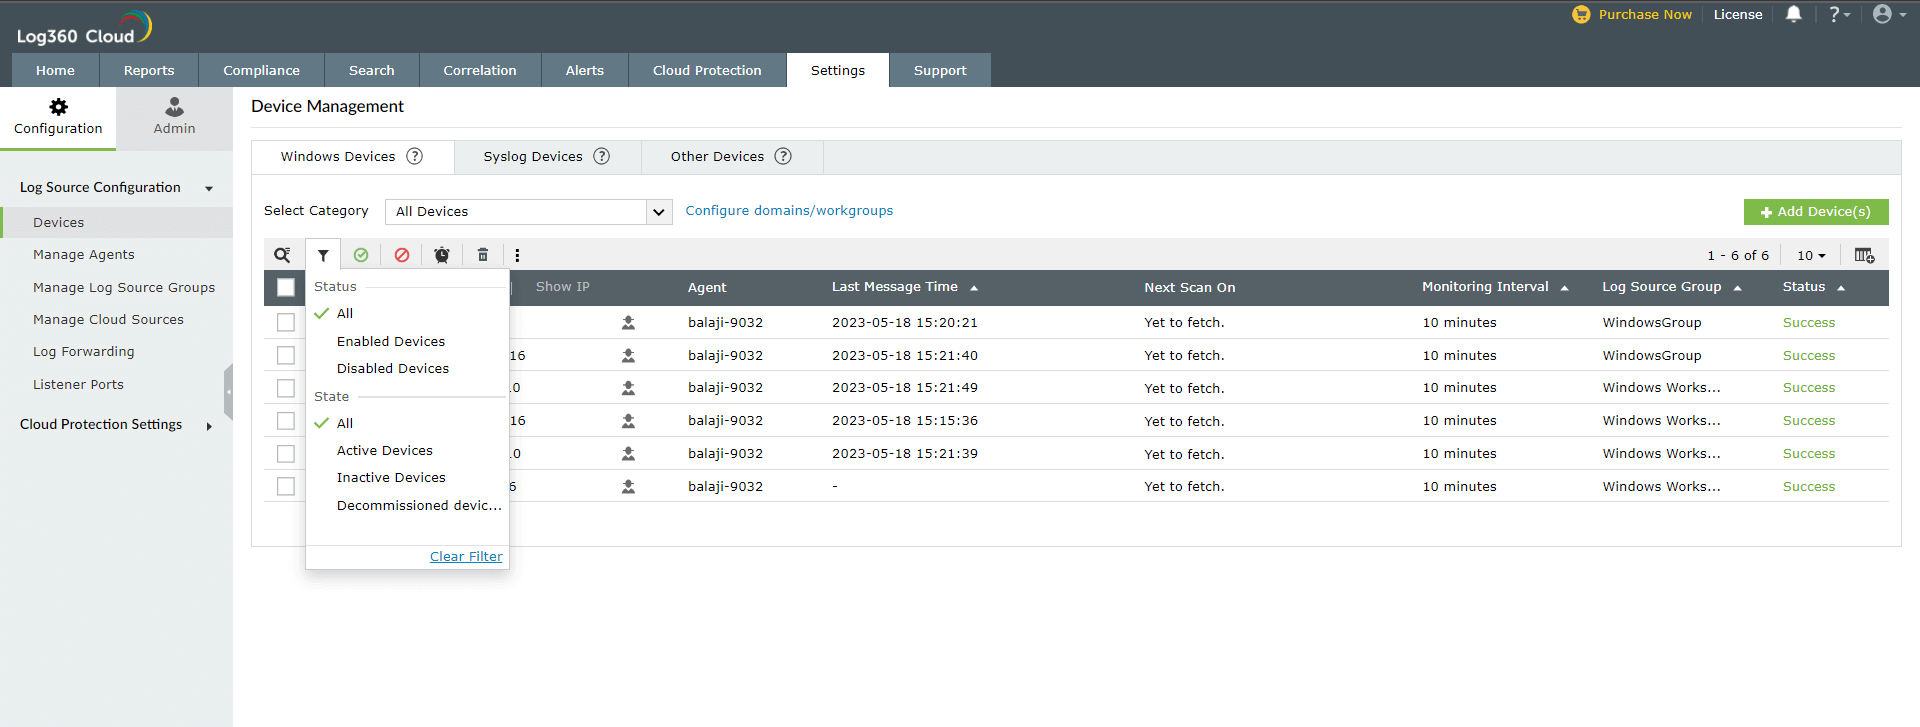
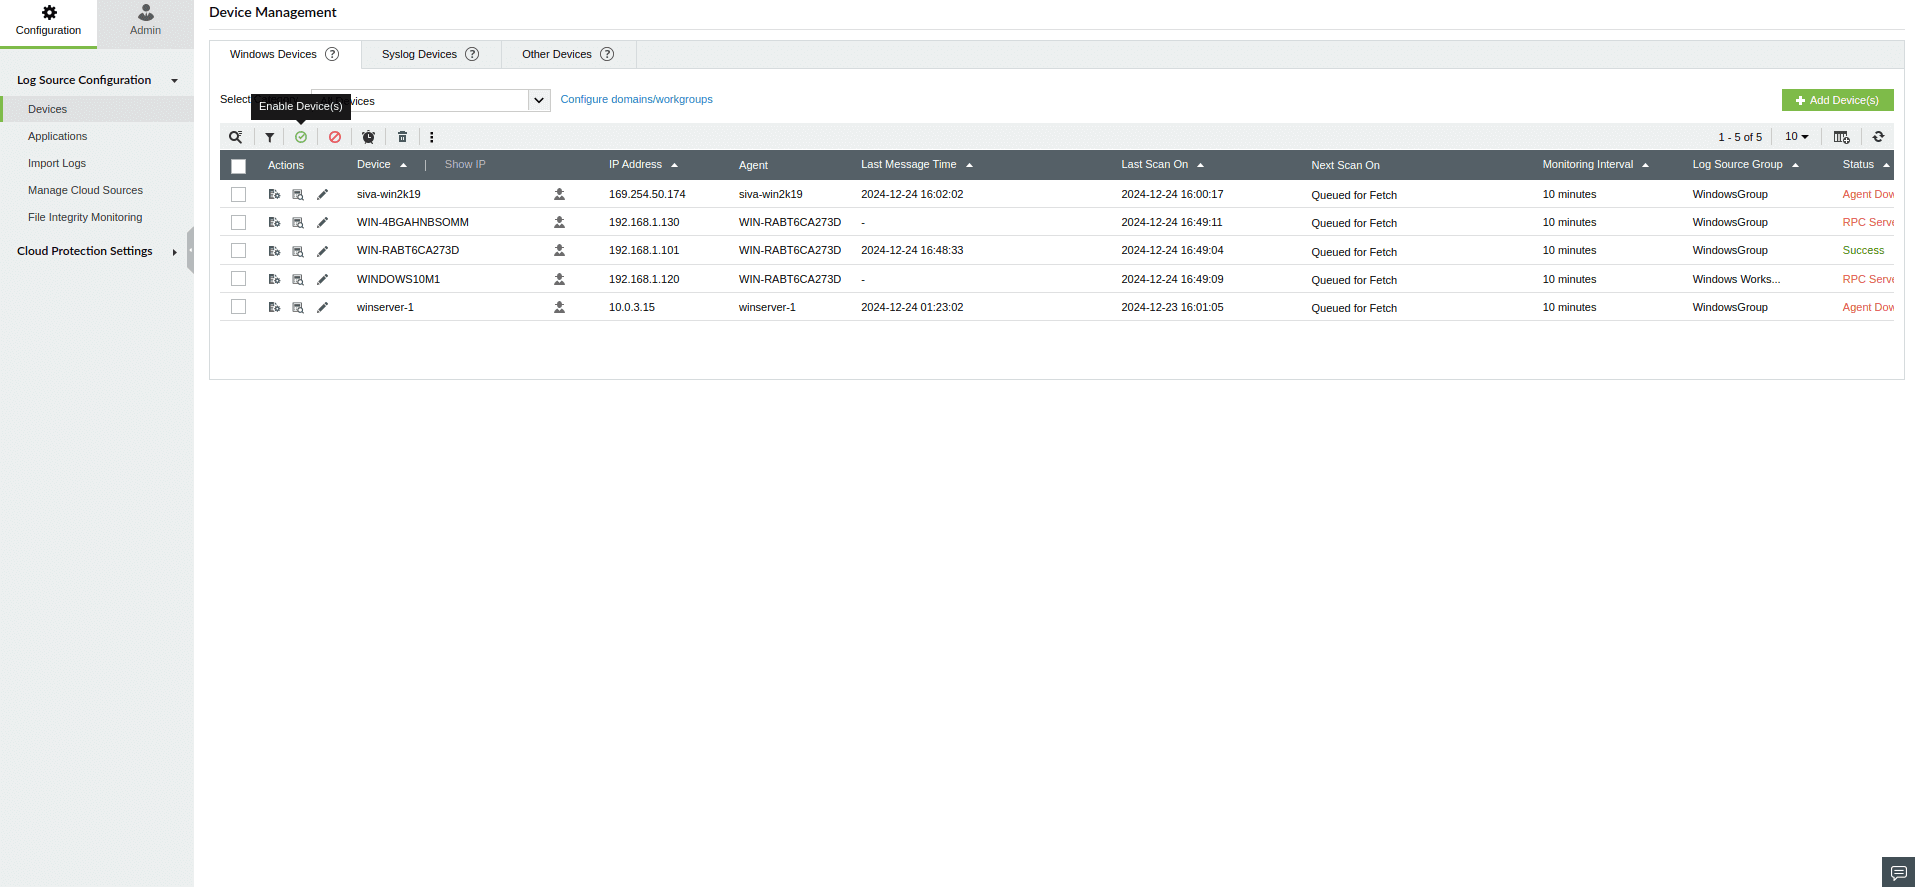
Devices are displayed with the following icons: Search, Enable, Disable, Filter Change Monitor time interval, and Delete. The Filter option lets you choose the devices for reports by their status (enabled/disabled), state (active/inactive/decommissioned) and device group.
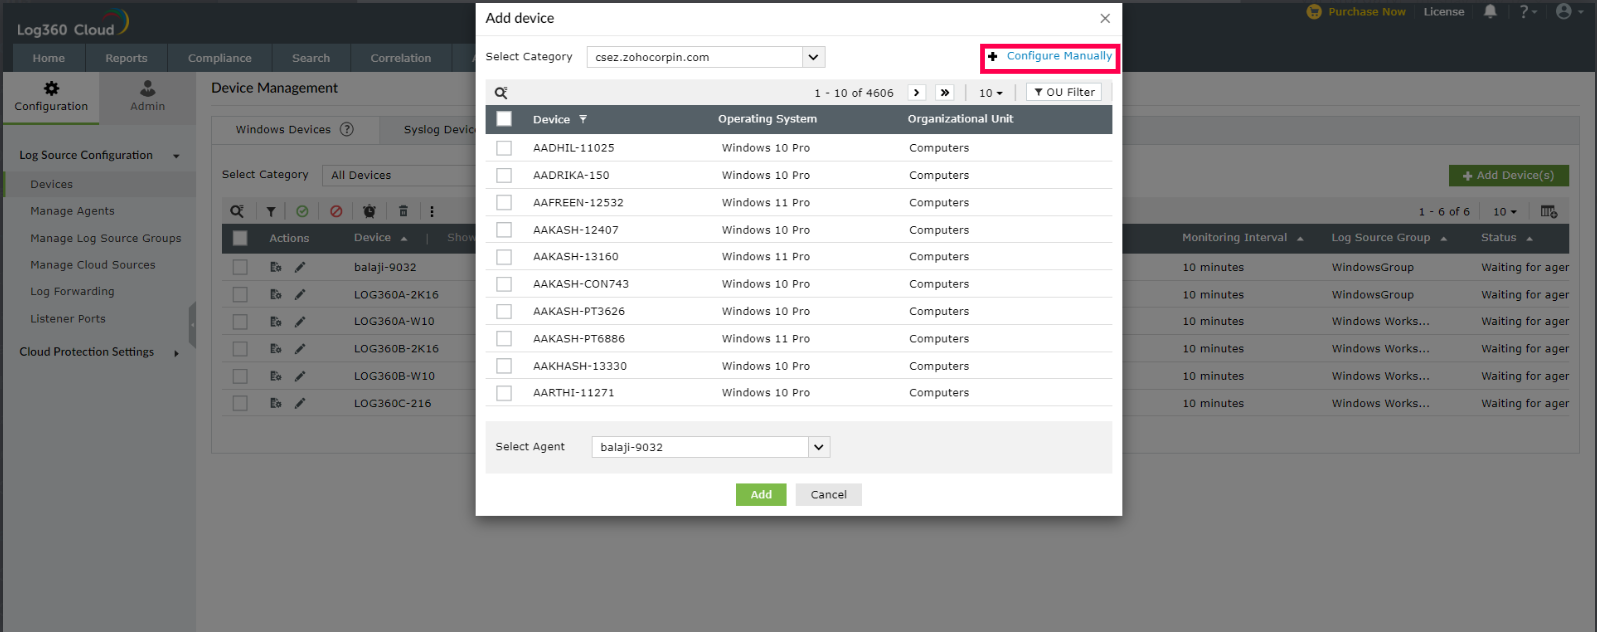
- Select the Windows Devices tab and click the + Add Device(s) button.
- Select a category and choose the devices by ticking the box corresponding to the device name.

- Select a Agent from the drop-down list and click Add.
- Alternatively, you can configure a Windows device manually by clicking on the + Configure Manually in the top right corner of the pop-up window.
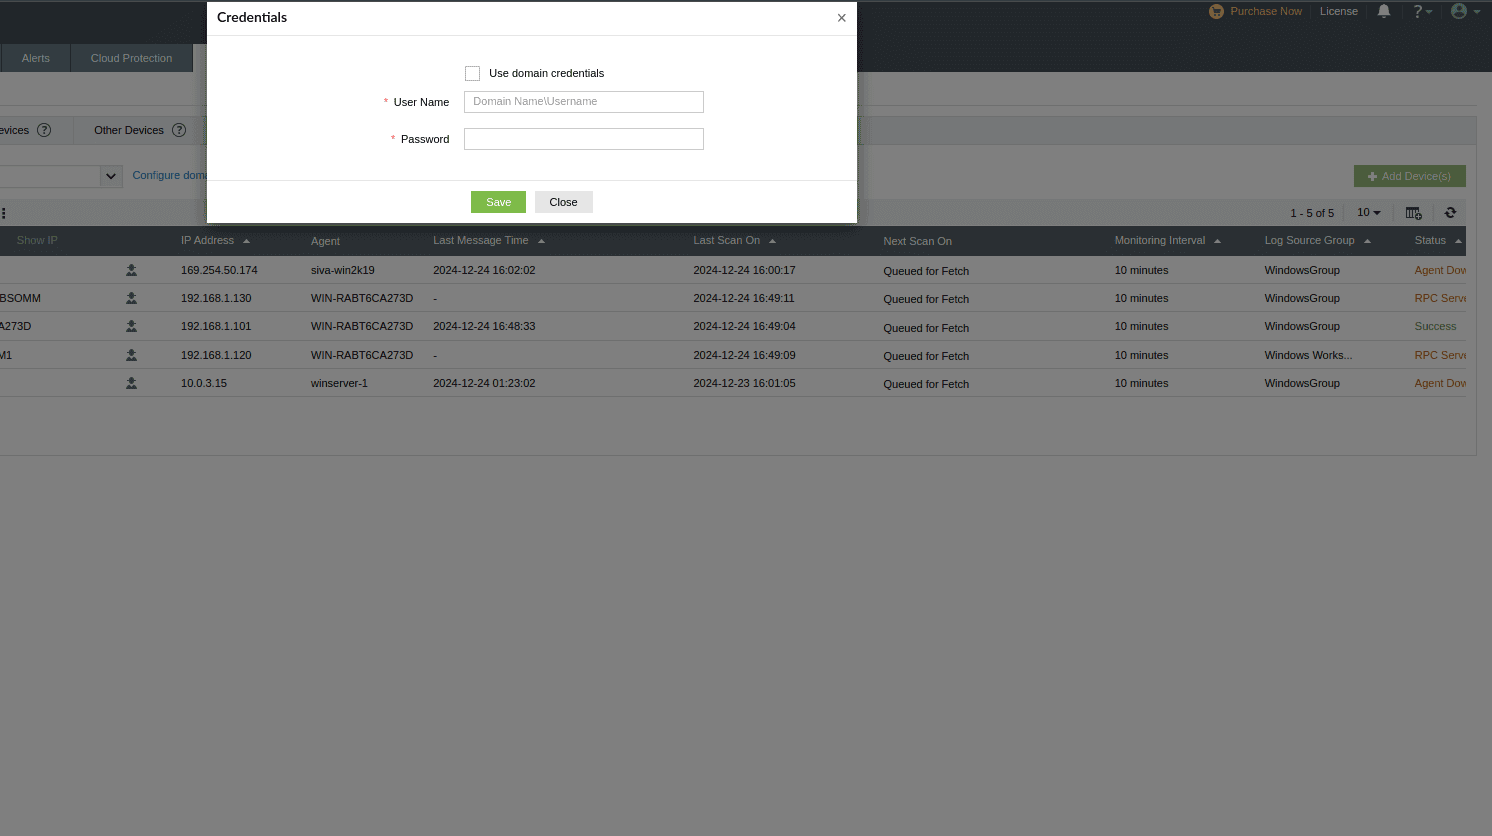
- In the Device field, provide the name of the device that you wish to add. Then, provide the Username and Password in the respective fields and click the Verify Credential button.
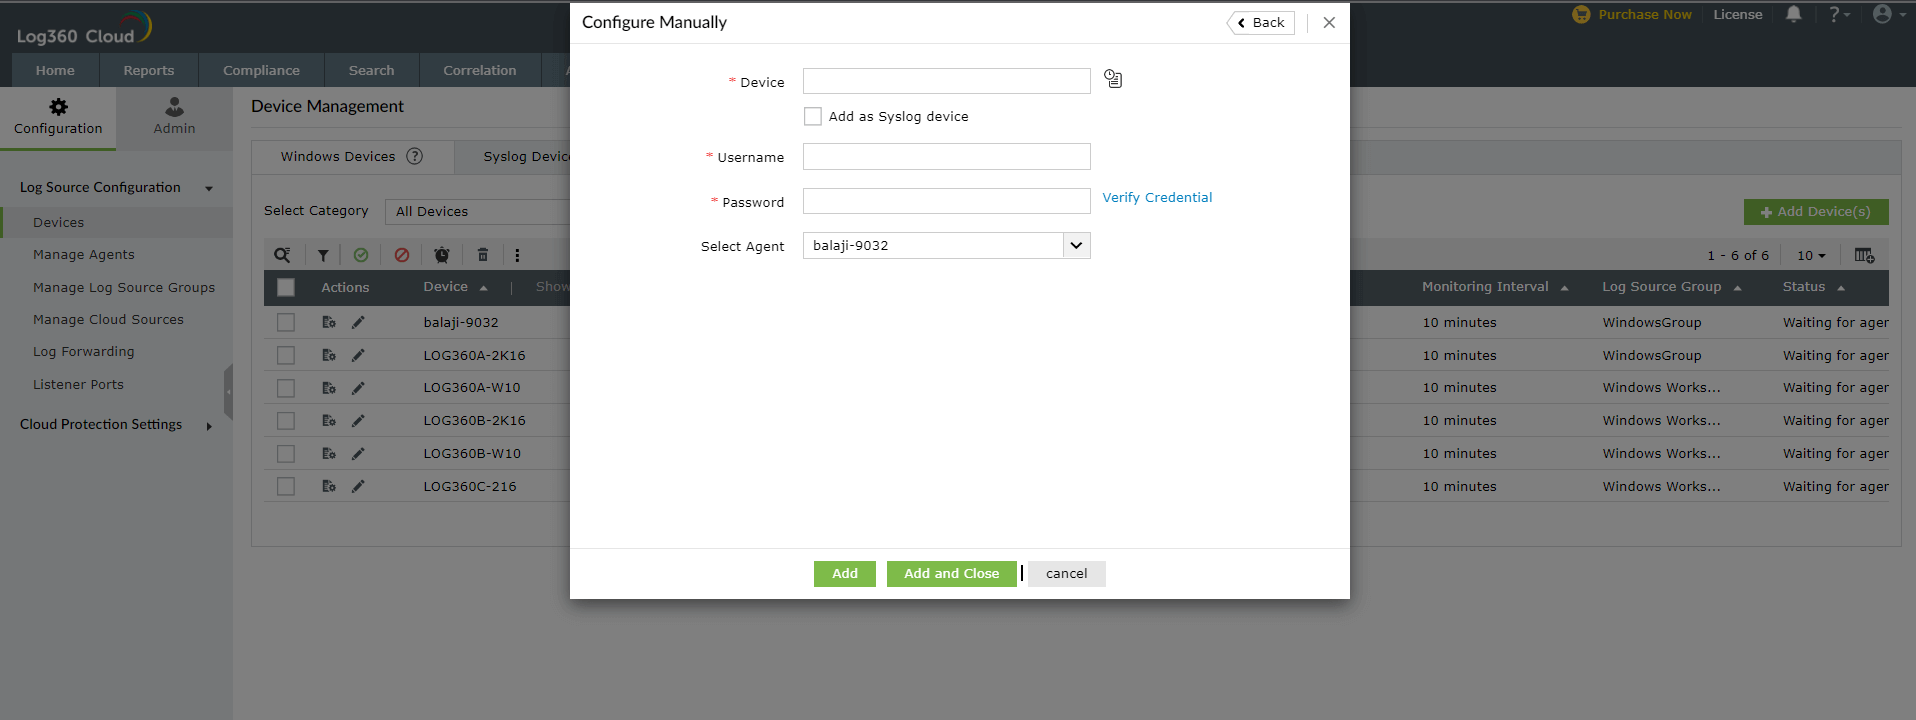
- After verifying the credentials, click the Add button.
Now the devices are successfully added to Log360 Cloud.
There are two ways to add a device with historic log collection:
- By manual configuration
- By adding from domains and workgroups
Add a device using manual configuration:
- Navigate to Settings > Configuration > Log Source Configuration > Devices.
- Click Add Device(s) on the top right corner.
- Click Configure manually.
- After filling in the fields, hover and click the icon on the right and enable historic log collection.
- You can choose between three options as shown.
- Select Collect Logs from current Time if you want Log360 Cloud to collect only logs from now.
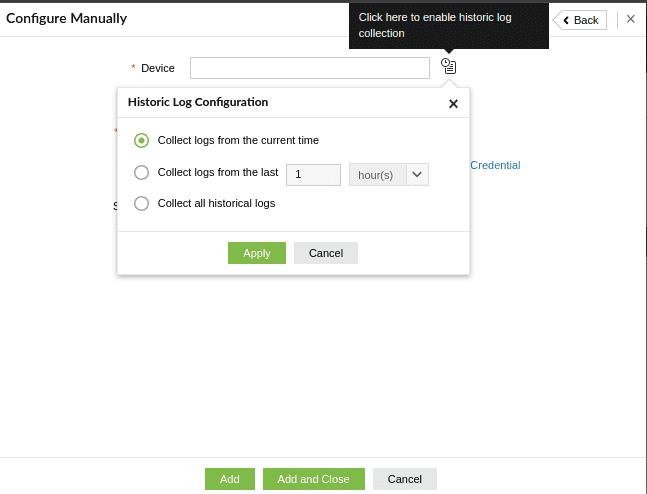
- You can customize log collection by specifying the number of hour(s)/day(s)/week(s)/month(s).
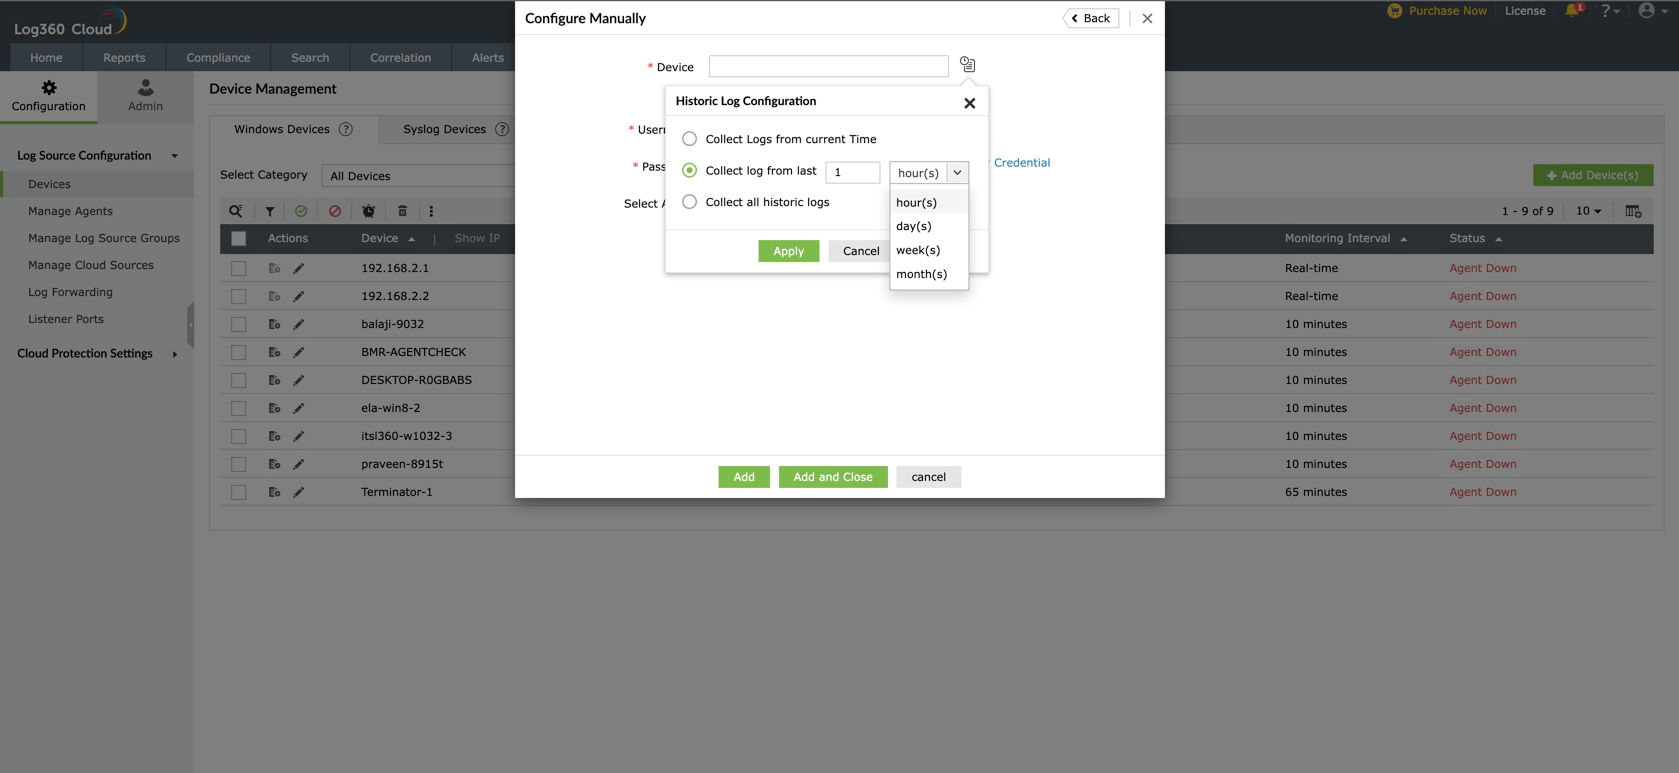
- Select Collect all historic logs if you want Log360 Cloud to collect all logs.
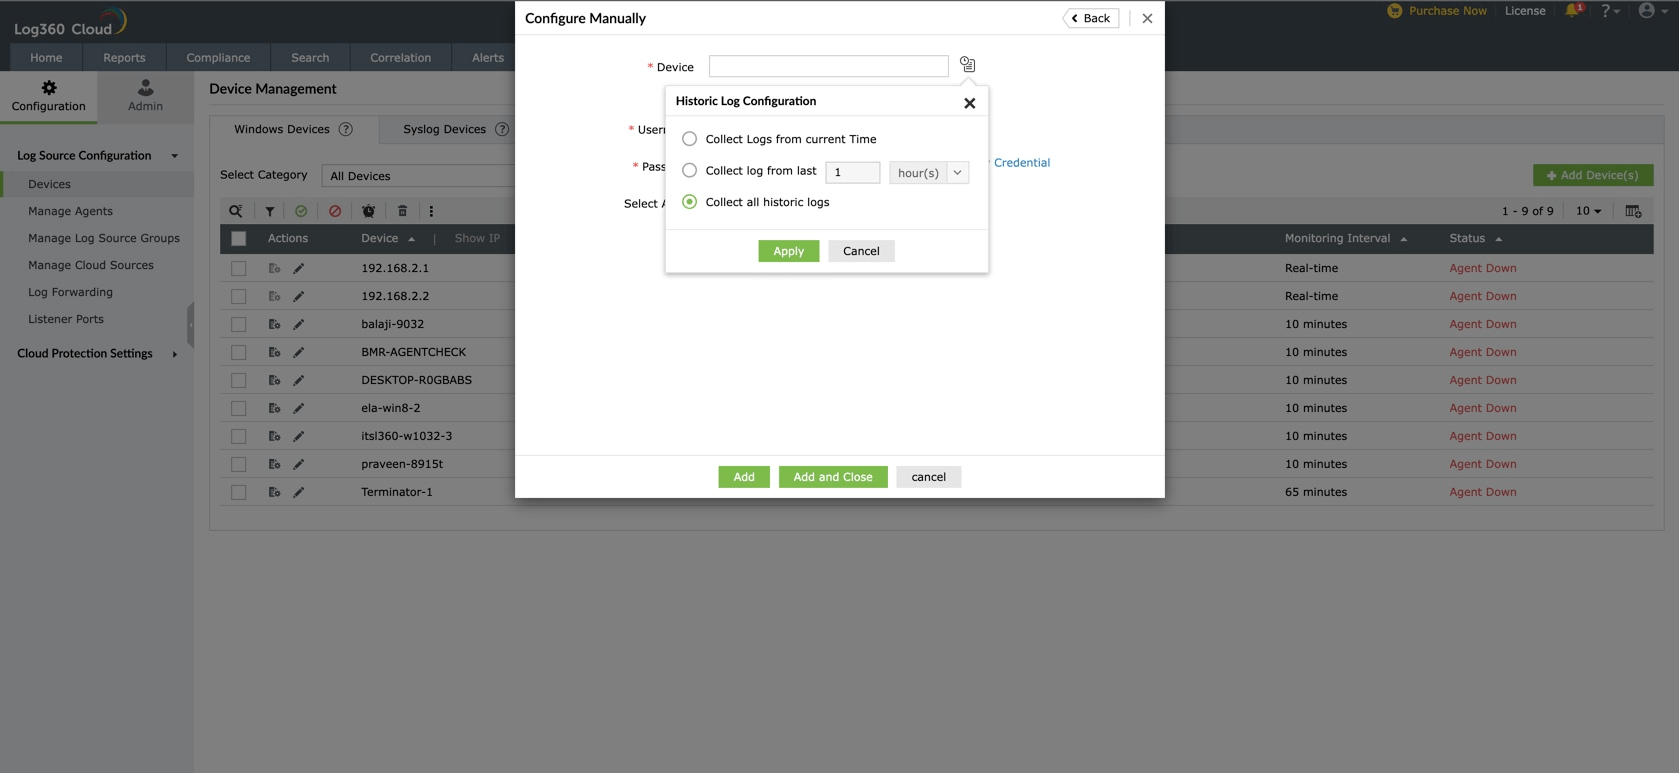
- Click Apply.
- Click Add.
Add a device from domain:
- On the main page, select Add Device(s).
- Choose the required domain/workgroup from the drop-down menu.
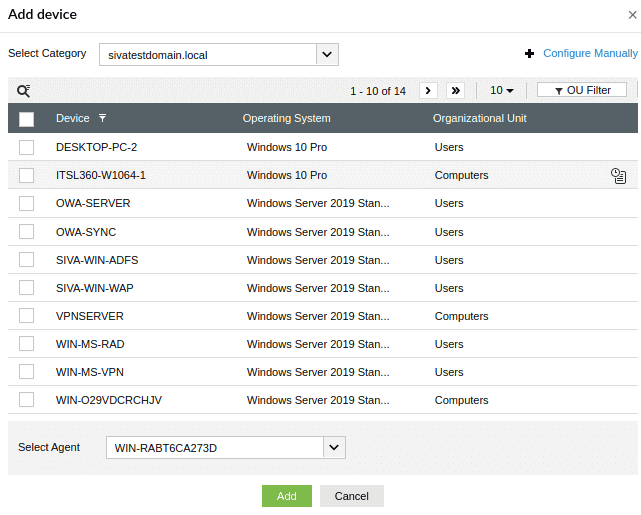
- Hover and click the icon on right side of each added device.
- Historic Log Collection pop-up opens up.
- You can choose between three options similar to manual configuration.
- Click Apply.
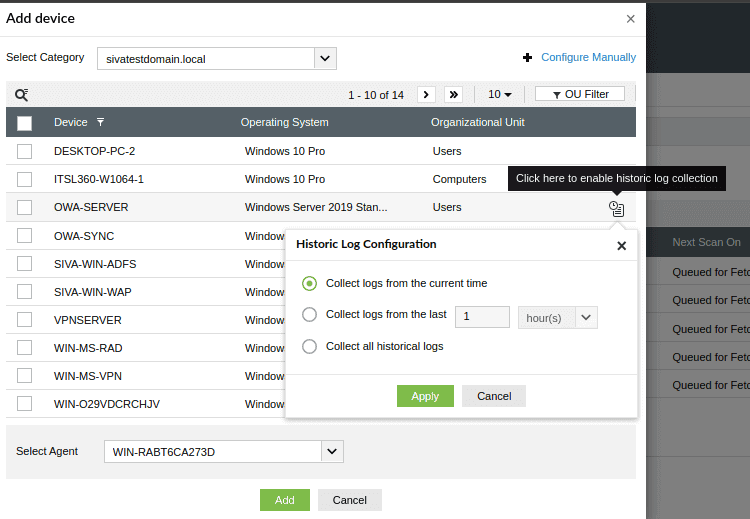
- Click Add.
Update a Windows device
To update an existing Windows device, follow the steps given below.
- Open Log360 Cloud and select the Settings tab. Then navigate to Devices under Configuration.

- Choose the Windows Devices tab and click the icon corresponding to the desired device.

- In the window that pops-up, make the necessary modifications.

- You will be able to refresh the IP from the console without specifying the new IP manually.
- You can manually change the IP in case there are any issues with the IP refresh.
- To modify the authentication credentials, provide a Username and Password in the respective fields and click Verify Credentials. Note that the agent login credentials are used when no authentication credentials are provided.
- Click AD details to view object GUID - The unique identifier for a Domain object.
- Click the Update button.
Now the devices are updated successfully.
Enable/Disable a Windows device
To enable/disable an existing Windows device, follow the steps given below.
- Open Log360 Cloud and select the Settings tab. Then navigate to Devices under Configuration.

- Choose the Windows Devices tab and select the required devices by ticking the box corresponding to the device.
- Click the Manage button and select Enable device(s)/Disable device(s) from the drop down list.
Now the Windows device has been enabled/disabled successfully.
Delete a Windows device
To delete an existing Windows device, follow the steps given below.
Change monitor interval for a Windows device
To change monitor interval for a Windows device, follow the steps given below.
- Open Log360 Cloud and select the Settings tab. Then navigate to Devices under Configuration.
- Choose the Windows Devices tab and select the required devices by ticking the box corresponding to the device.
- Click the Manage button and select Change Monitor Interval from the drop down list.
- In the window that appears, choose the new monitor interval and click Update.
You can select multiple devices and configure them for either Real-time log collection or Scheduled collection with a specific monitoring interval.Log360 Cloud\EventLog Analyzer lets you collect logs from up to 25 devices in real-time per agent.
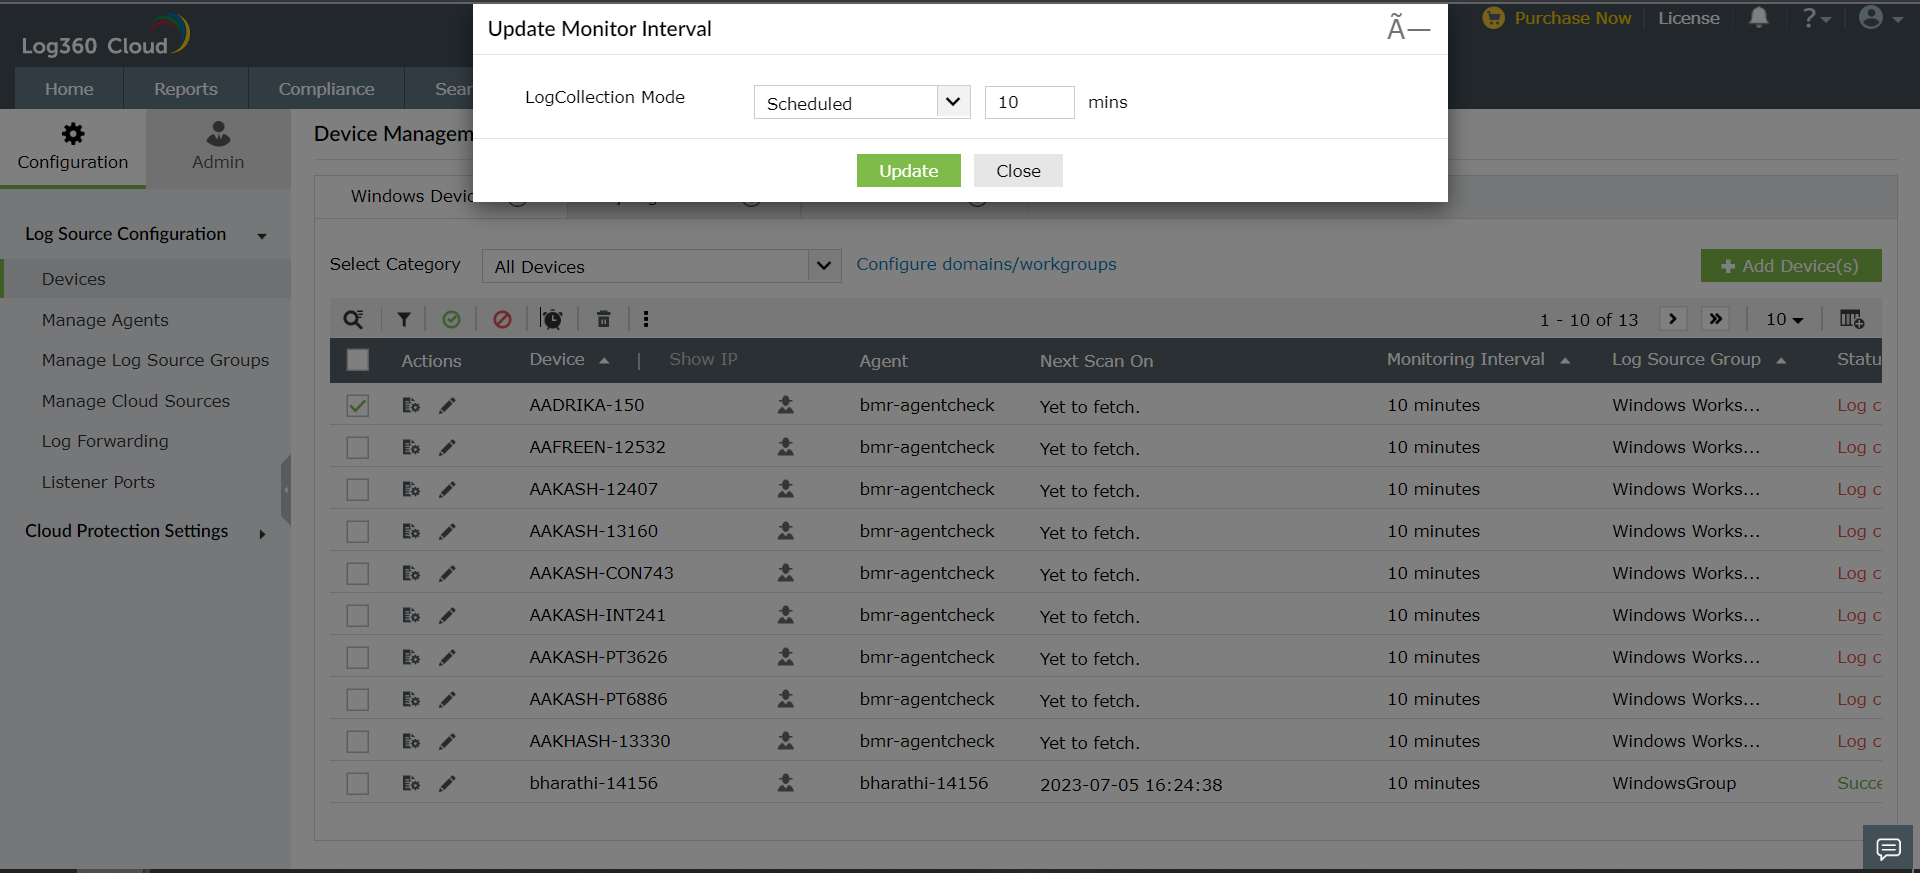
Now the monitor interval for the selected devices are updated successfully.
Configure Event Source files
To configure event source files for a Windows device, follow the steps given below.
- Open Log360 Cloud and select the Settings tab. Then navigate to Devices under Configuration.
- Choose the Windows Devices tab and click the
 icon corresponding to the desired device.
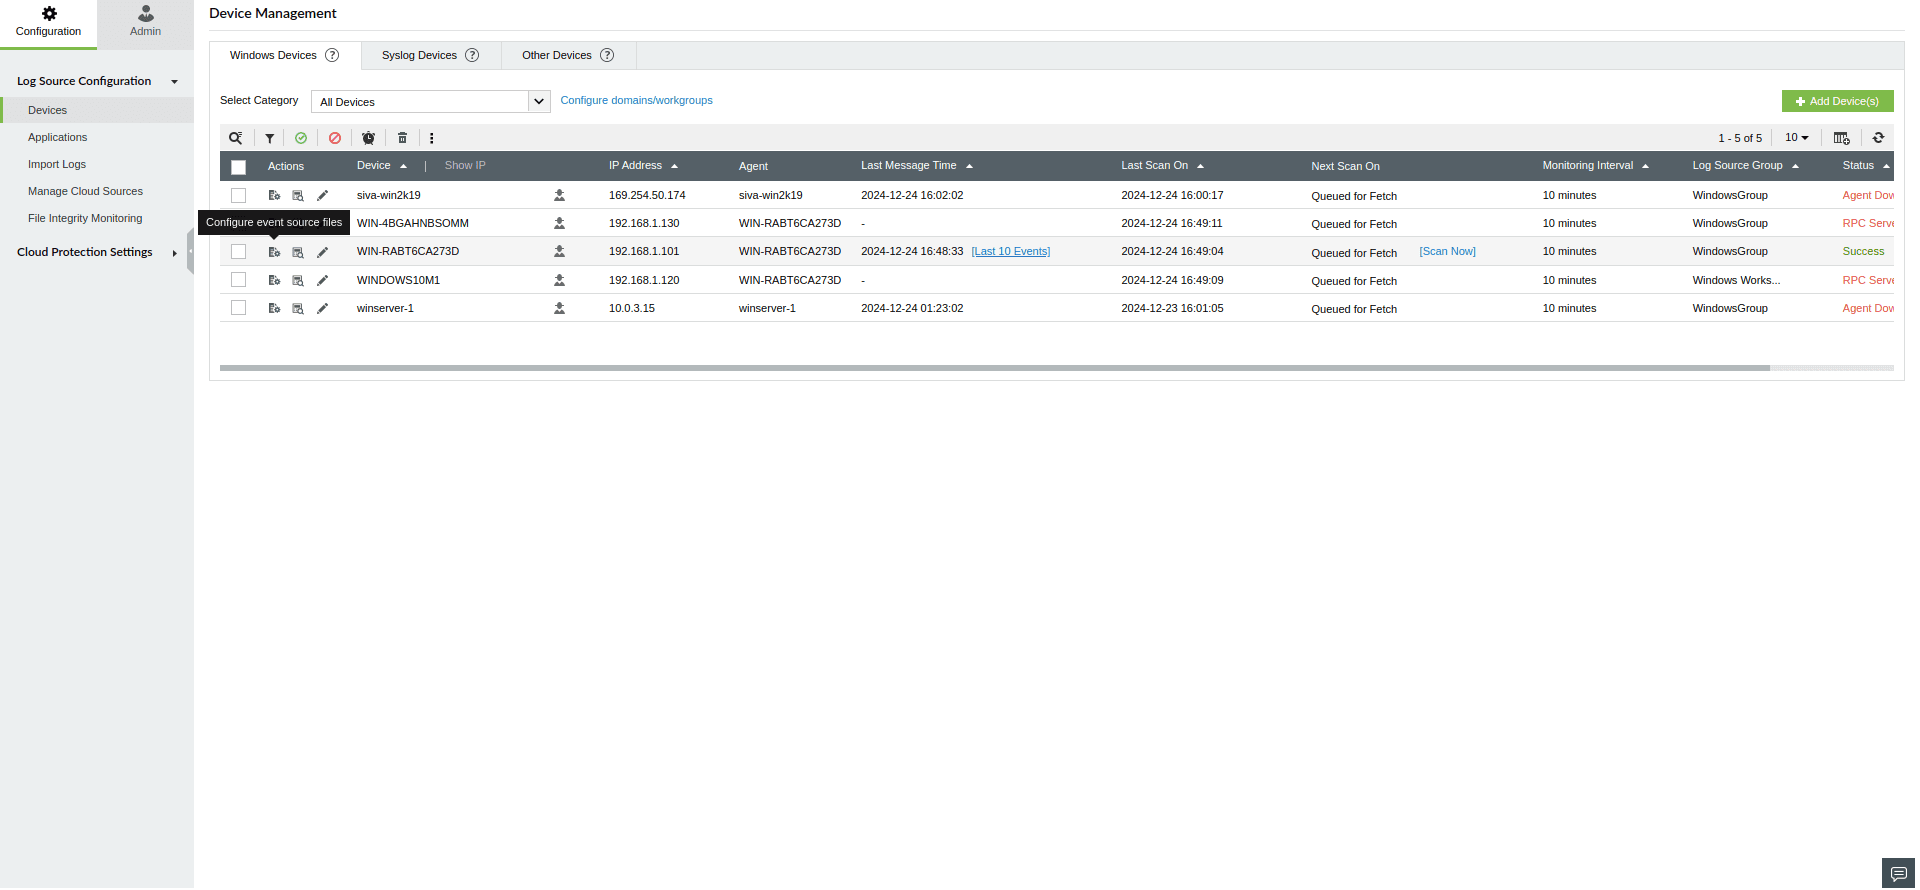
- In the window that pops-up, select the required types of event source files by ticking the corresponding boxes.
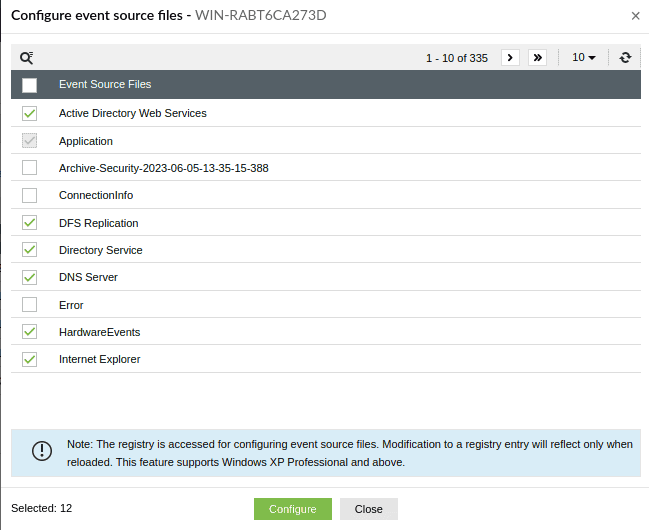
- After making the selection click Configure.
Now the event source files is configured successfully.
Note: "C$" should be enabled in remote device in order to configure event source files.
View RSoP Data
To view the Resultant Set of Policy (RSoP) for a Windows device, follow the steps given below:
- Open Log360 Cloud and select the Settings tab. Then, navigate to Devices under Configuration.

- Under the Windows Devices tab, click on the
 icon corresponding to the desired device.

- A window will pop up displaying the RSoP for the selected device.

- To refresh the RSoP data:
- You can click on the reload icon at the top of the RSoP table.
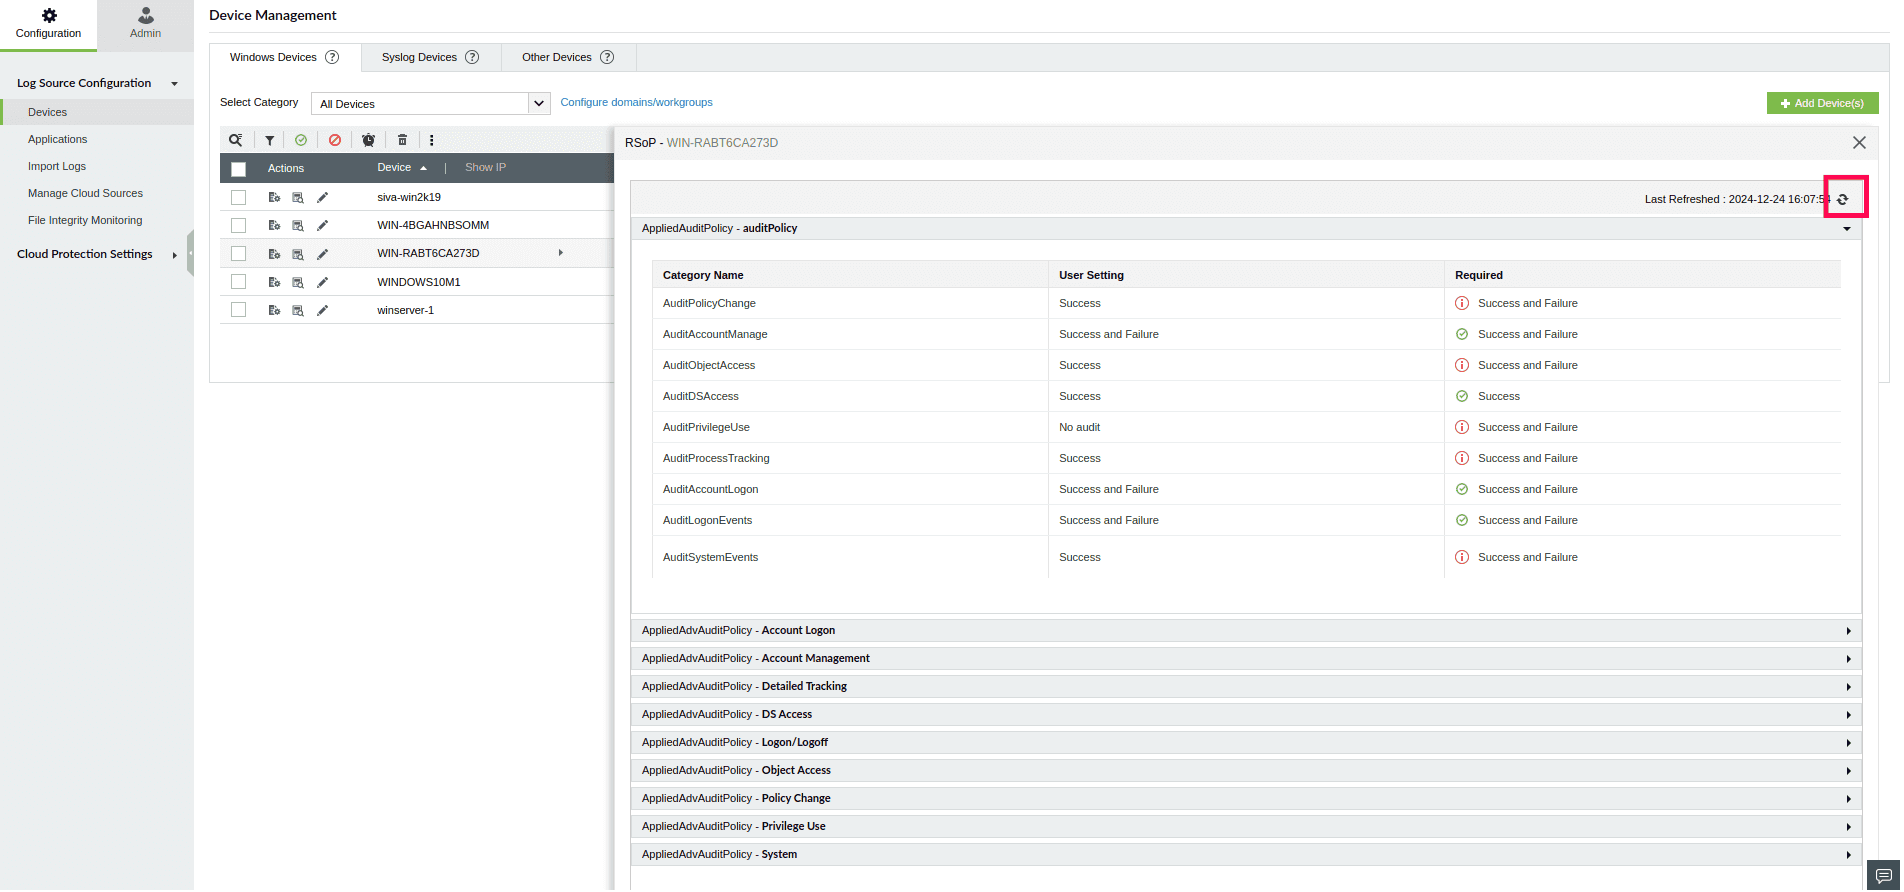
- You can also click on the Refresh button below the error message to refresh the RSoP data.

Note: RSoP cannot be viewed for workgroups and Windows syslog devices.
For more details on error codes, refer to our troubleshooting page.
Bulk device updation
How to Bulk update credentials
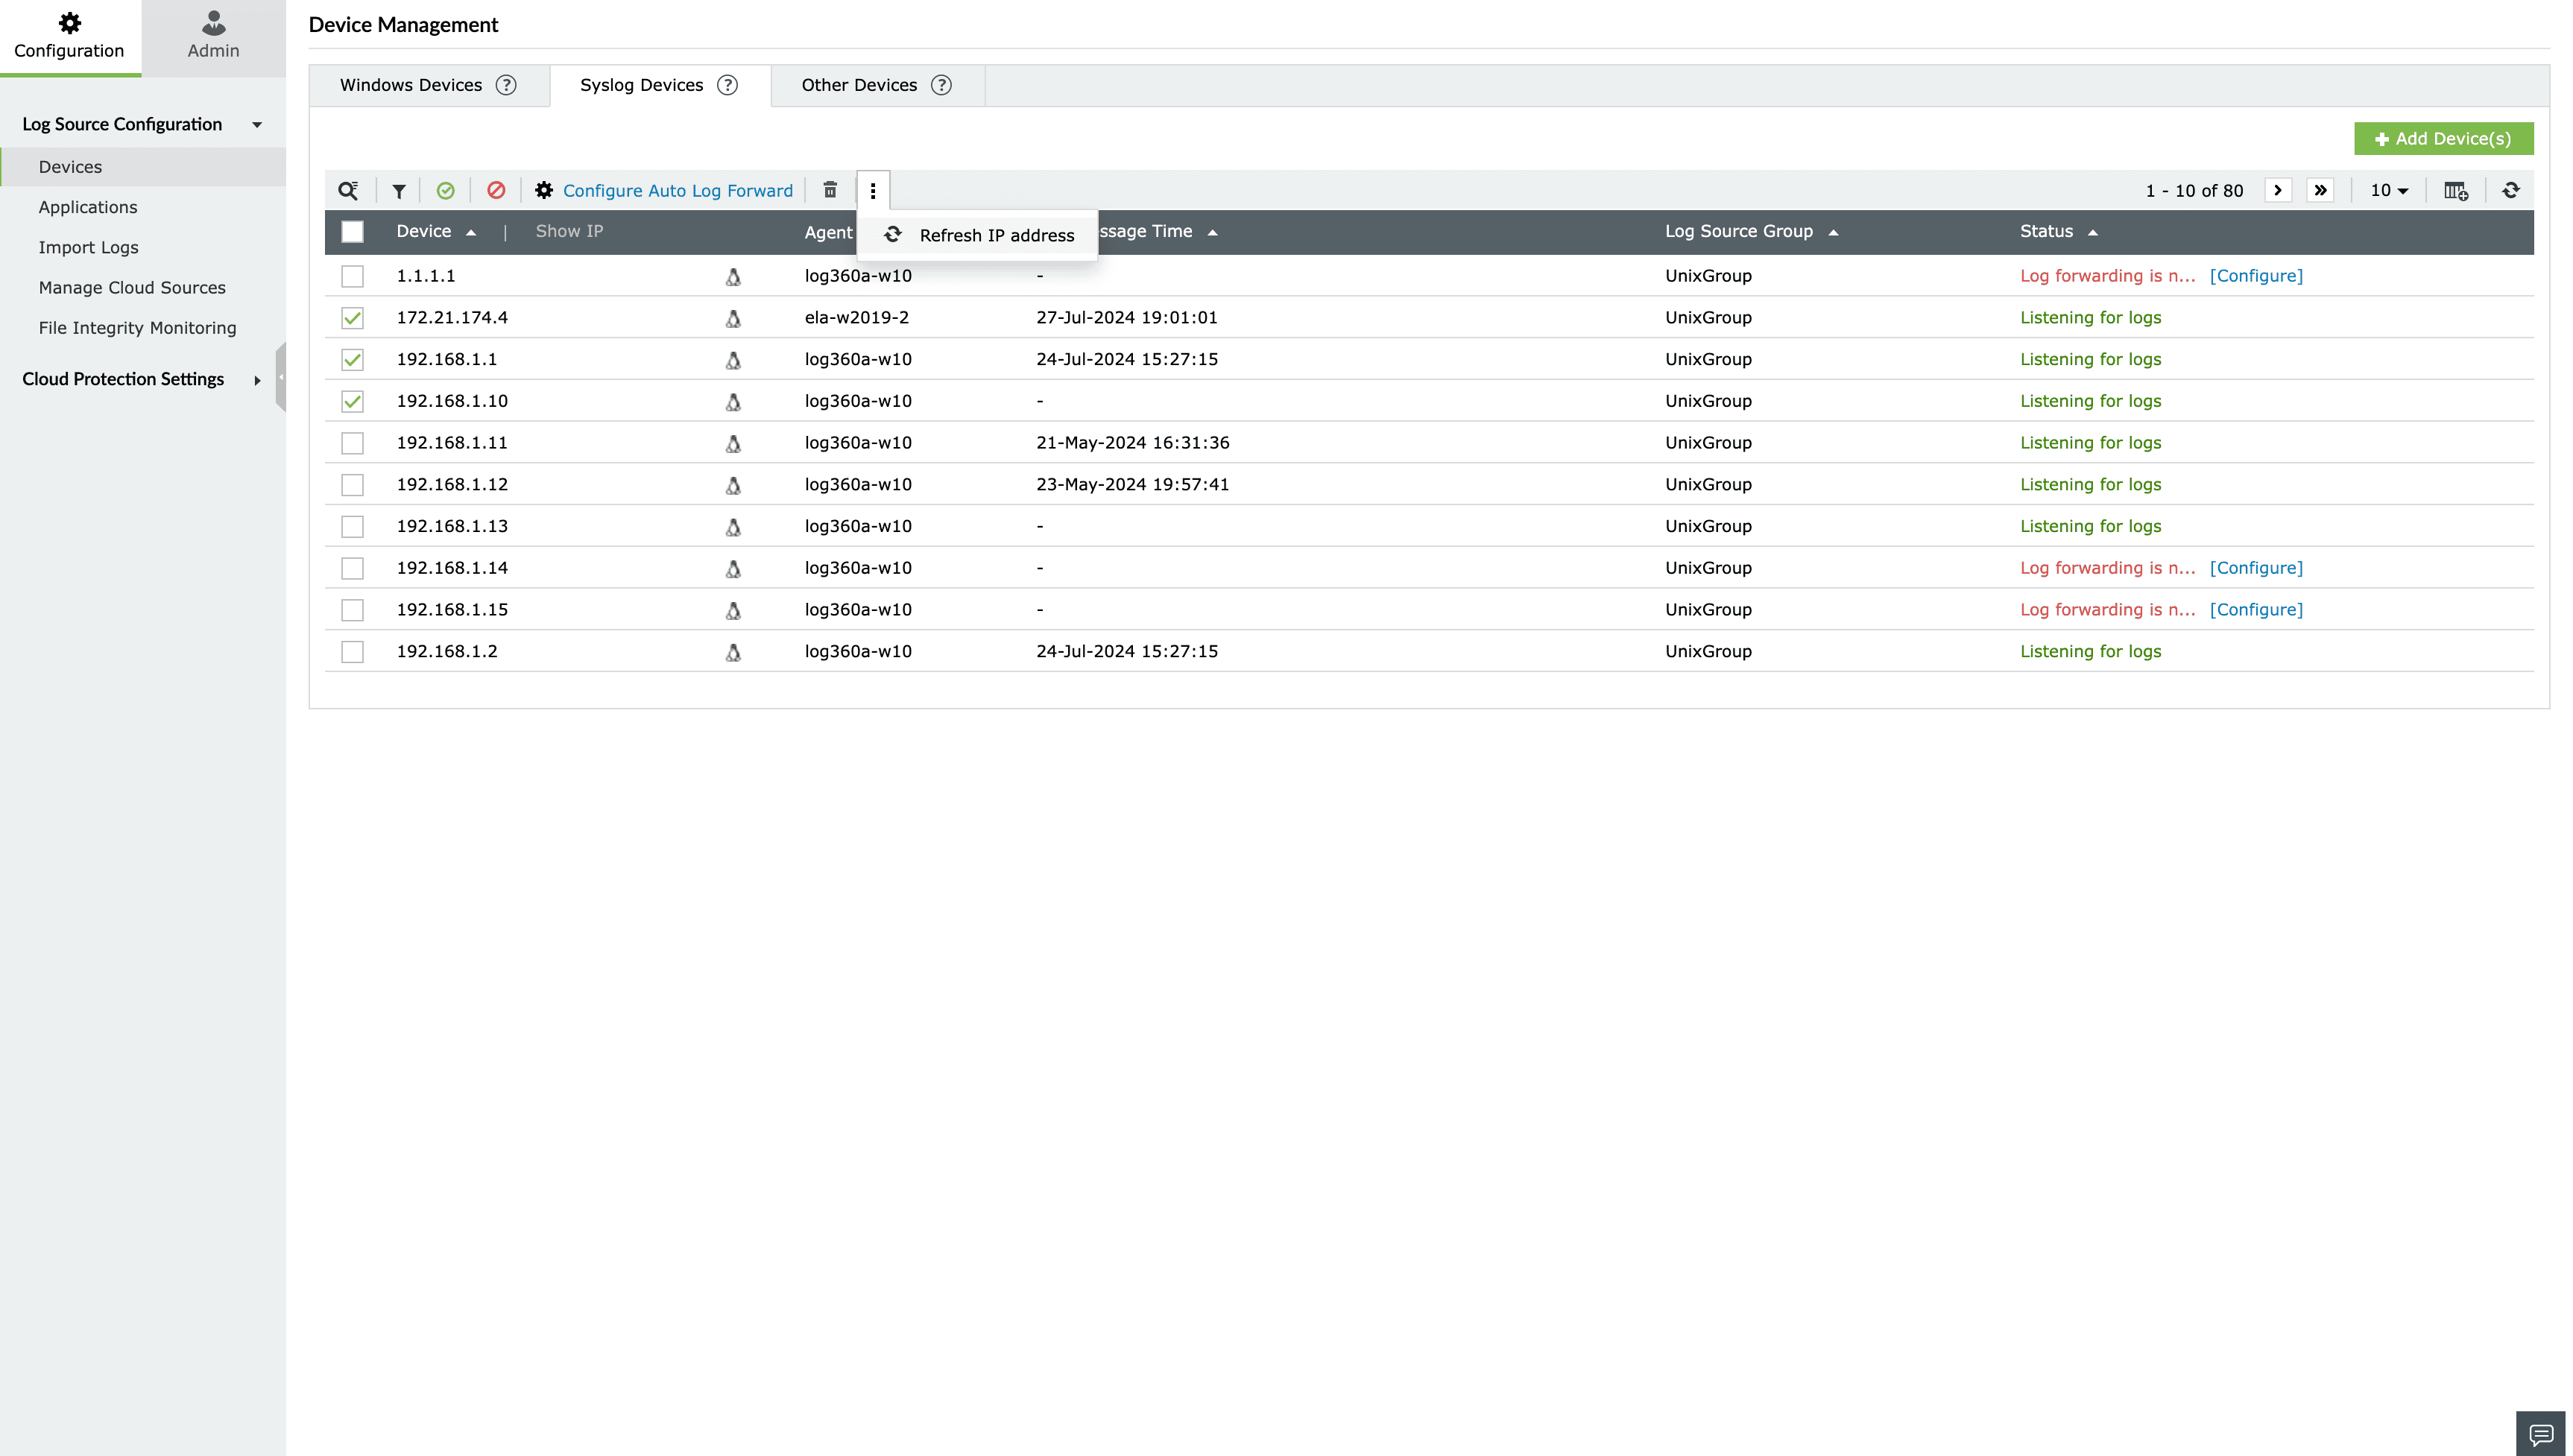
How to bulk refresh IP
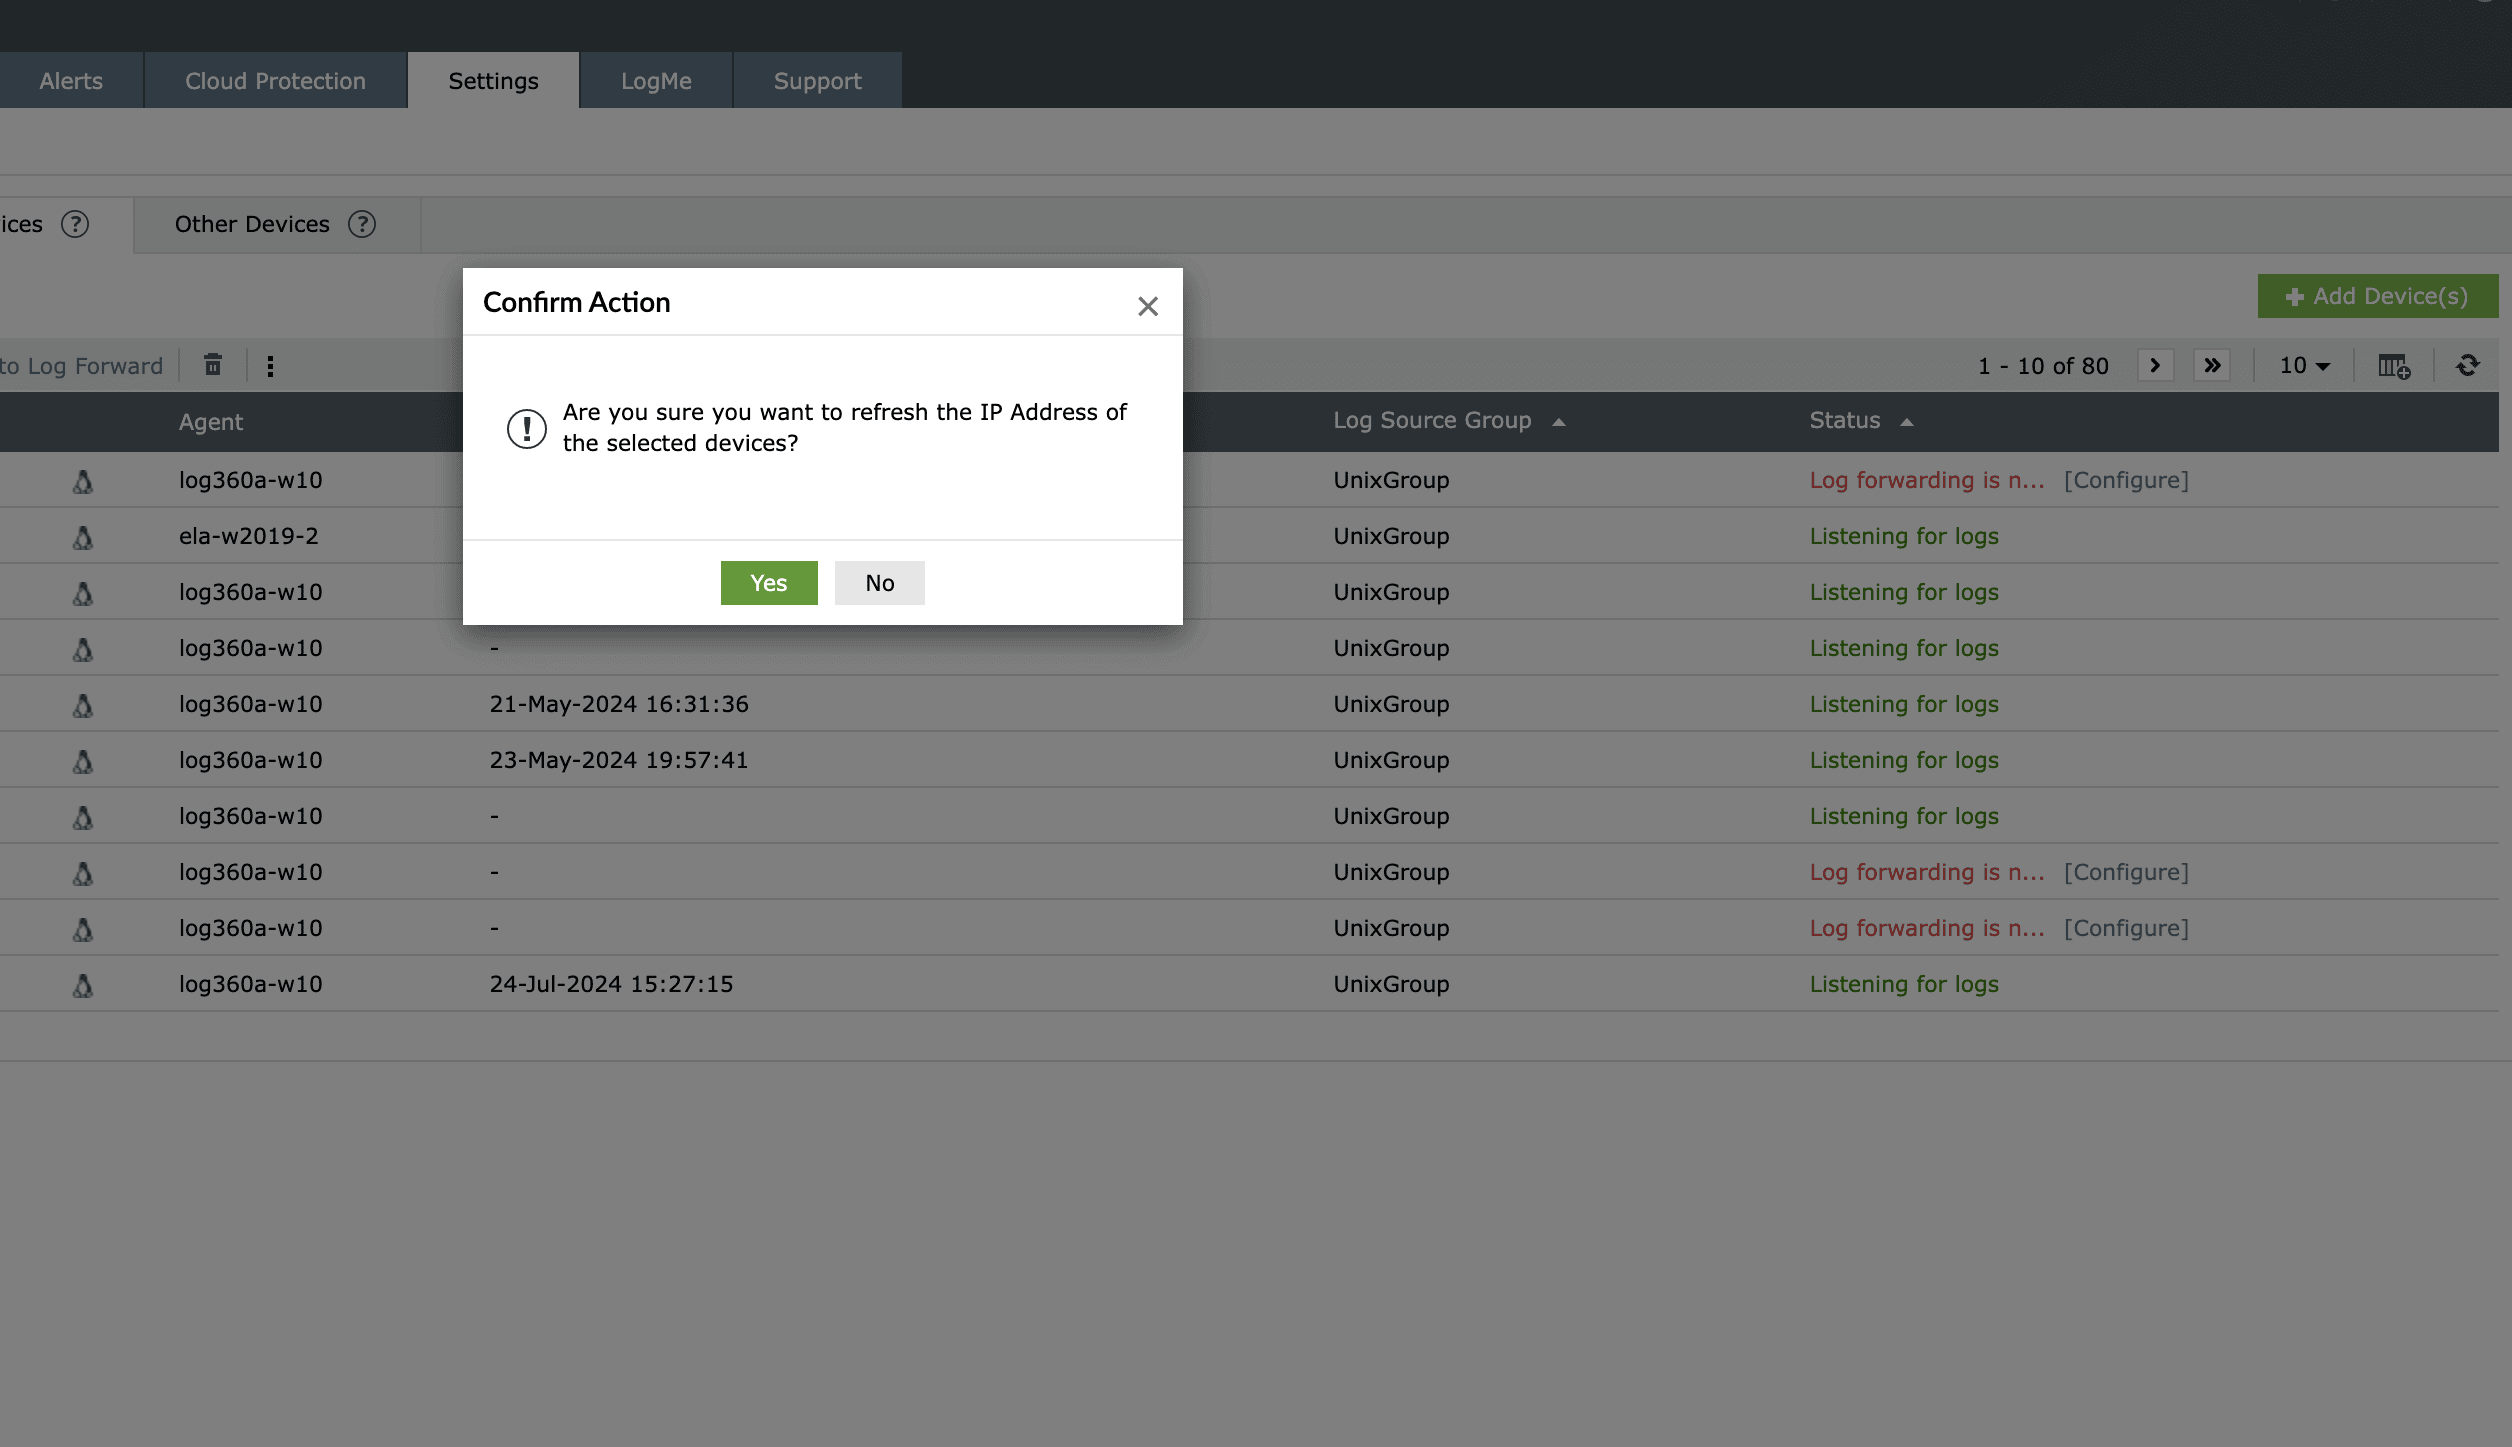
- Go to Settings → Devices → Windows devices → click on the ⋮ icon → select Refresh IP

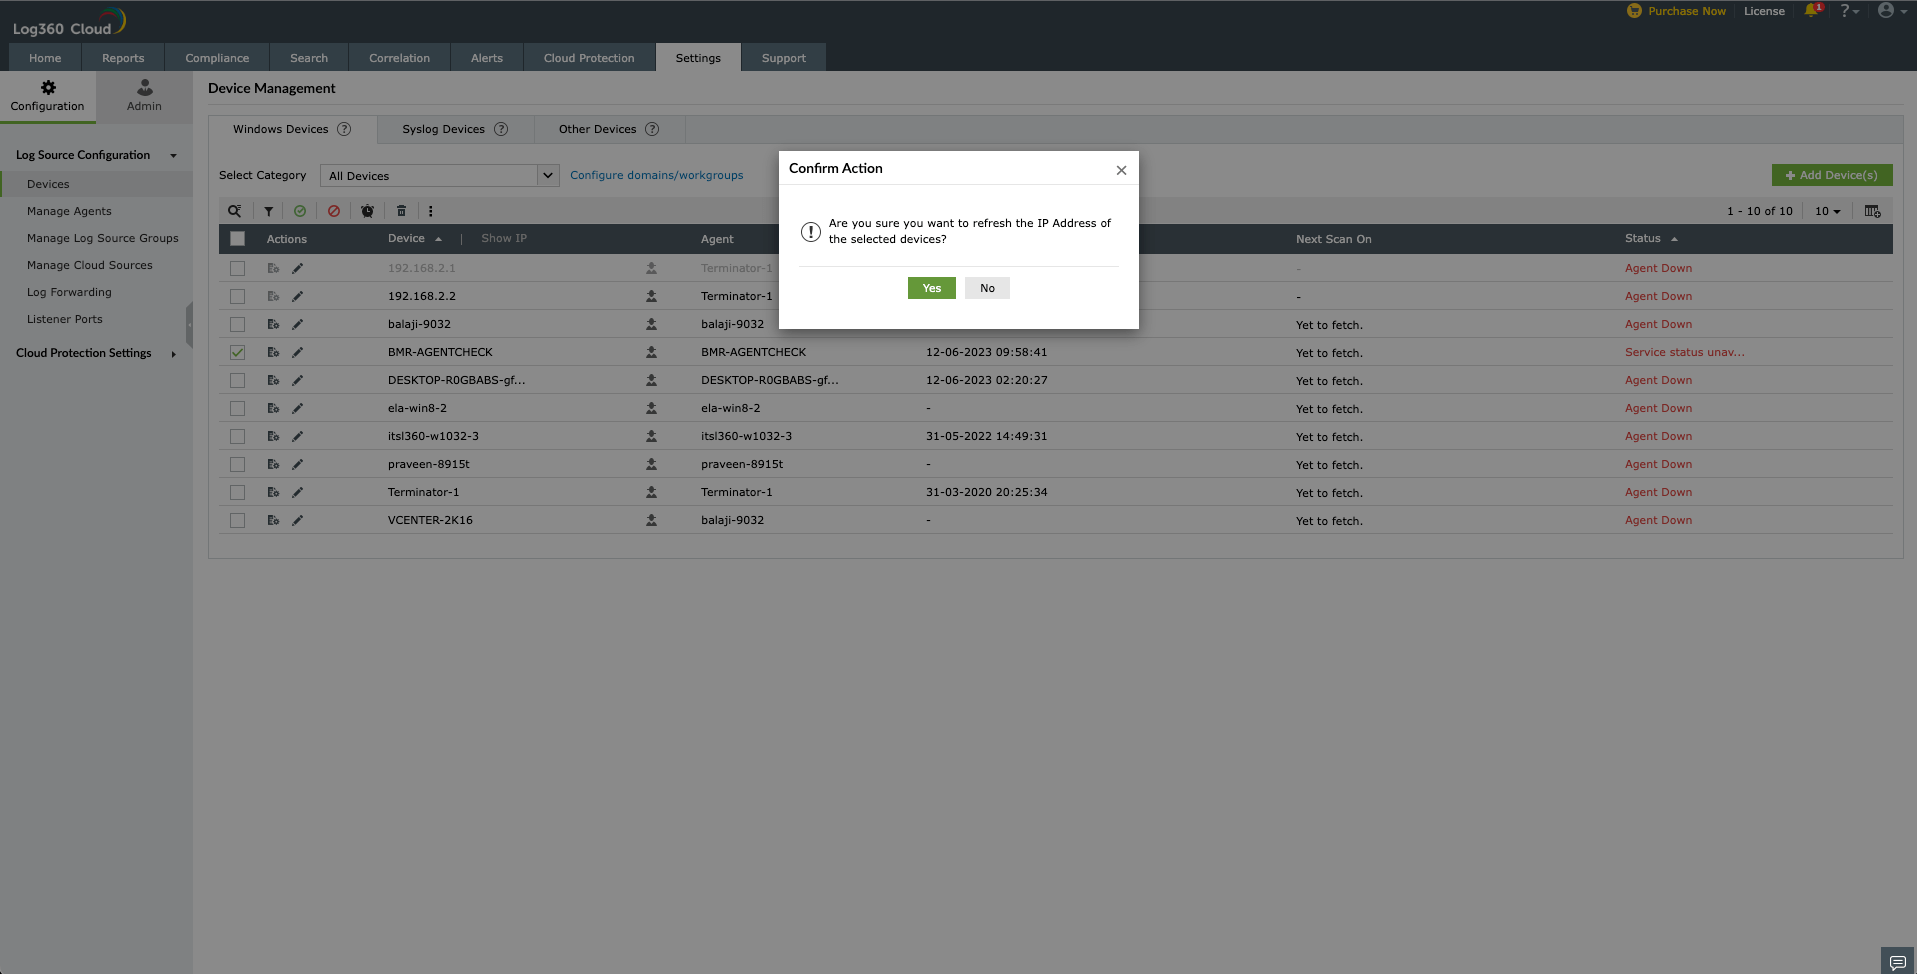
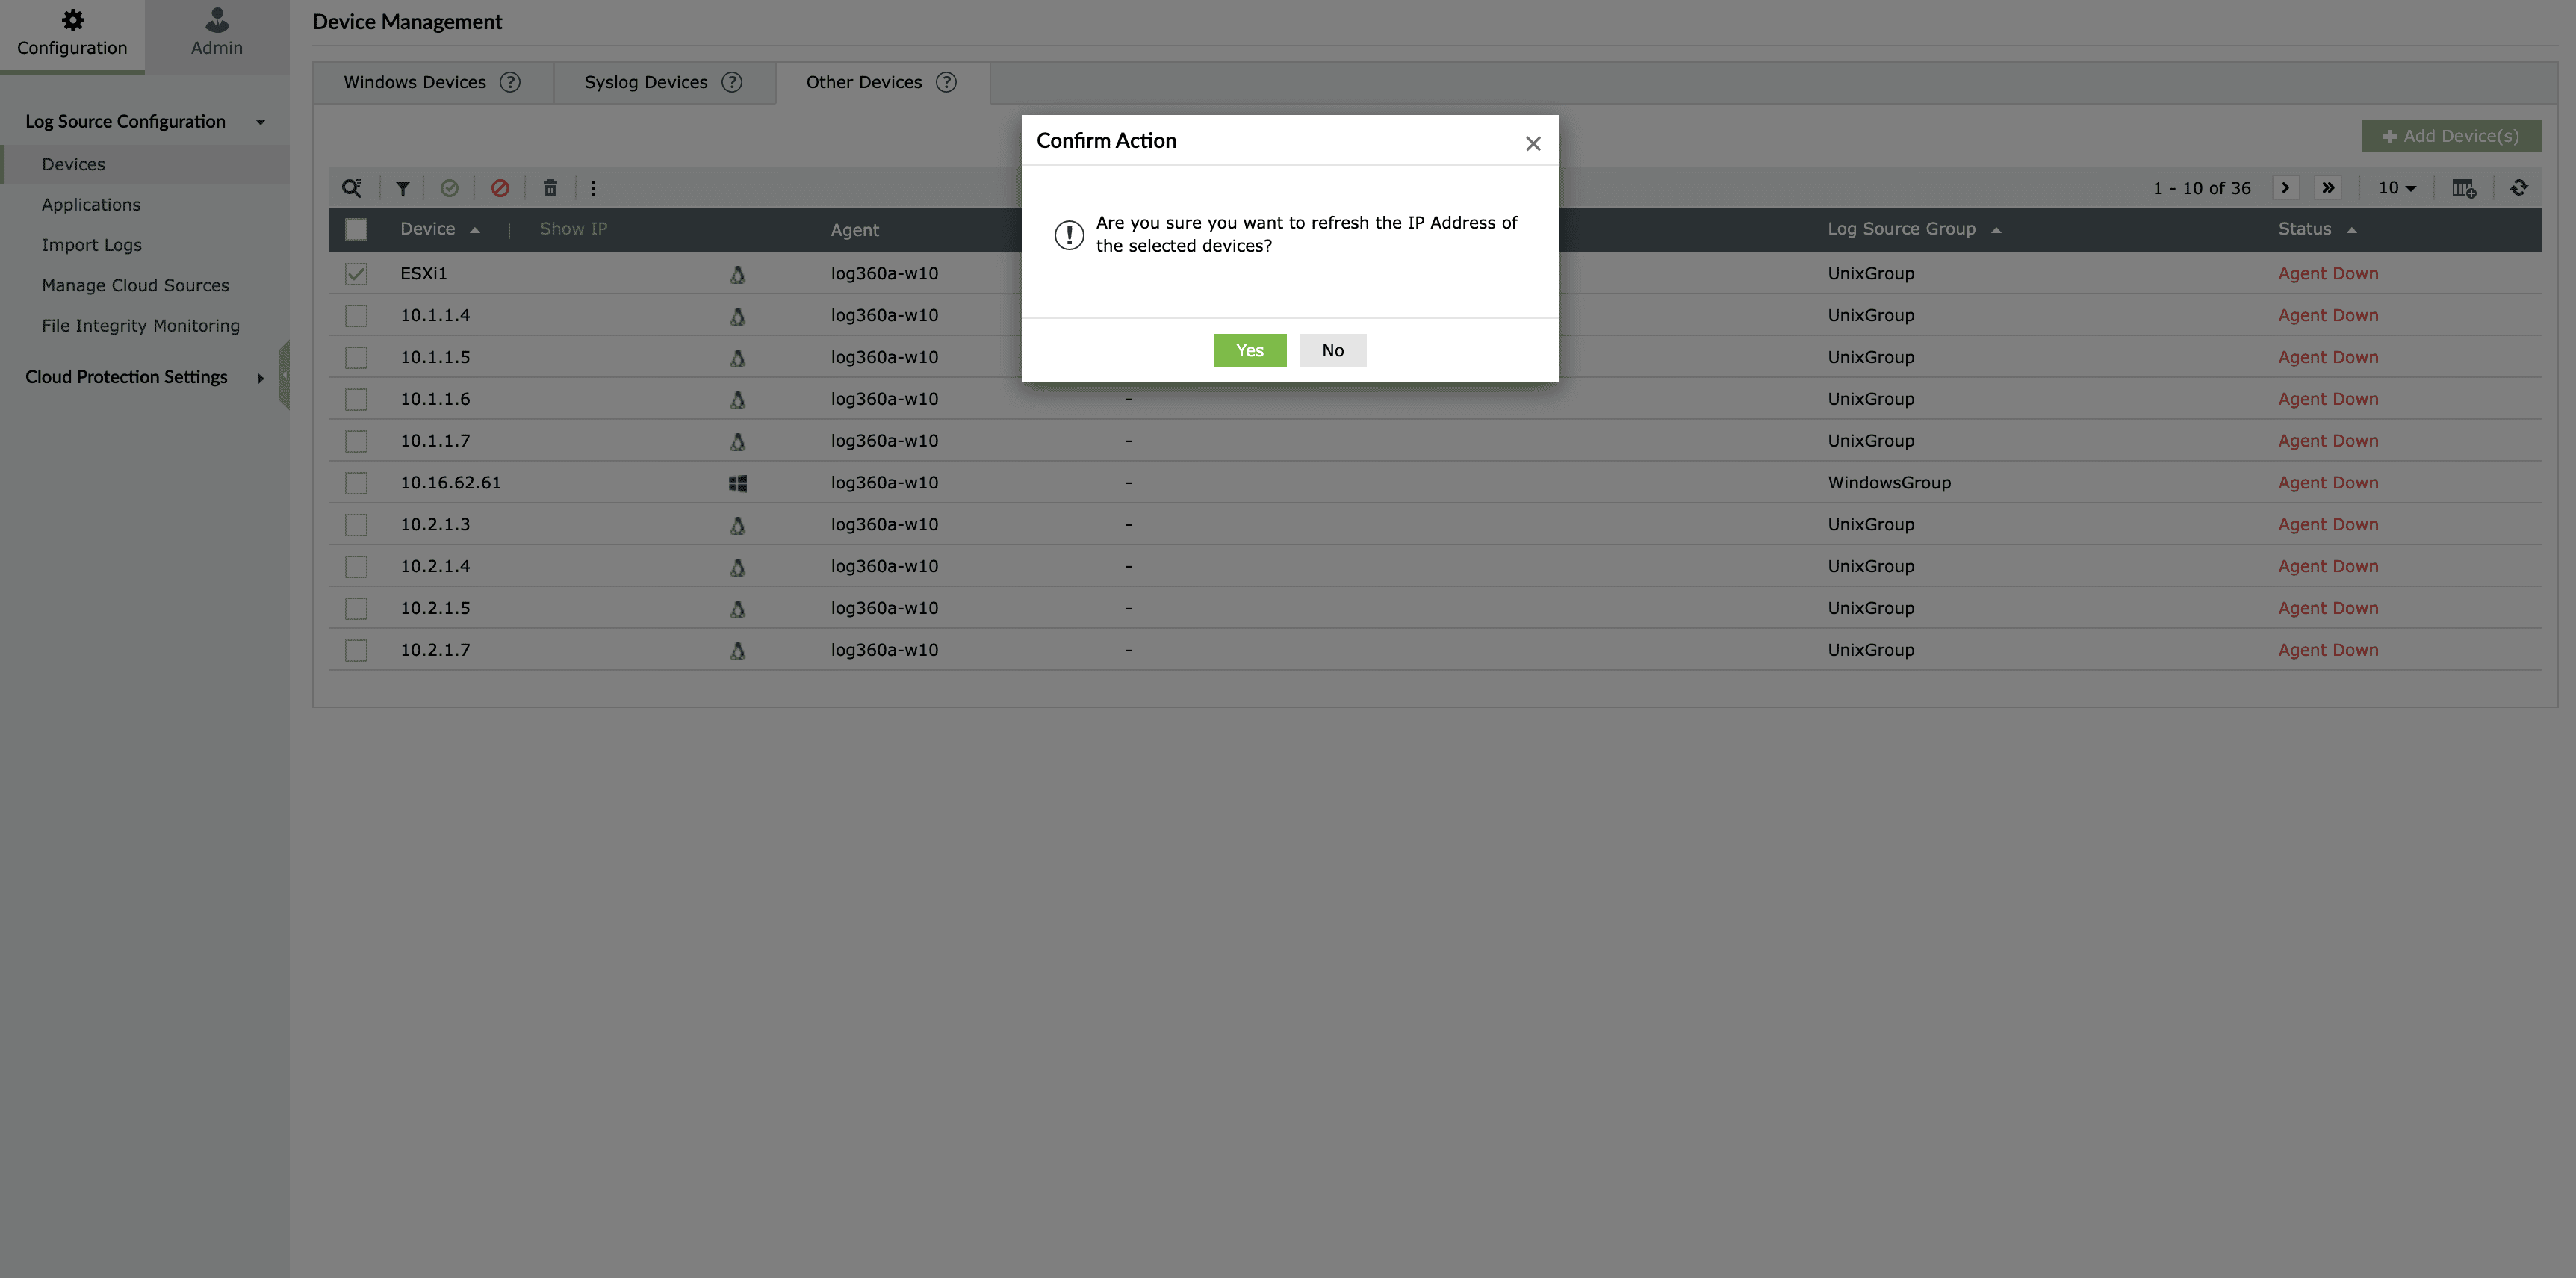
Click yes in the Confirm Action pop-up
Syslog Devices
- Add a Syslog device
- Update a Syslog device
- Enable/Disable a Syslog device
- Delete a Syslog device
- Configure Auto Log Forward
- Bulk refresh IP
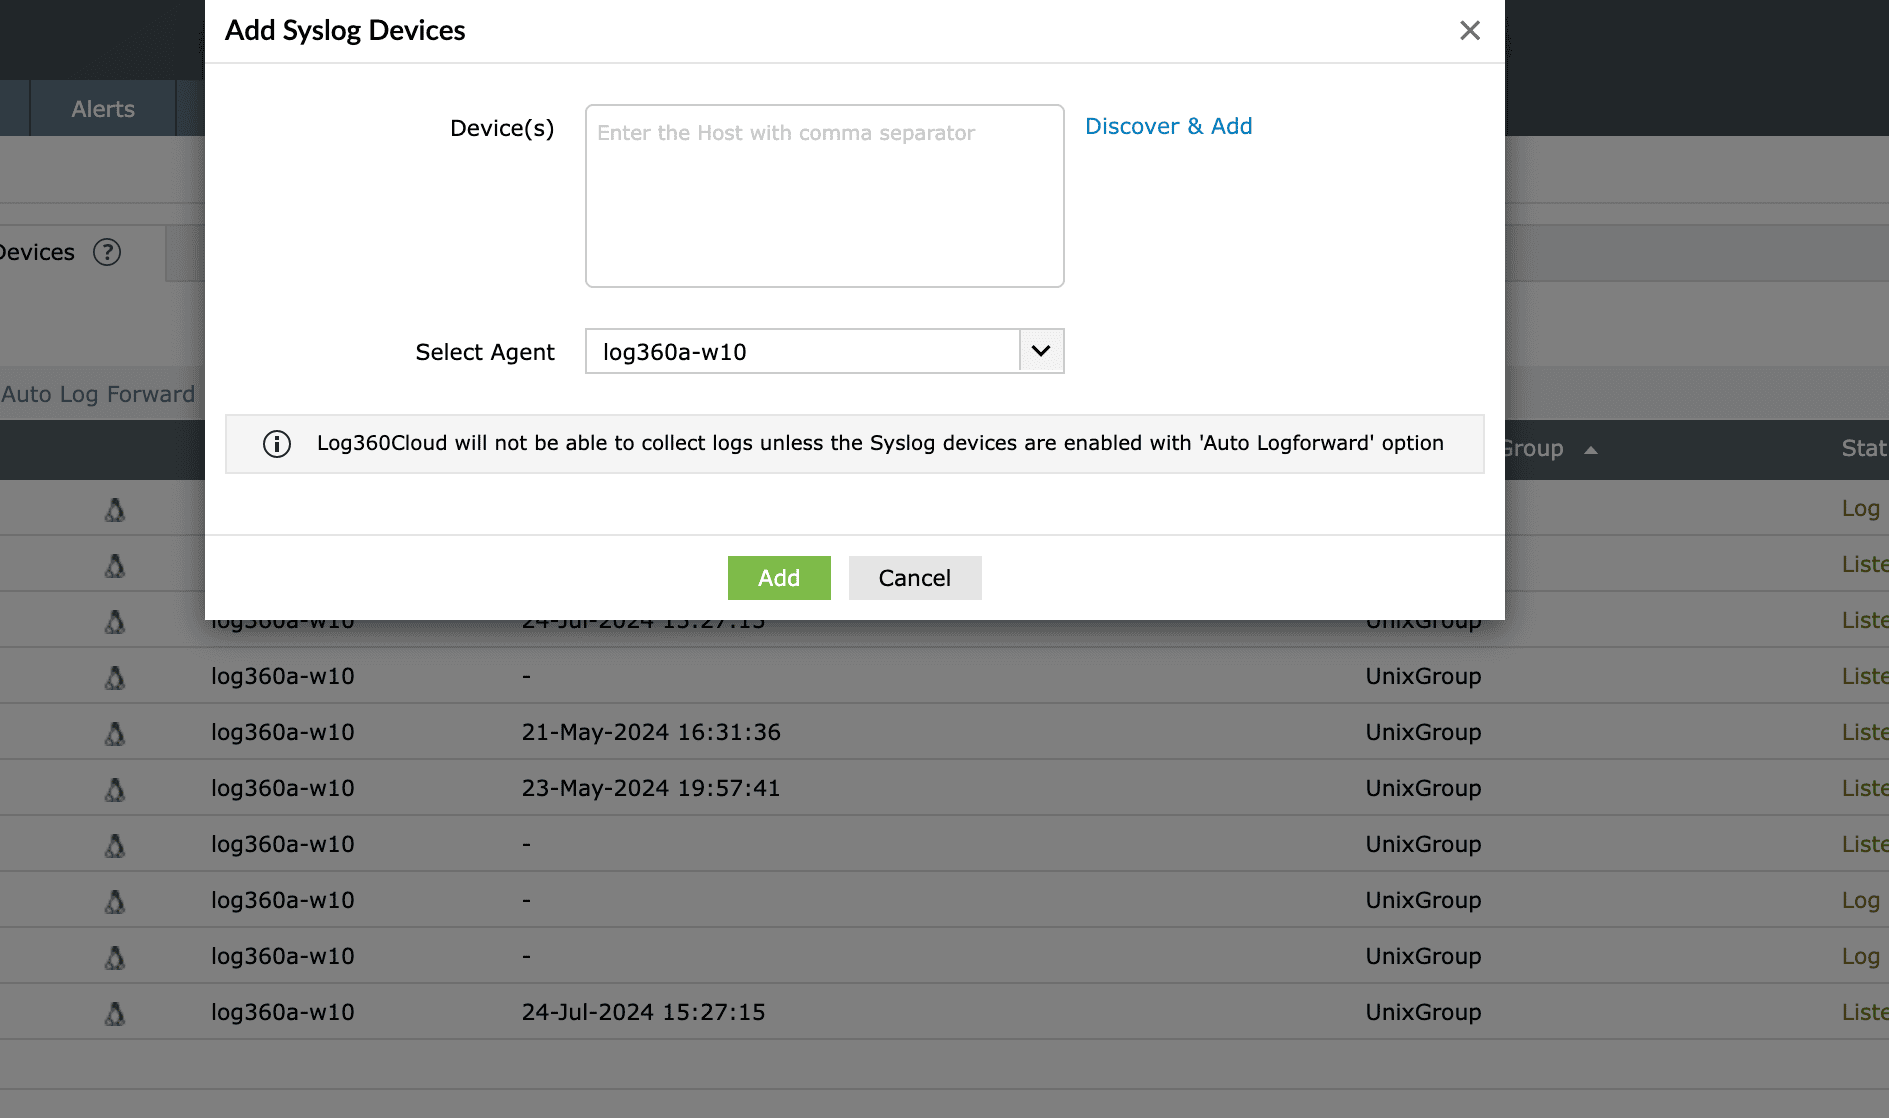
Add a Syslog device
To add a new Syslog device, follow the steps given below.
- Ensure Log360 Cloud agent is installed on at least one Windows device in your network, and the Syslog devices to be monitored are configured to forward logs to the agent. Click here to learn how to configure a Syslog device. Click here to learn how to configure auto log forwarding.
- Open Log360 Cloud and select the Settings tab. Then navigate to Devices under Configuration.

- Select the Syslog Devices tab and click the + Add Device(s) button.
- Select a Agent from the drop-down list and enter the names of the devices in the given field. Then click Add to add the devices. Alternatively, you can click Discover & Add to discover and add the available devices automatically.
- If you chose Discover and Add, follow the given steps.
- Choose the required method of discovery by selecting the appropriate radio button and provide the required values. Click Next.
- Now select SNMP Credential for Discovery by ticking the box against your choice. You can also add credential by clicking the + Add Credential button. Click Scan.
- Now a list of discovered devices will be displayed. Select the desired devices by ticking the box corresponding to the device. Click Add Device(s).
Now the devices are successfully added to Log360 Cloud.
Update a Syslog device
To update a Syslog device, follow the steps given below.
- Open Log360 Cloud and select the Settings tab. Then navigate to Devices under Configuration.
- Choose the Syslog Devices tab and click the
 icon corresponding to the desired device.
- In the window that pops-up, make the necessary modifications.
- Click the Update button.
Now the Syslog device has been updated successfully.
Enable/Disable a Syslog device
To enable/disable an existing Syslog device, follow the steps given below.
- Open Log360 Cloud and select the Settings tab. Then navigate to Devices under Configuration.
- Choose the Syslog Devices tab and select the required devices by ticking the box corresponding to the device.
- Click the Manage button and select Enable device(s)/Disable device(s) from the drop down list.
- Now the Syslog device has been enabled/disabled successfully.
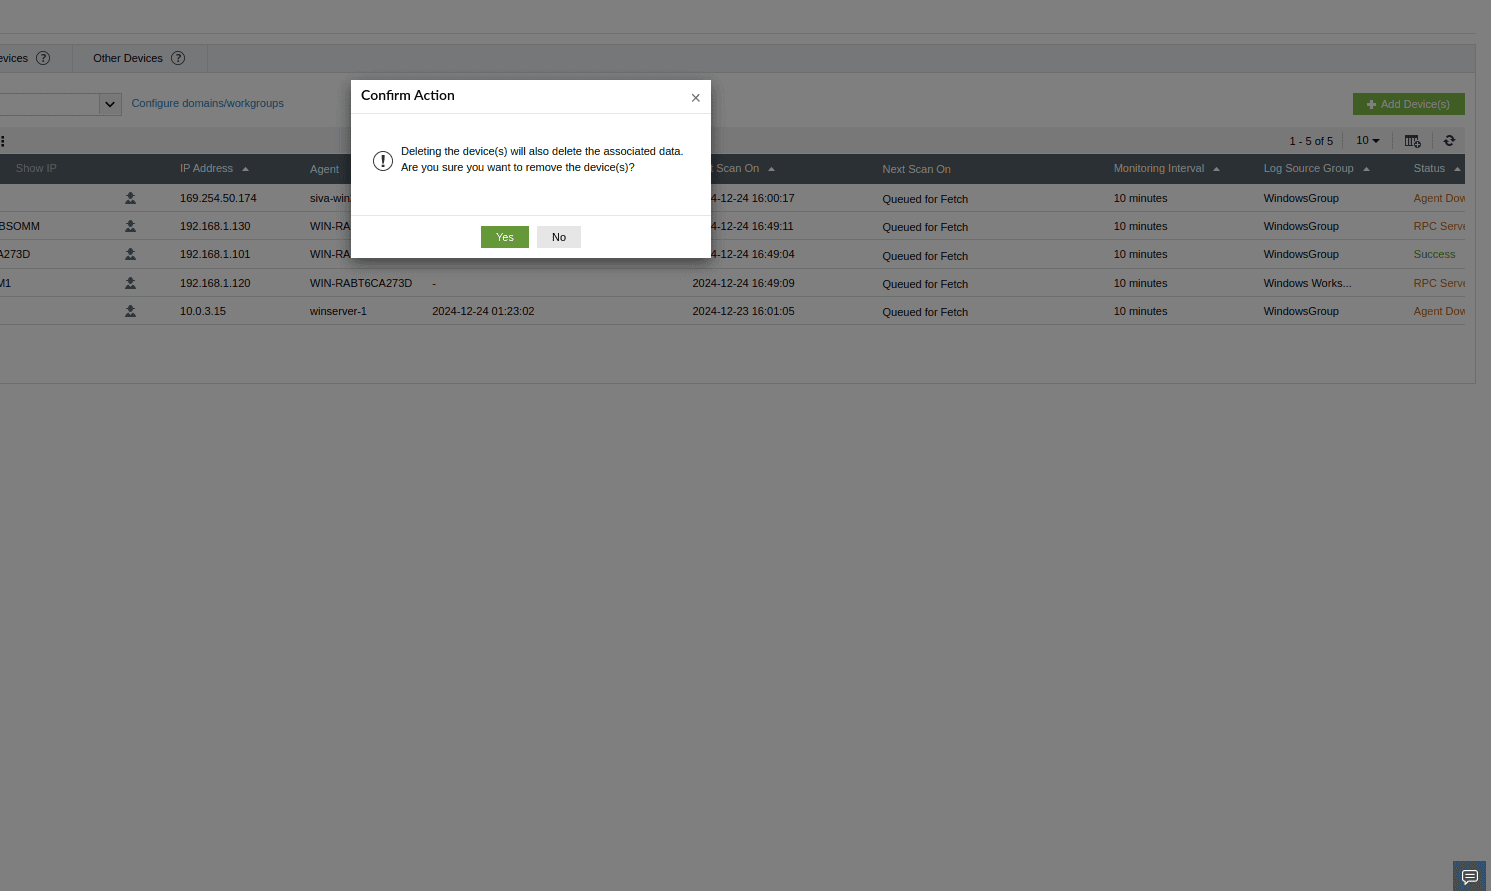
Delete a Syslog device
To delete an existing Syslog device, follow the steps given below.
- Open Log360 Cloud and select the Settings tab. Then navigate to Devices under Configuration.
- Choose the Syslog Devices tab and select the required devices by ticking the box corresponding to the device.
- Click the Manage button and select Delete device(s) from the drop down list.
- Click Yes to confirm the action.
Now the selected Syslog devices are deleted successfully.
Configure Auto Log Forward
To configure Auto Log Forward, follow the steps given below.
- Open Log360 Cloud and select the Settings tab. Then navigate to Devices under Configuration.
- Choose the Syslog Devices tab and select the required devices by ticking the box corresponding to the device.
- Click the Configure Auto Log Forward button.
- In the window that pops-up, provide the necessary values and click Verify and Update.
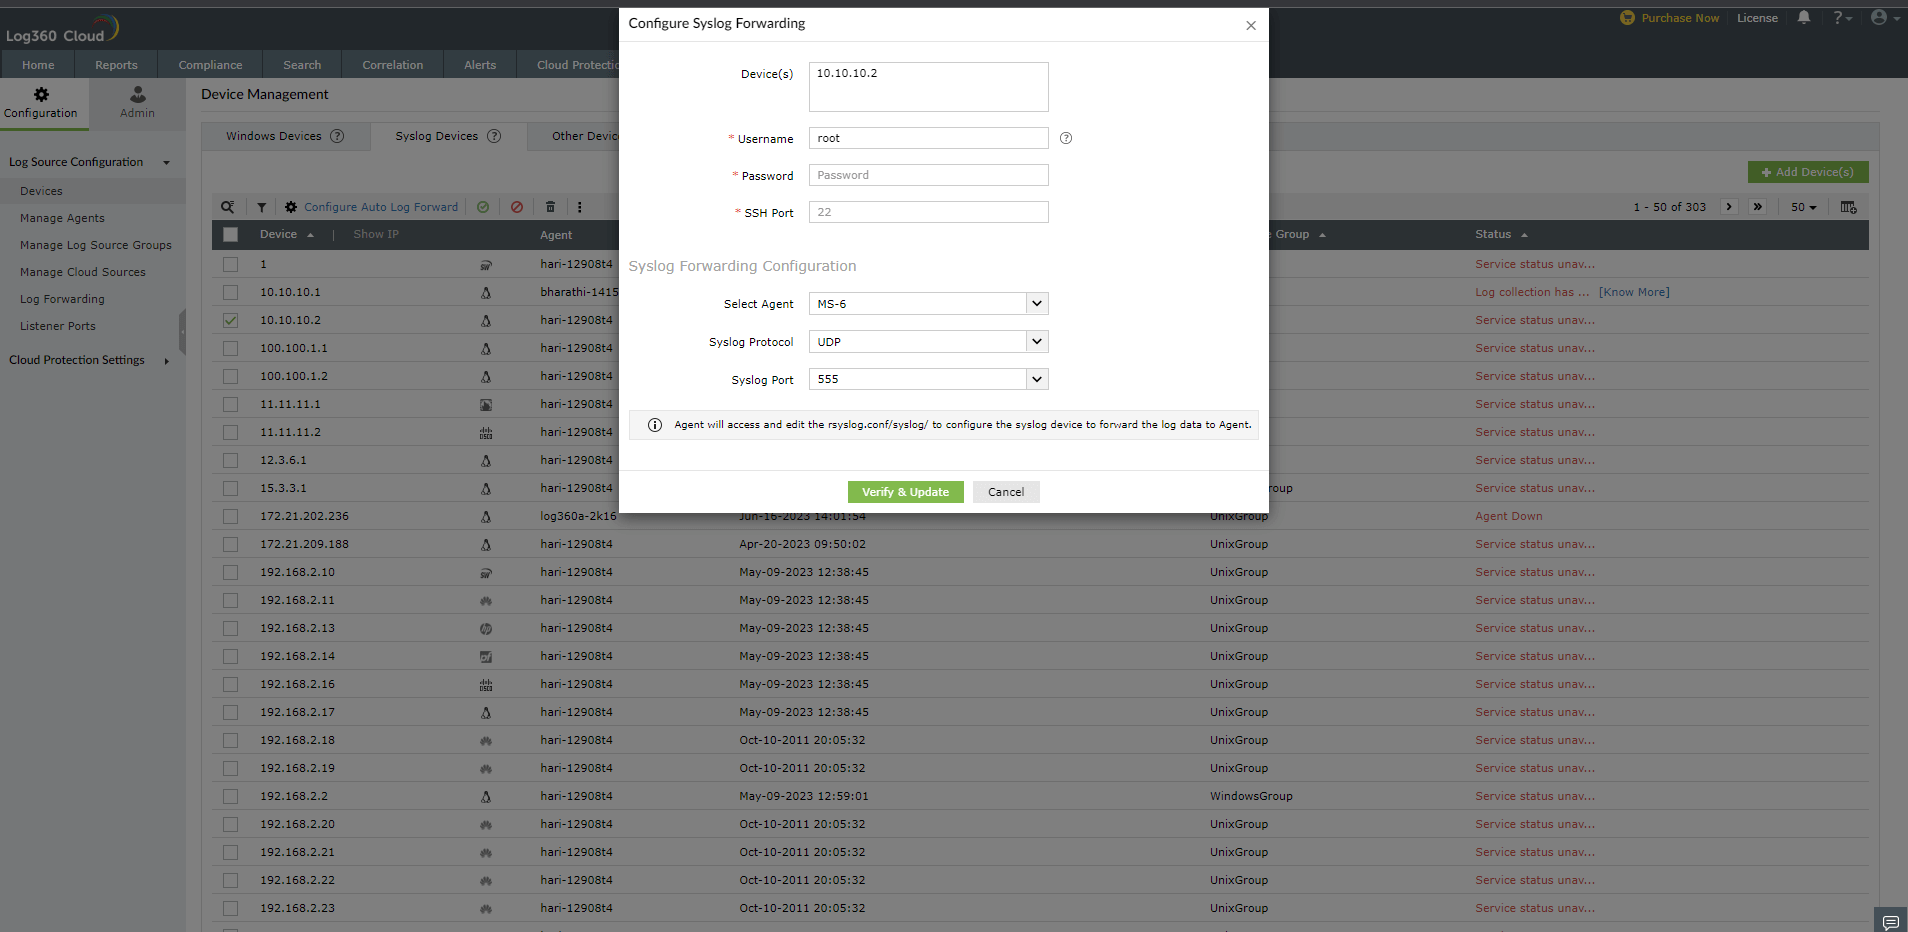
The Auto Log Forward is now configured successfully.
Bulk refresh IP
How to bulk refresh IP
Other Devices
- Add an ESXI device
- Update an ESXI device
- Enable/Disable an ESXI device
- Delete an ESXI device
- Bulk refresh IP
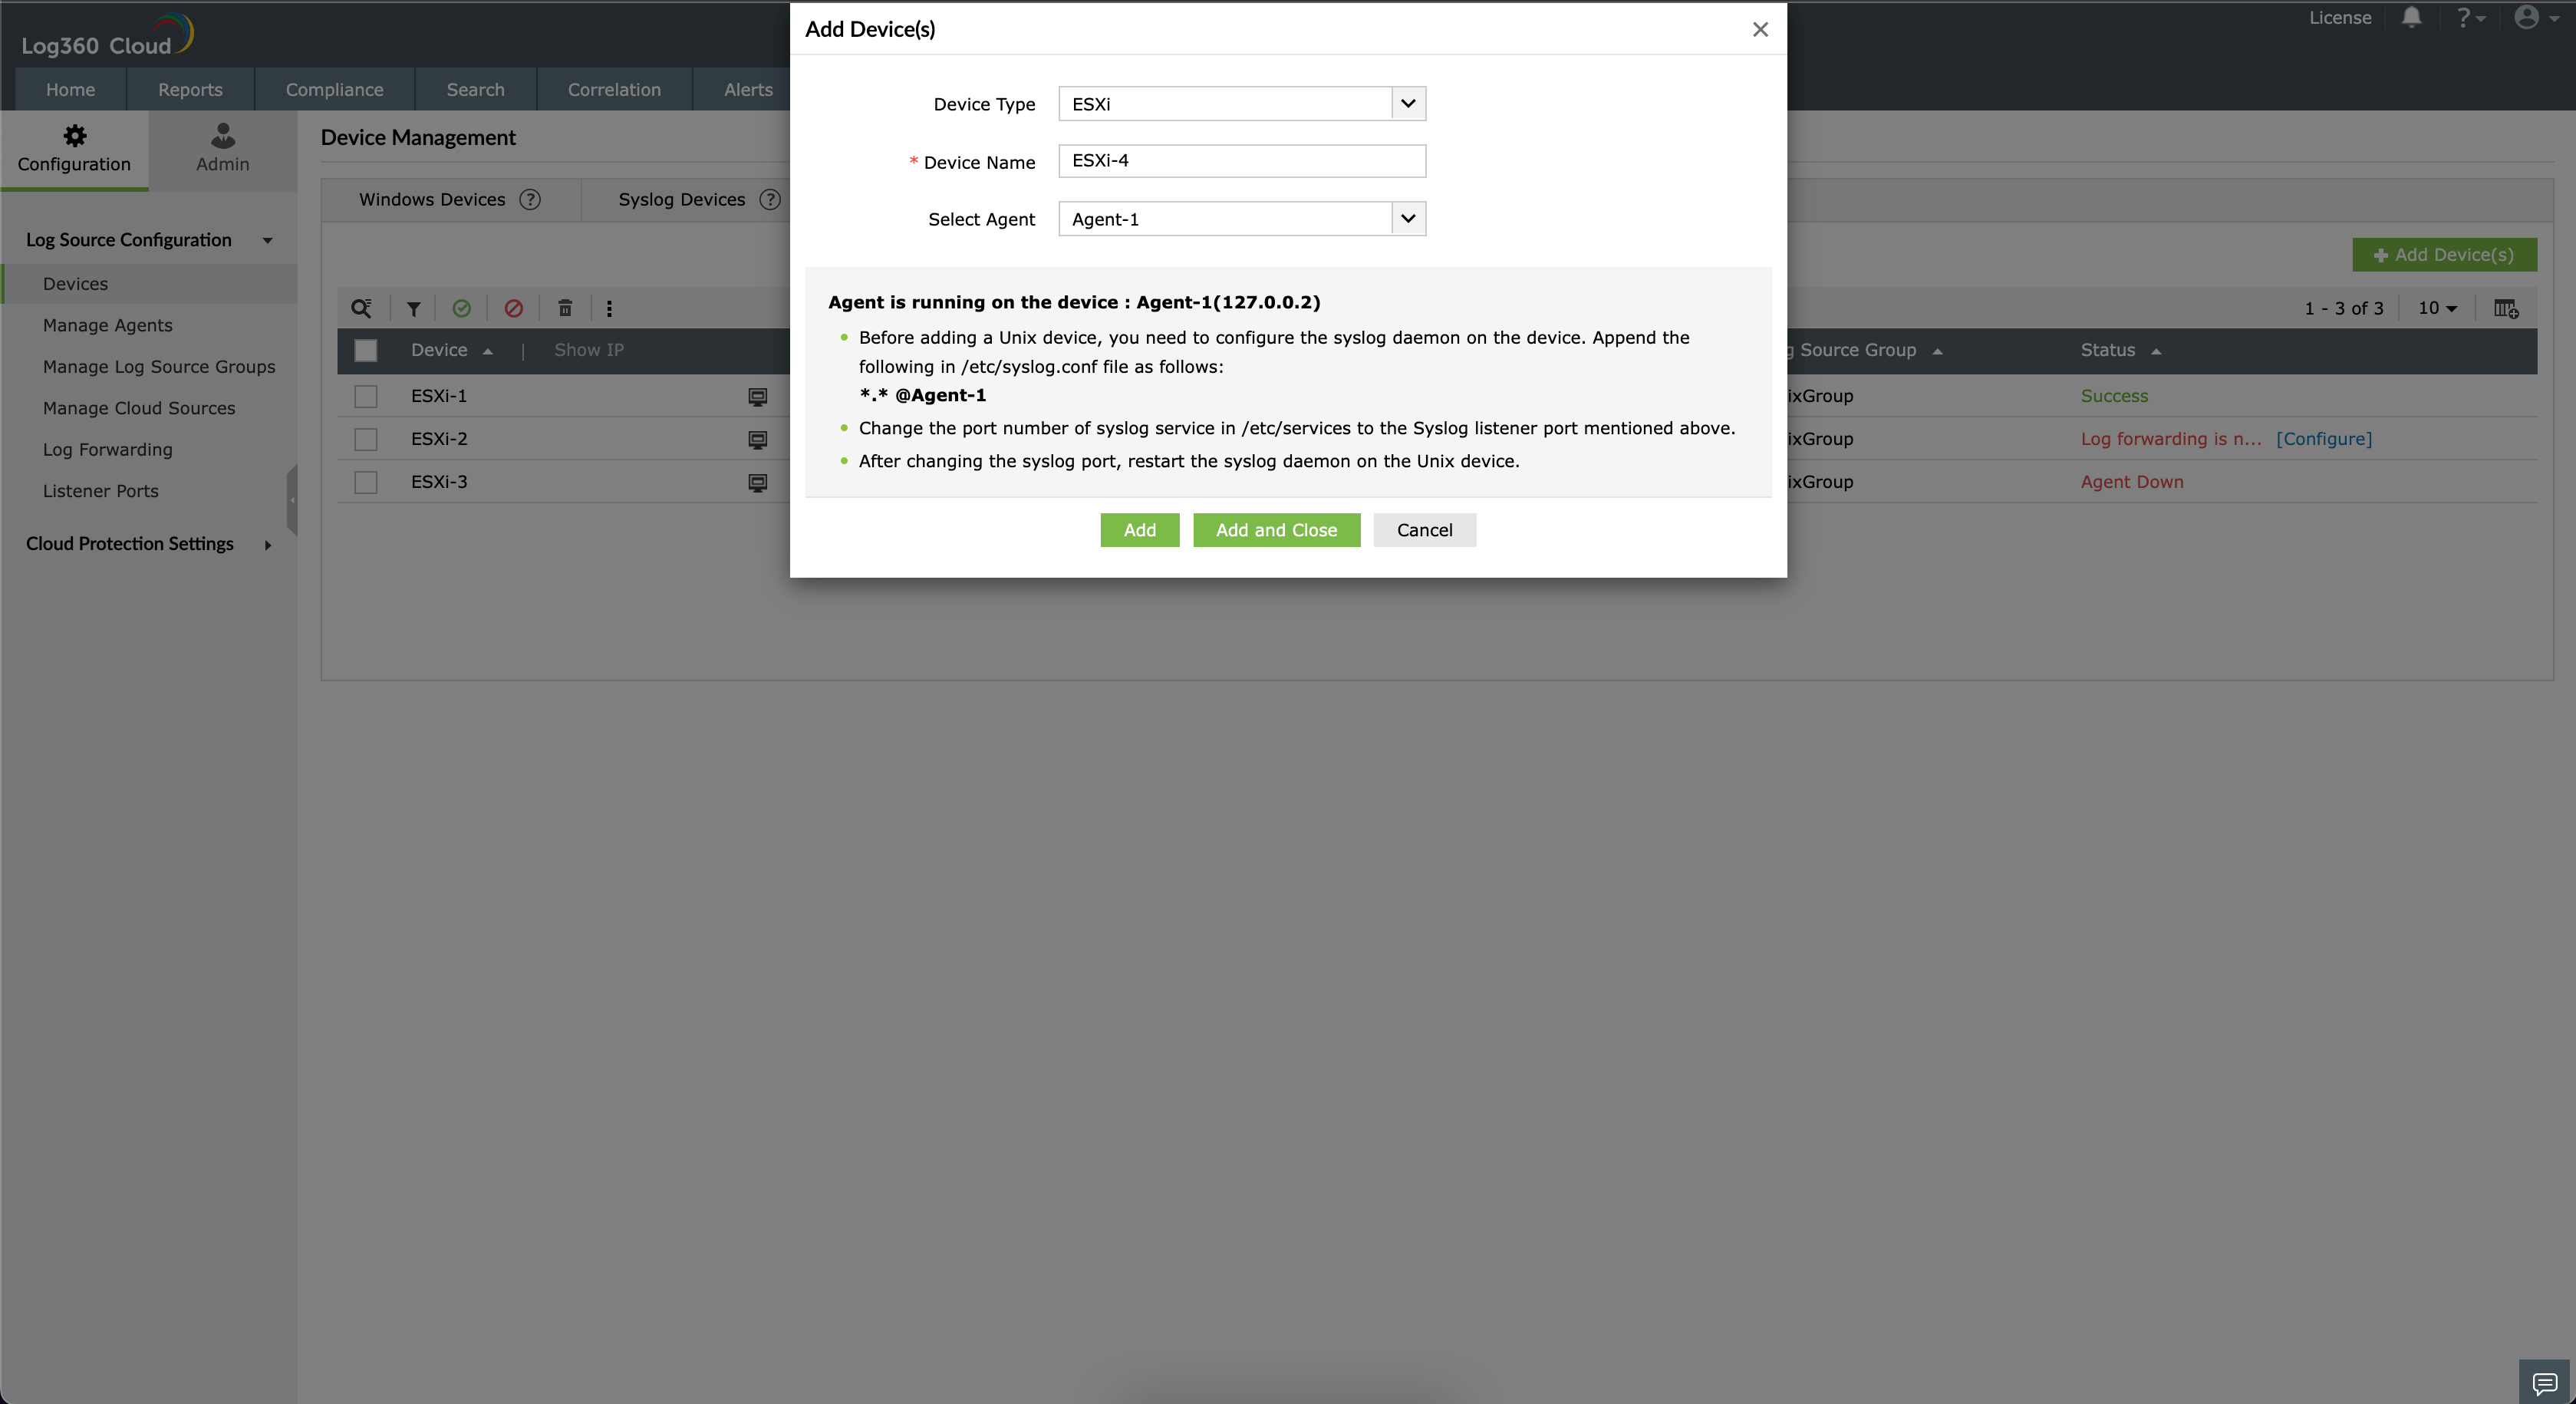
Add an ESXI device
To add a new ESXI device, follow the steps given below.
Note: Ensure Log360 Cloud agent is installed on at least one Windows device in your network, and the ESXI devices to be monitored are configured to forward logs to the agent. Click here to learn how to configure a ESXI device.
- Open Log360 Cloud and select the Settings tab. Then navigate to Devices under Configuration.
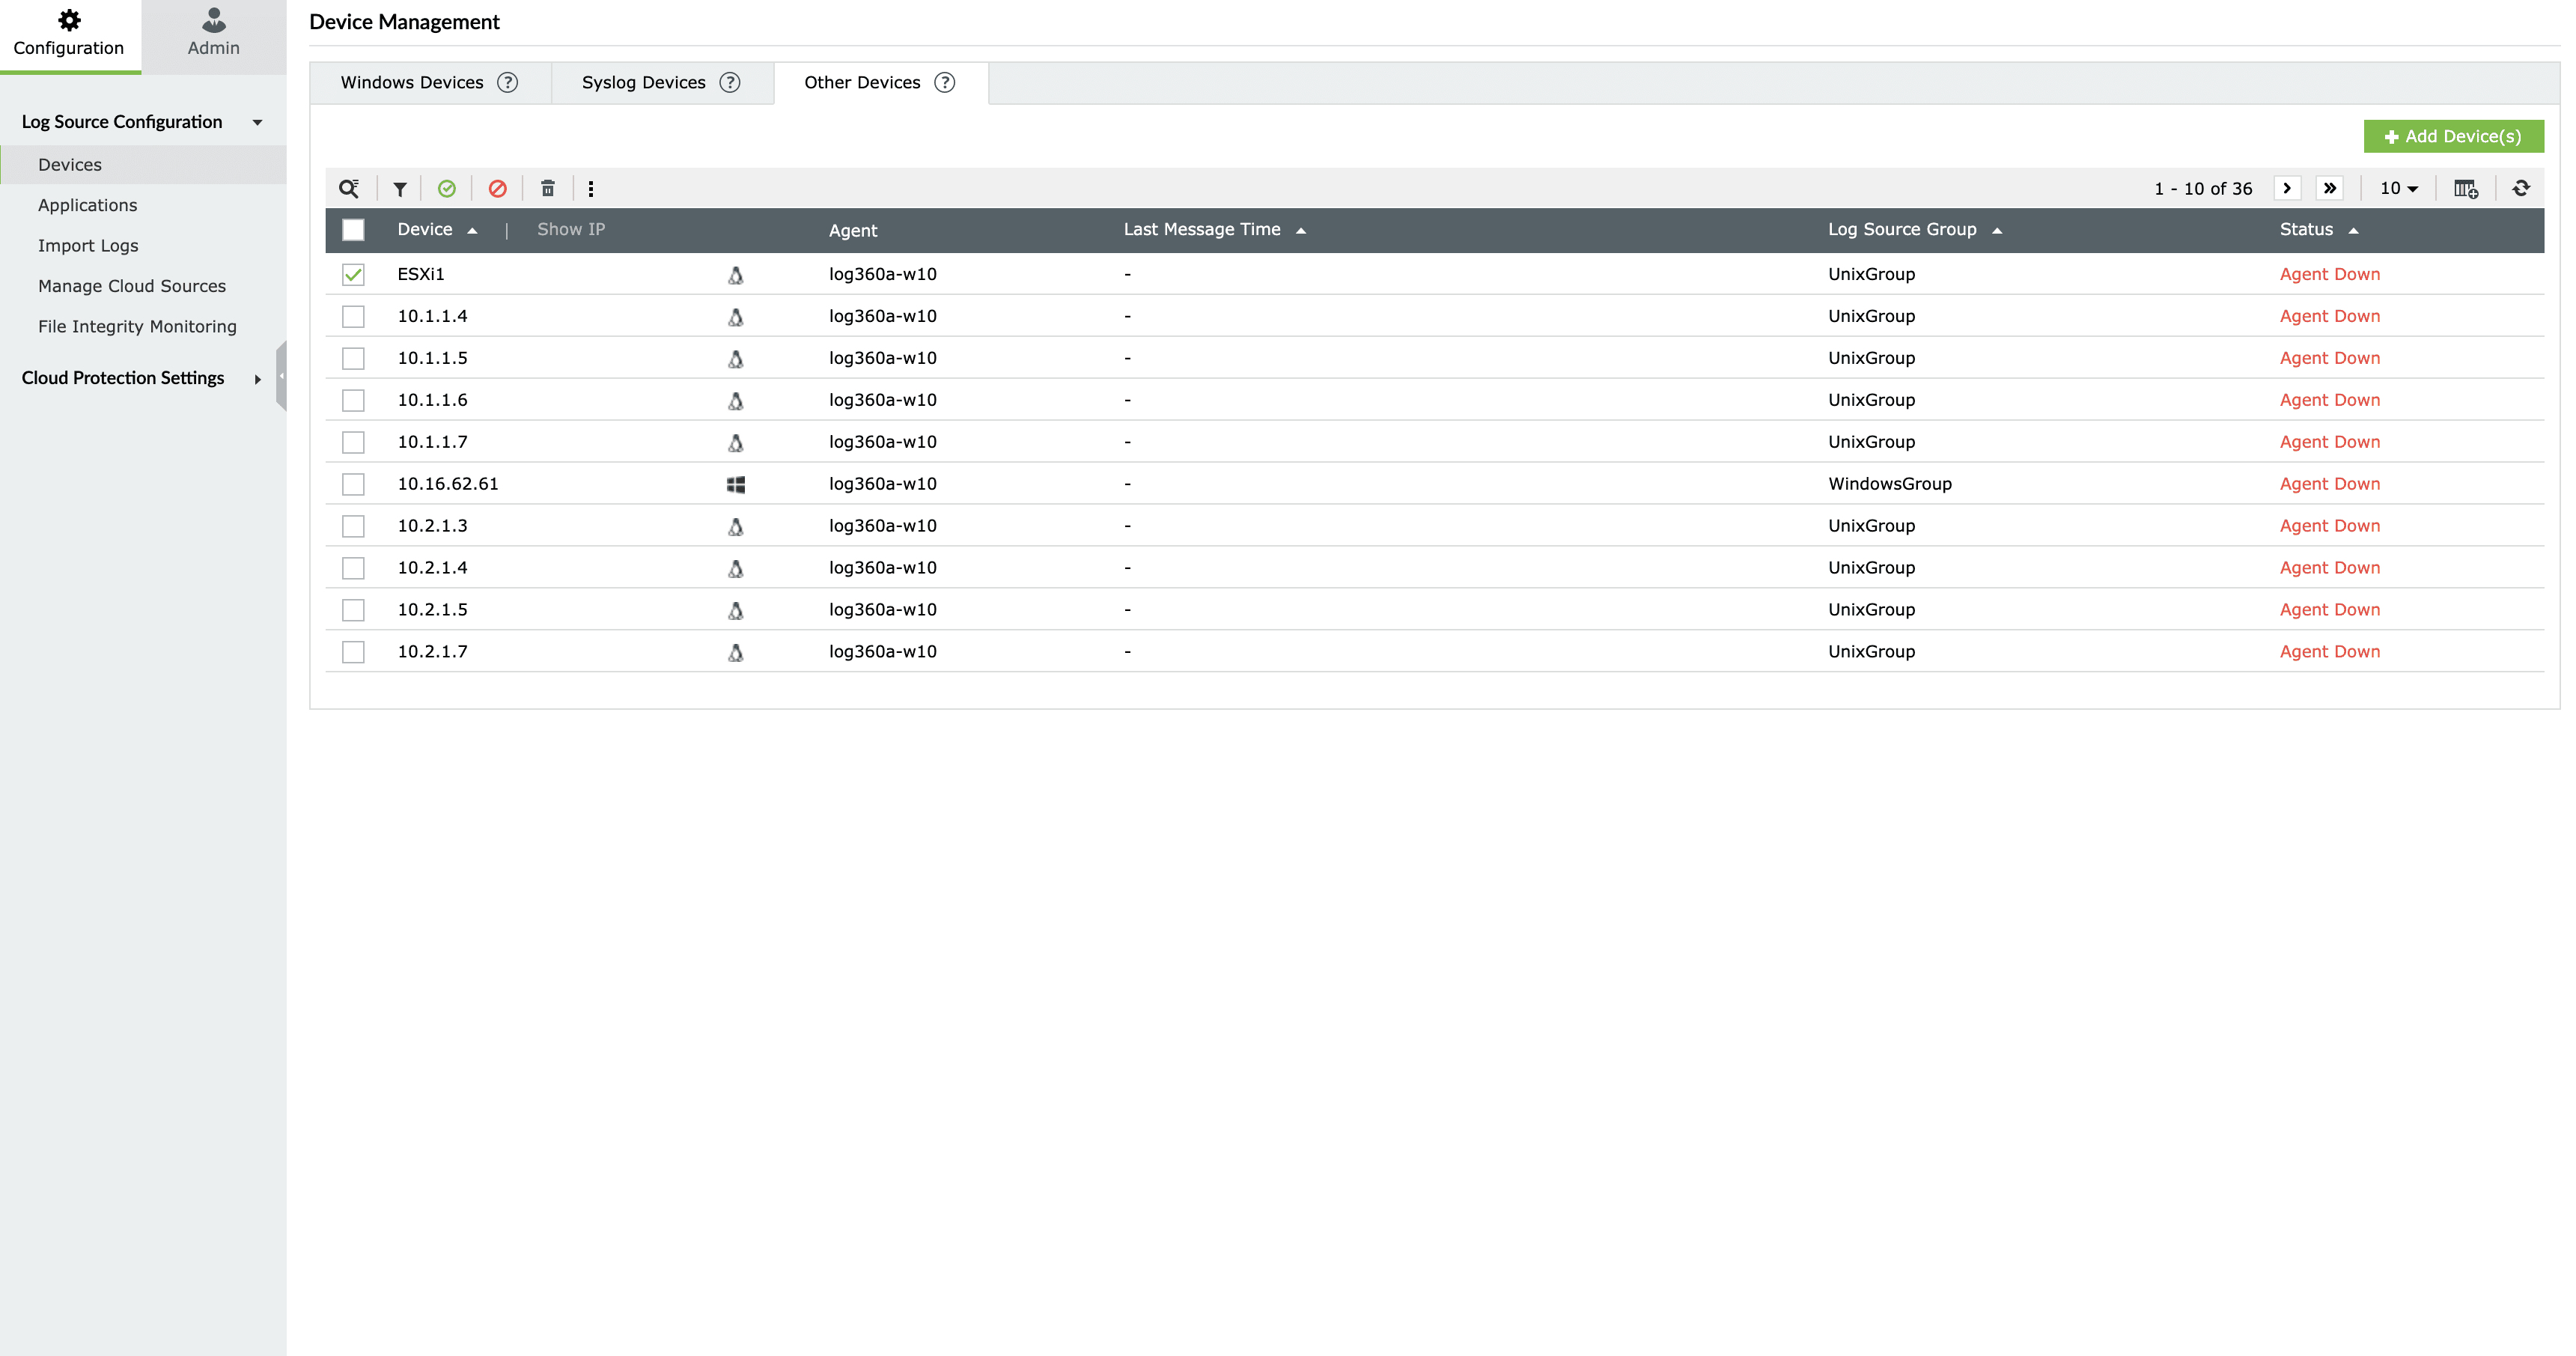
- Select the Other Devices tab and click the + Add Device(s) button.
- Click on Device Type and select ESXI. Enter Device Name.
- Select a Agent from the drop-down list and enter the name or the IP address of the device in the given field. Then click Add to add the device.
Update an ESXI device
To update a ESXI device, follow the steps given below.
- Open Log360 Cloud and select the Settings tab. Then navigate to Devices under Configuration.
- Choose the Other Devices tab and click the icon corresponding to the desired device.
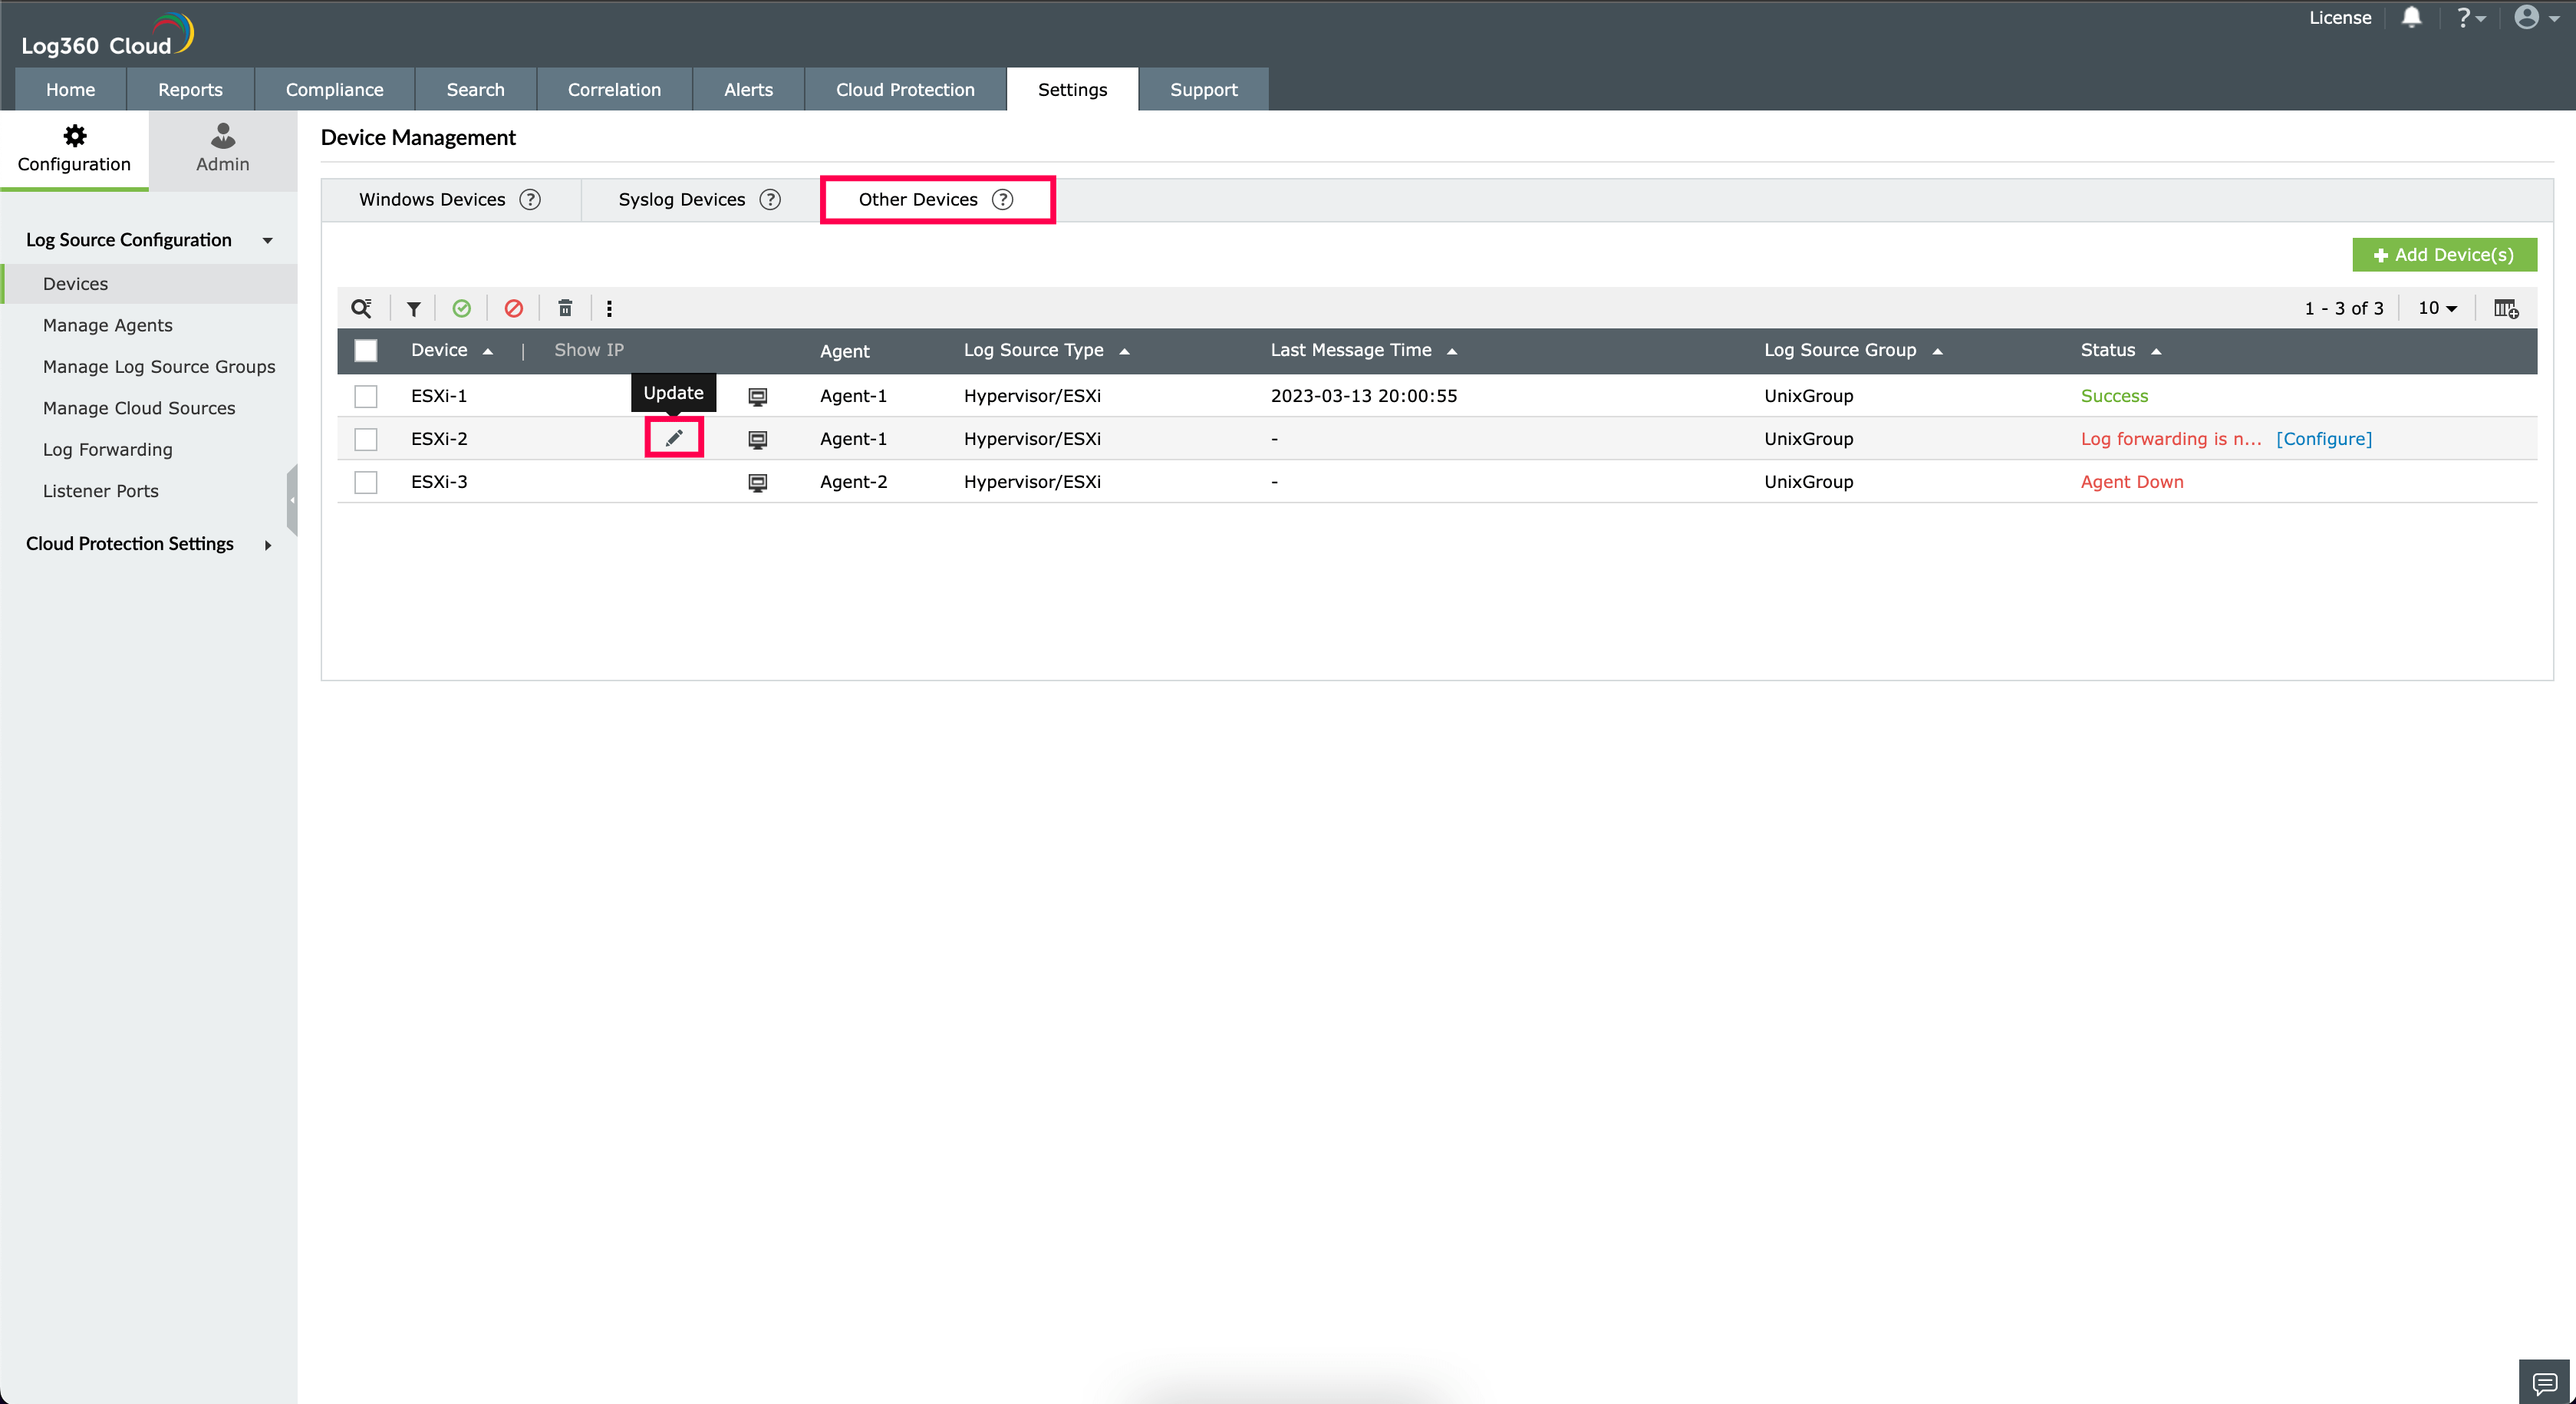
- In the window that pops-up, make the necessary modifications.
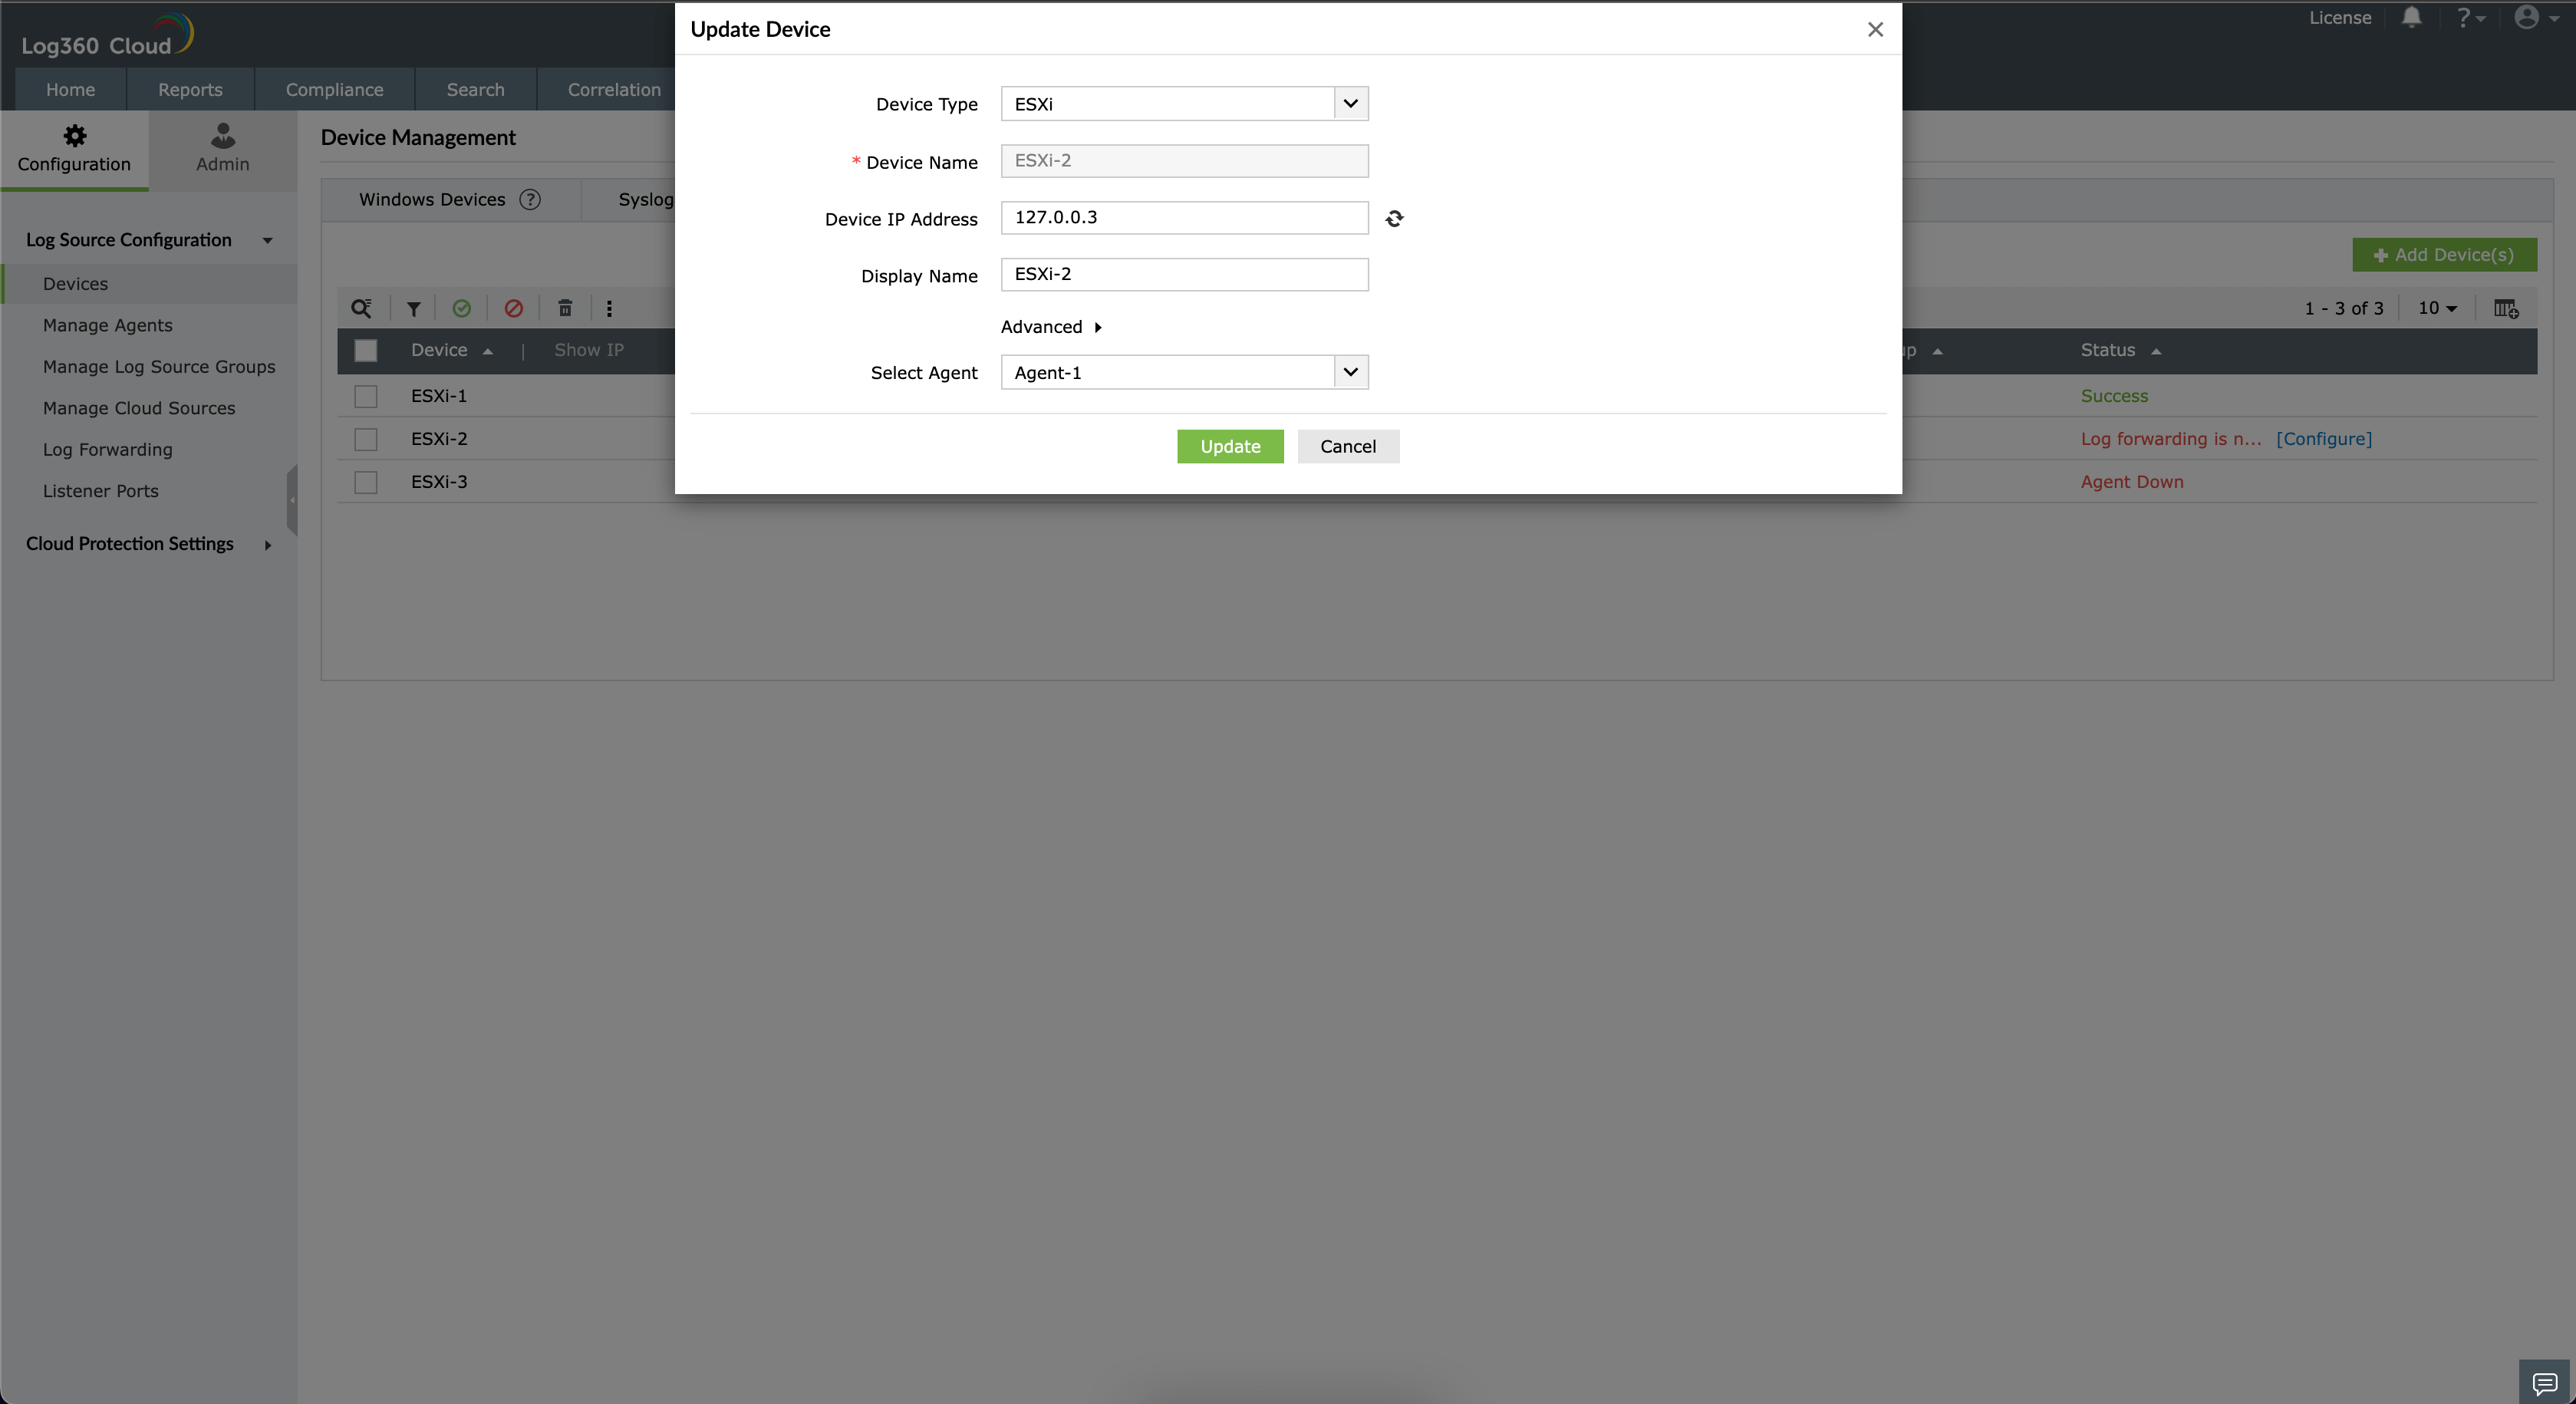
- Click the Update button.
Now the ESXI device has been updated successfully.
Enable/Disable a ESXI device
To enable/disable an existing ESXI device, follow the steps given below.
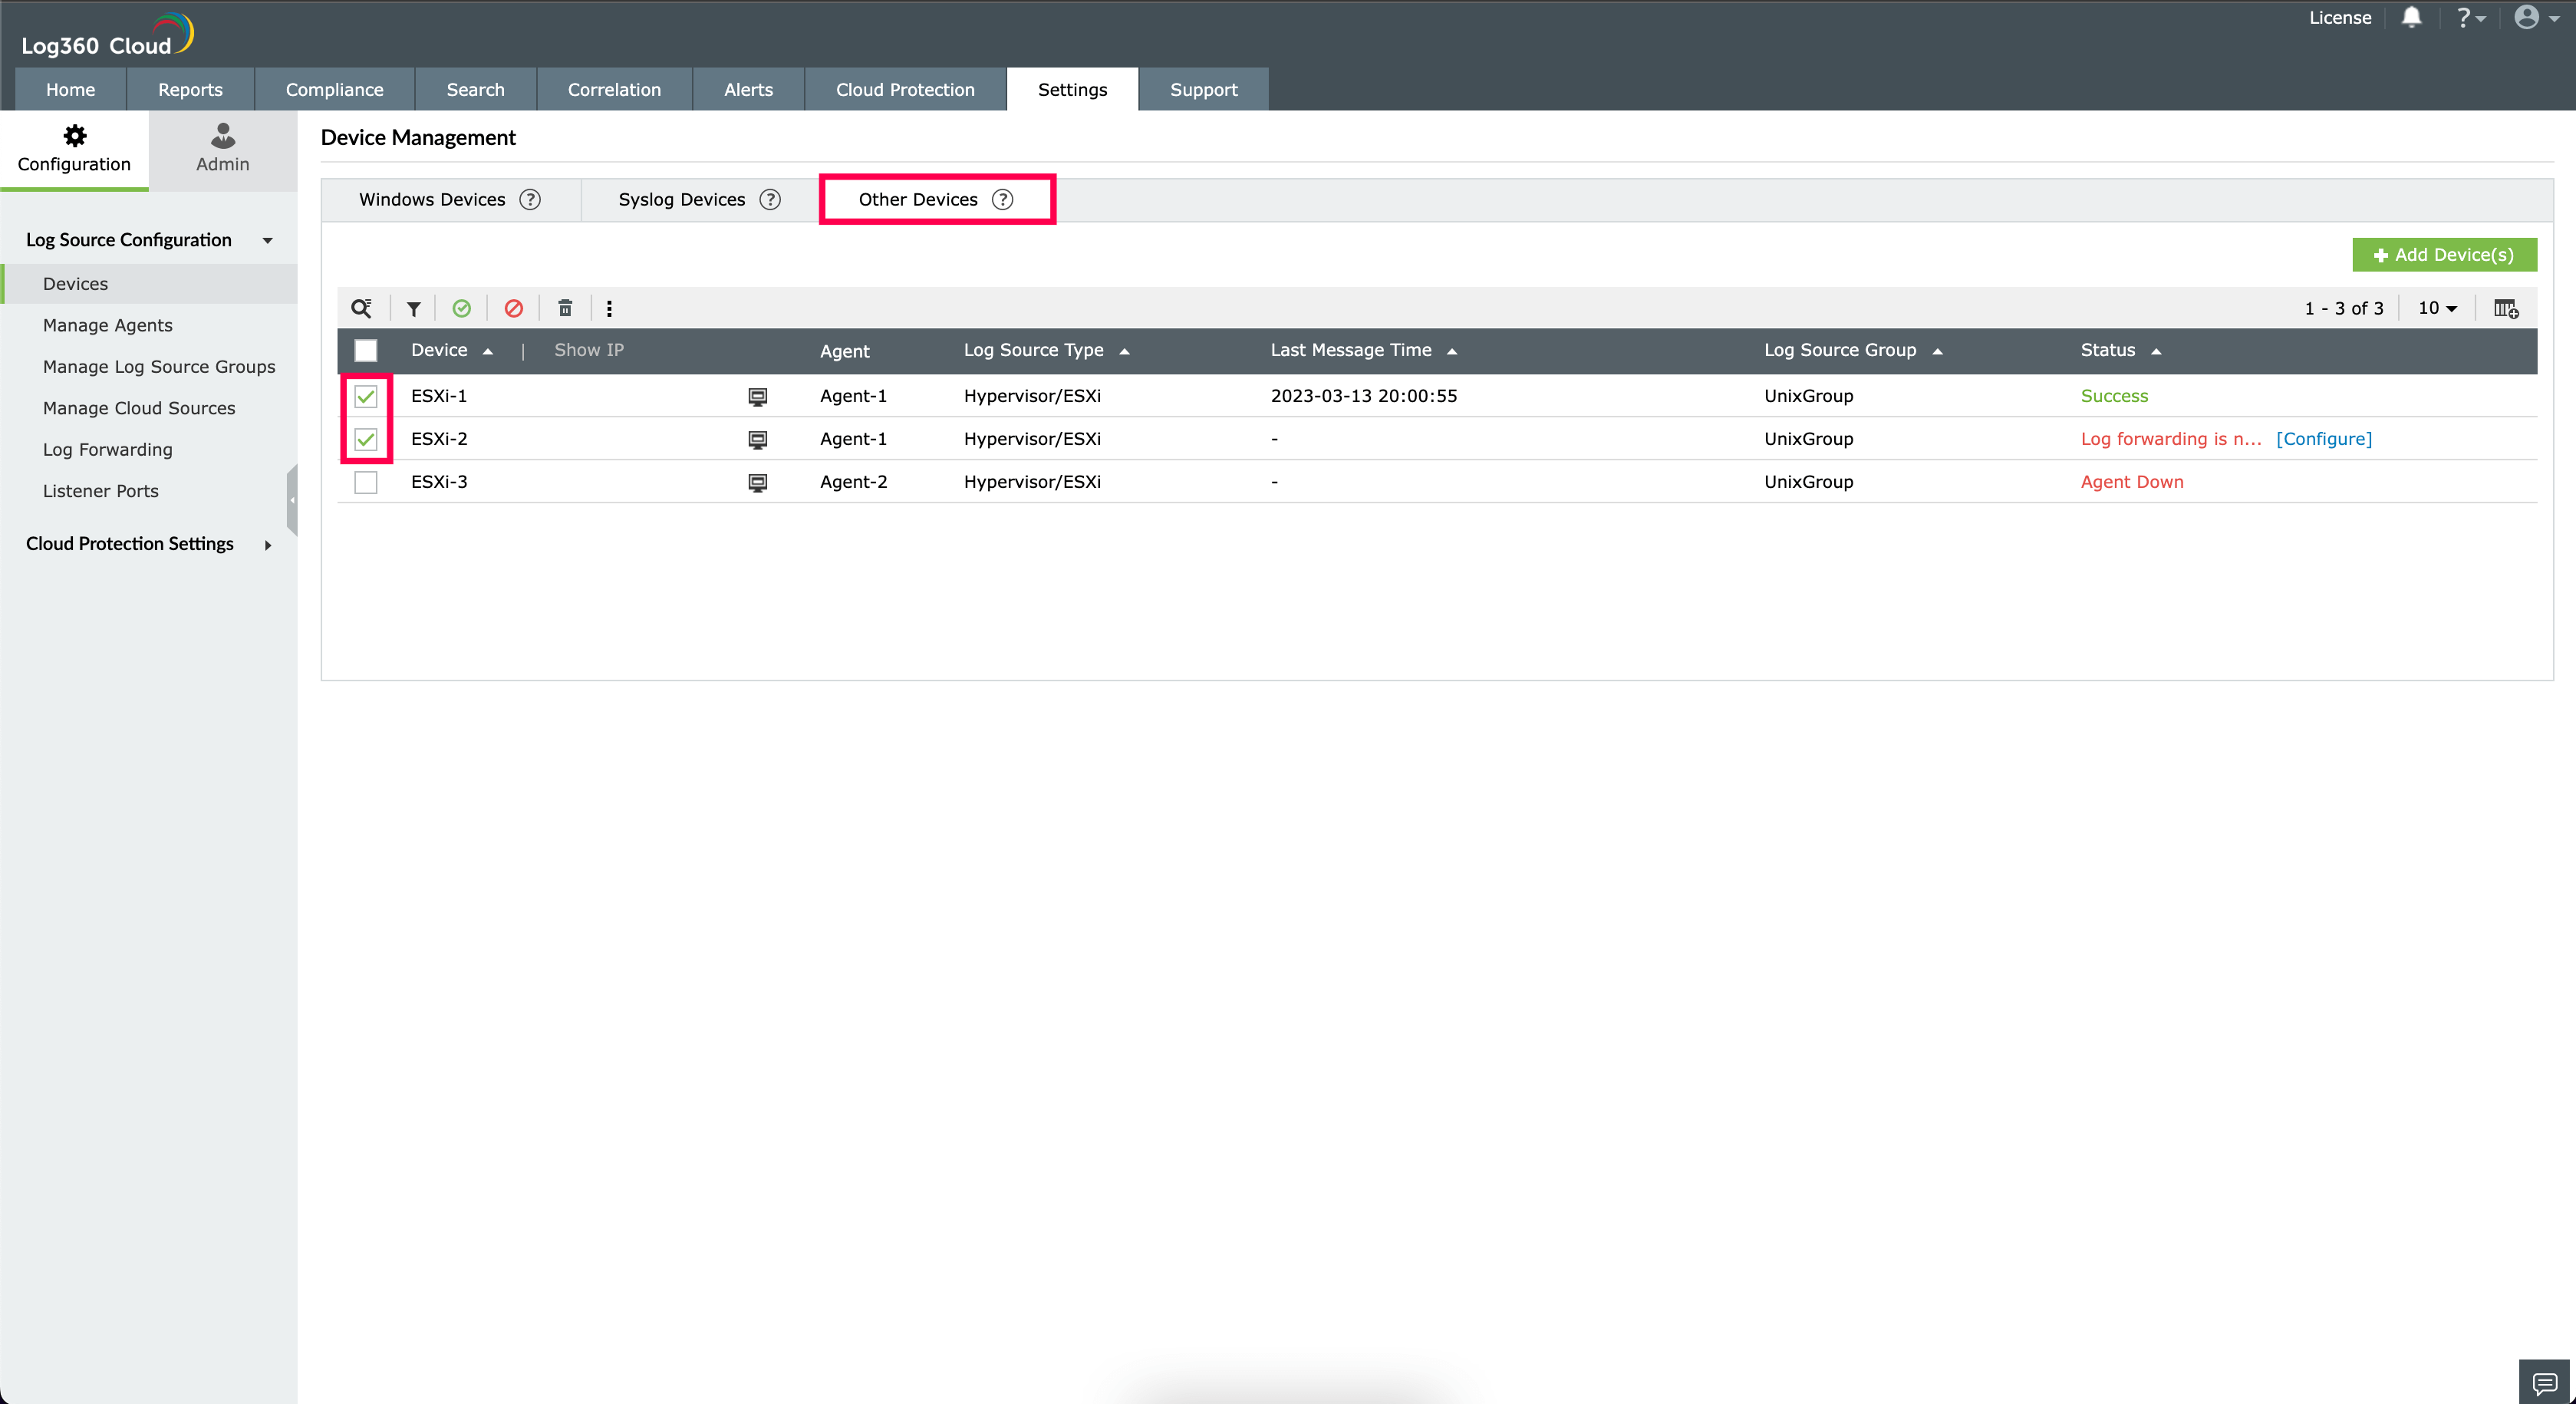
- Open Log360 Cloud and select the Settings tab. Then navigate to Devices under Configuration.
- Choose the Other Devices tab and select the required devices by ticking the box corresponding to the device.
- Select Enable device(s)/Disable device(s) from the icons on the Table Tool bar as shown.

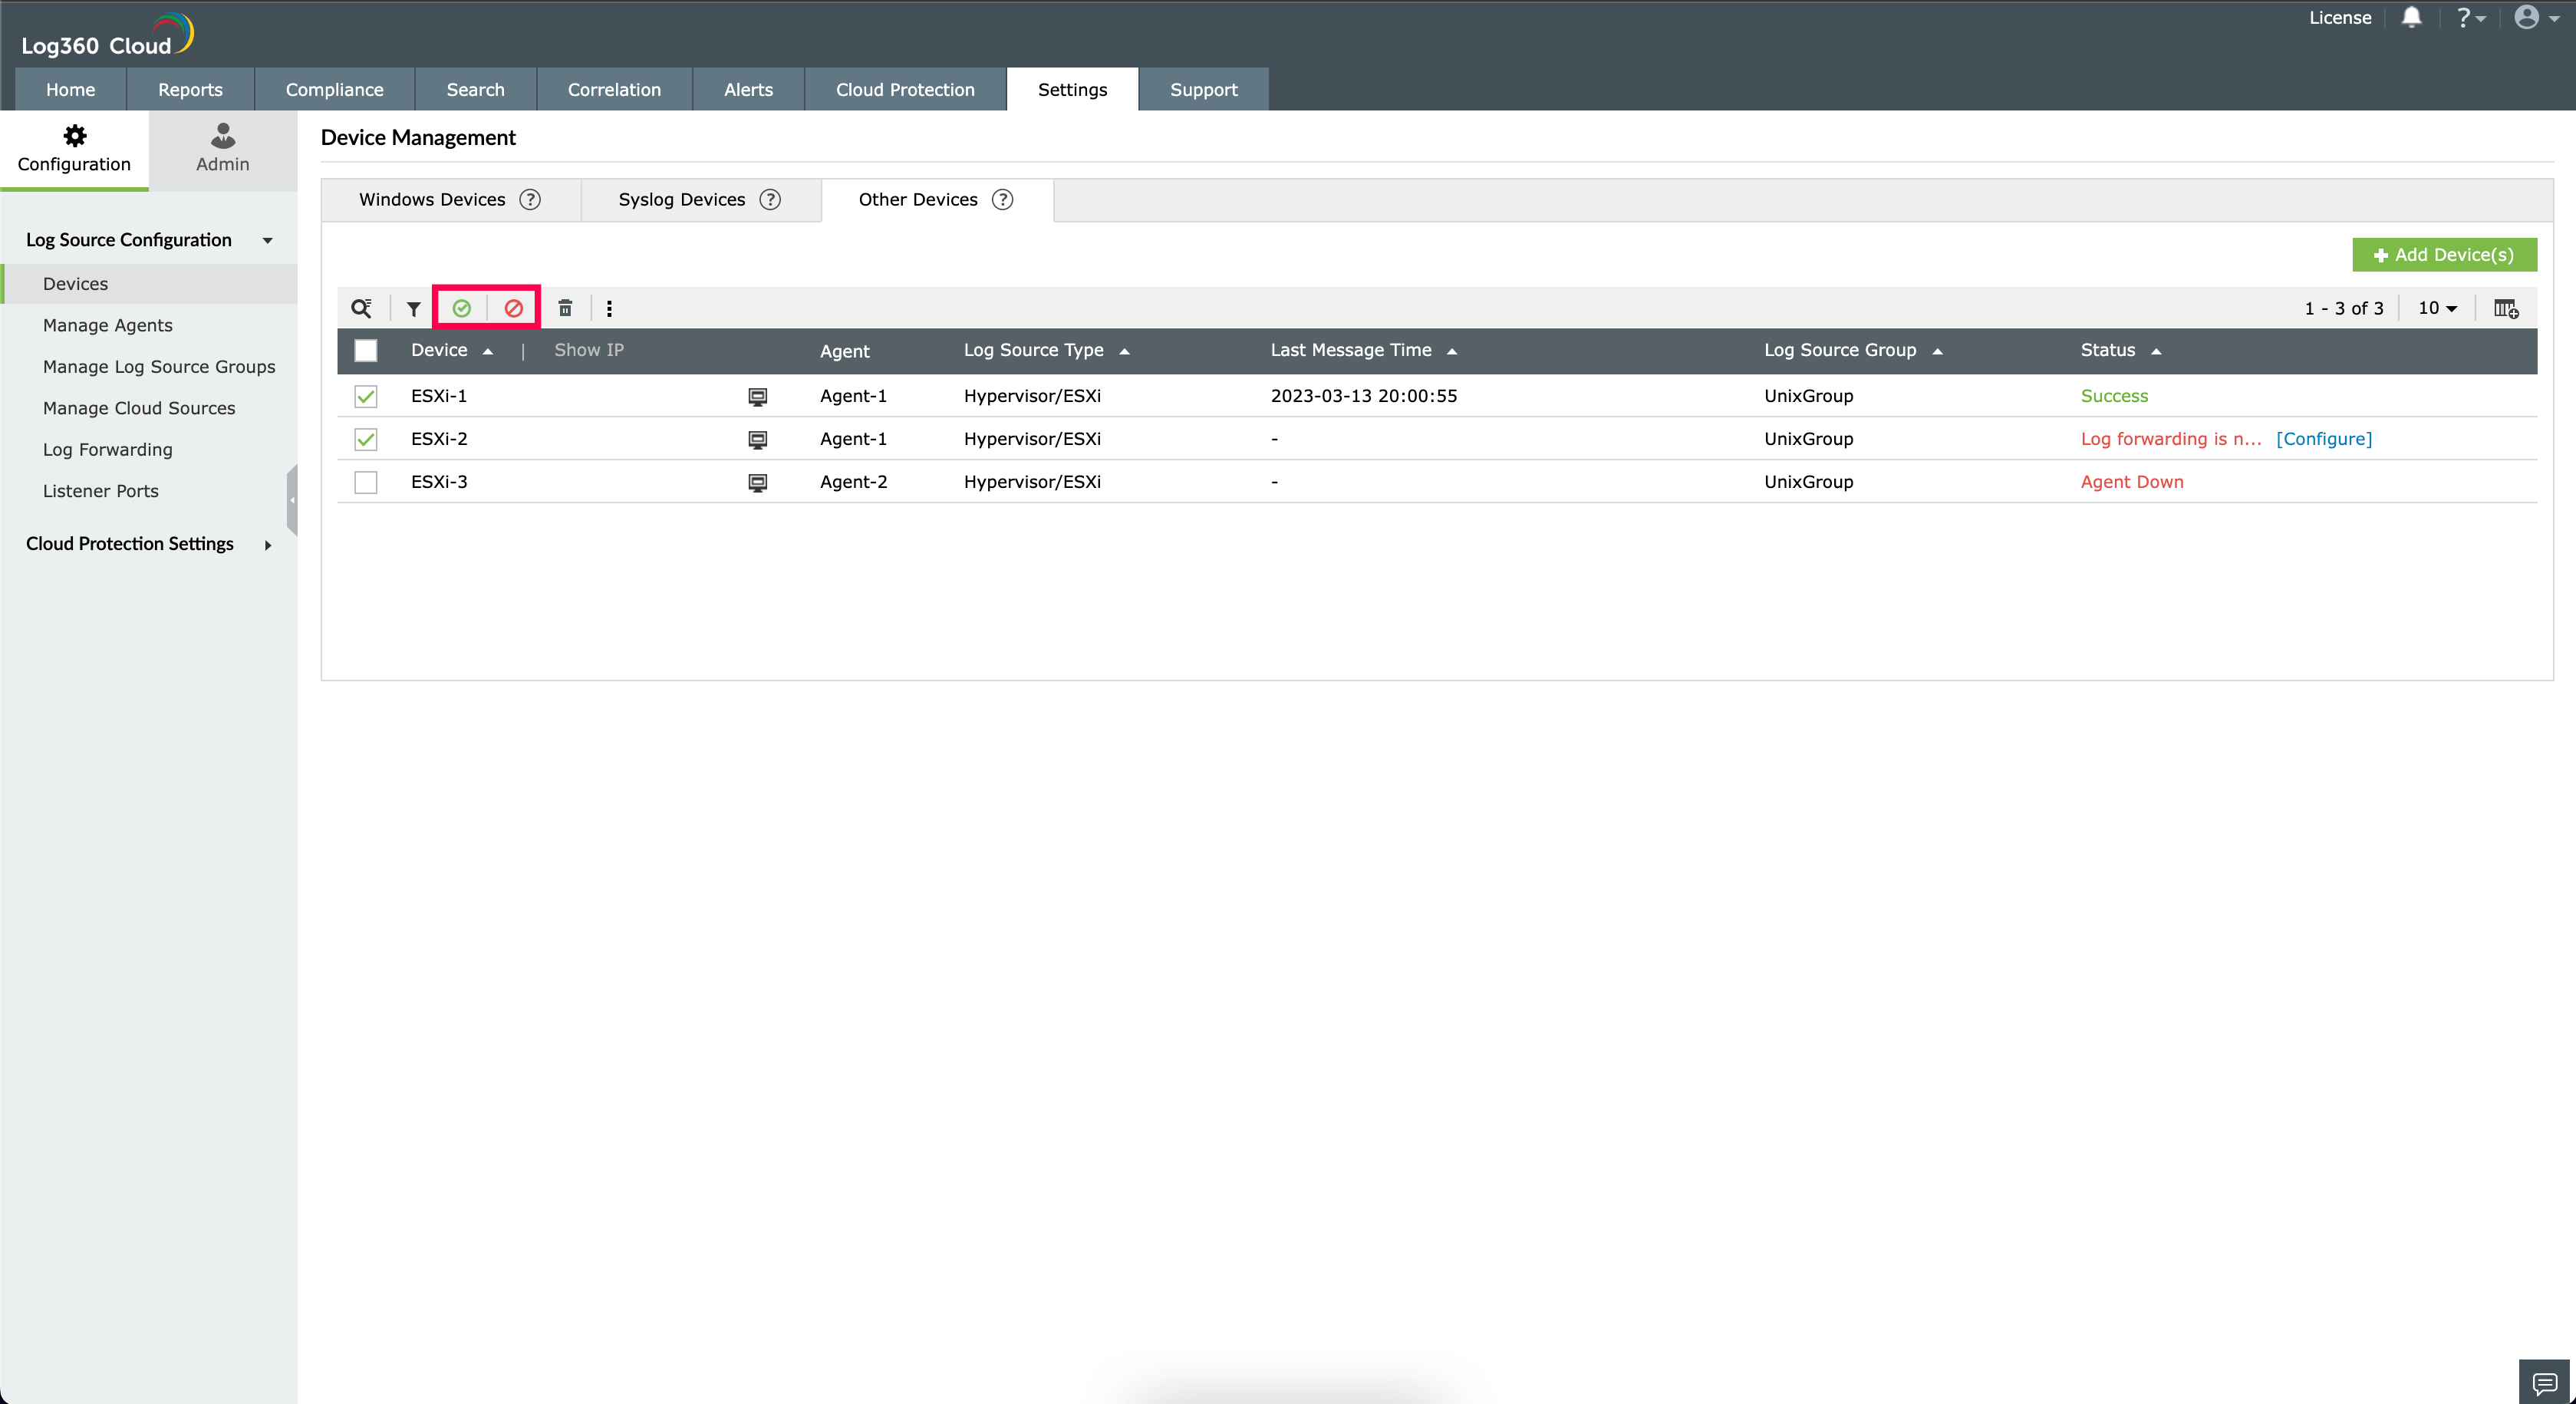
- Now the ESXI device has been enabled/disabled successfully.
Delete an ESXI device
To delete an existing ESXI device, follow the steps given below.
- Open Log360 Cloud and select the Settings tab. Then navigate to Devices under Configuration.
- Choose the ESXI Devices tab and select the required devices by ticking the box corresponding to the device.
- Click the Delete device(s) icon in the Table Tool bar.
- Click Yes to confirm the action.
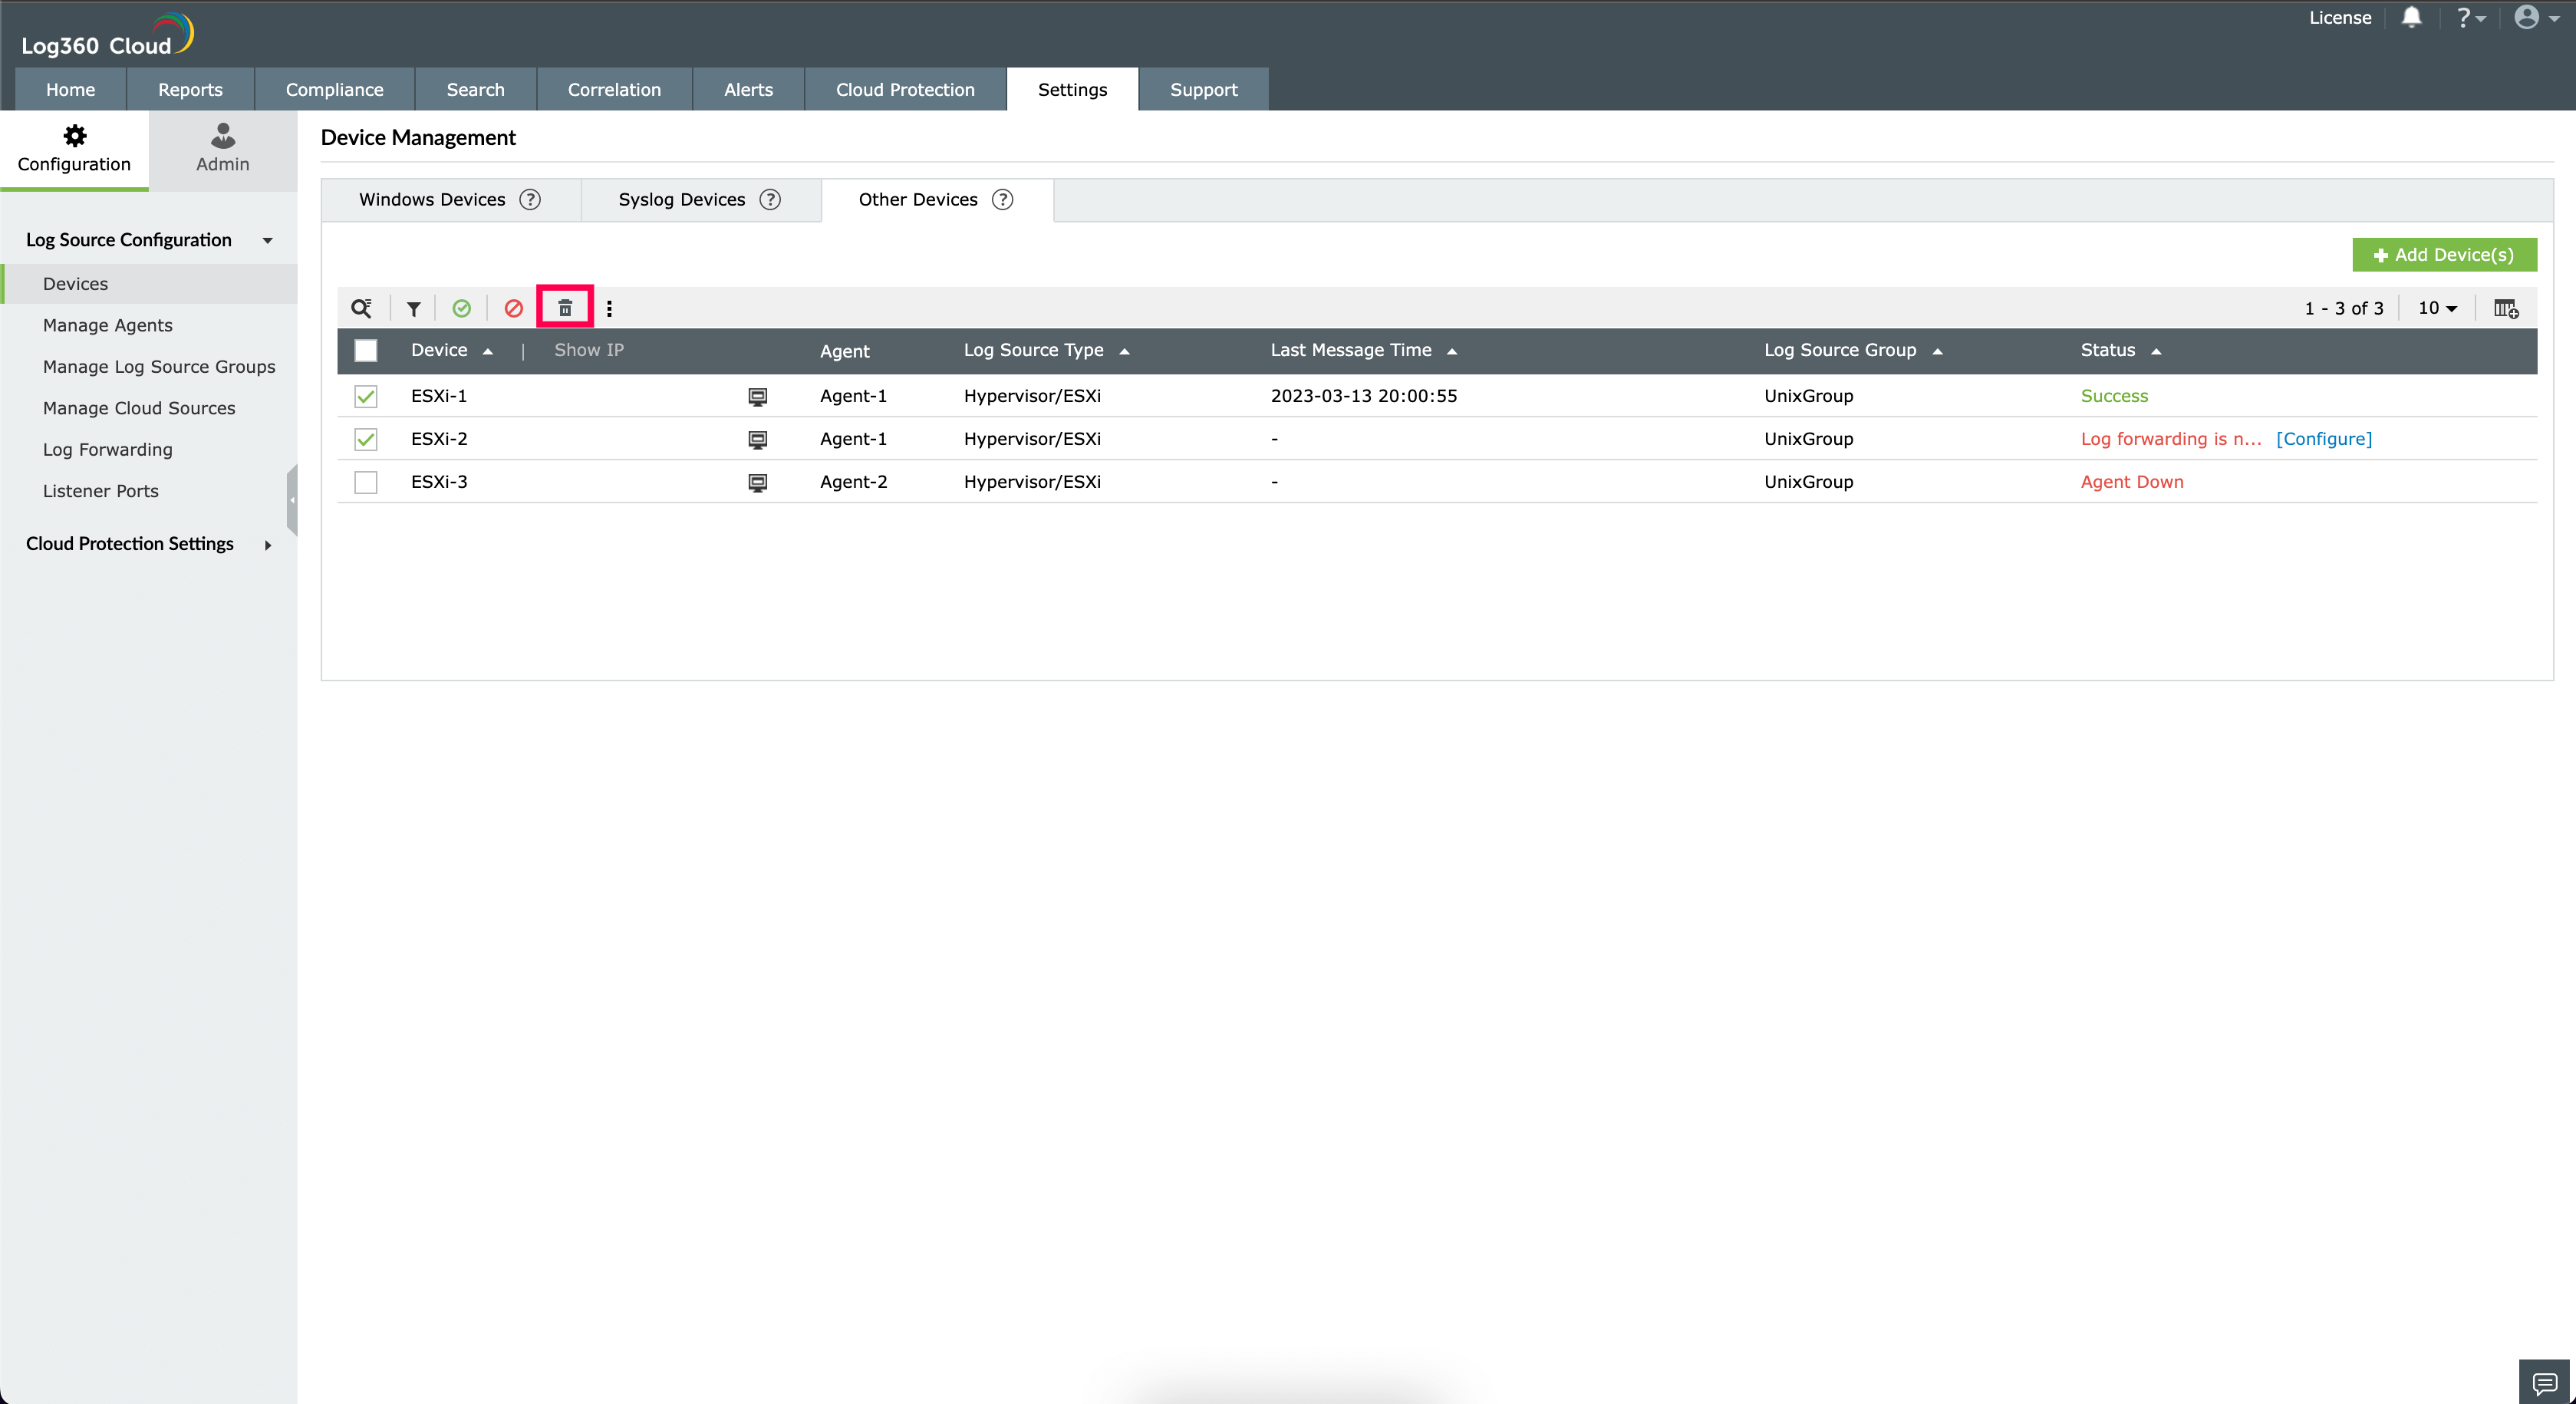
Now the selected ESXI devices are deleted successfully.
Bulk refresh IP
How to bulk refresh IP
- Go to Settings → Devices → Other devices → select the devices for which IP needs to be updated.

- Click on : icon and select Refresh IP address option from the dropdown menu to refresh IP.