- Log360 Cloud
- Admin Settings
- Storage Tiers
- Configuring Storage Tiers
Configuring Storage Tiers
In this page:
Overview
This section details how Storage Tiers can be configured in ManageEngine Log360 Cloud. Storage Tiers help you define custom log retention strategies by setting different policies for specific log types, sources, and optional filtering criteria. This ensures that critical logs can be retained longer while helping control storage usage for less relevant data.
The configuration includes selecting the logs to manage, setting retention periods for archive and search storage, applying filters, and enabling daily ingestion alerts. You can also create multiple condition groups to manage how incoming logs are routed to each tier.
Steps to configure Storage Tiers
- Log in to your Log360 Cloud account.
- Go to the Settings tab and select Admin.
- In the left pane, navigate to Data Storage and click Storage Tiers.
- In the Storage Tiers window, click Add Storage Tiers.
NOTE: You can create up to 20 Storage Tiers in ManageEngine Log360 Cloud.
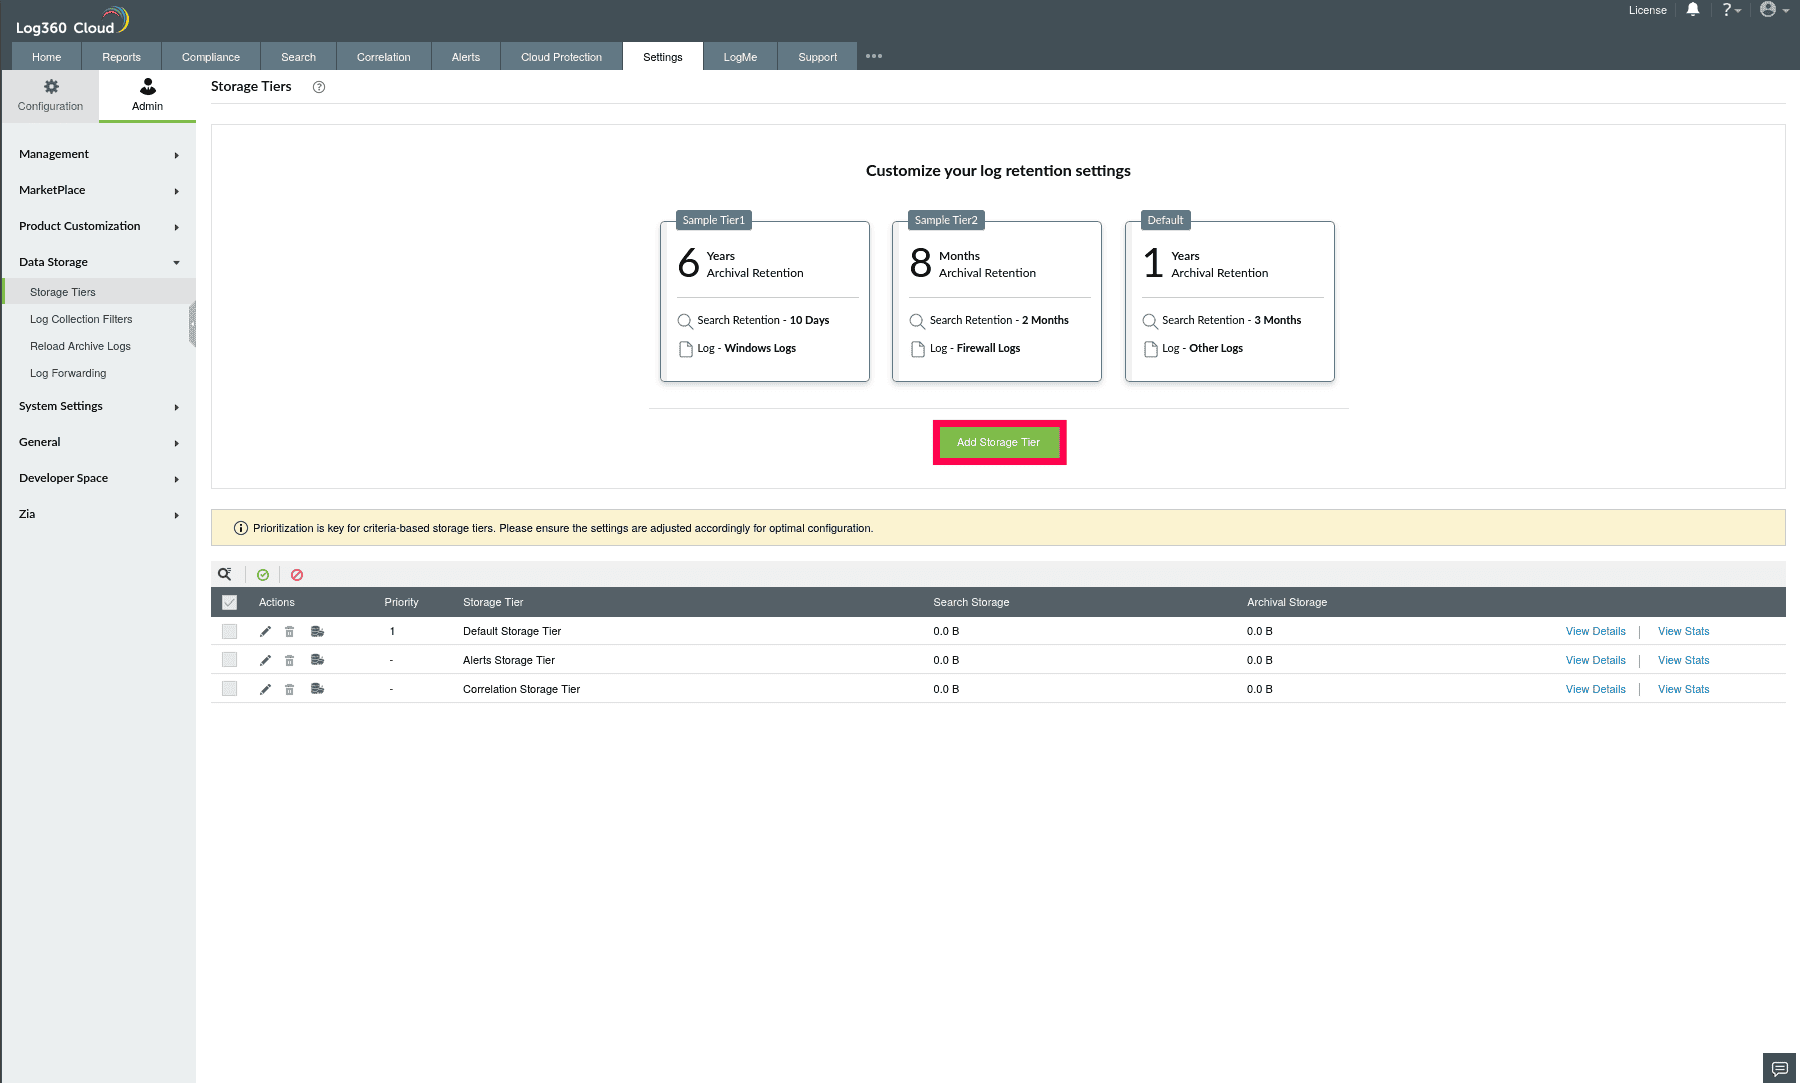
Figure 1: Configuring Storage Tiers
- Configure the following fields in the Add Storage Tiers window.
- Name: Enter a name for the Storage Tier (max 30 characters).
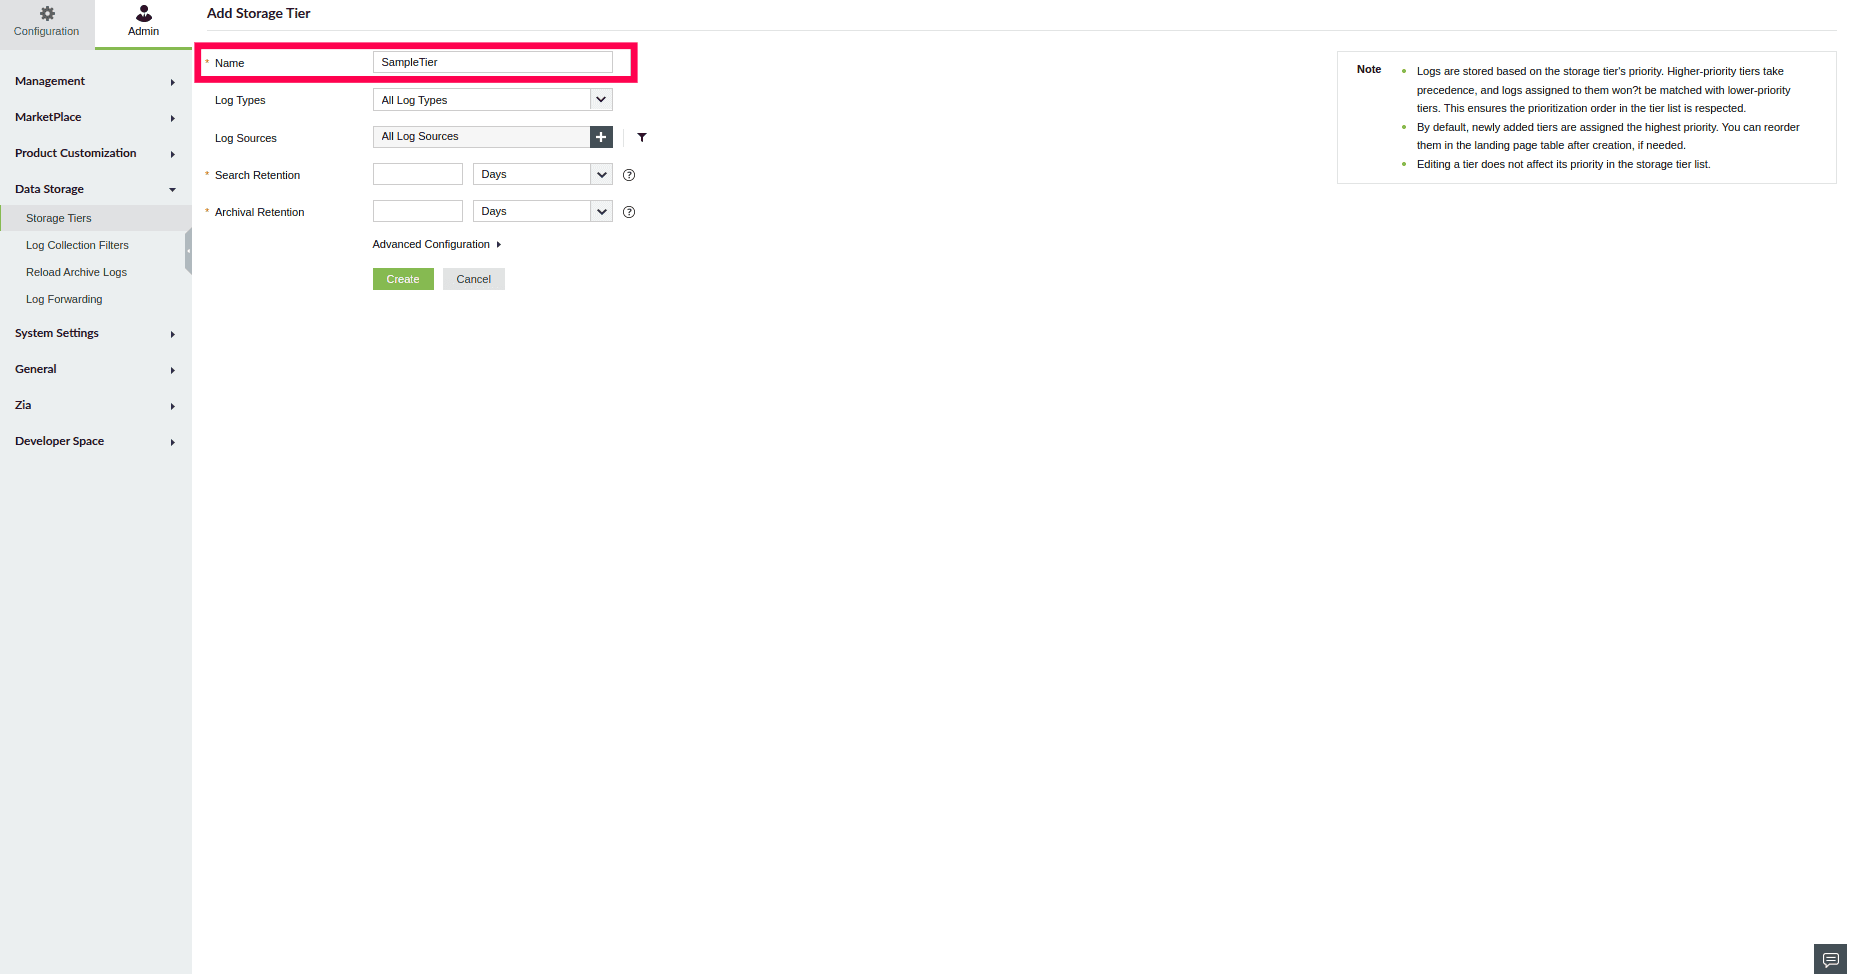
Figure 2: Naming a Storage Tier
- Log Types: Select one or more Log Types from the drop-down.
NOTE: By default, all log types are selected. You can select up to 50 Log Types from the drop-down.
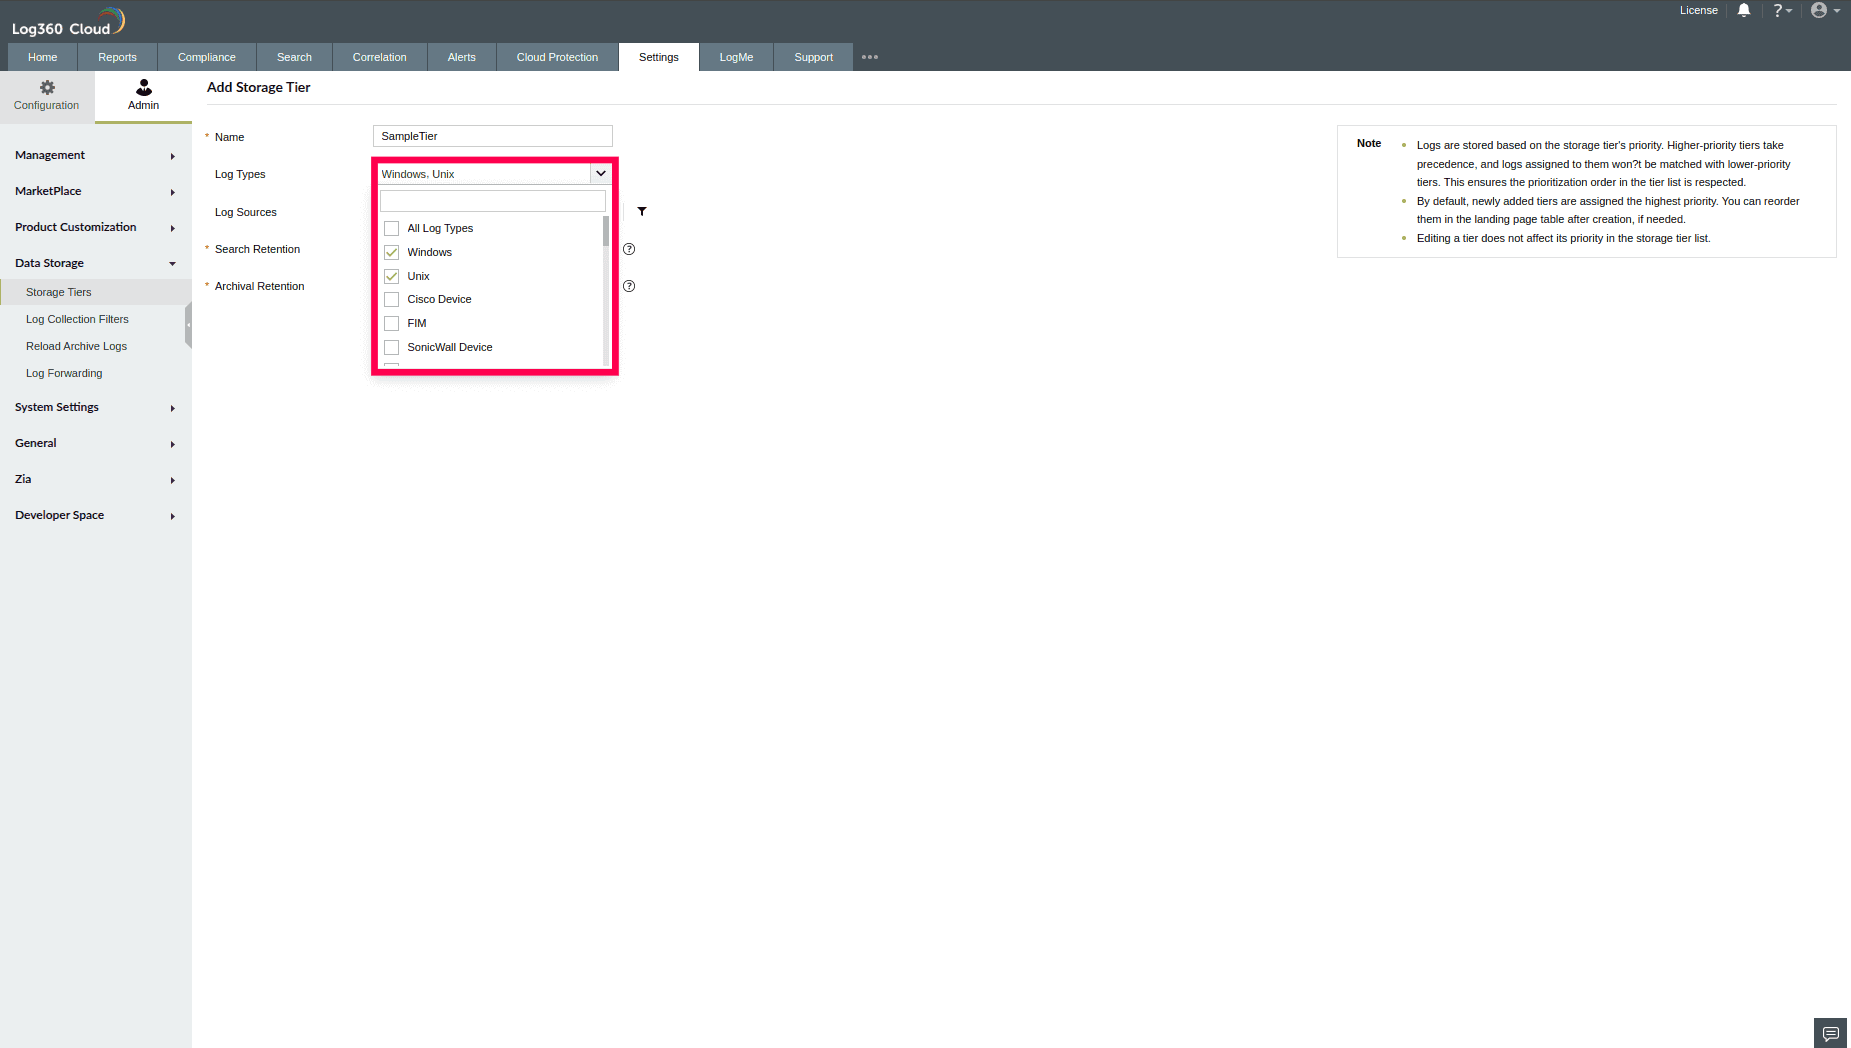
Figure 3: Configuring Log Types
- Log Sources:
- Click the
 icon to select the log sources this tier should apply to.

Figure 4: Configuring Log Sources
- You can choose from predefined source groups or individual devices. Alternatively, use the Select All checkbox to include all available log sources.
- After selecting Log Sources of your choice, select OK to save.
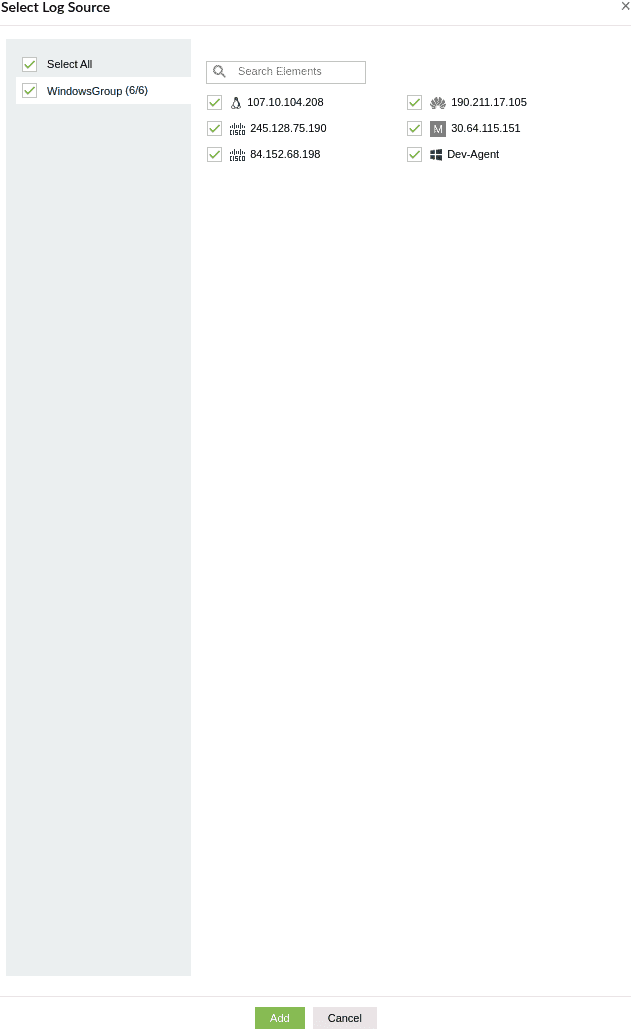
Figure 5: Selecting Log Sources
NOTE: By default, all Log Sources are selected. You can select up to 10,000 log sources.
- To narrow the selection further, click the
 icon.
icon.
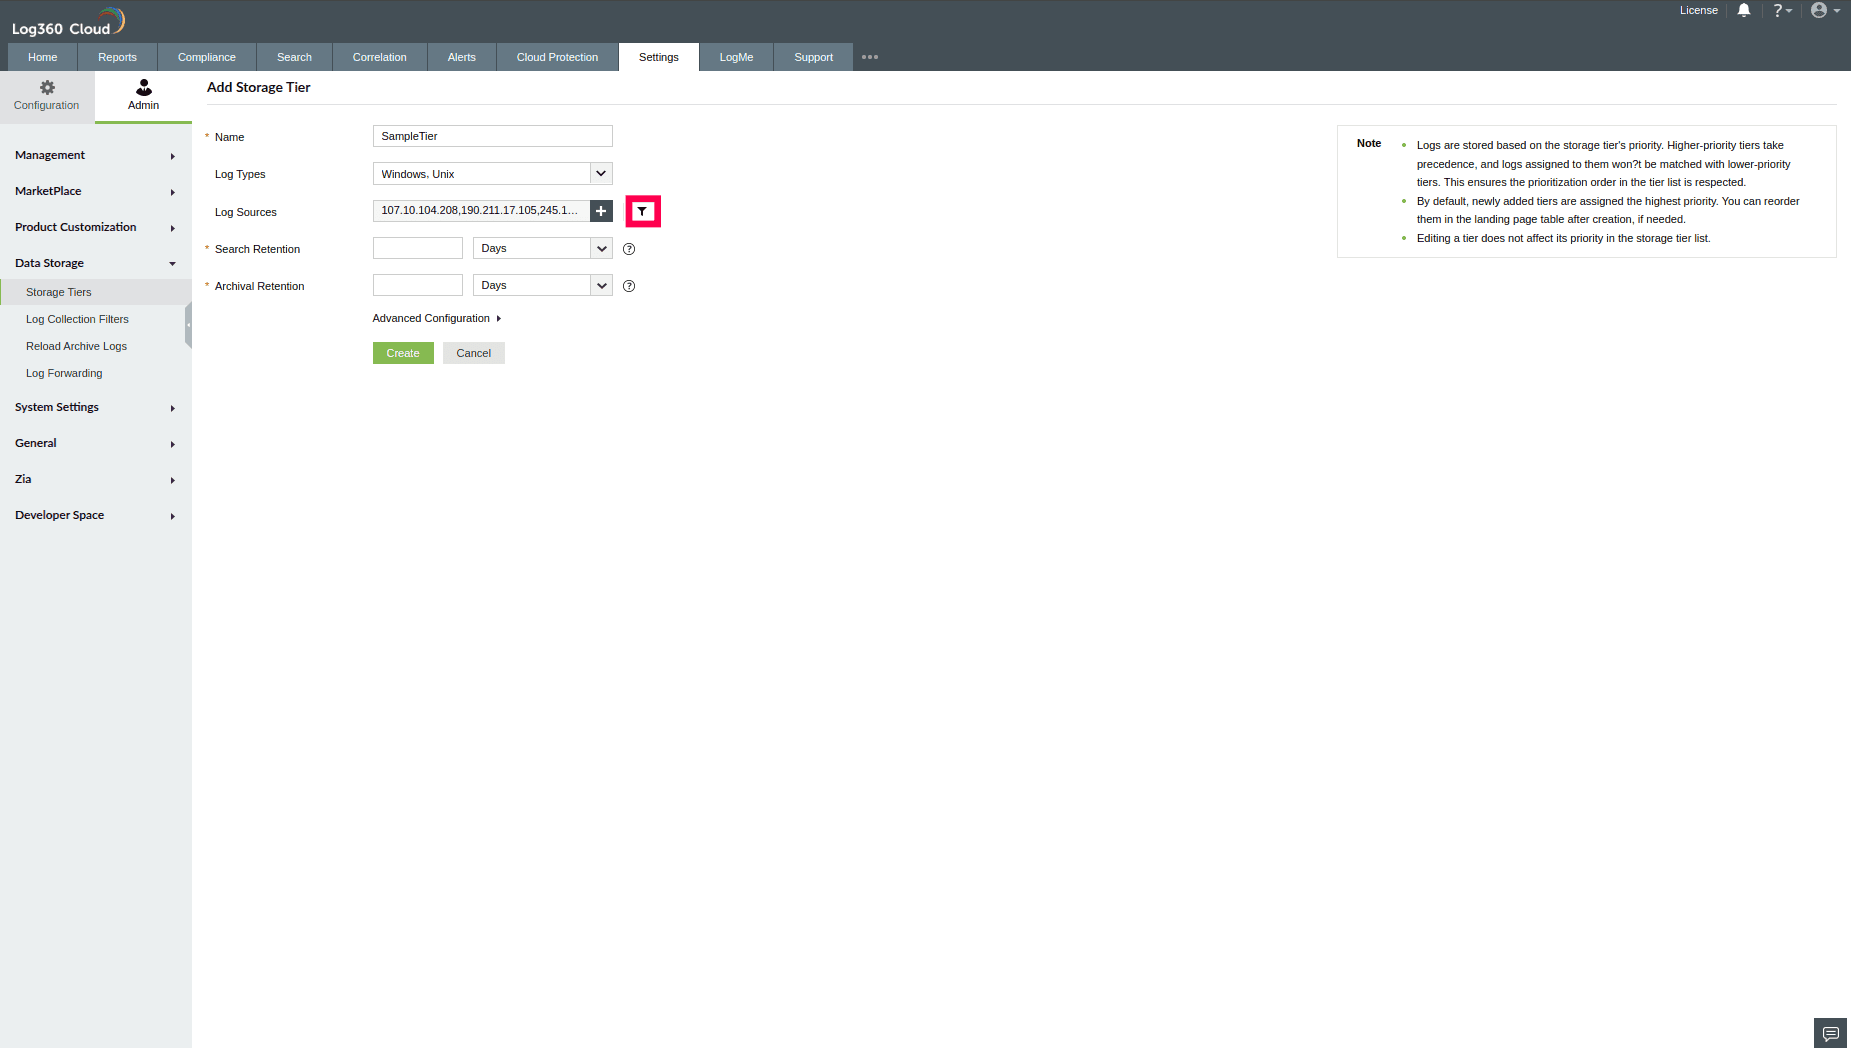
Figure 6: Creating a filter
- This opens the Create Filter window, where you can define rules to include only logs that match specific attributes.
- Select a field from the first drop-down.
- Choose a condition, such as Equals or Not Equals.
- Enter a value of the field that you want to filter in the third field.
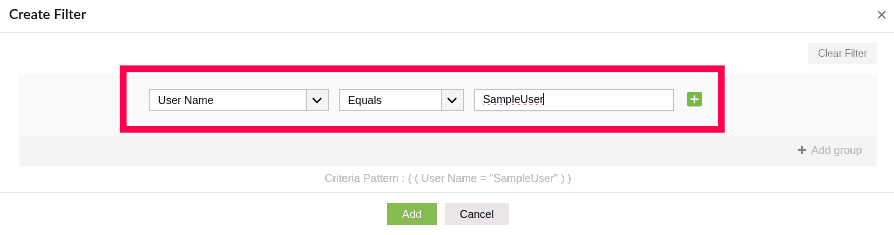
Figure 7: Filtering Log Sources
- To add another criterion to the same group, click the
 icon next to an existing group.

Figure 8: Adding a criterion
- All criteria within a group are evaluated together based on the selected AND/OR option from the drop-down.
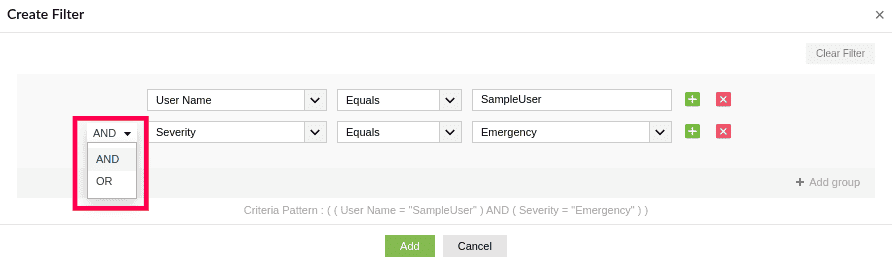
Figure 9: Configuring a criterion
- Click Add group to define an additional set of conditions.
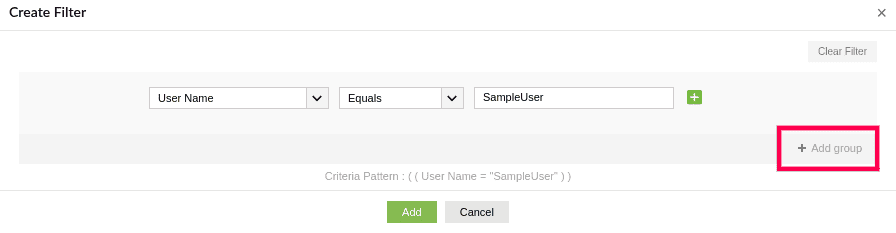
Figure 10: Adding a group
- When multiple groups are present, use the drop-down between them to choose whether they should follow AND/OR logic.
NOTE: AND means all conditions in the group must be true for the log to match. OR means at least one condition in the group must be true for the log to match. Logs that match the group’s condition set will be routed to the corresponding Storage Tier.
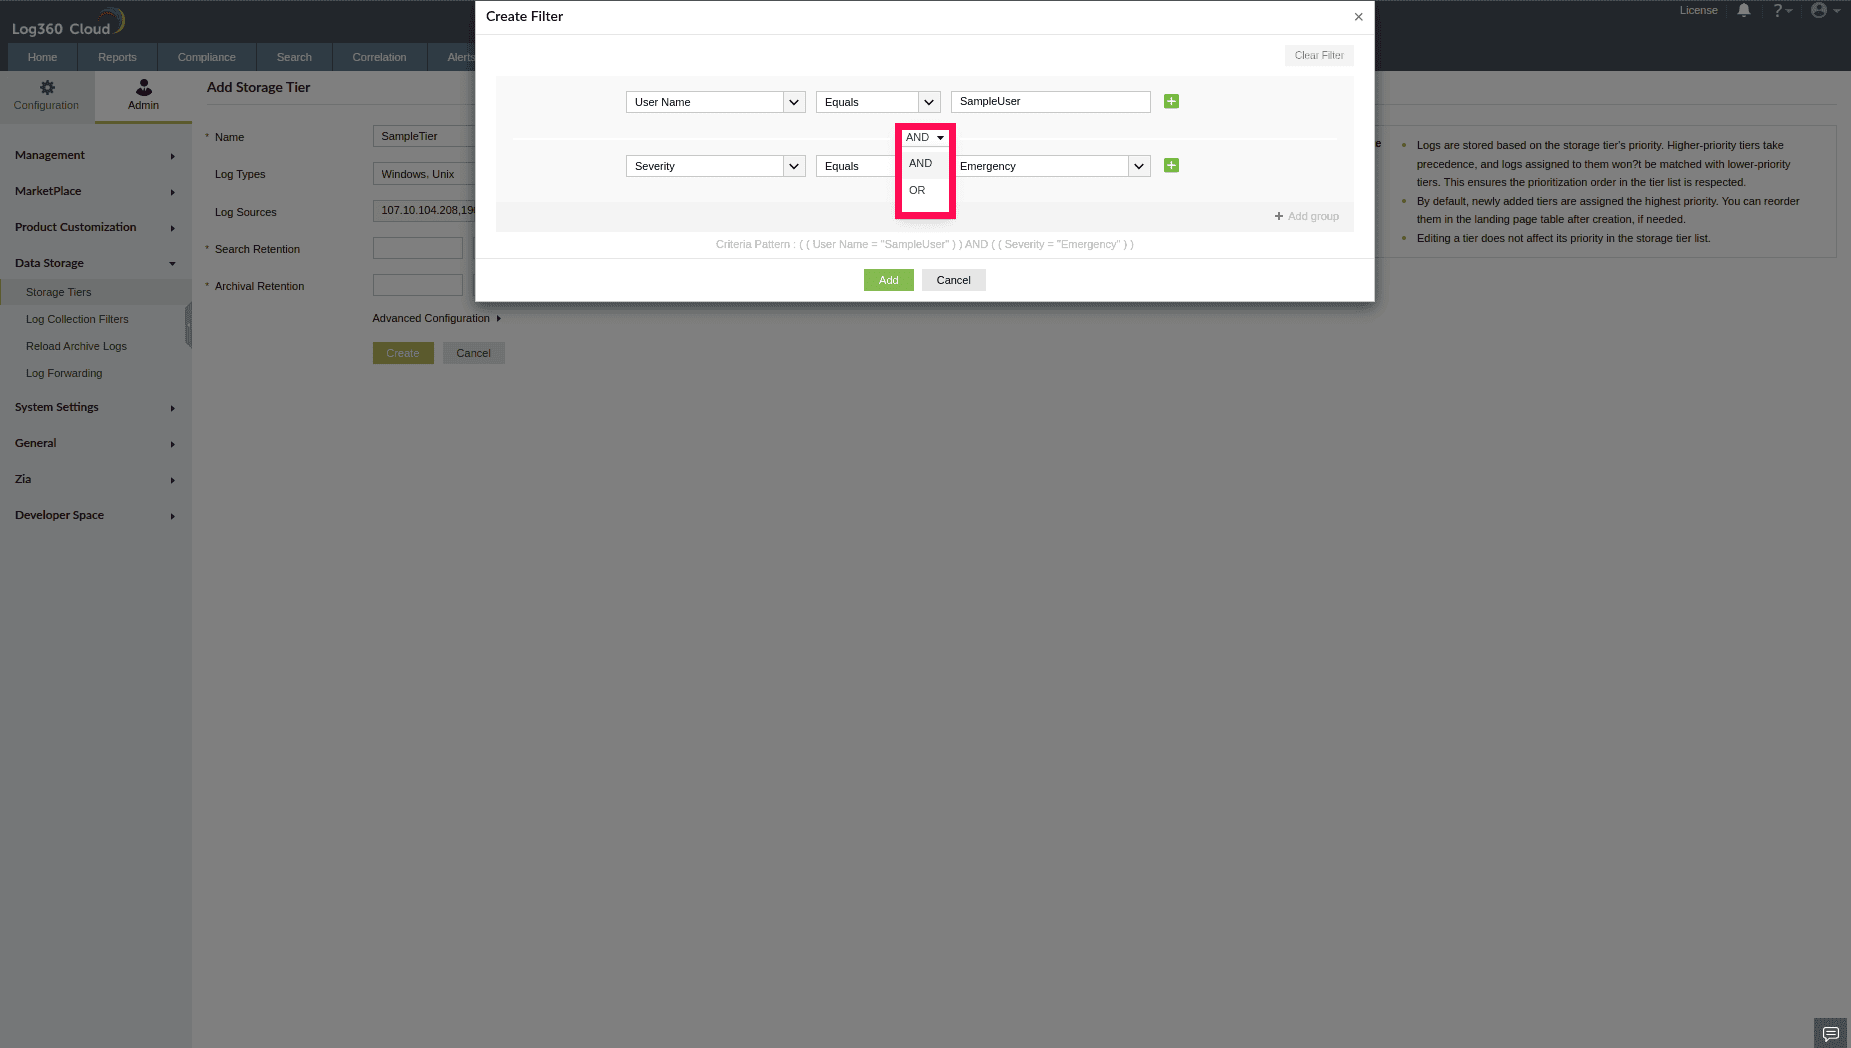
Figure 11: Configuring a group
NOTE: You can add up to 5 groups in the filter configuration. Each group can contain up to 10 criteria.
- You can delete a specific criterion by clicking the
 icon next to it, and remove an entire group by clicking the
  icon associated with that group.
NOTE: The following example details how filters can be applied using groups and multiple criteria with AND/OR logic.
Example: Filtering significant Windows logs by excluding noisy windows events
Group 1 (AND logic between criteria):
- Criteria 1: Log Source Type = Windows
- Criteria 2: Event ID Between 4620 and 4780
- Criteria 3: Severity Equals Critical, Success, Failure
Group 2 (OR logic between criteria):
- Criteria 1: Event ID Not Equals 4662
- Criteria 2: Event ID Not Equals 4658
- Criteria 3: Event ID Not Equals 4690
The groups are connected using AND logic, so only the significant Windows logs that meet all the conditions in Group 1 and at least one condition in Group 2 will be routed to the storage tier, ensuring that irrelevant event IDs are excluded.
If the criteria are not met, the logs will be stored in the default storage tier.
- Search Retention: Define how long logs remain available in searchable storage. Enter a numeric value and use the drop-down next to it to select the unit such as days, weeks, months, or years.
- Archive Retention: Define how long logs are retained in archival storage. Similar to search retention, enter the duration and choose the unit from the drop-down.
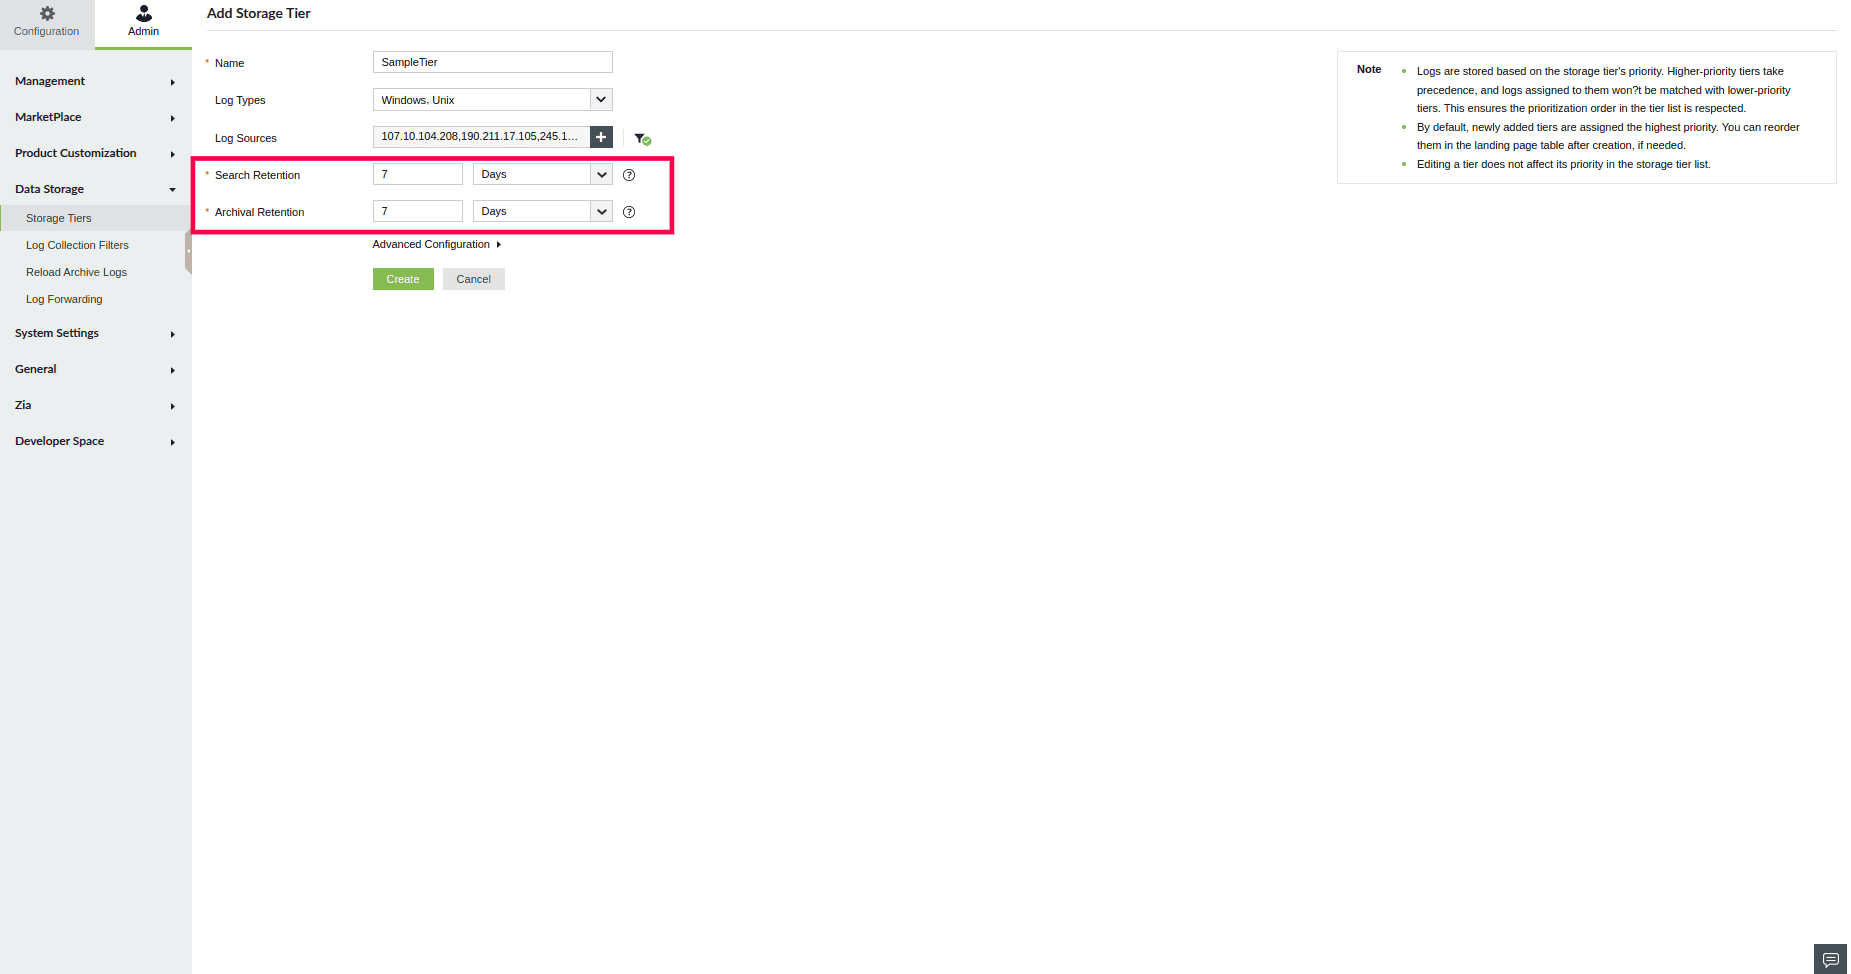
Figure 12: Configuring Search and Archival Retention
NOTE: Search Retention period must be shorter than the archive retention period.
- Click Advanced Configuration (optional) to:
- Enable the Notify when daily ingestion crosses checkbox to set a daily ingestion limit for this tier.
- Enter the threshold value in gigabytes (GB) to receive an email alert when the log volume exceeds the specified limit. By default, 1 GB is allocated.
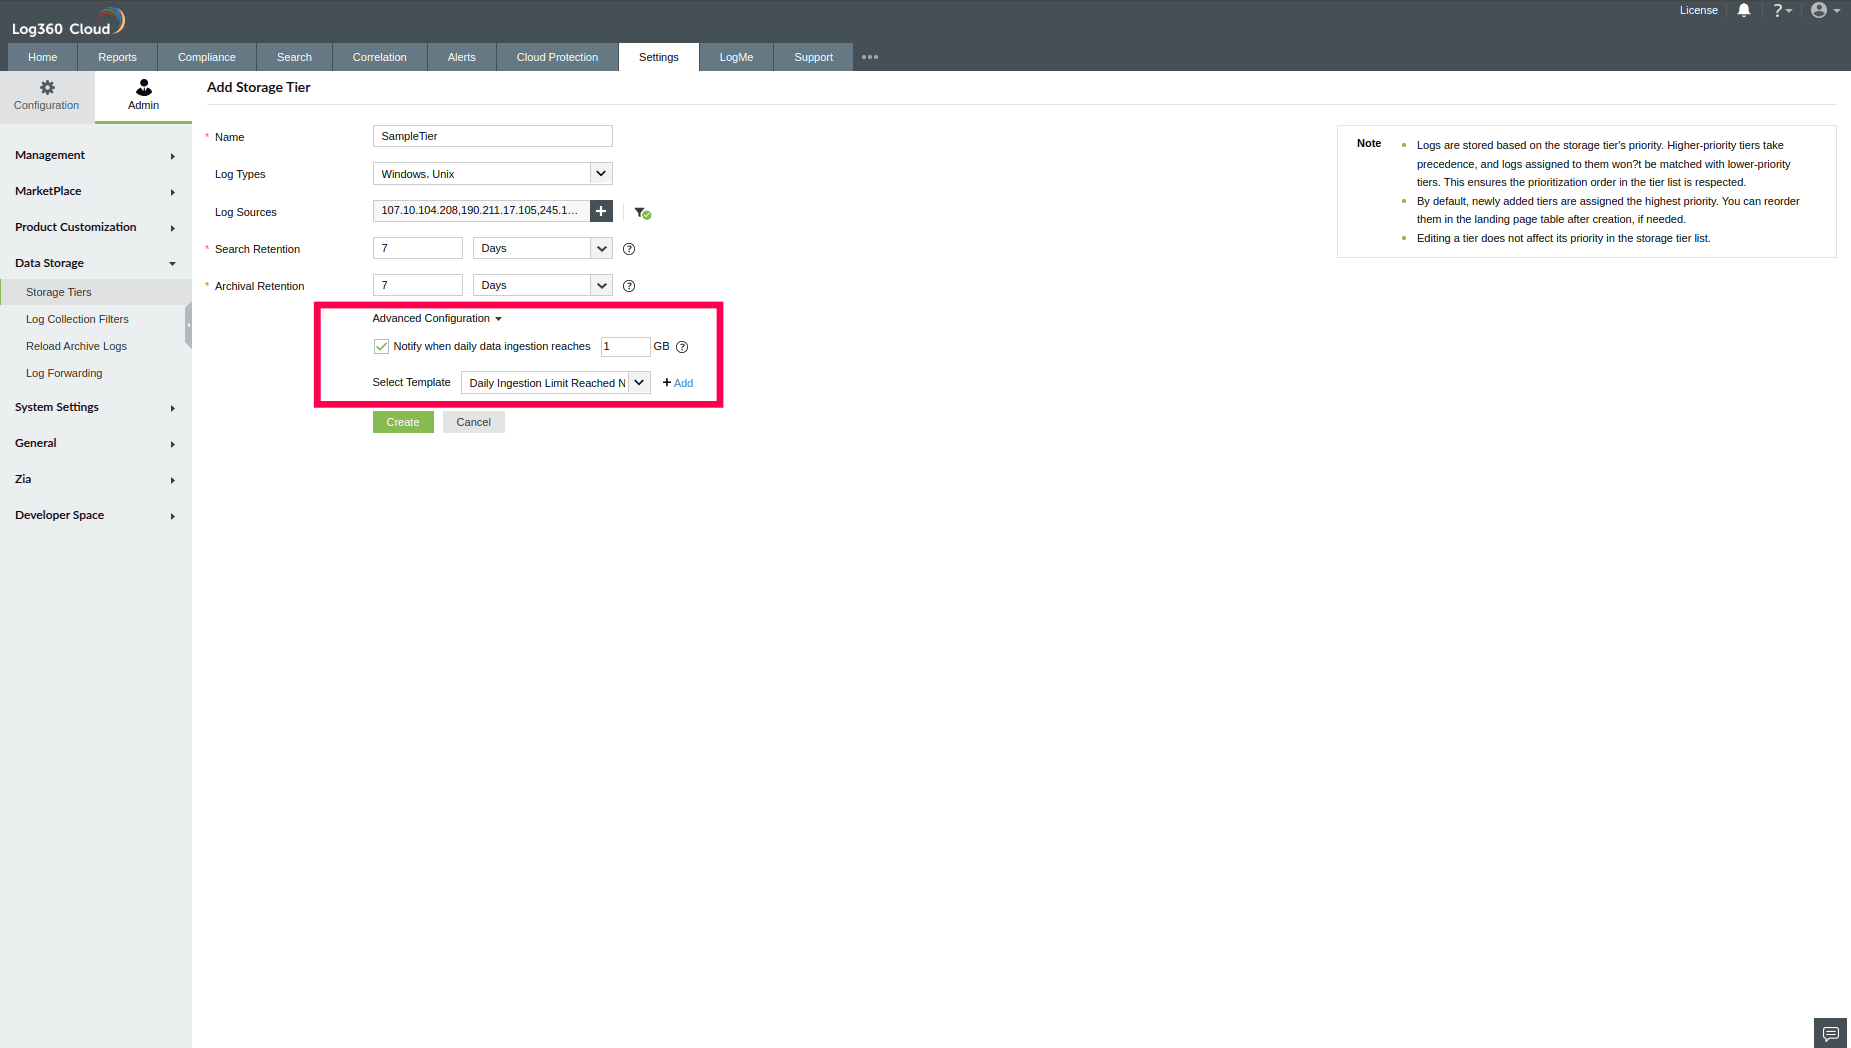
Figure 13: Advanced Configuration
- From the Select Template drop-down, choose the email notification template to be used when the threshold is reached.
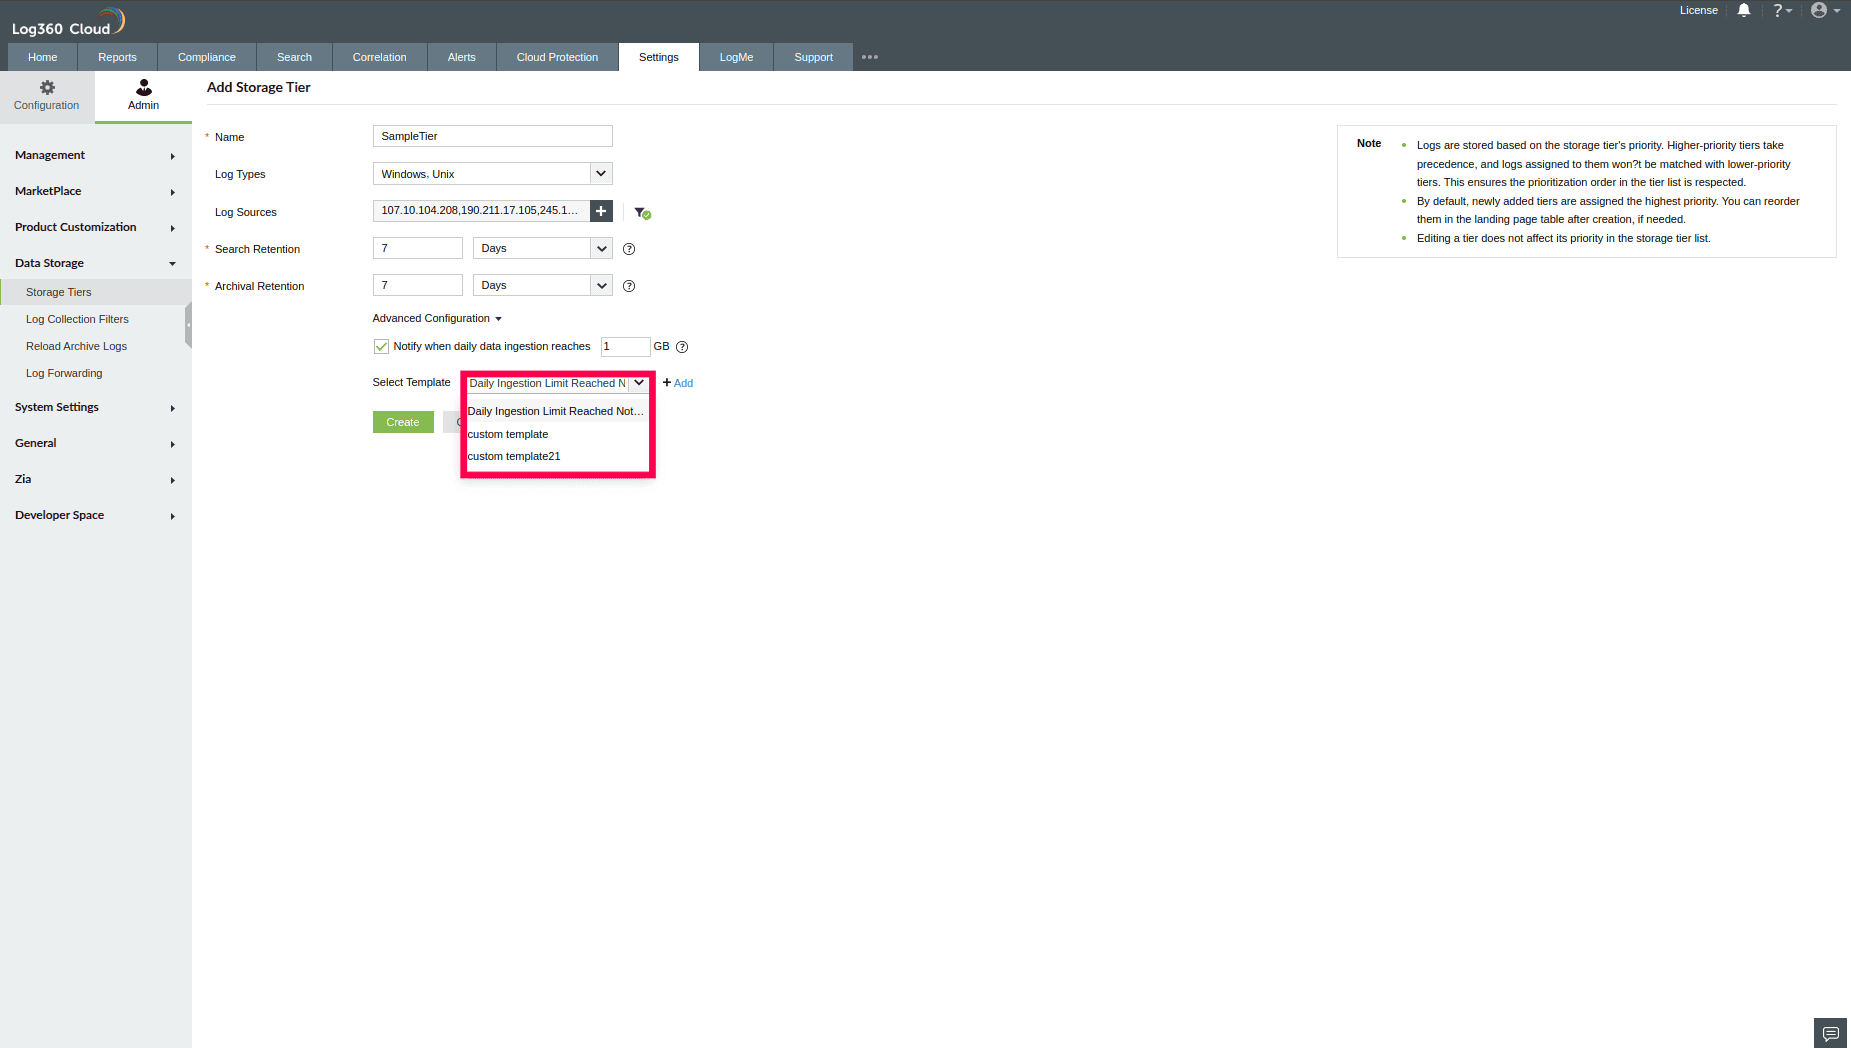
Figure 14: Advanced Configuration
NOTE: You can also click

icon to create a custom template, if needed. When you choose to create a new template, any unsaved tier configuration changes will not be retained. You will need to
re-enter all previous tier settings before clicking
Create. Follow the steps below to create a custom template.
- In the pop-up that appears, click Proceed to continue.
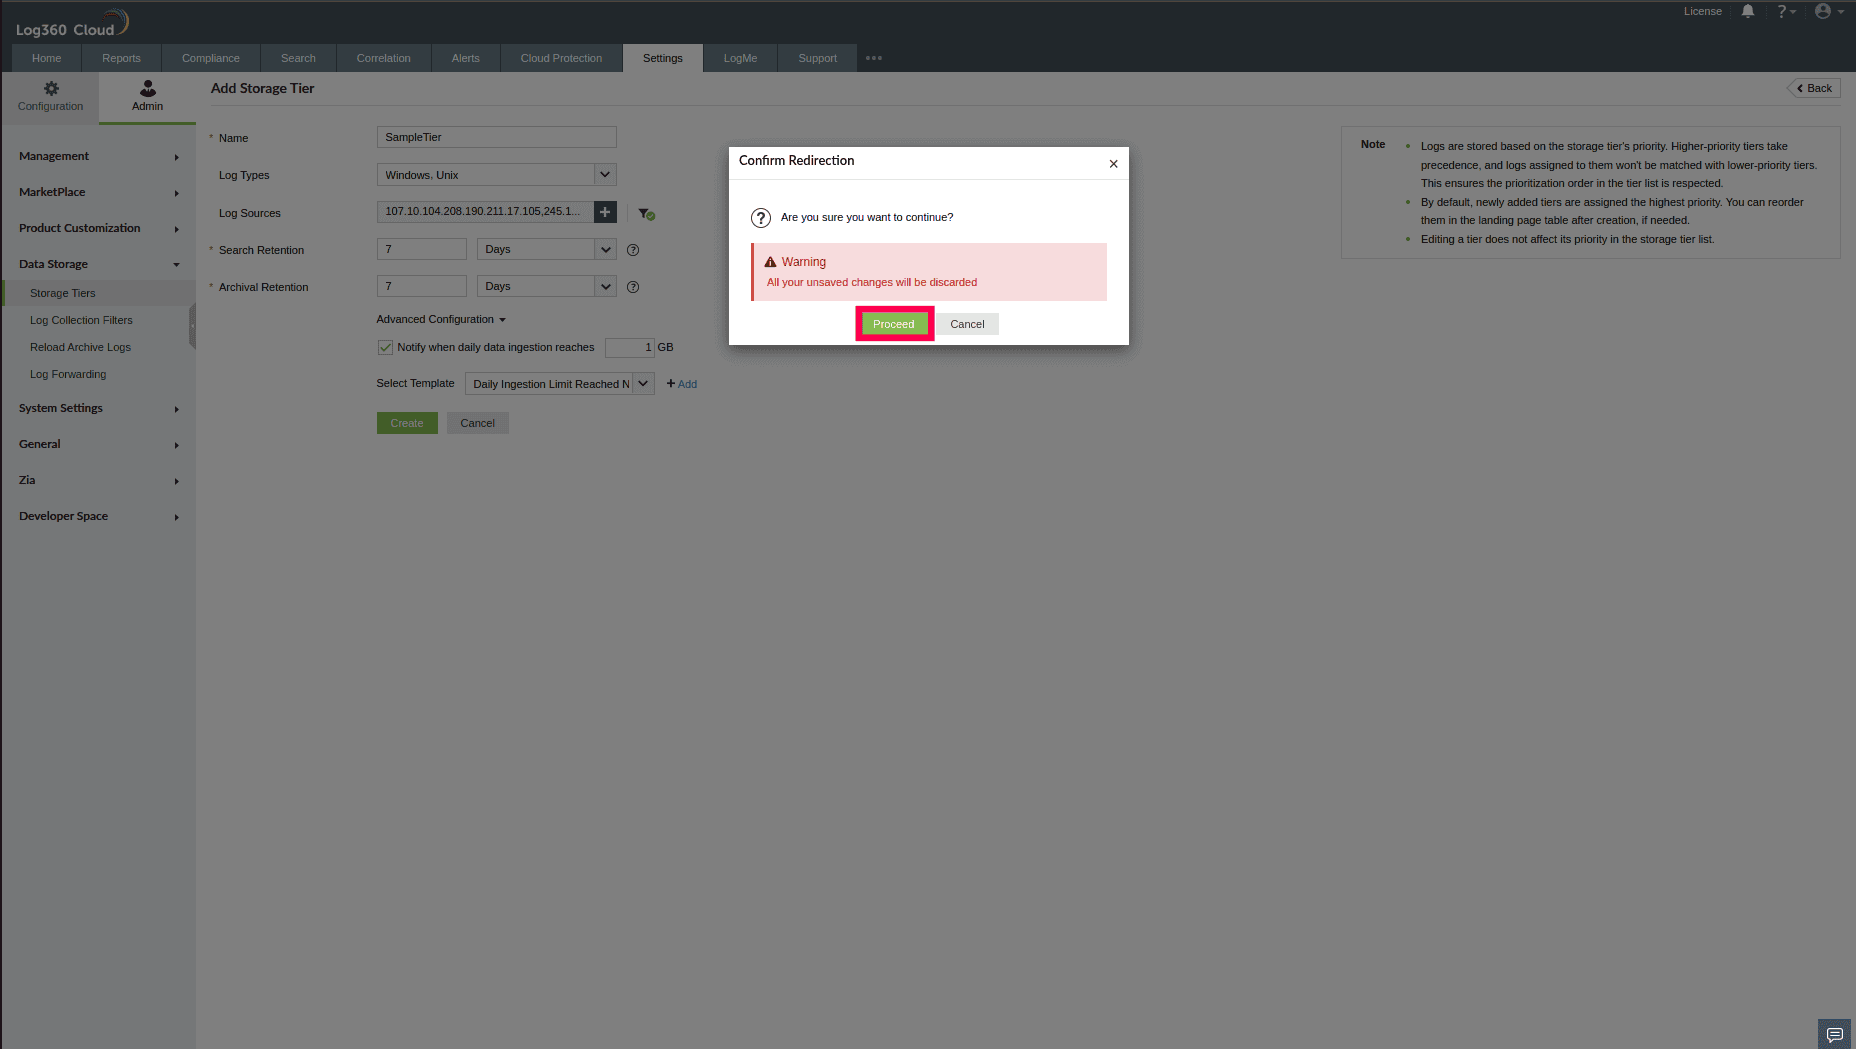
Figure 15: Configuring mail notification template
- In the Create Template window, enter a name and an optional description for the template.
- From the Module dropdown, select the appropriate module, such as Storage Tiers.
- Use the Notify Via dropdown to choose how notifications should be sent: Email, SMS, or both.

Figure 16: Creating a template
- Under the Email tab:
- In the Mail To field, enter the recipient email addresses.
- Enter a subject line.
- Compose your notification message in the Message field. Insert macros from the list on the right.
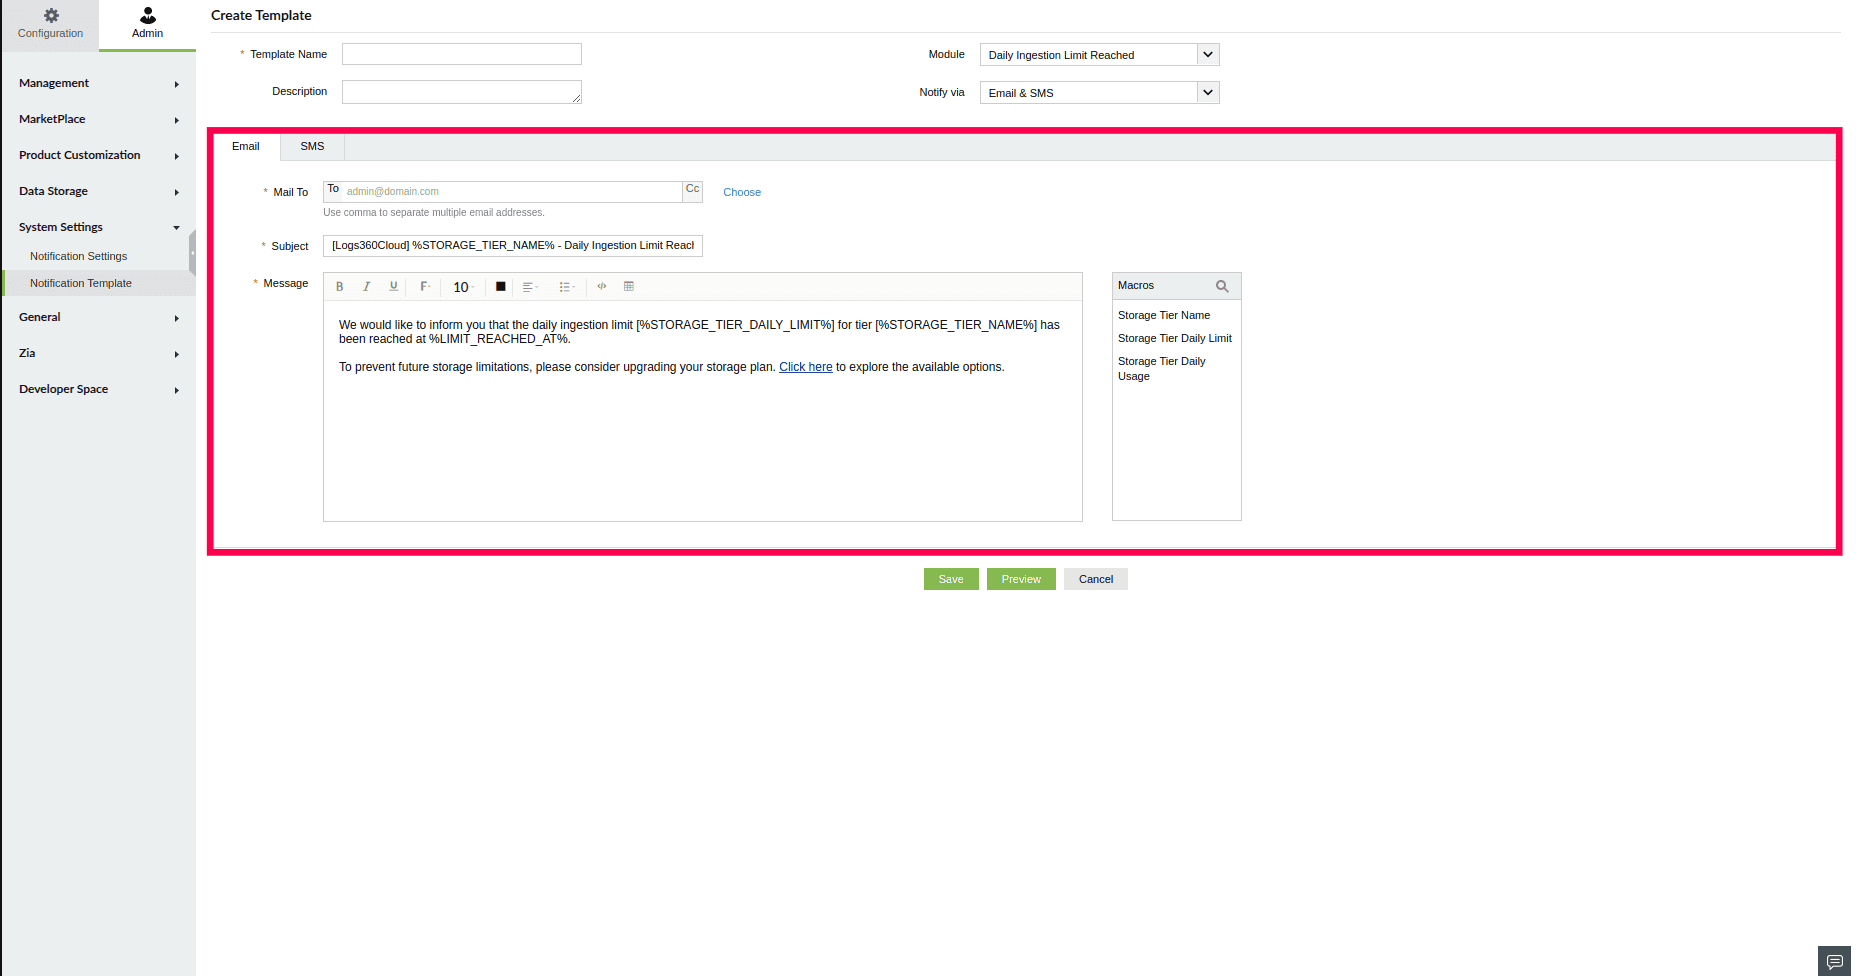
Figure 17: Email template for email notification
- To configure SMS notifications, switch to the SMS tab:
- In the Send To field, enter mobile numbers with country code. Use commas to separate multiple numbers.
- In the Message field, enter the SMS text. Macros can be used here as well.
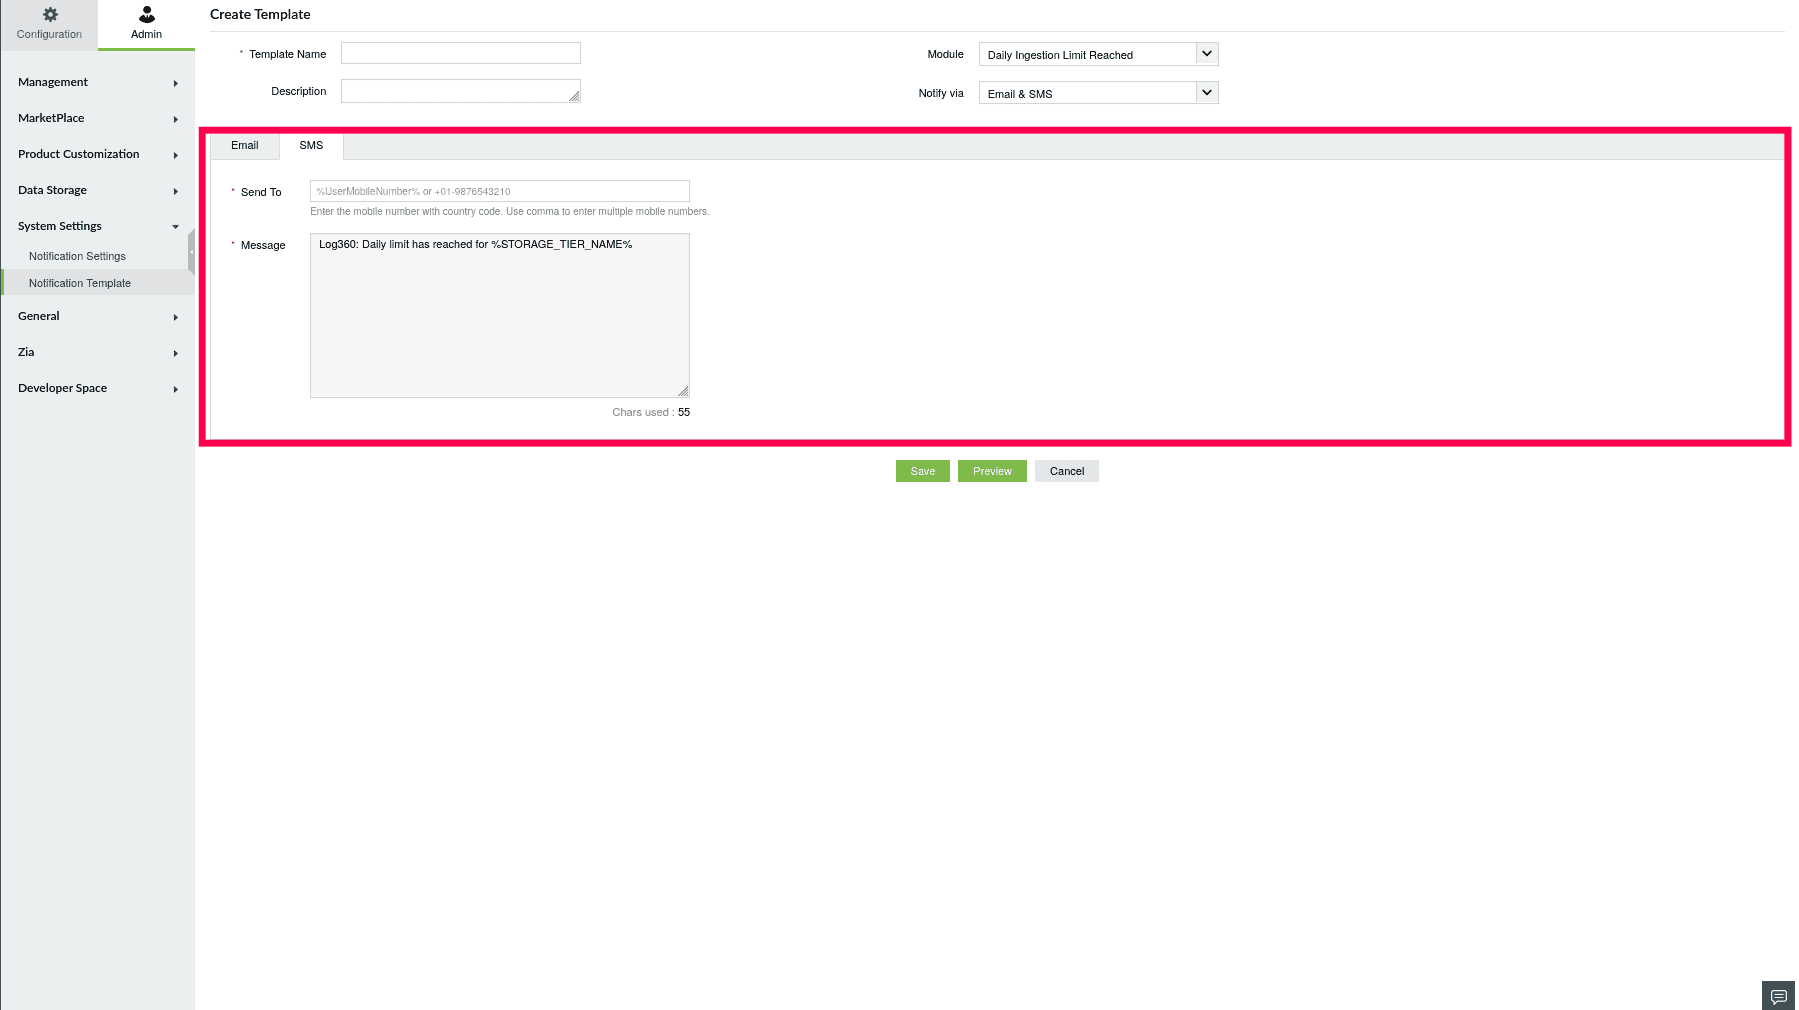
Figure 18: SMS template for SMS notification
NOTE: When configuring the notification template, use the phone number format: +01-XXXXXXXXXX.
- Once the template is configured, click Save to save the template.
- You can also click Preview to see how the message will appear before saving.
- Once the configuration is complete, click Create to add the tier.
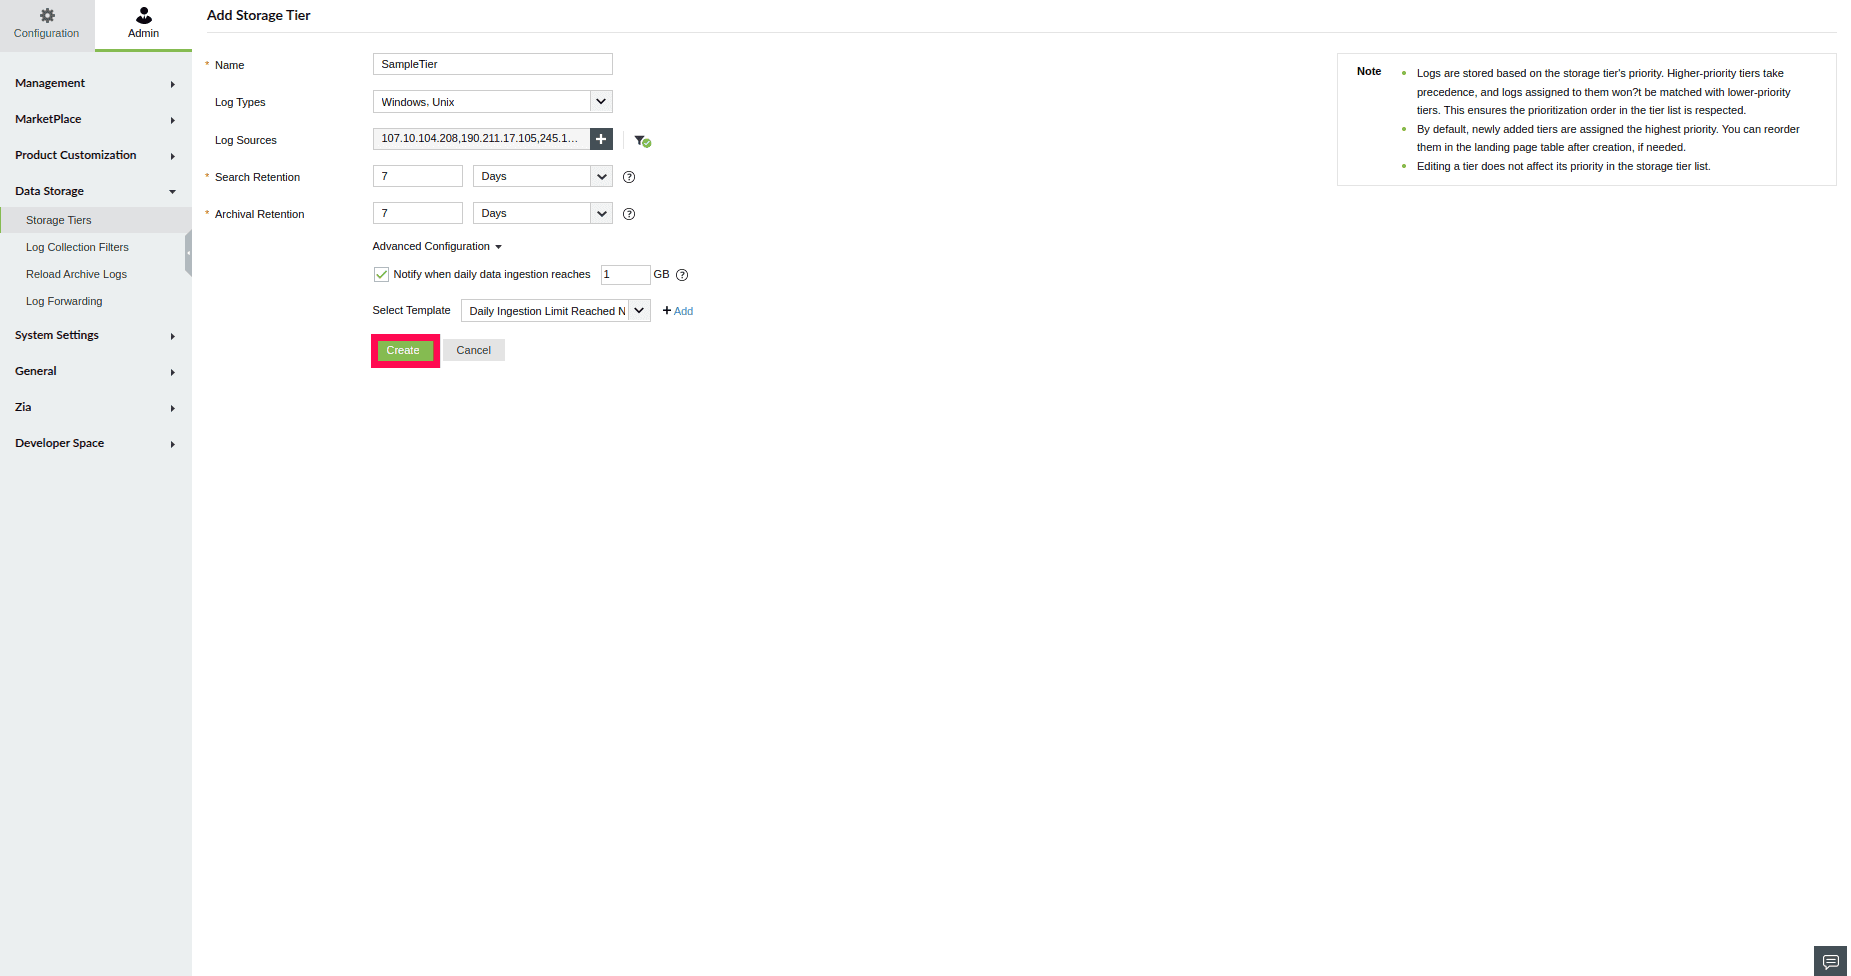
Figure 19: Adding a Storage Tier
- It will be listed in the Storage Tiers table, where you can view and manage all configured tiers.
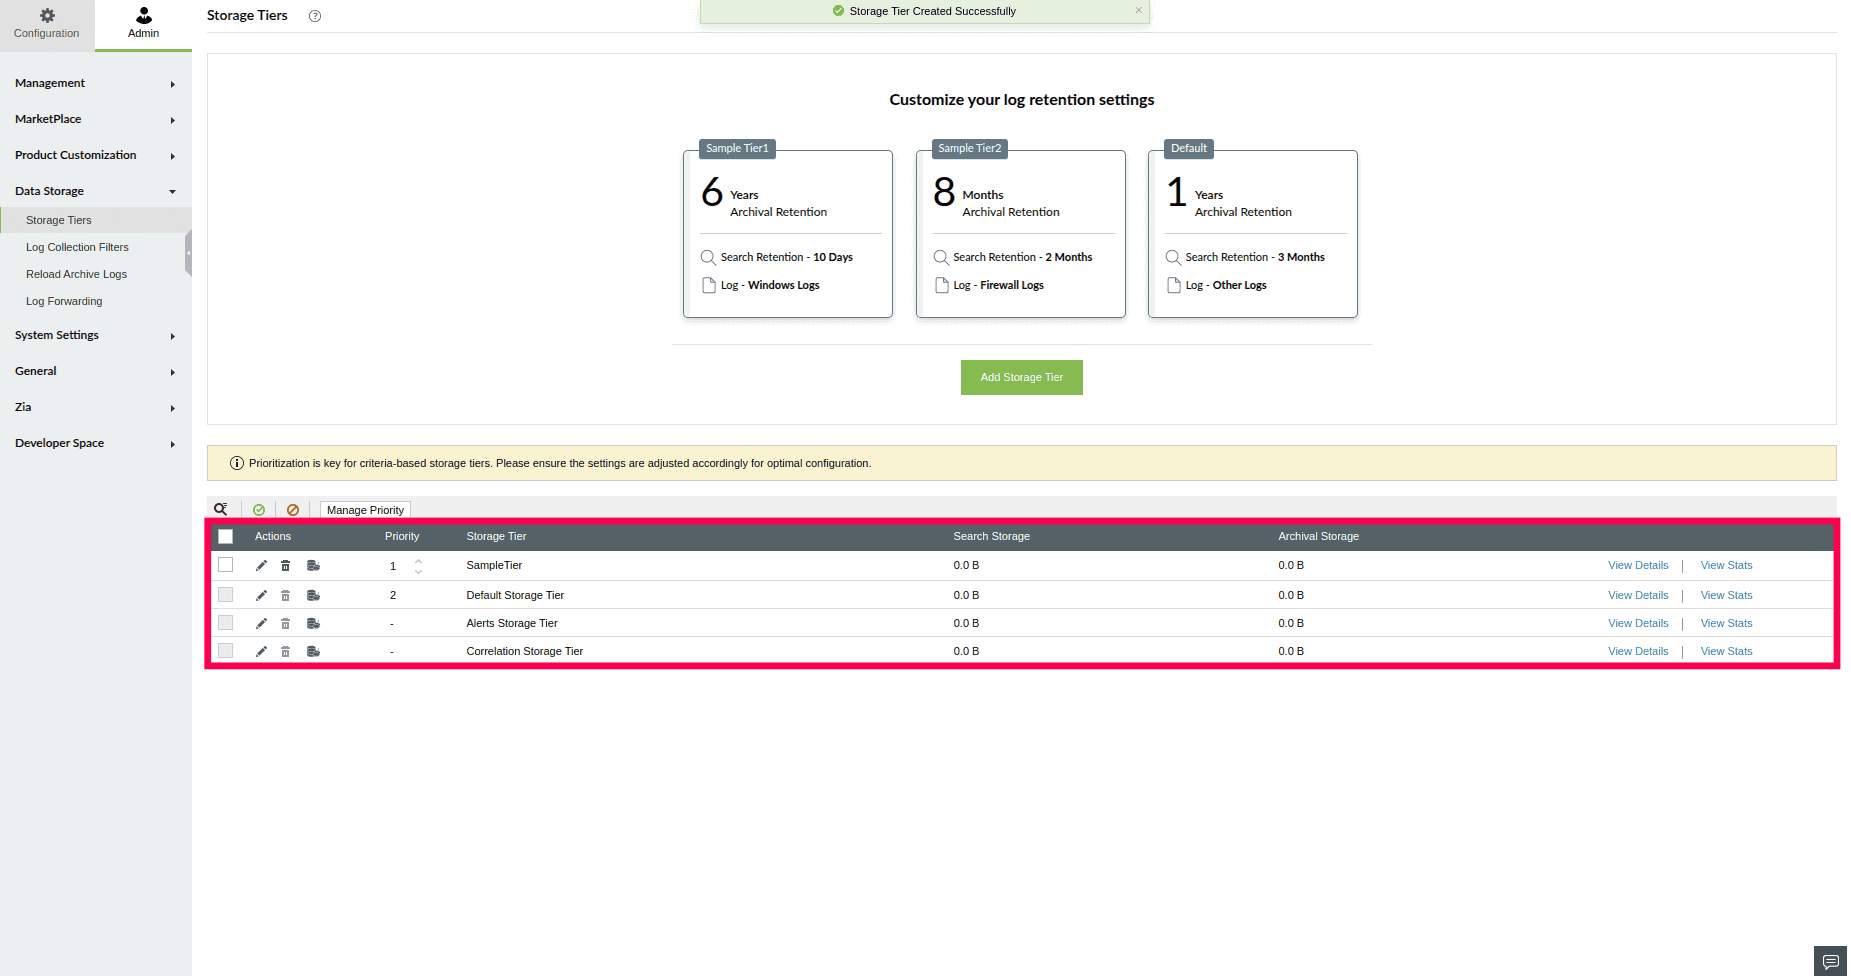
Figure 20: List of configured Storage Tiers
NOTE: Tier settings apply only to logs received after the tier is created. Existing logs are not reclassified retroactively. By default, newly created tiers are assigned high priority.
Read also
This page elaborated on how to set up and configure Storage Tiers in ManageEngine Log360 Cloud. To leverage and use the capabilities of Stats Analysis and Storage Tiers, read: