How to share the Primary and Secondary OpManager folders with each other for failover configuration?
The information between the primary and secondary instances are synced periodically Failover support for OpManager is necessary to achieve uninterrupted service incase of server failure. It has a primary and secondary server, and if the Primary server fails, the Standby server automatically starts monitoring the network.
- Windows Installations
- Linux installations
- User privilege
- Possible Reasons for File Synchronization Failure
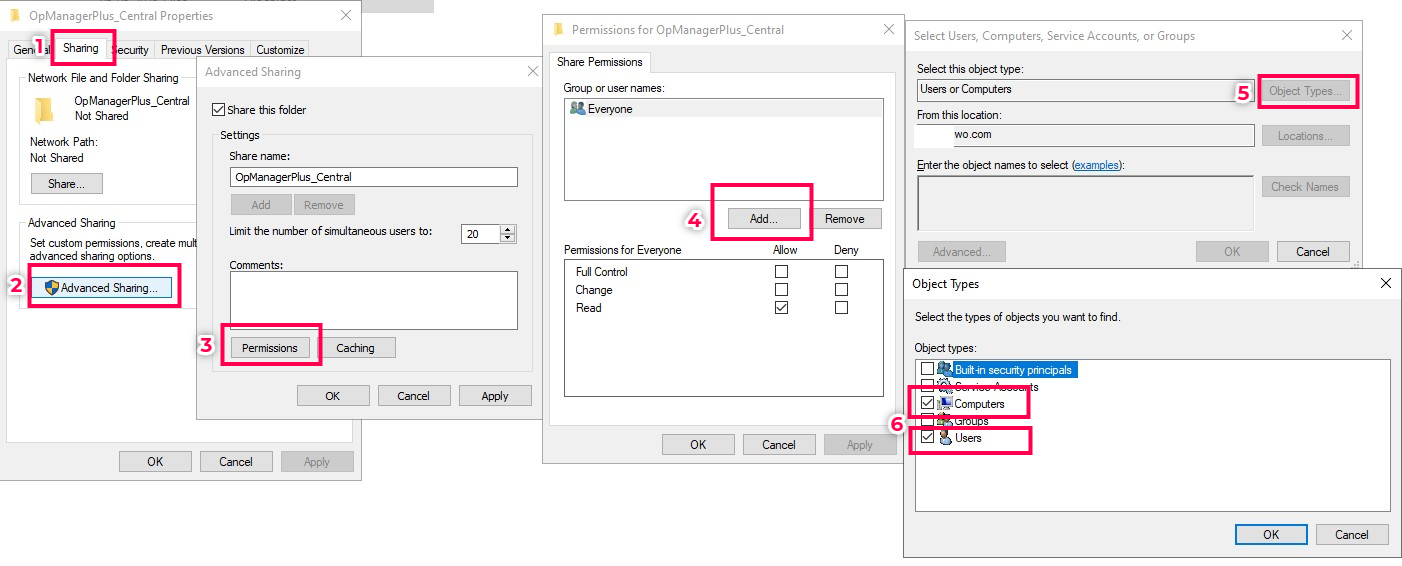
- Go to the <OpManagerHome> directory on the primary or secondary server.
- Right-click on the OpManager folder and select Properties.
- Navigate to the Sharing tab and click on Advanced Sharing.
- Enable 'Share this folder' and set the share name as follows, depending on the OpManager edition:
- Click on Permissions.
- In the Share Permissions window, click Add.
- Click Object Types and enable both Computers and Users.
- Select the server name and the user name, then click Check Names and OK.
- Back in the Permissions window, select the added entries and enable Full Control (it will automatically select Change and Read).
- Click Apply and OK to close the dialogs.
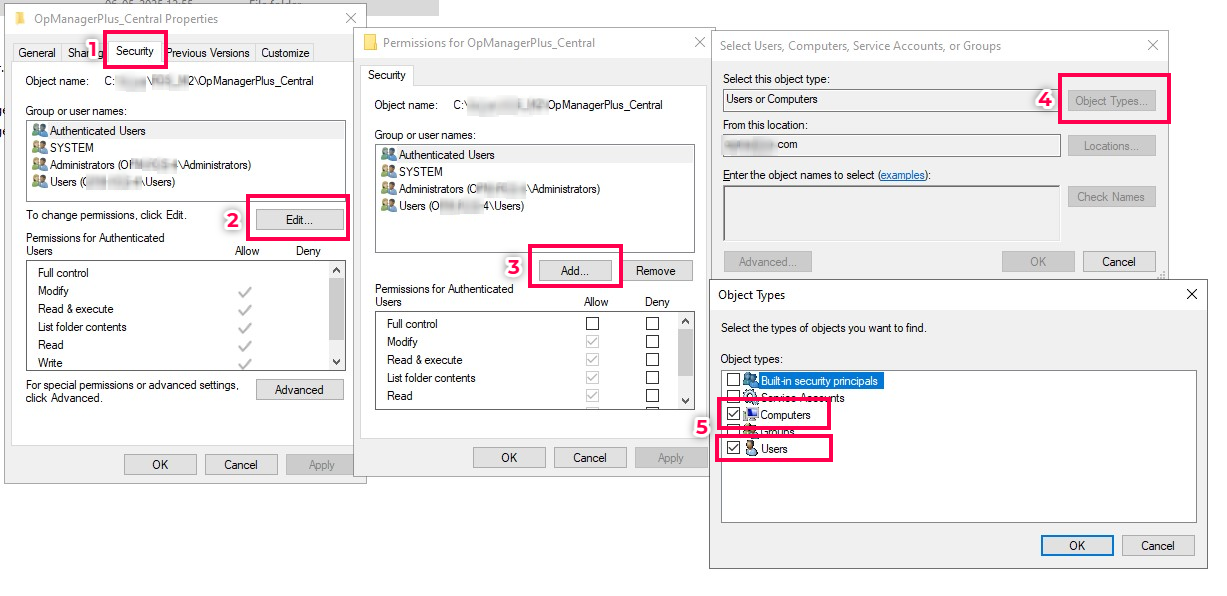
- Go to the Security tab in the folder’s Properties window.
- Click Edit, then click Add.
- In the object types, enable Computers and Users.
- Select the correct server name and user.
- Grant Full Control or Modify permissions.
- Click Apply and OK.
- If using a specific user to run the OpManager service, ensure that user has Backup and Restore rights by following the steps here.
- Go to the
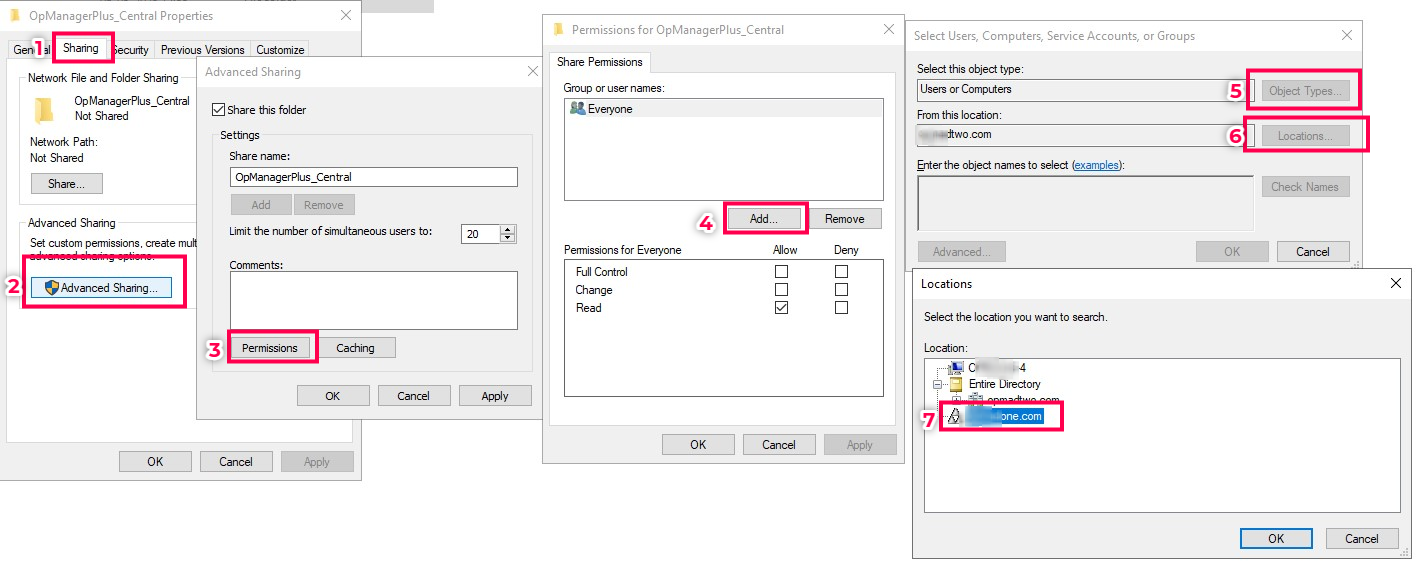
<OpManagerHome>directory on the primary or secondary server. - Right-click on the OpManager folder and select Properties.
- Navigate to the Sharing tab and click on Advanced Sharing.
- Enable 'Share this folder' and set the share name as follows, depending on the OpManager edition:
- Click on Permissions.
- In the Share Permissions window, click Add.
- Click Object Types and enable both Computers and Users.
- Click Locations next, and select the domain where the other server (primary or secondary) is located.
- Select the server name and the user name, then click Check Names and OK.
- Back in the Permissions window, select the added entries and enable Full Control (it will automatically select Change and Read).
- Click Apply and <1strong> OK to close the dialogs.
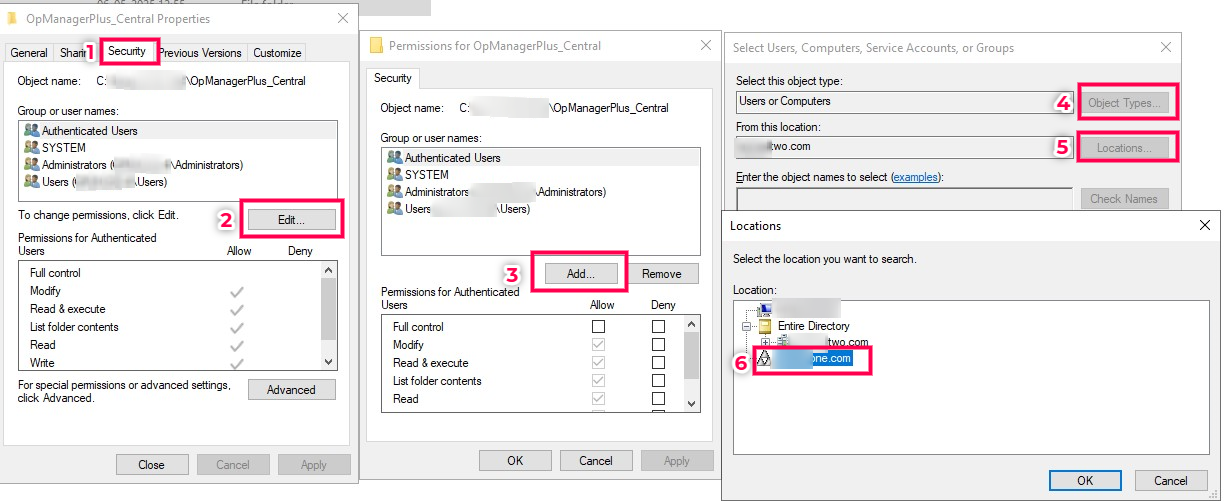
- Go to the Security tab in the folder’s Properties window.
- Click Edit, then click Add.
- In the object types, enable Computers and Users.
- Select the correct server name and user.
- Grant Full Control or Modify permissions.
- Click Apply and OK.
- If using a specific user to run the OpManager service, ensure that user has Backup and Restore rights by following the steps here.
- Press Win + R to open the Run dialog.
- Enter the shared folder path (e.g.,
\\<Primary_Server>\<OpManagerHome>from the Secondary server and\\<Secondary_Server>\<OpManagerHome>from the Primary server). - Ensure that the folder opens and you have both read and write access.
- Go to the
<OpManagerHome>directory on the Primary and Secondary servers. - Right-click on the
<OpManagerHome>folder and select:- Properties → Sharing → Advanced Sharing.
- Enable 'Share this folder' and set the share name as follows, depending on the OpManager edition:
- Click on Permissions, select Everyone, and allow Full Control.
- Click Apply and OK.
- Sharing folders and ensuring proper authentication is mandatory in workgroup environments. Authentication must be configured using Windows Credential Manager, and the Log On user for the OpManager service must match the credentials added.
- Sharing with 'Everyone' is still safe in a workgroup domain based setup, because the other server must still authenticate using proper credentials stored in Windows Credential Manager. Without valid credentials, access will be denied.
- Open Windows Credential Manager on the Primary/Secondary servers.
- Add a Windows Credential of the Primary in the Secondary server, and vice versa for the Primary server:
- Provide the username and password of a valid user account on the other machine.
- Save the credentials.
- Open Services (Run
services.msc) on both servers. - Locate the OpManager service.
- Right-click and select:
- Properties → Log On tab.
- Choose 'This account' and provide the same username and password added in Windows Credential Manager.
- Click Apply and restart the service.
- Test folder access using the credentials configured in Windows Credential Manager from both the Primary and Secondary servers:
- Open Run (Win + R) and enter the shared folder path:
\\<Primary or Secondary server>\<OpManagerHomePath>- e.g.,
\\opm-1\OpManagerfrom the Primary server and\\opm-2\OpManagerfrom the Secondary server.
- Ensure that the folder opens without prompting for additional credentials and verify that you have read and write access.
- If prompted for credentials or if access fails:
- Re-check the username and password entered in Credential Manager.
- Confirm that the shared folder permissions are set correctly.
- Add valid credentials in Windows Credential Manager on both servers for authentication.
- Ensure the Log On user for the OpManager service matches the credentials added in Windows Credential Manager.
- Proper folder sharing and permissions (with Everyone) must be configured for seamless access.
Steps to share primary and secondary OpManager folders with each other in same domain
| OpManager Edition | Component | Share Name |
|---|---|---|
| Standalone / Professional | OpManager | |
| Enterprise | Central | OpManagerCentral |
| Enterprise | Probe | OpManagerProbe |
| OpManager Nexus (Enterprise) | Central | OpManagerPlus_Central |
| OpManager Nexus (Enterprise) | Probe | OpManagerPlus_Probe |
| OpManager MSP | Central | OpManager_MSP_Central |
| OpManager MSP | Probe | OpManager_MSP_Probe |
Note: The Share Name must match the OpManager Home Path folder name exactly.
Steps to share primary and secondary OpManager folders with each other in different domains
To allow seamless sharing between the primary and secondary OpManager servers, the folders must be properly shared with the right permissions. If the servers are in different domains, establishing a two-way domain trust will enable them to function as if they are in the same domain.
1. Configure two-way domain trust:
Setting up a two-way trust between the domains of the primary and secondary servers enables cross-domain authentication, making them recognize each other as if they belong to the same domain.
Refer to the official Microsoft documentation here
2. Share the <OpManagerHome> folder
Once the domain trust is configured, the servers effectively function as if they are in the same domain. Follow these steps to share the OpManager folder:
| OpManager Edition | Component | Share Name |
|---|---|---|
| Standalone / Professional | OpManager | |
| Enterprise | Central | OpManagerCentral |
| Enterprise | Probe | OpManagerProbe |
| OpManager Nexus (Enterprise) | Central | OpManagerPlus_Central |
| OpManager Nexus (Enterprise) | Probe | OpManagerPlus_Probe |
| OpManager MSP | Central | OpManager_MSP_Central |
| OpManager MSP | Probe | OpManager_MSP_Probe |
Note: The Share Name must match the OpManager Home Path folder name exactly.
3. Verify accessibility:
Test folder access from both servers:
Steps to share primary and secondary OpManager folders with each other in workgroup machines
1. Share the OpManagerHome folder on both the servers:
| OpManager Edition | Component | Share Name |
|---|---|---|
| Standalone / Professional | OpManager | |
| Enterprise | Central | OpManagerCentral |
| Enterprise | Probe | OpManagerProbe |
| OpManager Nexus (Enterprise) | Central | OpManagerPlus_Central |
| OpManager Nexus (Enterprise) | Probe | OpManagerPlus_Probe |
| OpManager MSP | Central | OpManager_MSP_Central |
| OpManager MSP | Probe | OpManager_MSP_Probe |
Note: The Share Name must match the OpManager Home Path folder name exactly.
Note:
2. Add credentials in Windows Credential Manager:
3. Update the Log On User for the OpManager service:
4. Verify Windows Credential Manager functionality:
Note:
User privilege :
When user tries to log on as a specific user in a service, the user should be given backup and restore rights.

To provide the user, backup and restore rights, please add the user in the Back up files and Directories, and Restore files and Directories as done below.
To add the User in Backup files and directories,
Go to, Local Security Policy --> Security settings --> Local Policies --> User Rights Assignment --> Back up files and directories and add the Logon user (DomainName\TestFailover)

To add the User in Restore files and directories,
Go to, Local Security Policy --> Security settings --> Local Policies --> User Rights Assignment --> Restore files and directories and add the Logon user (DomainName\TestFailover)

Possible reasons for file synchronization failure
File synchronization between primary and secondary servers can fail due to configuration errors, permission issues, or network connectivity problems. To resolve this, ensure that both servers are properly configured, have the necessary permissions, and can communicate effectively over the network. Below are the specific checks and troubleshooting steps for Windows and Linux setups:
For Windows
- Verify that the Windows share name matches the
<OpManagerHomePath>:For example,
- For Essential Setup:
\\PEER_SERVER_HOST\OpManager - For Enterprise Central Setup:
\\PEER_SERVER_HOST\OpManagerCentral
- For Essential Setup:
- Confirm that all required steps for Windows sharing are correctly implemented. Refer to the instructions here.
- Check network accessibility:
- Access the peer server
<OpManagerHomePath>from the current server using the network path. - Ensure you have read and write permissions for the shared folder.
- Access the peer server
- Validate credentials:
- Verify that the credentials stored in Windows Credential Manager are correct and have the required permissions. (Applicable only for the Old Model Failover setup.)
For Linux
- Ensure SSH authentication is configured correctly:Follow the steps detailed here.
- Test password-less SSH access:
- Use the command:
ssh <PRIMARY_HOST_NAME>from the secondary server and vice-versa to confirm SSH functionality.
- Use the command:
- Check network connectivity between the servers:
- Use tools like
pingortelnetto verify the connection.
- Use tools like
If the issue persists, please contact support and provide logs from both the primary and secondary servers for further assistance.