Password Synchronizer
ADSelfService Plus' Real-time Password Synchronizer automatically replicates users' Windows Active Directory (AD) password resets and changes, and account unlocks across other platforms.
ADSelfService Plus supports a wide range of cloud-based and on-premise applications for password synchronization with Windows Active Directory. The list includes:
Real-time Password Sync Agent
ADSelfService Plus with its Password Sync Agent feature now makes it possible for real time password synchronization. When installed on the domain controllers in your domain, any native password changes get intercepted, the new passwords are encrypted and are automatically synchronized with multiple systems and applications.
To know more about Real-time Password Sync agent, click here.
Account linking
Password synchronization works only when the users' Active Directory (AD) accounts are linked with accounts from other providers in ADSelfService Plus. Account linking can either be automated or done manually.
How to link accounts automatically?
To link accounts automatically, you have to specify a source attribute, which is composed of one or more attributes in AD, and a target attribute from the enterprise application. When a user resets or changes the passwords, the modifications are synchronized only when the target attribute value matches the source attribute value.
Steps to link users' accounts automatically:
- Log in to ADSelfService Plus web console as an administrator.
- Navigate to Configuration → Self-Service → Password Sync/ Single Sign On. Now, a list of configured applications would be shown.
- Click the Advanced button for the required application configuration.
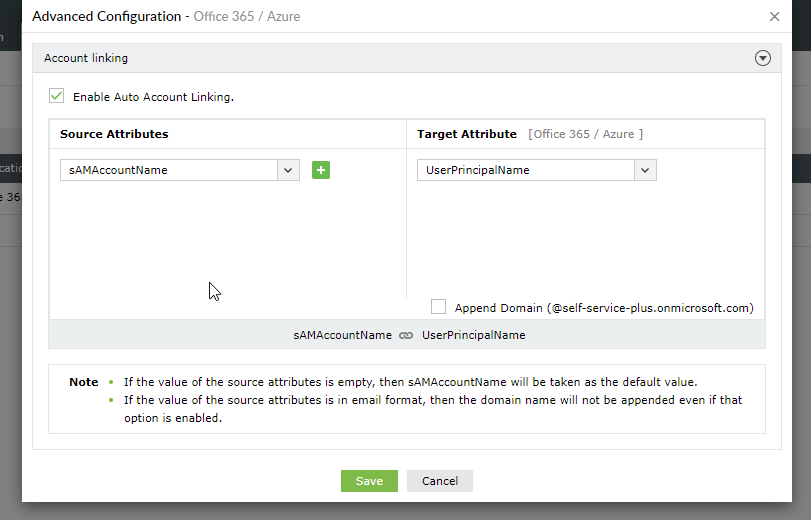
- In the window that opens, Select the Enable Auto Account Linking checkbox.
-
In the Source Attributes drop-down, select the attributes (one or more) from the AD domain where the users' password will be reset.
Example Say you want to use both ‘sAMAcountName’ and ‘Initials’ as source AD attributes. You select each of these AD attributes from the source attributes drop-down, and use the buttons near its field to add it. Make sure that the combined value of the AD source attribute (say 'JohnA' in this instance), matches the corresponding target attribute in enterprise application. -
In the Target Attributes drop-down, select the attribute whose value will equal the combined value of the selected source attributes.
-
Select the Append Domain checkbox to add the domain's name at the end of the combined value of the selected source attributes. That is, if the checkbox is selected, the sAMAccountName+Initials becomes, sAMAccountName+Initials@domain.
-
Click Save button.
- If the value of the source attributes is empty, then sAMAccountName will be taken as the default value.
- If the value of the source attributes is in email format, then the domain name will not be appended even if that option is enabled.
Note:
How to link accounts manually?
If manual linking is enabled, Users can do link their account themself by entering the credentials of their cloud application or other server accounts with which they want to link their AD accounts in the self-service portal.
Steps to enable manual account linking?
- Log in to ADSelfService Plus web console as an administrator.
- Navigate to Application tab. Now, List of configured applications would be shown.
- Click the Advanced button for the required application configuration.
- In the window that opens, Deselect the Enable Auto Account Linking checkbox.
-
Click Save button.