Help Center
Quick Start
- Overview
- System requirements
- Minimum privileges required
- Default port configuration
- Installing DataSecurity Plus
- Uninstalling DataSecurity Plus
- Starting DataSecurity Plus
- Launching DataSecurity Plus
- Configuring your solution
- Licensing details
- Applying a license
File Auditing
- About File Auditing
- Domain configuration
- File server configuration
- Failover cluster configuration
- NetApp server configuration
- Nutanix server configuration
- EMC Isilon server configuration
- Workgroup configuration
- Amazon FSx configuration
Setting up File Audit
Dashboard
Reports
Alerts
Configuration
Storage Configuration
File Analysis
- About File Analysis
- Domain configuration
- File server configuration
- Workgroup configuration
- SMB File Server Configuration
- On-Demand Reports
Setting up File Analysis
Dashboard
Reports
Alerts
Configuration
Data Risk Assessment
- About Data risk assessment
Setting up Data risk assessment
Dashboard
Reports
Ownership analysis
Configuration
Endpoint DLP
- About Endpoint DLP
Setting up Endpoint DLP
Reports
Alerts
Prevention policies
Configuration
Cloud Protection
- About Cloud Protection
- Gateway Server Installation Steps
- Gateway Configuration in Endpoint
- Gateway Cluster Configuration
- Gateway Server Management
- Certificate Authority Configuration
- Two-way SSL configuration
- Manage Certificate Trust Store
- Threat Analytics Database
- Manage Banned Applications
- Manage Authorized Applications
- Regenerating gateway server access key
- Updating gateway server
- Gateway Server Failover
- Load Balancer Configuration
- Global Insight
- Application Insight
- User Insight
- Shadow Application Insight
- Banned Application Insight
- Cloud App Discovery
- Activity Overview
- File Transfer Insights
- Control Policies
- Application Insights
- Actor Insights
- Shadow App Discovery
- GenAI Insights
- Cyber Threat Analytics
- CIPA Compliance
Setting up Cloud Protection
Dashboard
Reports
Control Policies
Storage Configuration
Administrative settings
- Technician configuration
- Notification filters
- Manage agent
- Agent settings
- SIEM integration
- Business hours configuration
- Two-factor authentication
- Workgroup configuration
- Security policy
Email configuration
General settings
- Connection
- Personalize
- DataSecurity Plus Server
- Privacy Settings
- Disk utilization
- Schedule Retention Policy
Release notes
2026
2025
2024
2023
2022
2021
2020
2019
2018
2017
2016
2015
Troubleshooting
- HTTP communication failure
- Dormant DataEngine
- Secure Gateway server failure
- RPC communication failure
- Cloud Protection Gateway server failure
- Known issues and limitations
- Known errors and solutions
- Report discrepancy in File Analysis
Guides
- Agent document
- How to Migrate/Move DataSecurity Plus
- How to apply SSL certificate
- How to automate DataSecurity Plus database backup
- How to set alerts in DataSecurity Plus
- How to secure your DataSecurity Plus installation
Nutanix server configuration
DataSecurity Plus helps you monitor file and folder events on Nutanix servers in real time, providing detailed insights into user operations.
Creating a Nutanix user
To perform file auditing on Nutanix servers, you need to create a new REST API Nutanix user dedicated to DataSecurity Plus. The permissions and privileges required for auditing will be automatically applied once the user is created.
Follow the steps below to create a user in the Nutanix Files Console:
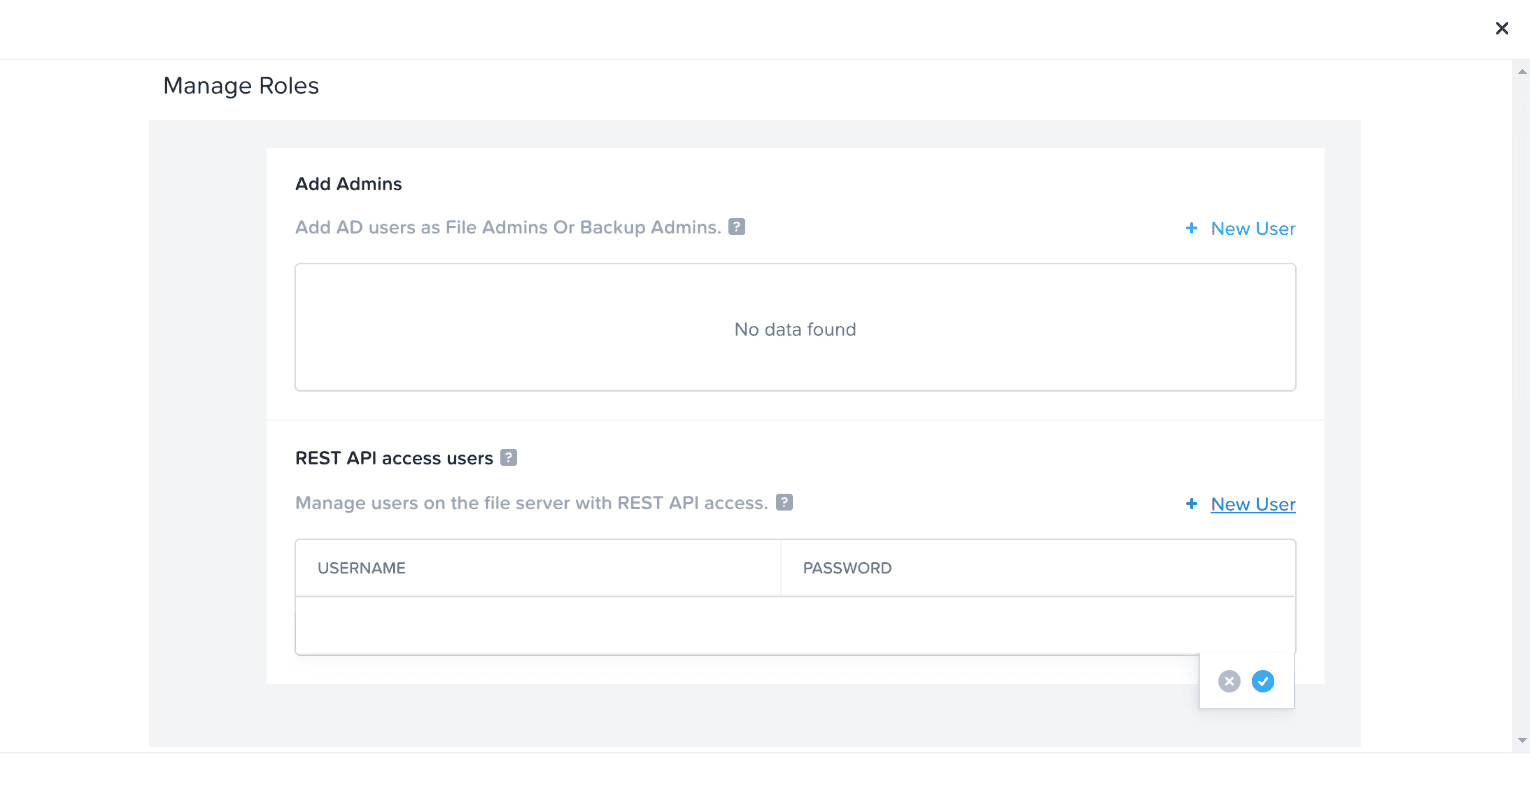
- In the Nutanix Files Console, go to Configuration > Manage Roles.
- Click + New User in the REST API access users section. A new line for the new user will appear at the bottom of the list.
- In the USERNAME field, enter the username requiring REST API access.
- In the PASSWORD field, type in a password for that user.
- In the same row, click the check mark icon to save the configuration.
Note: You cannot add "admin" as the username.
Configuring a Nutanix server
- Log in to the DataSecurity Plus web console.
- Configure the domain in which the file server you want to configure is located.
- Select File Audit from the application drop-down.
- Go to Configuration > Data Source > Nutanix Server.
- Click + Add Server.
- On the Select Nutanix Server tab, select your preferred domain and Nutanix server, then click Next.
- On the Select Shares tab, select the shares you want to audit and click Next.
- On the Management Details tab, enter the management IP , username, and password of the Nutanix user you created in the previous section.
- On the Collector Server tab, choose the Domain Name and Collector Server Name, specify the Collector Port, and click Next.
- On the Review Summary tab, review the configuration and click Configure.
Note: For Nutanix server auditing with DataSecurity Plus, configuring a collector server is required. The collector server acts as an intermediary server that collects file access events from the Nutanix server and forwards them to the DataSecurity Plus server. You may configure Windows file servers as collector servers. However, the Windows client OS cannot be configured as a collector server. No separate license is required for configuring collector servers.
Updating Nutanix server configurations
To make changes to the configured Nutanix server in DataSecurity Plus, follow the steps below:
Adding and removing shares
- Select File Audit from the application drop-down.
- Go to Configuration > Data Source > Nutanix Server.
- Select the server you want to update by clicking the respective server name at the top.
- If you want to remove existing shares, click Edit, select the shares you want to delete, and click Delete Shares.
- If you want to add more shares, click Add Shares, select the shares, and click Add Shares.
Note: You can also view reports by clicking the View Reports link.
Note: If you cannot find the list of shares available for configuration, click the refresh icon in the top-right corner of the table.
Editing management IP details
- Select File Audit from the application drop-down.
- Go to Configuration > Data Source > Nutanix Server.
- Select the server you want to update by clicking the respective server name at the top.
- Click Edit Details; change the IP, username, and password details as required; then click Save.
Editing collector server details
- Select File Audit from the application drop-down.
- Go to Configuration > Data Source > Nutanix Server.
- Select the server you want to update by clicking the respective server name at the top.
- In the Collector Details table, click the edit button under the Actions column to update the collector server port number.
- If you want to change the collector server:
- Click the delete button under the Actions column to remove the currently configured collector server.
- Click the + Add Collector button that will appear on the right once the server is deleted.
- Under Add Collector, choose the Domain Name and Collector Server Name, specify the Collector Port, and click Add.
Deleting Nutanix server configurations
- Select File Audit from the application drop-down.
- Go to Configuration > Data Source > Nutanix Server.
- Select the server you want to update by clicking the respective server name at the top.
- Click the delete icon next to the server name.
- Click OK.
Note: Once deleted, servers will no longer be audited. However, previously audited data will be retained.